Version 9.0.2
Part Number A90881-02
Home |
Solution Area |
Contents |
Index |
| Oracle9i Discoverer Administrator Administration Guide Version 9.0.2 Part Number A90881-02 |
|
This chapter explains how to implement joins using Discoverer Administrator, and contains the following topics:
In Discoverer, a join relates two folders using one or more common items. In the database a join relates two tables using common columns.
A join between two folders enables you to include items from both folders when creating:
When you select an item, you can only select another item from the same folder or from other folders joined to the first folder. If the second item you select comes from a different folder, you can subsequently select items from folders joined to that folder.
Joins have a master end and a detail end. The master end is the folder that has one row, for which there are several detail rows. For example, the relationship between a master row in the Department folder and the many detail rows in the Employee folder. Where every employee works for one department, a department can have none, one or many employees.
It is important to make sure you define the join with the correct folder as the master. In cases where a query uses three or more folders this can, in some circumstances, lead to misleading or incorrect results. It can also affect whether summary folders can be used to speed up queries. This chapter will help you to avoid this problem and correct it if it does occur.
Single item joins relate two folders using an item that is common to both folders. For example, if we create a business area using the SCOTT schema, the Emp and Dept folders can be joined using the common item Deptno in a single join, that is where:
Multi-item joins relate two folders using more than one join condition, such that the join becomes true when all of the join conditions are met. For example, two folders (Emp and Salgrade) do not share the common items needed to create a single item join. The following example becomes true for an employee (i.e. the Emp folder becomes joined to the Salgrade folder) when the employee salary falls within the specified salary band:
For each salary record in the Emp folder (where the salary is between the lowest and the highest salary), Discoverer can display salary grade information about the employee from the Salgrade folder.
Usually joins are one-to-many, where one row in the master folder is joined to multiple rows in the detail folder.
Occasionally there are one-to-one and many-to-many joins. Many-to-many joins are not supported directly in Discoverer, or in any relational system, although they can always be reworked to be transformed to multiple many-to-one joins.
Users of Discoverer Plus (Discoverer Desktop and Discoverer Viewer) cannot set up their own join conditions. However, they can choose which join to use if more than one join exists.
For more information, see the "Join Properties dialog".
To create a join:
Note: If you want to change the folder in the Master Folder or Detail Folder fields, click More items at the end of the drop down list. This reopens the New Join dialog, where you can select a different folder or item.
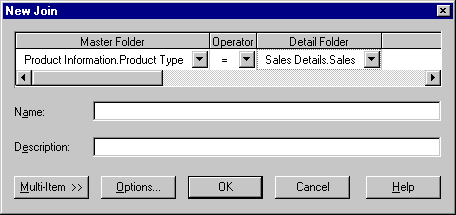
You can also choose a detail item from a folder in another open business area.
The join is added to the folder in the Workarea. An icon next to it indicates the join relationship.
You can add multiple items to the join between folders. In a multi-item join, all master items must belong to one folder and all detail items must belong to one folder.
To create a multi-item join:
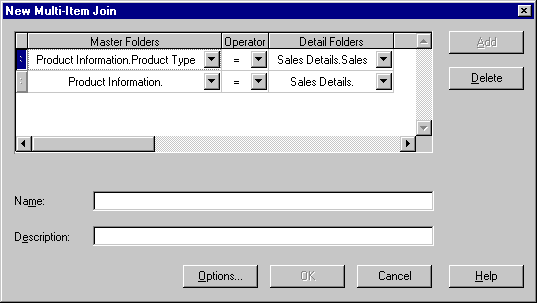
Notice that the folders that appear by default are the same folders as in the previous row.
Note: If you add a master or detail item from a different folder, all items from the previous folder will be deleted from the join.
Use the "Join Properties dialog" to view or edit all the EUL join properties for one or more selected joins. If you just need to view or edit join items, add new join items, view and amend join options or edit the join name and description use the Edit | Edit. option instead.
To edit join properties:
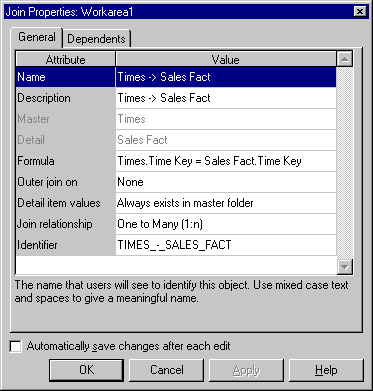
Hint: You can select more than one join at a time by holding down the Ctrl key and clicking another join.
All properties that are common to each of the selected joins are displayed. If the data for a field is not common to each of the selected joins, the field is blank.
Use the "Edit Join dialog" to view and edit existing join items, add new join items, view and amend join options or edit the join name and description. If you want access to all the EUL join properties for one or more joins, select the join item(s) and choose Edit | Properties instead.
To edit an existing join:
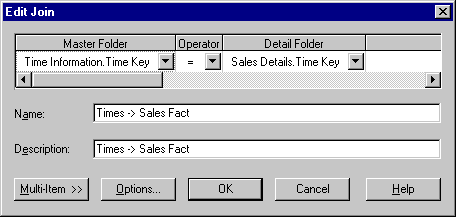
Note: You use the Edit Join dialog in the same way as the New Join dialog (for more information, see "How to create single item joins").
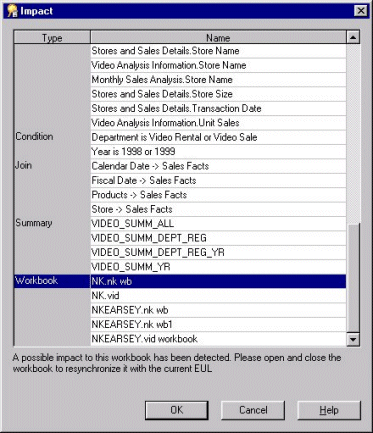
Use this option to delete one or more joins. Note that when you delete a join, other EUL objects might be affected if they use the join you want to delete. The Impact dialog enables you to review the other objects that might be affected when you delete a join.
To delete a join.
You can select more than one join at a time by holding down the Ctrl key and clicking another join.
The Impact dialog shows other objects that might be affected by the deletion and helps you to make the right choice.
A fan trap is a schema (group of joined database tables) that can return unexpected results. The most common manifestation occurs when a master table is joined to detail tables independently. Although relationally correct, this kind of schema can result in incorrectly aggregated data points. The following example illustrates the point:
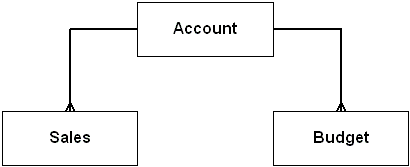
The example fan trap schema includes a master folder (ACCOUNT) and two detail folders (SALES and BUDGET). Every account can have several sales figures and several budget figures for each period.
In the following example we will see how a seemingly straightforward query can produce incorrect results and how Discoverer avoids this problem. The figure below shows the data in our master and detail tables:
| ACCOUNT | |
|---|---|
| ID | Name |
|
1 |
Account 1 |
|
2 |
Account 2 |
|
3 |
Account 3 |
|
4 |
Account 4 |
| BUDGET | ||
|---|---|---|
| Accid | Budget | Period |
|
1 |
200 |
1 |
|
1 |
200 |
2 |
|
2 |
100 |
3 |
|
3 |
150 |
2 |
|
3 |
250 |
3 |
|
3 |
350 |
4 |
|
4 |
100 |
1 |
|
4 |
100 |
2 |
| SALES | ||
|---|---|---|
| Accid | Sales | Period |
|
1 |
100 |
1 |
|
1 |
100 |
2 |
|
1 |
200 |
3 |
|
2 |
50 |
1 |
|
2 |
80 |
2 |
|
3 |
200 |
3 |
|
4 |
150 |
2 |
|
4 |
50 |
3 |
|
4 |
100 |
4 |
If the Discoverer end user creates a query to answer the question, "what is the total sales and total budget by account?" the aggregates (SUM) from the two detail tables come from the same master table (ACCOUNT).
Discoverer delivers the following expected (and correct) result:
| Account | Sales | Budget |
|---|---|---|
|
Account 1 |
400 |
400 |
|
Account 2 |
130 |
100 |
|
Account 3 |
200 |
750 |
|
Account 4 |
300 |
200 |
If however, you use straightforward SQL, the following unexpected (incorrect) result is delivered:
| Account | Sales | Budget |
|---|---|---|
|
Account 1 |
800 |
1200 |
|
Account 2 |
130 |
200 |
|
Account 3 |
600 |
750 |
|
Account 4 |
600 |
600 |
While the results in the above figure are relationally correct they are obviously wrong. For example, the above results indicate that the total sales for Account 1 are 800, but if you look at the Sales table in Figure 10-7 you can see that the total sales figure for Account 1 is 400 (i.e. 100+100+200).
The unexpected (incorrect) results above are based on a single query in which tables are joined together first in a temporary table and then the aggregation is done. This causes the aggregates to be summed (incorrectly) multiple times. The straightforward SQL that generates the incorrect results is:
SELECT Account.Name, SUM(sales), SUM(budget)
FROM
Account, Sales, Budget
Where
Account.id=Sales.accid
AND
Account.id=Budget.accid
GROUP BY
Account.Name
Every query generated by Discoverer is interrogated. Discoverer detects a fan trap and rewrites the query to ensure the aggregation is done at the correct level. Discoverer rewrites the query using inline views, one for each master-detail aggregation, and then combines the results of the outer query.
The following example shows the inline view SQL Discoverer uses to give correct results:
SELECT inACC as Name, SUM(inSalesSum) as SALES_SUM, ,SUM(inBudgetSum) as BUDGET_ _SUM, FROM(SELECT masterID AS OutMasterIDSales, SUM(SalesDetailsSales) AS inSalesSum FROM (SELECT ID AS masterID, NAME AS masterName FROM ACCOUNT) INLineAccount, (SELECT ID AS SalesDetailId, ACCID AS SalesDetailAccID, SALES AS SalesDetailsSales FROM SALES )INLineSalesWHERE(masterID = SalesDetailAccID(+)) GROUP BY masterID) inner1, (SELECT masterID AS OutMasterIDBudget, SUM(BudgetDetailBudget) AS inBudgetSum, masterName AS inACC FROM(SELECT ID AS masterID, NAME AS masterName FROM ACCOUNT) INLineAccount, (SELECT ID AS BudgetDetailId, ACCID AS BudgetDetailAccID, BUDGET AS BudgetDetailsSales FROM BUDGET )INLineBudgetWHERE(masterID = BudgetDetailAccID(+)) GROUP BY masterName, masterID ) inner2 WHERE ((OutMasterIDBudget = OutMasterIDSales)) GROUP BY inACC
The result is correct because each sale and each budget is summed individually (one for each master-detail aggregation) and is then combined with a join based on the master key(s).
Discoverer will normally resolve a query that involves a fan trap schema. In situations where a query involves an unresolvable fan trap schema, Discoverer disallows the query and displays an error message.
Discoverer prevents queries involving unresolvable fan trap schemas in the following circumstances:
For more information about enabling or disabling fan trap detection in Discoverer, see the Oracle9iAS Discoverer Plus User's Guide.
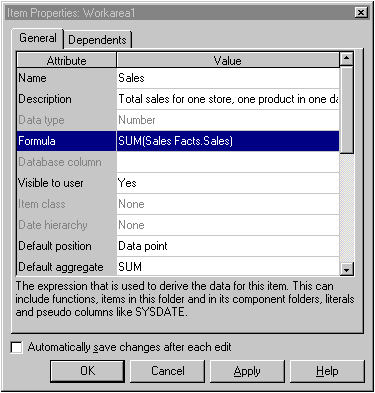
Discoverer warns about fan trap join configurations in complex folders by displaying a message indicating that an invalid join configuration exists. To ensure that Discoverer returns correct results for complex folders (where a fan trap join configuration exists inside a complex folder), you can specify the aggregates to use for the details by editing the item properties and setting the formula (for example SUM(Sales Fact.Sales)).
The figure below shows the aggregate (SUM) specified for an item in a complex folder.
For more information about joins, see the Oracle9i Database Documentation.
Discoverer does not allow joins between different data types (e.g. varchar, numeric or date). However, if you have upgraded from a previous version of Discoverer, an existing join might already exist between mismatched data types. Where an existing exists that joins two items with mismatched data types, Discoverer runs the query but displays an error message and does not complete the query. Discoverer also displays an error message when you try to edit a join that contains items that have mismatched data types.
You can create a join between two items that have mismatched data types by:
The following tasks illustrate how you might create a join between two items that have mismatched data types. The tasks use the Video Store Tutorial business area (for more information about loading the Video Store Business area, see the Oracle9i Discoverer Administrator Tutorial).
The following tasks create a join between two items, Day of Week (varchar) and Transaction Date (date) that have mismatched data types. In order to join these two items you must create a new item and then create a join as follows:
To create a new item that converts the Day of Week item from varchar to a date data type:
This is where you will create the new item.
This pastes the TO_DATE function into the Calculation field for this new item.
Day of Week,Day
The Calculation field will now display the following text:
TO_DATE(Day of Week,Day)
Note: The calculation above creates a new item based on the Day of Week (varchar) item and converts it to a date data type using the TO_DATE function.
You have now created a new item based on the Day of Week (varchar) item that has been converted to a date data type.
The following task illustrates how you can join the new item in the Calendar Date folder (that you created in the previous task), with the Transaction Date item from the Store and Sales Details folder:
To create a join between two items that have the same data type:
This New Join dialog enables you to select the detail folder or item for the new join.
Discoverer creates the join using the newly created item that has a matching data type. The new item has been created with a data type that matches the other item, therefore Discoverer is able to create a valid join.
|
|
 Copyright © 2002 Oracle Corporation. All Rights Reserved. |
|