Version 9.0.2
Part Number A90881-02
Home |
Solution Area |
Contents |
Index |
| Oracle9i Discoverer Administrator Administration Guide Version 9.0.2 Part Number A90881-02 |
|
This chapter explains how to create and maintain calculated items using Discoverer Administrator, and contains the following topics:
A calculated item is an item that uses a formula to derive data for the item.
Calculated items enable Discoverer end users to apply business calculations to the data. For example, typical business calculations might include:
Calculated items behave like any other item in a folder and can be used in conditions, summary folders, lists of values, joins, and other calculated items.
As the Discoverer manager, you can create calculated items and make them available for inclusion in workbooks.
Creating calculated items provides the following benefits:
You create calculated items using expressions that can contain:
There are three types of calculated items:
You can obtain more information about calculations in Discoverer from the following sources:
A derived item is an expression that behaves in the same way as any other item in a folder. Derived items can be axis items or data points and can be used anywhere that you would use an ordinary item. The value of a derived item depends only on the value of the other items in the same row, and will be the same regardless of which other items are included in the workbook.
The following are examples of derived items:
Sal*12+NVL(Comm,0) - returns annual salary plus commission
Initcap(Ename) - capitalizes the first letter of Ename
1 - returns the value 1
Sysdate-7 - returns today's date minus seven days
An aggregated calculated item is a calculated item to which a GROUP function is applied (e.g. SUM, COUNT, MAX, MIN, AVG, DETAIL).
The following are examples of aggregate calculations:
Aggregate calculation values depend on other items used in the Discoverer Plus worksheet. How the axis items are grouped together affects the number of rows that are aggregated. This is particularly important in the case of calculations that are ratios of two aggregates.
For example, to calculate a margin, you would use the calculation SUM(Profit)/SUM(Sales) rather than Profit/Sales. Used in a query, the latter would result in SUM(Profit/Sales), which produces a different result from SUM(Profit)/SUM(Sales). The example uses the SUM aggregate, but same can be applied for any of the other aggregates (e.g. SUM, COUNT, MAX, MIN, AVG, DETAIL).
Note: If you want to compute the sum of a ratio of two data points, always sum data points before computing the ratio.
When creating aggregate calculated items, note that a number of restrictions apply to aggregate calculations. Aggregate calculated items:
Aggregate calculations do not affect the number of rows of data referenced by the folder. They only affect generated SQL when selected in Discoverer Plus.
Analytic functions behave like aggregate calculations except for the following (for more information, see the Glossary entry "analytic functions"):
For more information about analytic functions see the Oracle 9iAS Discoverer Plus User's Guide.
Aggregate derived items are calculated items created in a complex folder that aggregate another aggregate calculated item (in the same complex folder). In other words, an aggregate derived item is simply an aggregate calculated item nested inside another aggregate calculated item.
Aggregate derived items enable you to apply an aggregation (e.g. AVG, SUM, COUNT) to the current level of aggregation to derive additional information.
Aggregate derived items behave in all respects like ordinary derived items (for more information, see "What are derived items?").
This example explains how an aggregate derived item is used to display the average monthly sales per store over one year, for a video stores chain. The aggregate derived item in this example uses an aggregate calculated item created in the same folder. For more information about aggregate calculated items, see "What are aggregate calculated items?".
This example uses two complex folders, Video Analysis and Monthly Sales Analysis, that are created when you complete the Discoverer Administrator Tutorial exercises (for more information, see the Discoverer Administrator Tutorial).
An aggregate derived item is created in the complex folder Monthly Sales Analysis. The Monthly Sales Analysis complex folder is built by dragging the following items from the Video Analysis complex folder (for more information, see the Discoverer Administrator Tutorial):
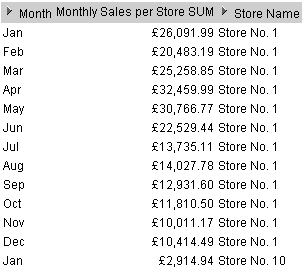
The complex folder Monthly Sales Analysis references a row of data for every store, for every month.
An aggregate calculated item (Monthly Sales Per Store) is created in the Monthly Sales Analysis complex folder using the following formula:
This item shows the total sales for a given store in a given month.
An aggregate derived calculated item (called Average Monthly Sales per Store), is created in the Monthly Sales Analysis complex folder using the following formula:
This item shows the average total sales for a given store in a given month.
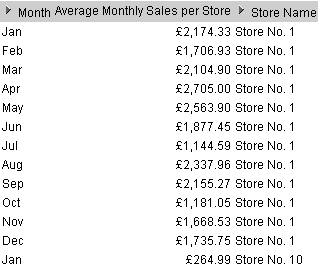
The Average Monthly Sales per Store item shows the average monthly sales and can be analyzed over region, quarter, year, which is useful to compare trends. This form of nested aggregate is only possible by creating the aggregate item in a new folder. The aggregate item must be created in a new folder because the new folder now represents monthly sales, not the individual sales that were in the original complex folder.
Aggregate derived items cause the SQL created by Discoverer to contain a GROUP BY clause that forces Discoverer end user queries to return one row for each combination of the non-aggregated items, regardless of whether the calculation is used in the query. This reduces the number of rows returned by the folder, because the rows are aggregated at the level of the other items.
You can create calculated items, derived items, aggregate calculated items and aggregate derived items using this task.
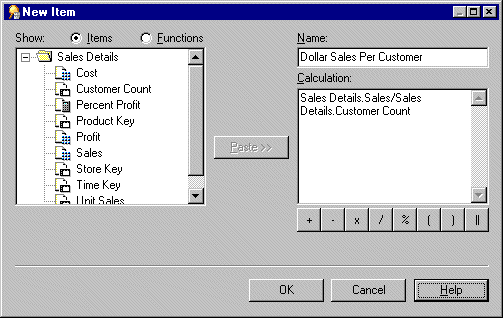
To create a new calculated item:
This dialog enables you to create a new calculated item and add it to the selected folder.
Note: If you did not select a folder, Discoverer Administrator displays the "New Item dialog" where you can select a folder to contain your new calculation (you can select any folder from any open business area).
Note: Calculations follow the standard Oracle calculation syntax. For a full description of this syntax, see the Oracle SQL Language Reference Manual.
Displays a list of the items in the selected folder (if a complex folder, the source folders and their items are also displayed here).
You can insert an item into your calculation (double-click it or use Paste).
Displays a list of the functions (grouped by type) available for use in your calculation.
Registered custom PL/SQL functions are displayed in the Database group. For more information, see "What are custom PL/SQL functions?"
You can insert a function into your calculation (double-click it or use Paste).
Operators are listed along the bottom of the Calculation area. Click an operator to insert one into your calculation.
Hint: You can resize the "New Item dialog" to give you more room to specify your calculation.
If there are no errors in the formula, the new item is created. If there are errors in the formula, Discoverer Administrator displays the first error and returns you to the New Item dialog so that you can correct it.
You can now use the new calculated item to create joins or conditions, even new calculations. You can also include the new calculated item in other calculated items.
To edit calculated item properties see Chapter 9, "How to edit item properties" for more information.
To edit an existing calculation:
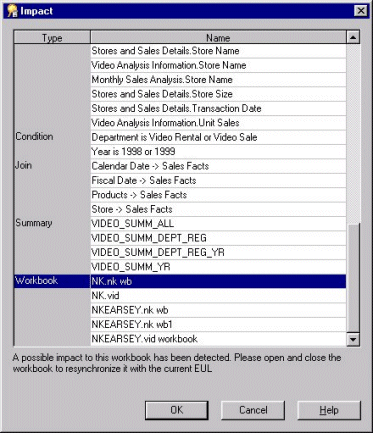
Use this option to delete one or more calculated items. Note that when you delete a calculated item, other EUL objects might be affected if they use the calculated item you want to delete. The Impact dialog enables you to review the other objects that might be affected when you delete a calculated item.
To delete a calculated item:
You can select more than one item at a time by holding down the Ctrl key and clicking another item.
The Impact dialog shows other objects that might be affected by the deletion and helps you to make the right choice.
PL/SQL functions are one of Oracle's procedural extensions to SQL. PL/SQL functions offer access through PL/SQL references in the SQL, to PL/SQL functions that run in the Oracle server. PL/SQL functions enable you to compute values in the database. For more information about PL/SQL functions, see the PL/SQL User's Guide and Reference.
Custom PL/SQL functions are PL/SQL functions created by the Discoverer manager that are designed to meet additional Discoverer end user requirements (e.g. to provide a complicated calculation). Custom PL/SQL functions supplement the PL/SQL functions provided by Oracle and are available to all database processes.
You create custom PL/SQL functions using SQL*Plus, or a procedural editor. You do not create custom PL/SQL functions directly in Discoverer Administrator. For more information see the SQL*Plus User's Guide and Reference.
Note: In Discoverer Plus, folders containing derived items (for more information, see "What are derived items?") that use PL/SQL functions will be visible only to users who have EXECUTE database privileges on those functions.
To access custom PL/SQL functions using Discoverer, you must register the functions in the EUL. When you have registered a custom PL/SQL function, it appears in the list of database functions in the "Edit Calculation dialog" and can be used in the same way as the standard Oracle functions.
You can register custom PL/SQL functions in two ways:
We recommend you register PL/SQL functions by importing automatically (especially if you have many functions to register), because it is easy to make mistakes when manually entering information about functions. When you import functions, all of the information about each function (e.g. names, database links, return types, lists of arguments) is imported. Importing ensures correct information about the function, because the information does not have to be manually entered on a function-by-function basis.
Manual registration requires that you register each function individually by supplying all of the information about the function.
To register PL/SQL functions automatically you must import them in the following way:
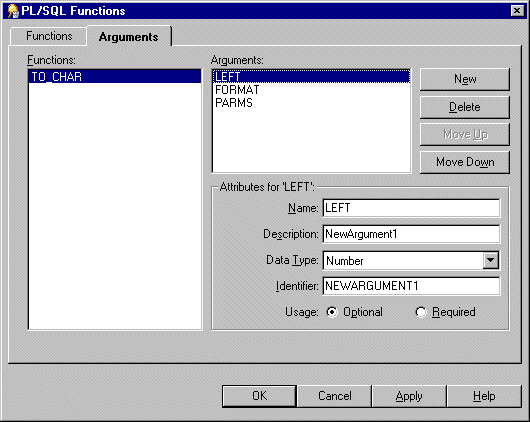
This dialog enables you to select the PL/SQL functions that you want to import.
You can select more than one function at a time by holding down the Ctrl key and clicking another function.
Information about the selected functions is imported automatically. In other words, you do not have to manually enter information or validate the information.
To manually register a PL/SQL function for use in Discoverer:

The custom PL/SQL function is now registered for use in Discoverer.
|
|
 Copyright © 2002 Oracle Corporation. All Rights Reserved. |
|