Release 1 (v1.0.2.2) for Sun SPARC Solaris
Part Number A90215-01
Library |
Contents |
Index |
| Oracle9i Application Server Installation Guide Release 1 (v1.0.2.2) for Sun SPARC Solaris Part Number A90215-01 |
|
![]()
![]()
This chapter guides you through the installation steps for the Standard Edition of Oracle9i Application Server. The following topics provide detailed installation steps, and basic postinstallation tasks:
The following instructions guide you through the Standard Edition installation option of Oracle9i Application Server.
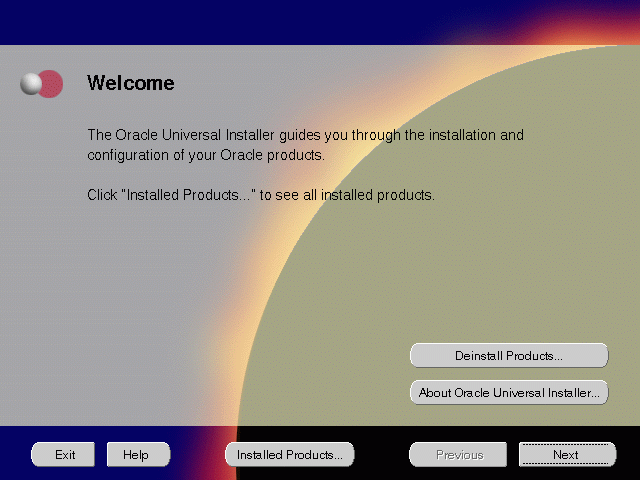
The Welcome screen provides information about the Oracle Universal Installer.
The following function buttons appear on the installation screens.
oraInventory directory and click OK.
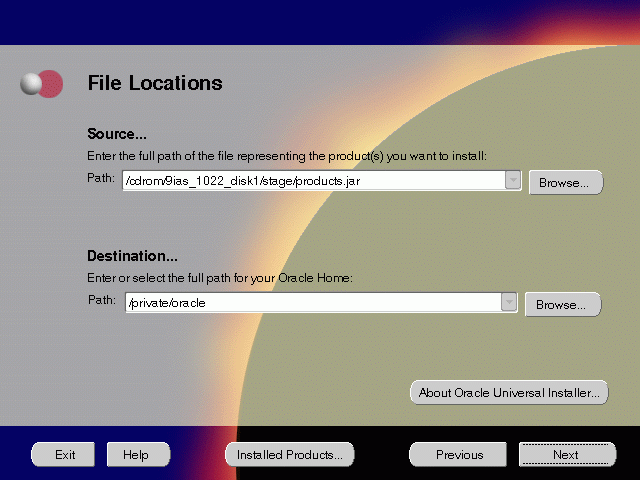
The File Locations screen allows you to enter the full path for the source and destination locations of Oracle9i Application Server.
products.jar file from which the product will be installed. The installer detects and uses the default values of the products.jar file of the installation program. Do not change the path.
For more information regarding Oracle home, refer to "ORACLE_HOME".
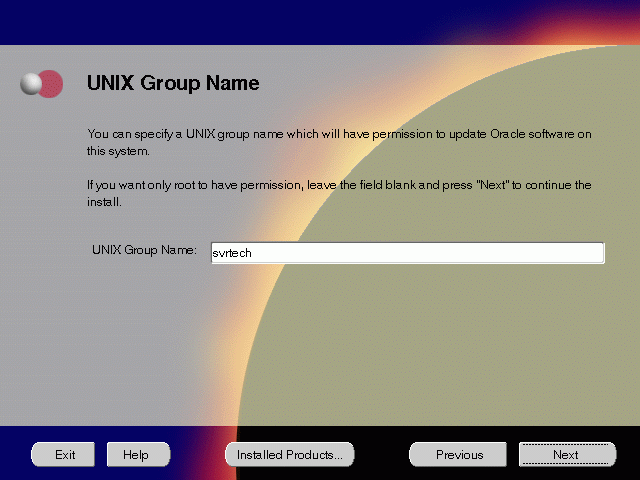
The UNIX Group Name screen grants permission for the oraInventory directory to the group specified. For more information, refer to "UNIX Group Name for the Oracle Universal Installer Inventory" on page 2-9.
UNIX Group Name:
prompt> id
orainstRoot.sh script from your Oracle home to grant permissions to the root user only. You must have root privileges to run this script. The script creates pointers to the components as the installer installs them in the system so that they can be identified later in the installation procedure. It produces the /var/opt/oracle/oraInst.loc file, which provides a pointer to the oraInventory directory.
After you have run the script, click Retry to continue.
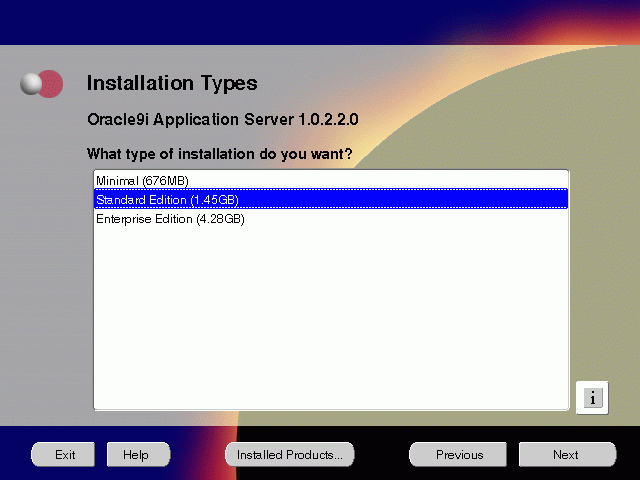
The Installation Types screen allows you to select the Oracle9i Application Server installation option that you are licensed to use.
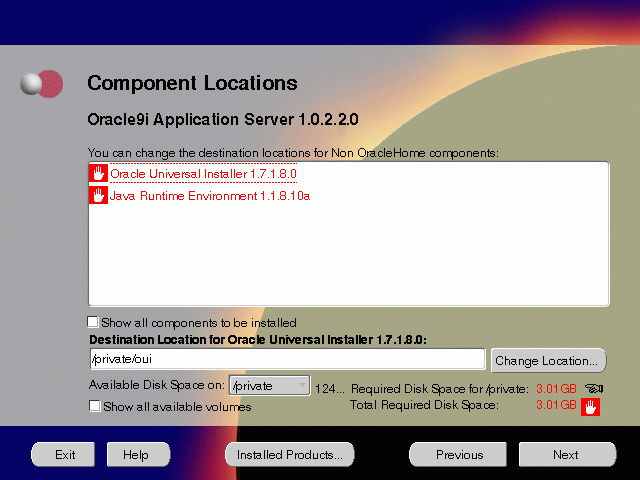
The Component Locations screen allows you to select alternative locations for some components.
Show all components to be installed: To view the complete list of components chosen for installation. Select check box to display component list. Click individual components to view and change destination location path. The installer enables you to change the destination location of the components displayed on the screen.
TMP space. Remove unneeded files from the swap directory to provide sufficient space for installation and click Next. If your swap space is smaller than 500 MB, click Exit and correct the problem.
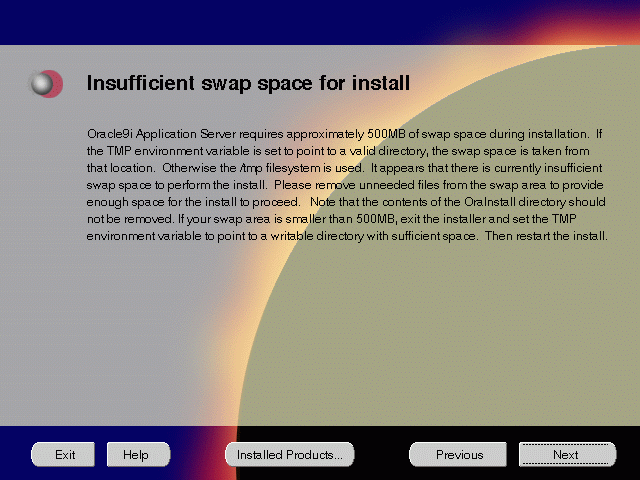
The Insufficient Swap Space for Install screen indicated inadequate space in the swap directory. You have two options:
TMP environment variable to point to a writable directory with sufficient space.
For detailed information on TMP directory, refer "TMP".
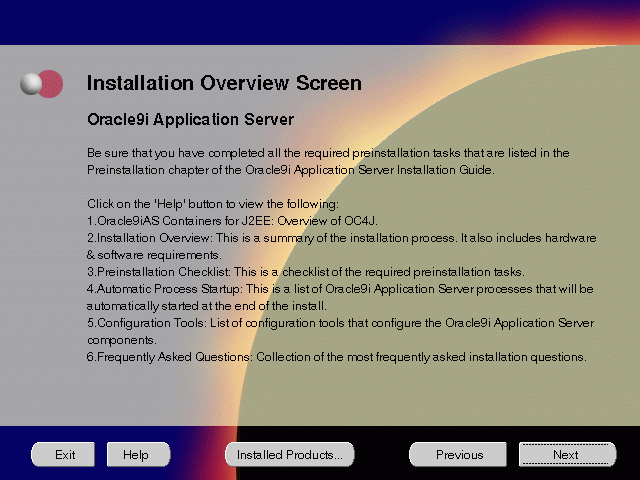
The Installation Overview screen gives you an overview of the installation process. Click on the Help button for information on the installation process, preinstallation checklist, automatic process startup, configuration tools, and frequently asked questions.

The Component Configuration and Startup screen allows you to select the components that you want the installer to configure and start after installation. This screen offers two configuration options:
You can select or de-select multiple components by holding down the Control key while clicking on the component name.
oracle account is not a member of the dba group. Enter the database administrator and operator group name and click Next.
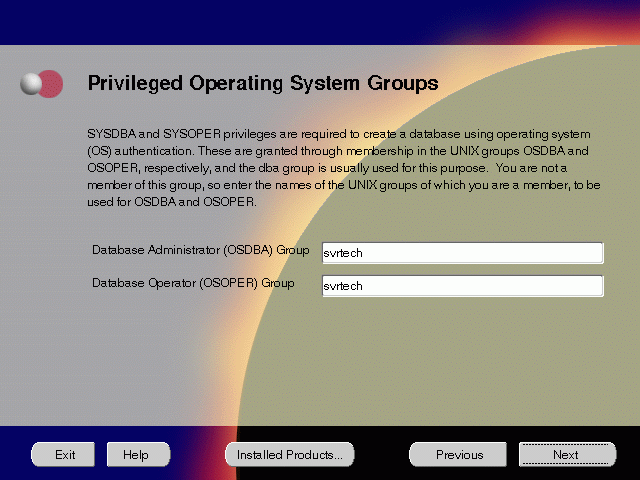
The Privileged Operating System Groups screen allows you to enter the database administrator and operator group name. For more information regarding privileged group names, refer to "UNIX Group Names for Privileged Groups". The installer detects and defaults to the user's OS group.

The Apache Listener Configuration for Oracle9iAS Portal screen allows you to enter the name of the Database Access Descriptor (DAD) that will be used to access Oracle9iAS Portal, and the name of the database schema where Oracle9iAS Portal will be installed. It also enables you to enter the database connection information if Oracle9iAS Portal and Oracle HTTP Server are installed in different Oracle homes. The information you enter here is used to create the PL/SQL Gateway settings which you can access upon installation from the following location: http://machine_name:port/pls/admin_/gateway.htm
portal30.
portal30.
host:port:sid.
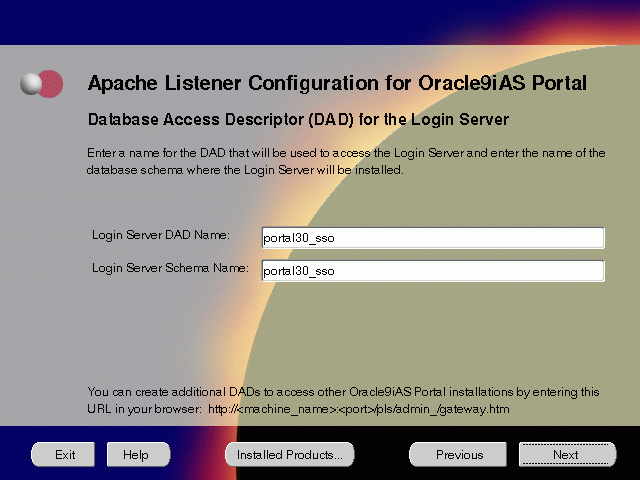
The Apache Listener Configuration for Oracle9iAS Portal screen allows you to enter the Login Server DAD and Schema Name, with a _sso extension for easy recognition. The Login Server provides an enterprise-wide Single Sign-On (SSO) mechanism that enables an Oracle Portal user to log in securely to Oracle Portal and any partner and external applications using a single user name and password.
SID) of the mid tier database and click Next.
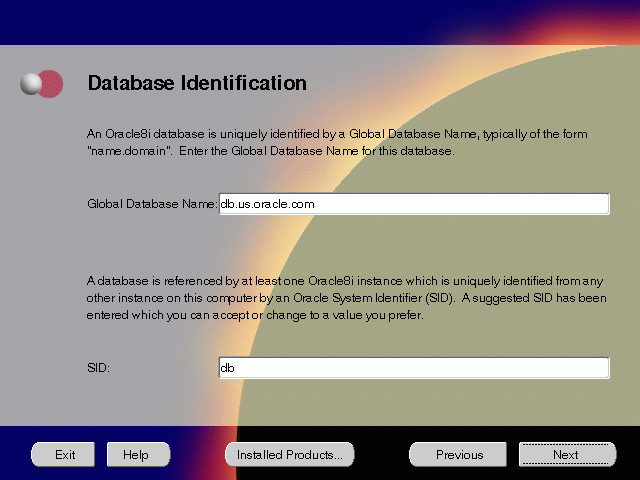
The Database Identification screen allows you to enter the Global Database name and SID of the database that is created to run Oracle Enterprise Java Engine applications.
db.us.oracle.com, where db is the name of the database and us.oracle.com is the network domain in which the database is located.
SID field defaults to the database name portion of the Global Database Name. (For example: db). You can accept or change the default value.
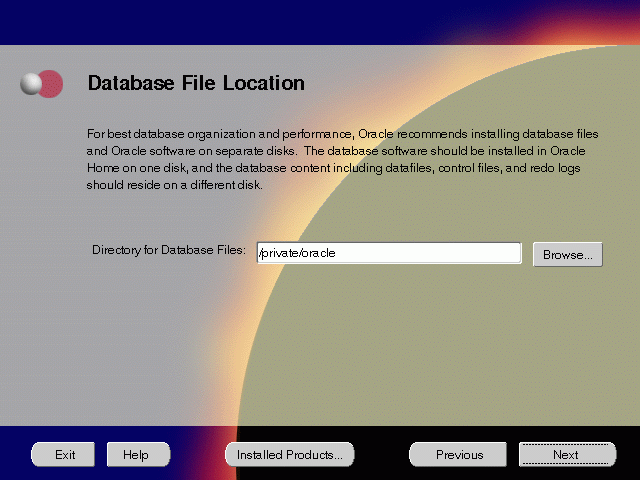
The Database File Location screen allows you to enter the directory name for the database files. Oracle recommends installing the database software and the database content, including files, on separate disks.
/dbmount, then the database file locations will be:
| File Type | Path Name |
|---|---|
|
Data Files |
/dbmount/oradata/SID/*.dbf |
|
Control Files |
/dbmount/oradata/SID/*.ctl |
|
Log Files |
/dbmount/oradata/SID/*.log |
SID of the origin database where you will install the Oracle9iAS Wireless, and click Next. If you are upgrading from Oracle9i Application Server, version 1.0.2.1, then an "Upgrade Installation Detected" screen will appear. Review the content on the screen and click Next or Exit accordingly. If you click Next, then the installation will continue and the following screen will appear.
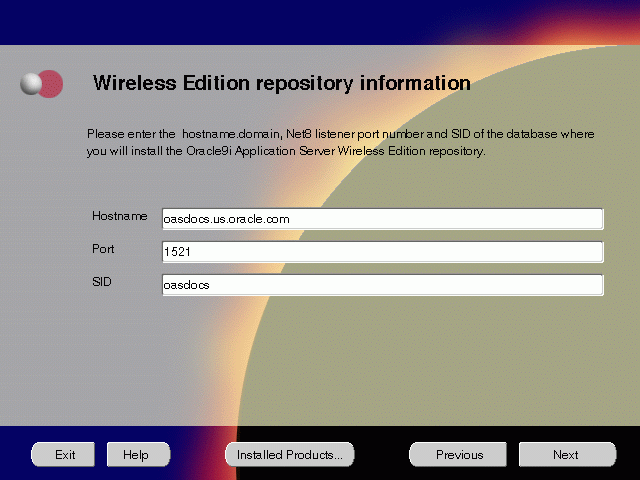
The Wireless Edition Repository Information screen allows you to enter the hostname, Net8 Listener port number, and SID of the database where you will install the Oracle9iAS Wireless repository.
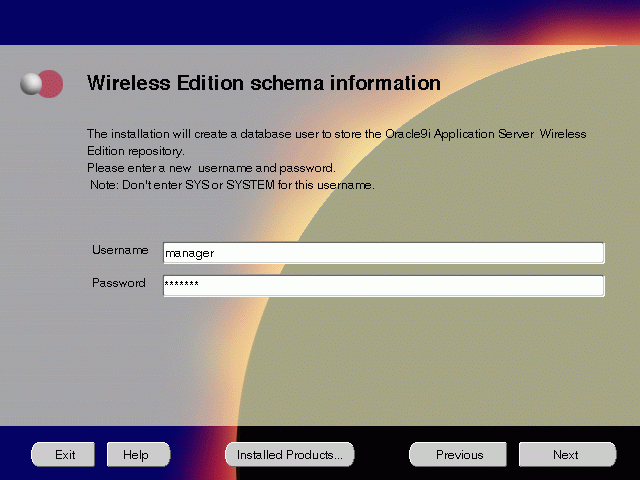
The Wireless Edition Schema Information screen allows you to create a database user to store the Oracle9iAS Wireless repository.
SYSTEM password of the database, and click Next. If you are upgrading from Oracle9i Application Server, version 1.0.2.1, then a "Wireless Edition Administrator Password Information" screen appears. Enter and confirm the "Administrator" password, and click Next.
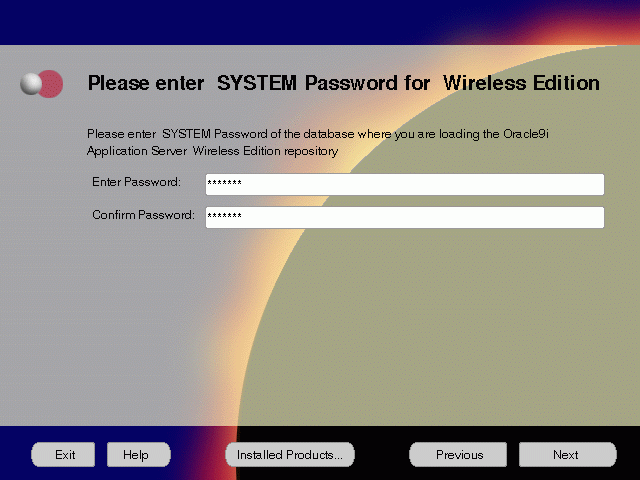
The System Password for Wireless Edition screen allows you to enter and confirm the SYSTEM password of the database where you are loading the Oracle9iAS Wireless repository.
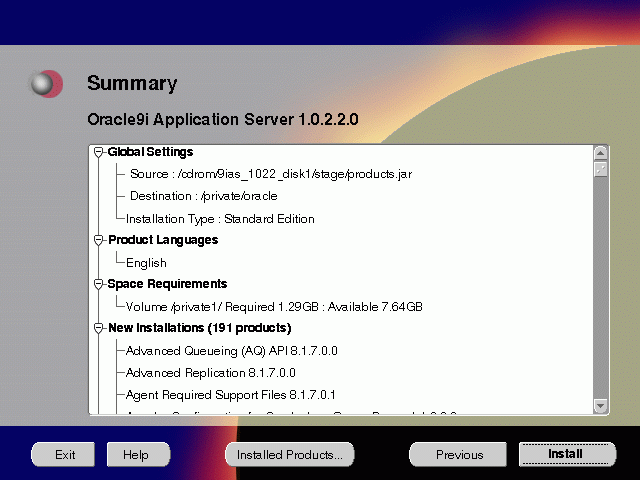
The Summary screen allows you to review all the settings before the actual installation process. These settings include source, destination, installation type, product language, space requirements, and a list of components.
When you click Install, the installation process begins.
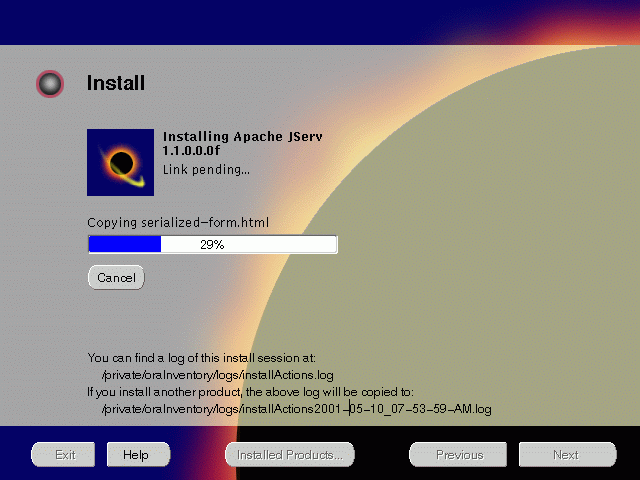
The Install screen appears while the product is installing. Installation operations include executing actions such as file copy and linking, and executing decision points and calculations. It also displays the full path of the installation log.
For more information about installation log, refer to "oraInventory Directory".
Changing Disks
During installation, the installer prompts you to switch between Disks 1 through 5. Use these steps to change disks and continue the installation process.
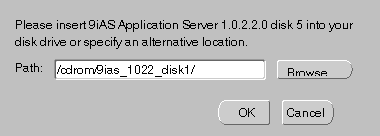
If you are using Solaris Volume Management software and Disk1 was automatically mounted, then this can be done with the following command:
prompt> eject cdrom
If you are not using Solaris Volume Management software, then you must manually eject and unmount the disk. For further instructions, refer to your operating system documentation
If you are using the Solaris Volume Management software, then the next disk will be automatically mounted.
If you are not using Solaris Volume Management software, then you must manually mount the disk. For further instructions, refer to "Starting Oracle Universal Installer".
/cdrom/9ias_1022_diskx. This directory may be different depending on where the original disk was mounted.
Running root.sh
After installation is completed, the installer prompts you to run root.sh script. Use these steps to run the root.sh script.
prompt> cd $ORACLE_HOME
root.sh script.
prompt> ./root.sh
Once you see "Finished running generic part of the root.sh script" and "Now product-specific root actions will be performed," exit root user and return to the Install screen.
The root.sh script detects:
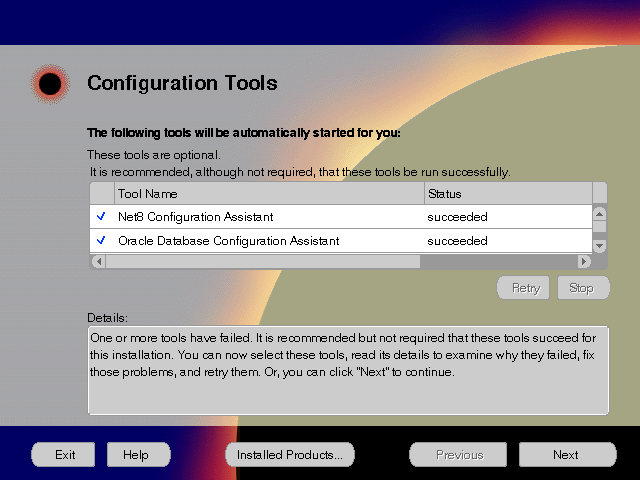
The Configuration Tools screen lists the configuration tools for all installed components.
Scroll down the list to review the configuration status of each tool. The status changes as each component is configured.
The installer performs the following functions in this screen:
Configuration Tools
This installation option launches the following configuration tools:
Net8 Configuration Assistant - This configuration assistant enables you to connect and configure the Oracle client/server network environment.
Oracle Database Configuration Assistant - This configuration assistant configures the database for Oracle Enterprise Java Engine. Oracle Database Configuration Assistant will not appear if you are migrating from Oracle9i Application Server 1.0.2.1 to 1.0.2.2.
|
See Also:
"Oracle Database Configuration Assistant" for instructions on running Oracle Database Configuration Assistant. |
Oracle9iAS Portal Configuration Assistant - This configuration assistant loads necessary database objects for Oracle9iAS Portal to run.
|
See Also: "Oracle9iAS Portal Configuration Assistant" for instructions on running Oracle9iAS Portal Configuration Assistant. |
Starting HTTP Server - This starts Oracle HTTP Server.
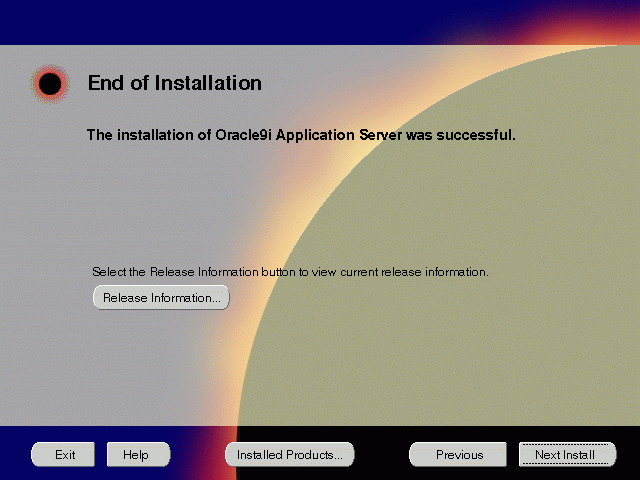
The End of Installation screen appears at the end of the installation process. It notifies you whether the installation was successful or unsuccessful.
If the installer detects that specific port numbers such as 7777, are occupied, it will display the alternate port numbers on the end of Installation screen. For Oracle HTTP Server port number information, refer to "Port Allocation".
You have successfully installed the Standard Edition installation option of Oracle9i Application Server. Proceed to "Postinstallation" to complete the installation process.
The following instructions guide you through the basic postinstallation tasks for Oracle9i Application Server. Before performing these tasks, install, if needed, Oracle9i Application Server Client from the Oracle9i Application Server Administrative and Development Client CD included in the Oracle9i Application Server CD pack.
The postinstallation contains the following sections:
Table 4-1 lists the environment script for Standard Edition installation option:
| Component | Environment Scripts |
|---|---|
|
Oracle Internet File System |
ORACLE_HOME/ifs1.1/bin/infenv.sh ORACLE_HOME/ifs1.1/bin/ifsconfig |
You must run the Oracle Internet File System Configuration Assistant manually to configure Oracle Internet File System.
|
See Also:
"Oracle Internet File System Configuration Assistant" for instructions on running Oracle Internet File System Configuration Assistant. |
Table 4-2 lists the commands needed to individually start and stop the components.
Table 4-3 lists Web sites for Oracle9i Application Server components.
Table 4-4 lists the default port numbers on which requests are received for each component.
| Components | Port Number |
|---|---|
|
Oracle9iAS Portal |
Oracle9iAS Portal uses the same port number as Oracle HTTP Server |
|
Oracle9iAS Wireless Web Integration Server |
Oracle9iAS Wireless uses the same port as Oracle HTTP Server 5555 |
|
Oracle HTTP Server |
For information on port numbers, refer to "Port Allocation". 8007 |
|
Oracle Internet File System |
Oracle Internet File System uses the same port number as Oracle HTTP Server |
|
Oracle Enterprise Java Engine TNS Listener |
TCP/IP: 1521 |
For further information on postinstallation and configuration tasks, refer to component-specific documentation. For information on viewing and installing the documentation, refer to Appendix F, "Installing Documentation Library".
|
|
 Copyright © 2001 Oracle Corporation. All Rights Reserved. |
|