Release 1.1
A75154-04
Library |
Solution Area |
Contents |
Index |
| Internet File System User's Guide Release 1.1 A75154-04 |
|
![]()
![]()
This chapter covers ways to control who can use your files. Topics include:
Controlling access to data files and folders is a critical aspect of data management. Oracle iFS provides security at two levels:
Whenever you create a new user or user group, you assign permissions, or levels of access, to the user or the members of the group. When you create a file or folder, you, as the owner of the file or folder, indicate which permissions a user or group must have in order to access that file or folder. If a user group has a lesser permission than is required to access a file, members of the group can't open the file.
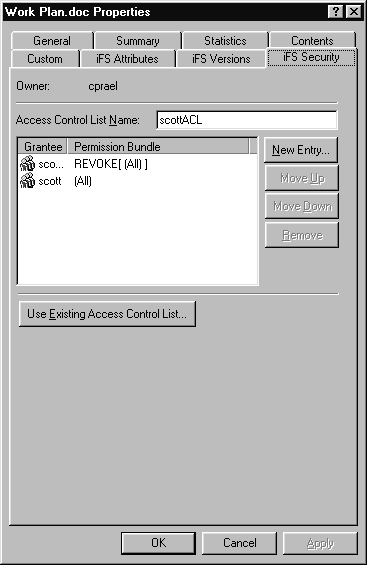
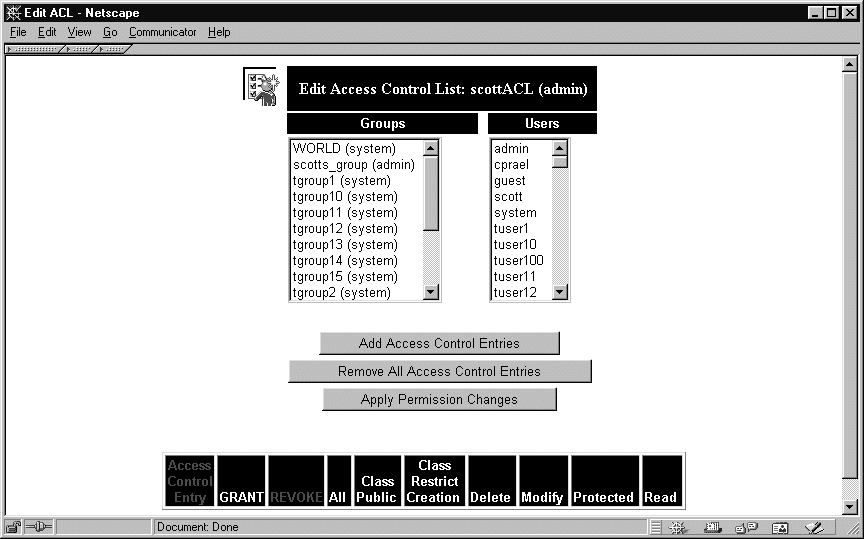
In Oracle iFS, user groups and individual users, along with the permissions assigned to them, are called Access Control Entries (ACEs). An ACE is one item in an Access Control List (ACL) that grants or revokes privileges to a user or group. Here's what an ACL looks like from the Windows interface:
As you can see from this list, an ACL consists of:
As the owner of any folders or files you create, you can control who can access them and the level of access permitted. You can assign the predefined ACLs that are built into Oracle iFS or tailor one or more ACLs to fit your publishing strategy. Also, you can apply an ACL at two different levels:
When an ACL is applied to a file or folder, it defines what individual users and groups are allowed to do with it. For example, when the Public ACL is applied to a file, it means that all users and groups have full access to that file.
When an ACL is applied to a folder, it defines what folder-level operations individual users and groups are allowed to perform with the folder (add files, remove files, etc.).
As a user, you are assigned a default ACL that was determined by your system administrator. When you create a file or folder, your default ACL is applied to that item. In many cases, your default ACL will be Private, meaning that only you have access to that file or folder. To change your default ACL, you must have administrative permission. If you have any questions on this subject, you should contact your system administrator.
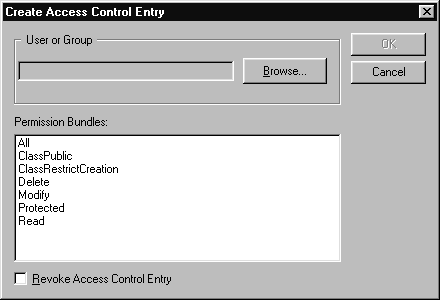
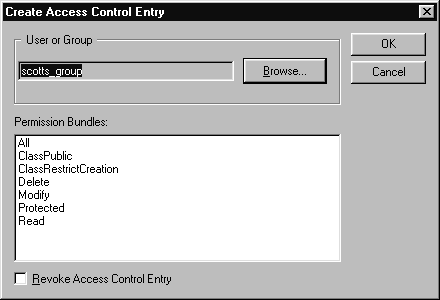
For each user or group, you need to decide which of five permissions will be granted to it. Permissions are actions that users are allowed to perform in relation to a file or folder. A set of permissions assigned to a specific user or group is called an Access Control Entry (ACE).
An Access Control List (ACL) is a list of ACEs that defines the level of access all of the listed users and groups will have to the files and folders to which you assign the ACL. ACLs give you the flexibility to grant the permissions your co-workers require, while helping to protect your files against accidental modification or unauthorized access.
The permissions you may grant and revoke for each ACE are listed and defined in the table below.
By setting each of these permissions for an individual or group, you create an ACE in your Access Control List. It's possible to create a different ACE for every user in your Oracle iFS repository for every file you control, but in most cases the standard ACLs that come with Oracle iFS should meet your needs, and the remaining cases can be handled by creating a short ACL.
When you define an ACE, the first choice you must make is whether you are going to grant permissions to the ACE, or revoke them. If you are going to give only a few permissions to a selected user or group, choose Grant, and select only those few permissions.
If you are going to give the selected user or group general access with only a few restrictions, choose Revoke and select the permissions you don't want the ACE to have. Users will receive all of the permissions except for the ones you revoked.
For example, if you want a group to have access to make changes to files in a directory, but not to delete the files, you would choose Revoke, then select the Delete permission. Users in the group would have complete access to the directory, but they couldn't delete any files. Conversely, the standard Published ACL only allows users to view and download the file.
Access Control Entries are listed in a specific order in the ACL, usually the order in which you create them. An ACE that's lower in the list supersedes all the ACEs above it.
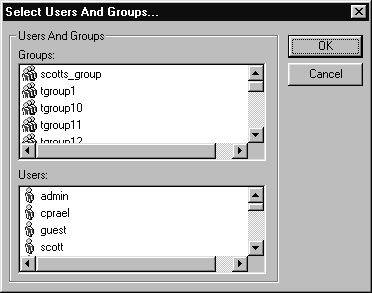
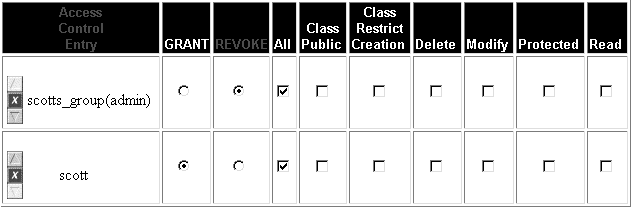
For example, I can create an ACL named scottACL.
The first Access Control Entry I create is for the group scotts_group. I give scotts_group no permissions at all. If I apply the Access Control List to a folder at this time, no one, including Scott, will have access to the folder.
Scott is the manager of scotts_group. He needs to have full access to the folder. I create an ACE for the User scott. In the Access Control Entry for scott, I grant All. permissions. Since scott's ACE appears at the bottom of the Access Control List, his ACE supersedes the instructions in the scotts_group ACE.
The final result is that Scott has full access to the folder. No one else in Scott's group can view or modify anything in the folder.
It's important to keep the ACE precedence in mind as you create your ACL in order to implement the security settings you want. In this case, if I created the ACE for scott before I created the ACE for scotts_group, no one, including Scott, could access a folder or file assigned that ACL.
There are two categories of ACL:
Predefined ACLs provide the following security levels:
You can create a user-defined ACL to cover any specific security needs not provided by the predefined ACLs. For example, a marketing manager might decide that everyone in the marketing department needed access to all product collateral currently being developed. The manager could create a custom ACL to provide that access by performing the following steps:
In this case, every member of the marketing group would have the same access to the files in the Collateral directory. Unspecified users (users for whom no ACE was created either granting or denying permission) would have whatever the default ACL for the creating user was.
Before you can begin managing access to your files, your system administrator must perform certain tasks related to Oracle iFS security:
Once the system administrator has created an initial set of users and groups, you can do the following:
The remainder of this chapter will deal with your security tasks.
To change your password, access your user profile:
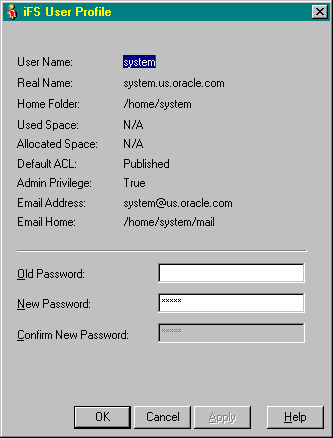
To change your password:
You can assign any of the default ACLs to a folder or file you control.
To assign an ACL to a file or folder:
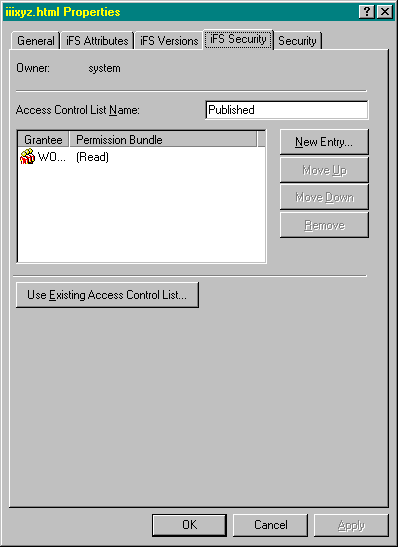
The iFS Security tab displays the name of the ACL currently assigned to the item you selected with the Grantees and their abbreviated access levels. For example, in the illustration above, the Published ACL grants Read privileges to the World, a group that represents all users in the Oracle iFS repository.

When assigning ACLs, you must ensure that the folder enclosing the file or folder allows sufficient access to your users that they can discover (view and select) the items to which you're granting them access. For example, if you grant full access privileges to a file that is stored in a folder that uses the Private ACL, users will be unable to locate the file because even though they have been granted permission to view and edit the file, they don't have permission to look inside the folder where it's kept.
To create an ACL:
Once you've created your ACL, you can assign it to a file or folder as described in the "Windows: Assigning a Default ACL to a File" section.
When you create an ACE, rather than defining the permissions you're granting to users, you can define the permissions you're revoking. If you're primarily granting full access but revoking one or two permissions, it may be easier to define just the actions the user can't take. To define an ACE that revokes privileges, click the Revoke Control Entry checkbox at the bottom of the Add Oracle iFS Access Control Entry dialog.
The Remove button lets you delete a selected ACE from an ACL. This can either provide more or less access for the users, depending on the definition of the ACE.
To remove an ACE from an ACL:
There is no way to edit an existing ACE within the Windows interface. To change an ACE, remove the existing entry, as described in this topic, then recreate the ACE with the new permissions. You can, however, change the order of ACEs within an ACL. Select an ACE and click on the Move Up and Move Down buttons to reorder your ACL. For more information on ordering ACEs within an ACL and how this affects access, see "ACE Precedence".
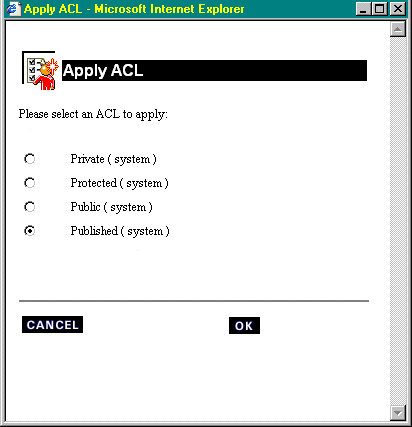
To apply a standard ACL to a file or folder:
To create an ACL in the Web interface:
The ACL you have created can now be applied to any of the files or folders you control as described in the section Applying an Existing ACL.
The ACL editor in the Web interface has two advantages over the Windows ACL editor.
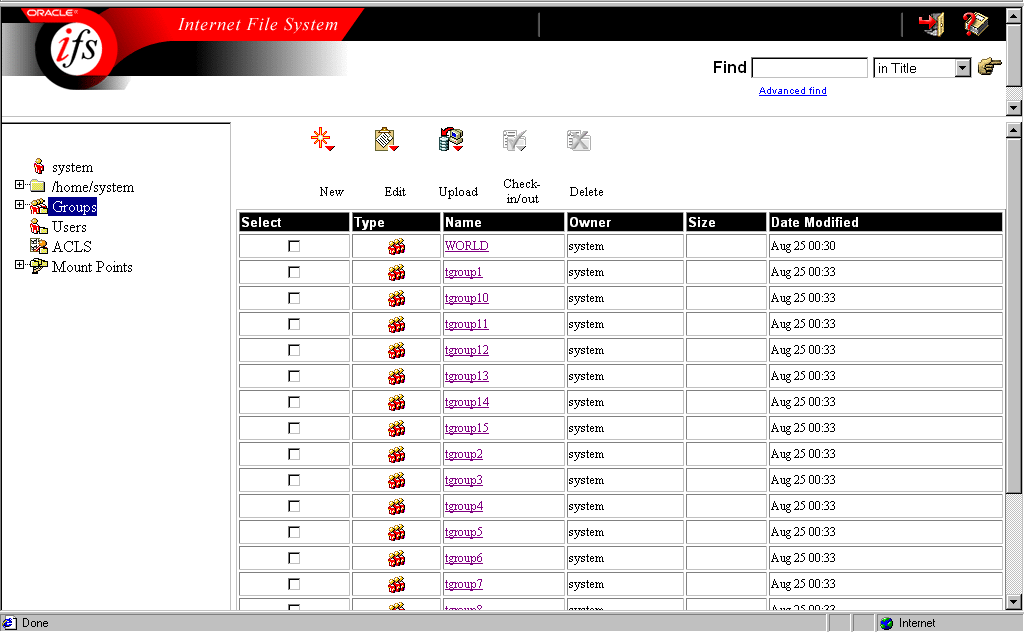
Groups are logical collections of users, usually organized by job function or project. By creating a group, you can assign the same permissions to several users at once.
To create a user group in the Web interface:
You can add users to the group at any time by following steps 4-9.
If you have already defined groups, you can add a user or group to a group.
To add a group to a group:
You can also add individuals to groups, following the steps listed above. Instead of copying and pasting a group name, you'll select an individual from the Users icon, and copy and paste that individual's name into your group list.
To edit a group, click the Groups icon in the Directory Tree, then click the group's name in the Groups List. Follow the steps for adding and removing users and groups.
To remove a Group, click the Select checkbox to the left of the Group name, then click the Delete icon.
To ensure that the group can access the content they need, and only that content, you must assign an ACL to each group you create.
Earlier, we noted that the ACL applied to a folder does not automatically apply to every file or folder in the folder. This grants you a great deal of flexibility in organizing your data and granting access. It allows you to, for example, place all Human Resources material in one folder or hierarchy of folders, but grant less access to certain files than to others.
Here's one scenario:
I create a folder called "Marketing Department," which has my default ACL of Private. However, I change the default to Published. I use Published, because I want others to be able to view the contents and download them, but not change them. (I could use Protected, but that would allow others to add files and folders to this folder, and in this case, I don't choose to allow them to do so.)
In the folder, I place a Word template (.dot) to be used for weekly reports by my staff. This template requires that users have the Published permission, so they can see and download it, but not change it or delete it from the folder.
I add an Excel spreadsheet (.xls) on monthly sales figures, but want to limit access to this data. So I apply a custom ACL, Marketing Managers, to it. Applying this ACL gives Marketing Managers full access to the data, but revokes all access for anyone else.
Finally, I add my own notes on prospective clients, which I don't want anyone but myself to read, and which has the ACL Private. No one else can see, modify, delete, or download this file.
Now, I have all my marketing data in one place, but access to specific content is granted or revoked based on the user groups' need to use it.
For more on managing access to data in folders, please refer to Chapter 3, "Managing Files and Folders".
|
|
 Copyright © 2000 Oracle Corporation. All Rights Reserved. |
|