Internet File System User's Guide
Release 1.1

A75154-04

Library

Solution Area

Contents

Index

Prev Next

3
Managing Files and Folders

This chapter describes the file management features of Oracle iFS. It shows how to manipulate files and folders using both the Windows and Web interfaces. Topics include:

Working with the Folder Hierachy: An Overview

The folder hierarchy is an organizational structure of one or more folders in Oracle iFS. Folder hierarchies organize the repository so that users can browse through it easily. Because different users may want to organize their information in different ways, Oracle iFS allows the creation of multiple folder hierarchies to organize Oracle iFS in different ways to make browsing convenient. For example, the sales, development, marketing, and consulting departments of a company may use different hierarchies.

The initial folder hierarchy is usually set up by the system administrator, but users with administrative permissions may work with the hierarchy. This is especially useful in larger organizations made up of self-managing groups or teams.

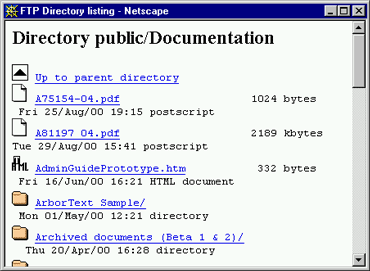
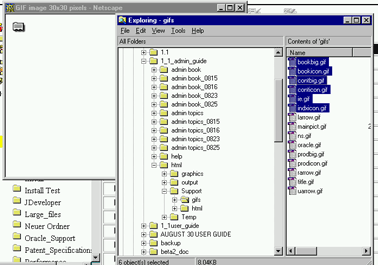
Whether you access your Oracle iFS files with the Windows interface, the Web interface, or FTP, the folder structure within Oracle iFS looks the same.

The Default Folders

By default, every user is assigned three folders:

In addition to these three folders, which are specific to each user, there are two common folders.

The public and root folders and your personal home folder are set up as mount points (navigable entries in the Directory Tree).

Figure 3-1 Sample folder hierarchy

The Home Folder

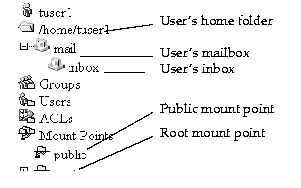
All users are assigned a home folder named for their user ID. For example, if your username is jdoe, you automatically receive a home folder named /home/jdoe. The home folder is a private storage area where you can store files and other folders. This storage area is a folder in Oracle iFS that is owned by and reserved for you. You have complete control over your home folder and can add files to it up to your designated quota, or space allocation, set by the administrator.

Although files in your home folder are private, you can make them available to other users. A file can be "published" in your home folder by changing the Access Control List (ACL) applied to the file. For more information on file access settings using ACLs, see Chapter 6, "Managing Access to Files".

Figure 3-2 The home folder is a private storage area for your files

The Mail Folder and Inbox

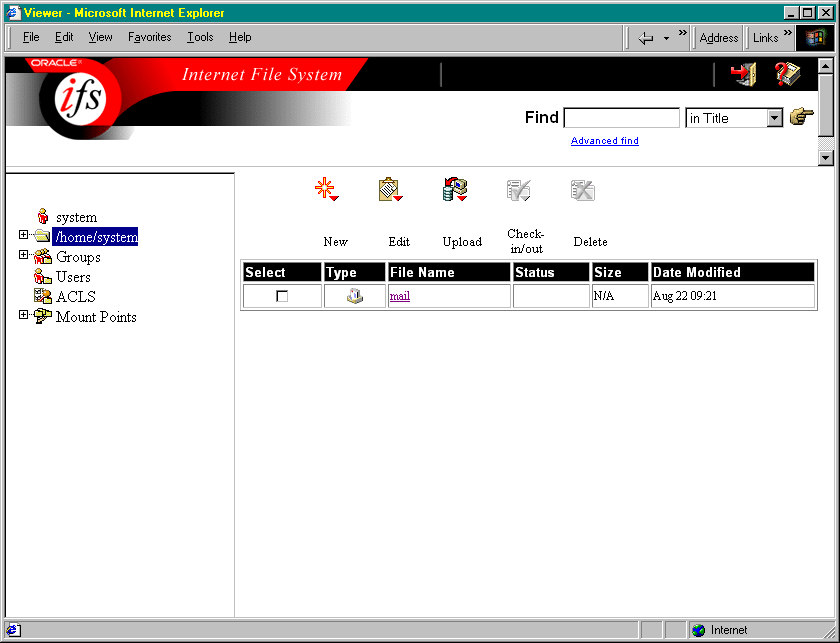
By default, the home folder has a mail subfolder. The mail folder has a subfolder named inbox, which is the default location where all incoming e-mail messages are stored. Once your system administrator sets up your inbox, your e-mail arrives in that subfolder. You can then retrieve your e-mail using an e-mail application that points to your inbox; open the e-mail in the Windows Explorer; or open your e-mail directly from the Web interface. Depending on how you use your mail client, it may set up other folders as required.

Rules for Accessing Folders

XML and Oracle iFS

All types of files may be stored in the Oracle iFS repository, including XML files. Many XML files contain or refer to a Document Type Definition (DTD), a set of rules to which the tags in the XML file must adhere. The DTD describes which tags and attributes are valid in an XML file, and in what context they are valid. Because Oracle iFS has built-in DTD validation, your XML documents are checked for validity as well as whether they are well-formed. If the file is found to be invalid, Oracle iFS will display an error message and will not upload the file.


Note:

DTD validation is not a default. It must be turned on. Refer to your system administrator for more information.  


Windows: Working with Folders

In Oracle iFS, you perform all operations on folders exactly the way you are accustomed to doing in other Windows applications. Everything in Windows Explorer works the same whether you're in the Web Folders section or the regular folder hierarchy. For a quick reminder of how to perform folder operations in the Windows Explorer interface, see the following table.


Table 3-1 Folder operations

Task  Action 

Open a folder 

Click the plus symbol (+) to the left of the folder name in the Directory Tree. 

Close a folder 

Click the minus symbol (-) to the left of the folder name in the Directory Tree. 

Create a new folder 

Select the parent for the folder you want to create, then choose File->New->Folder. Type the name of the new folder. 

Rename an existing folder 

Select the folder, choose File->Rename. Type the new name.

Note: In this version of the product, you can rename the home, mail, and inbox directories. Oracle strongly recommends that you do not rename these folders because doing so can confuse client applications. 

Copy an existing folder 

Select the folder, press Ctl, then drag and drop the folder to its new location. If copying to a second disk, drag and drop the folder to the disk.  

Move a folder 

Select the folder, then drag and drop it to its new location to move to a different folder on the same drive. If moving the folder to another drive, right-click and drag the folder to another drive, then choose Move Here from the Context menu. 

Delete a folder 

Select the folder, choose File->Delete. 

Windows: Working with Files

In Oracle iFS, you perform all operations on individual files exactly the way you would in other Windows applications. For a quick reminder, see the following table.

Table 3-2 File operations

Task  Action 

Open a file 

Double-click the file. 

Close a file 

Choose File->Close. 

Save a new file 

With a file open, choose File->Save. 

Rename an existing file 

In Windows Explorer, choose File->Rename. Type the new name and press Enter. 

Copy an existing file  

In Windows Explorer, select the file, press Ctrl, then drag and drop the file to its new location on the same drive. If you're copying the file to a different drive, drag and drop the file to the second drive. 

Make a copy of the current file 

With the file open, choose File->Save As. 

Move a file 

In Windows Explorer, select the file, then drag and drop it in its new location on the same drive. If moving it to a different drive, right-click and drag the file to the second drive, then choose Move Here from the Context menu. 

Delete a file 

In Windows Explorer, select the file, then choose File -> Delete. 

Web: Working with Folders

You can create and populate folders using the Web interface. Changes you make to your home folder using the Web interface will be reflected in the Windows interface (the reverse is also true--changes you make in Windows will appear in the Web interface).

Opening a Folder

To open a folder, click its icon or file name in the File List.

You can also use the Directory Tree to navigate up or down your file hierarchy. Click the plus symbol (+) to the left of the folder icon to display its subfolders.

Closing a Folder

To close a folder, click the minus symbol (-) to its left in the Directory Tree.

Creating a New Folder

To create a folder:

  1. Navigate to the folder in which you want to create your new folder.

  2. Click the New icon and choose Folder.

  3. In the dialog, type the name for your new folder.

  4. Click OK.

Renaming a Folder

To rename a folder:

  1. In the File List, click the Select checkbox to the left of the folder.

  2. Click the Edit button and choose Rename.

  3. Type the new name for the folder.

  4. Click OK.


Note:

You can rename the home, mail, and inbox folders. Oracle strongly recommends that you do not rename these folders because doing so can confuse client applications. 


Copying a Folder

To copy a folder:

  1. Navigate to the parent folder of the folder you want to copy.

  2. In the File List, click the Select checkbox to the left of the folder.

  3. Click the Edit icon and choose Copy.

  4. Navigate to the folder where you want to paste the folder.

  5. Click the Edit icon and choose Paste.

Copying a folder in this way makes a second copy of the folder and all its contents. You can also use the Paste as Links command to create a link to the original folder in another location. For more information on creating links, see "Web: Creating a File Link".

Moving a Folder

To move a folder:

  1. Navigate to the parent folder of the folder you want to move.

  2. In the File List, click the Select checkbox to the left of the folder.

  3. Click the Edit icon and choose Cut.

  4. Navigate to the folder where you want to paste the folder.

  5. Click the Edit icon and choose Paste.

Moving a folder in this way relocates the folder in a single location.

Deleting a Folder

To delete a folder:

  1. Navigate to the parent folder of the folder you want to delete.

  2. In the File List, click the Select checkbox to the left of the folder.

  3. Click the Delete icon.

  4. In the confirmation dialog, click OK to delete the folder.

Web: Working with Files

Opening a File

To open a file, click the file name or icon of the file. Oracle iFS opens the file with the appropriate application so you can view or edit it on your local operating system.

If you don't have an application that can display the type of file you have opened, Oracle iFS asks you for a local drive to which to save the file.

To edit a versioned file, you must save it to your local hard drive. To store your changes in Oracle iFS, you must upload the file to add a new version. For more information on versioning files, see Chapter 5, "Content Management Functions".

Uploading Files

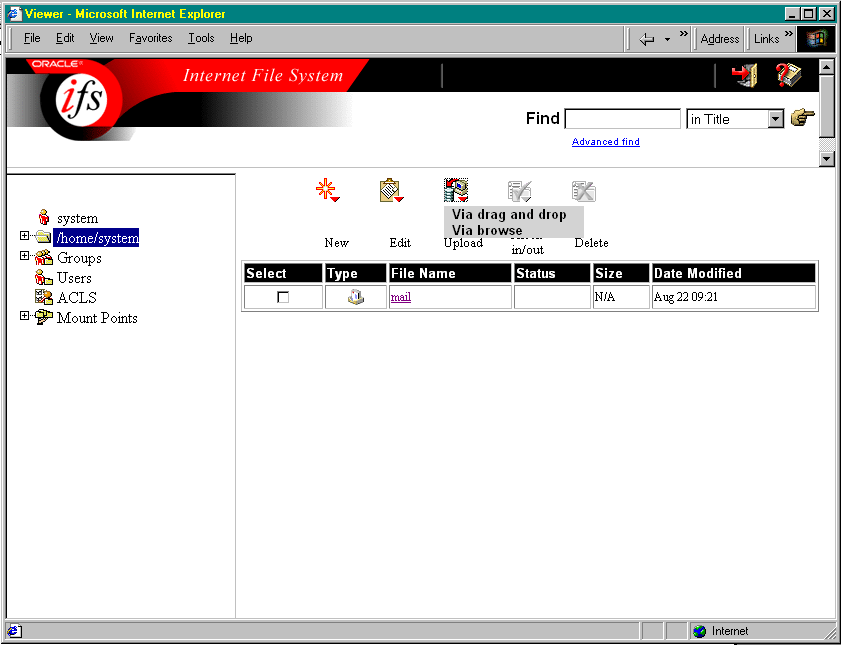
There are two options for uploading a file using the Web interface. Using the Upload command, you can either upload one file at a time using a file browser window, or you can drag and drop several files at once. If for some reason you cannot use FTP between your computer and the Oracle iFS server, or if your Oracle iFS administrator has not activated the Oracle iFS FTP server, you will need to use the Upload via Browse method.

Uploading a File Using the File Browser

To upload using a standard system file browser:

  1. Navigate to the folder where you want to store the file.

  2. Click the Upload icon and choose Via browse.

  3. In the Upload window, click the Browse button.

  4. Locate the file you want to upload and click Open.

Figure 3-3 The Upload icon lets you choose the upload method

Figure 3-4 The Upload window presents options you can apply to files

.

  1. To apply an ACL to the file as it is uploaded, select the ACL you want to use from the drop-down list. You must use an existing ACL.

  2. To assign a language to this file, choose from the Language drop-down list. The language feature is not a translator. It applies a set of syntax and grammar rules by which the document can be indexed and searched efficiently.

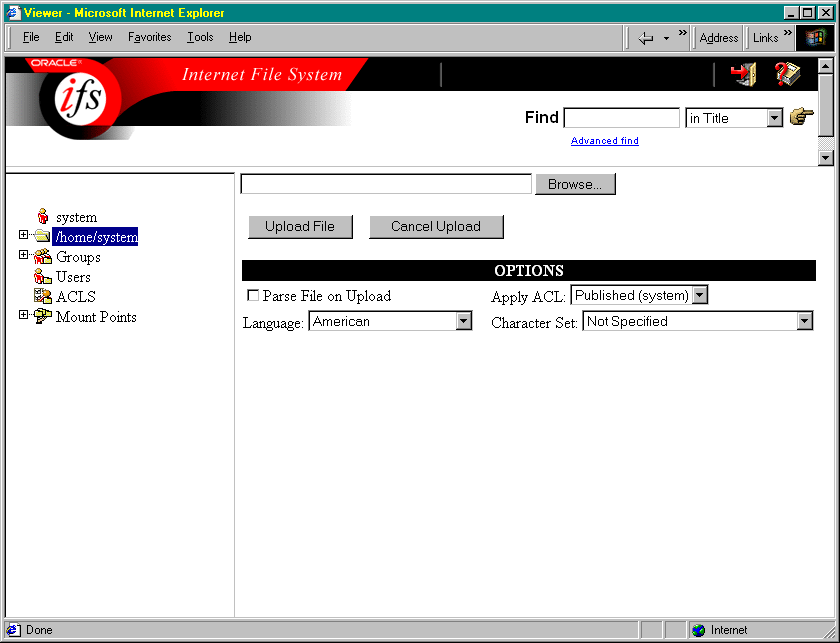
    When Oracle iFS indexes a document, it makes note of terms that it will not search for because they appear too often to yield a relevant search result. These words vary from language to language (like the word the in English, le in French, el in Spanish). The Language you assign to the file helps Oracle iFS index the document correctly and avoid searching for unnecessary terms.

  3. In the Character Set menu, choose a character set by which the file can be identified (Western, for example). This provides the character set information by which the file can be correctly indexed for searching. It does not apply to binary files, such as Word documents or Excel spreadsheets, only to text-based files such as XML, HTML, .txt, and .eml files.

    Again, this is not a translation feature. It simply provides another indicator by which your file can be correctly indexed. For example, if your character set is German, and you enter jager as a search term, Oracle iFS will search for jager and jäger.

  4. In the Upload window, click the Upload button.The file is added to the File List.

Uploading a File Using Drag and Drop

To upload one or more files using drag and drop:

  1. Navigate to the folder where you want to store the file.

  2. Click the Upload icon and choose Via drag and drop. An FTP client window is displayed, showing the files and folders in the current folder.

Figure 3-5 The FTP client allows you to drag and drop files to Oracle iFS

  1. Open Windows Explorer.

  2. Select one or more files, then drag and drop them to the FTP directory window.

Figure 3-6 The files you upload are displayed in the FTP client window

  1. Click OK to confirm that you want to upload the files. If you are uploading multiple files, a progress window appears and lists each file as it is transferred to Oracle iFS.

  2. You can continue to drag files onto the Current Directory window to transfer additional files. When you are finished uploading files, close the Current Directory window.


Notes:

  • In some browsers, you may not be able to upload folders using this method. You must explicitly create the folders using the procedure for "Creating a New Folder", as described above.

  • The Web interface drag-and-drop feature requires that the Oracle iFS FTP server is running. If this feature doesn't work, ask your system administrator to check that the FTP server is running and, if necessary, start it.


Copying Files

To copy a file:

  1. In the File List, click the Select checkbox to the left of the file(s) you want to copy.

  2. Click the Edit icon and choose Copy.

  3. Navigate to the folder where you want the copied file(s) to appear (which could also be the current folder).

  4. Click the Edit icon and choose Paste. If a file by that name already exists, Oracle iFS appends the words "Copy of" to the name of the file.

Figure 3-7 You can place a copy in the same folder as the original, or another folder

Copying files in this way creates a second file, separate from the original. You also have the option of working with the same file but listing it in multiple folders using links. For more information on creating links, see "Web: Creating a File Link".

Moving Files

To move a file:

  1. In the File List, click the Select checkbox to the left of the file(s) you want to move.

  2. Click Edit and choose Cut.

  3. Navigate to the folder to which you want to move the file.

  4. Click the Edit icon and choose Paste. If a file by that name already exists, Oracle iFS appends the words "Copy of" to the name of the file. You can rename the file(s).

Deleting Files

To delete a file:

  1. In the File List, click the Select checkbox to the left of the file(s) you want to delete.

  2. Click the Delete icon.

  3. In the confirmation dialog, click OK to confirm the delete.

Renaming a File

To change the name of a file:

  1. In the File List, click the Select checkbox to the left of the file(s) you want to rename.

  2. Click the Edit icon and choose Rename.

  3. In the dialog, enter the new name for the file.

  4. Click OK to save the file with the new name.


Note:

You cannot rename a file with the name of an existing file in the same folder. If you want to replace an existing file with another of the same name, first delete or move the file you want to replace, then rename the second file. 


Using Links to Display the Same File in Multiple Folders

Most of the time, the standard file system will meet your needs for storing and organizing your information. For example, you might create a weekly status report and file these reports in a folder called "Status." You know that you can always find your status report files by going to the Status folder.

However, in some circumstances, the organization of your files is more complex than will fit into a single hierarchy. When the same document fits in a number of categories, you may want the same file to appear in multiple folders. For example, you might want the letter to M. Aloyne about the trade show in Paris to appear in three folders: Letters, Aloyne, and Trade Shows.

You could store the original file, then make copies into the other locations, but to make changes you need to remember to update the file in all three places. Instead, you can create a link to the file in the repository from all three folders.

What are Links?

In Oracle iFS, you can use links to display the same file in more than one folder, eliminating the need to manage multiple copies in multiple locations.

How Links Work

Links shouldn't be confused with shortcuts in Microsoft Windows. Shortcuts are pointers to a file location, but don't represent the file itself. If the original file is deleted, the shortcuts remain, but they no longer point to anything.

In Oracle iFS, each Oracle iFS link represents the file equally. If you delete a link from one folder, all of the other links associated with the file remain, and the file isn't removed. Only when all links have been deleted is the file actually removed from the Oracle iFS repository.

The process for creating a link is similar to that of making a copy of a file and pasting it into another folder (the steps for creating links are described for both the Web and Windows interfaces).

Links created in the Web interface will be visible in the Windows interface, and vice versa. You may need to refresh your windows view or reload your File List in the Web interface before changes made in one interface are visible in the other. In the Web interface, the links appear in italics.

Multiple Parents

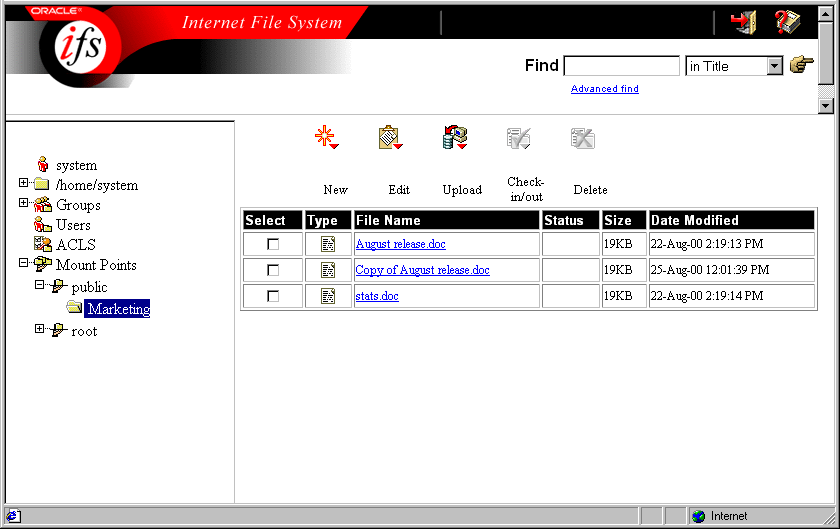
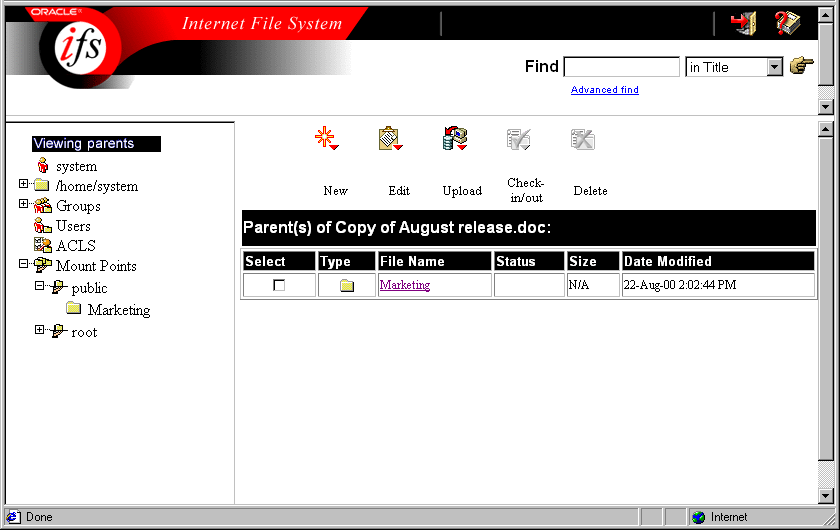
Files that are stored in more than one folder are said to have multiple parents. When you see a link to a file in a folder, you may want to know what other folders hold links to the same file, especially if you need to keep track of who has access to the file. Both the Windows and Web interfaces include commands that allow you to list a file's parents. Once you have located the parents you can navigate to the parents for tasks such as changing their security settings or deleting them from Oracle iFS.

Figure 3-8 The Parents List shows where the selected file resides

Windows: Creating a Link

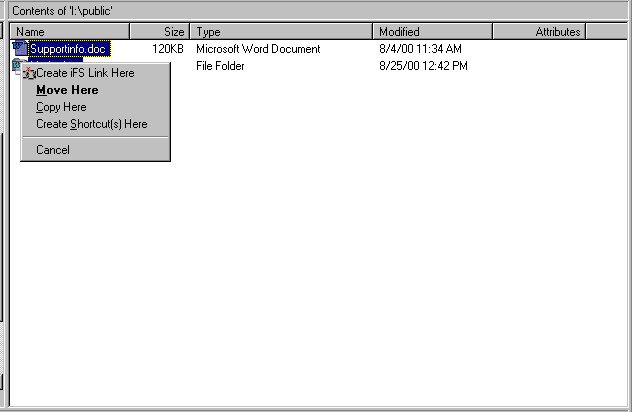
To create a link, you locate the file you want to link to, then drag and drop it to the folder in which you want to create the link.


Note:

Be sure to use the drag and drop method. Do not use the Copy command. 


  1. In Windows Explorer, select the Oracle iFS file or files.

  2. Holding down the right mouse button, drag and drop the file to the folder in which you want the link.

  3. In the context menu, click Create Oracle iFS Link Here.

Figure 3-9 Create links using the context menu

  1. From the View menu, choose Refresh to see the new link.

Windows: Viewing a File's Parent Folders

The List Parents function is available from both Windows Explorer and the Start menu.
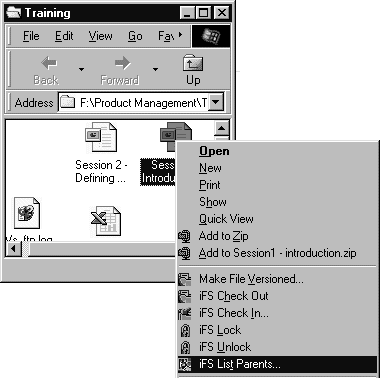
From Windows Explorer:

  1. Right-click the file to display the context menu.

  2. Click List Parents.

Figure 3-10 The Oracle iFS List Parents tool is available from the context menu

From the Start Menu:

  1. Click Programs.

  2. From the Programs menu, click Oracle Oracle iFS Utilities.

  3. Click iFS List Parents.

  4. On the iFS List Parents tool, choose the Oracle iFS drive on which the file resides.

Figure 3-11 List Parents is also available from the Start menu

  1. Click OK.

  2. Click the Browse button to browse for the folder or file whose parents you want to see.

  3. Navigate the Directory Tree and click the folder or file for which you want to list parents.

  4. Click OK.

  5. Click List Parents.

View the Parent Within the Folder Hierarchy

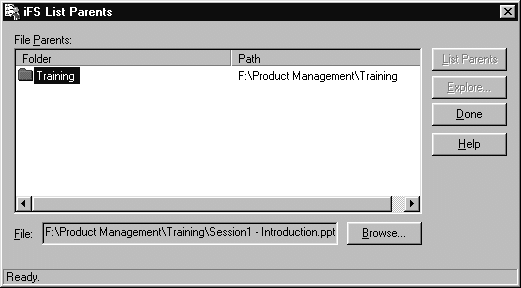
Once you have displayed a folder or file's parents, you can easily navigate to them in Windows Explorer.

  1. On the List Parents tool, click one of the parent folders displayed.

  2. Click the Explore button.

Oracle iFS displays the Windows Explorer, highlights the parent folder you selected within the Directory Tree, and shows the content of the folder.

Web: Creating a File Link

To create a file link:

  1. Click the Select check box to the left of the file or folder you want to display in another folder.

  2. Click the Edit icon and choose Copy.

  3. Navigate to the folder in which you want to create the link.

  4. Click the Edit icon and choose Paste as links.

If you want to create a link in more than one location:

  1. Navigate to the next folder in which you want to create a link.

  2. Click Edit and choose Paste as links.

  3. Continue until you have created links in all desired locations.

Files with multiple links are listed in italic text in every folder (including the original from which you copied). Should the number of links be reduced to one, the name will again appear in plain text. This prevents you from accidentally deleting all links to a file because you thought there were still other links.

Web: Displaying a Document's Parents

To display a file's parents:

  1. Click the Select checkbox to the left of the file or folder for which you want to display parents.

  2. Click the Edit icon and choose Parents.

  3. The File List displays a list of the folders that contain instances of the file you selected. Click any of the folder names or icons to go to that folder.

Web: Deleting a File Link

File links are deleted in the same way as any other item in the Web interface.

  1. Click the Select checkbox to the left of the file or folder you want to delete.

  2. Click the Delete icon.

  3. Click OK to confirm the deletion.

When you delete a link, the file remains in Oracle iFS and can still be accessed through any other existing link. When the number of links is reduced to one, the file name appears in plain text, indicating that it is the sole remaining instance of the file. When the last link to a file is removed, the file is deleted from Oracle iFS.

Introduction to File Attributes

File management systems store two types of information for every file:

The information about the file is known as its attributes or properties. Oracle iFS uses file attributes to provide additional information and capabilities beyond those of a standard file system. One common use of attributes is to allow quick searches for multiple search criteria. For example, you might search for all word processing files written by T. Frank during May 2000.

Files in Oracle iFS store more attributes than files in standard file systems, enabling you to specify precise search criteria. In this way, you can locate the file you want quickly and accurately.

Working with Custom Attributes

In addition to the default attributes that Oracle iFS assigns to every file (name, creator's name, creation date, description, and so on), your system administrator can opt to create custom attributes. If so, you may be able to search for data using those attributes. For information on whether custom attributes have been created, contact your system administrator.

Windows: Working with Attributes

To view a file's attributes in Windows:

  1. Right-click the file.

  2. Select Properties from the drop-down menu.

  3. In the Properties window, click the Oracle iFS Attributes tab.

Figure 3-12 File attributes can be viewed from the iFS Attributes tab

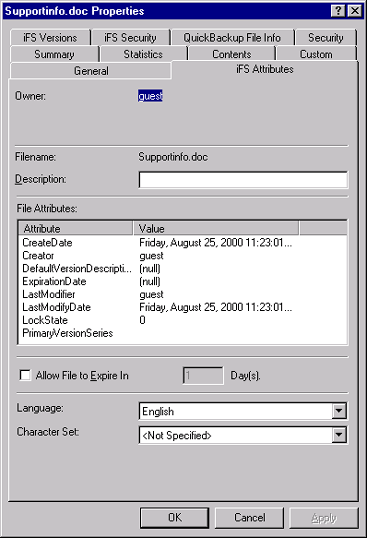
The iFS Attributes tab is divided into five sections:

Table 3-3 Sections of the iFS Attributes tab

Section  Description 

Owner 

Lists the owner of the file. This is the login of the person who controls access to this file (this may not be the same person as the creator, who first inserted the file into Oracle iFS). 

File Name and Description 

The name of the file. Provides a text field for an abstract description of the contents of the file. 

File Attributes 

Lists attributes specific to this file type. 

ExpirationDate 

Used to specify that Oracle iFS should delete the file in n days.  

Language 

Shows the language associated with the file. 

Character Set 

Shows the character set associated with the file. 

iFS Attributes Tab: File Attributes

This table lists the file-specific attributes you will see on the Oracle iFS Attributes tab.

Table 3-4 File Attributes

Attribute  Description 

CreateDate 

Date the file was created, in the format appropriate for the language in which your Web interface is displayed. For example, U. S. English dates may be displayed as MMMM DD, YYYY, hh:mm AM/PM. For example, April 1, 2000, 11:45 AM. 

Creator 

The person who first stored this file in Oracle iFS. 

DefaultVersionDescription 

The current version description (if a versioned file). 

ExpirationDate 

If an expiration date has been set for this file or folder, the expiration date is shown. If no expiration date is set, the field displays (null). 

LastModifier 

The login of the last person to change the file. 

LastModifyDate 

The date the file was last modified, in some combination of DDDD, MMMM DD, YYYY, hh:mm:ss AM/PM, depending on the language of the Web interface you are working with. For example, Sunday, April 2, 2000, 12:15:22 PM. 

LockState 

A code representing whether the file is available for use, or checked out, or locked.

0 = Unlocked; anyone with the proper permissions may use the file.

1 = Locked; no modifications or deletions are allowed, but anyone with lock and update permissions can unlock it.

3 = Locked; no modifications or deletions are allowed by anyone other than the user or administrator holding the lock.

4 = Locked; no modifications or deletions may be made. The administrator may unlock it.  

Read by Owner 

Used by e-mail to show that the file has been read by the owner. 

Language 

The language used in the file. When you specify the language, you enable language-sensitive indexing and searching for this file. 

Character set 

The character set associated with the file. If you upload a file in German, for example, you should change the language to German and choose the appropriate character set. Character set attribute applies only to text-based files such as HTML, XML, .txt, and .eml, not to binary files like Word and Excel. 

PrimaryVersionSeries 

The version number of the file. If the file is not versioned, this field is not displayed. 

Note that the number of attributes displayed may vary, depending on whether any custom attributes have been defined by your system administrator.

Changing Attribute Values

Some file attributes can be changed on the Oracle iFS Attributes tab; most cannot. The following table summarizes which attributes can be changed (by users with appropriate access privileges), in sequence by their location on the Attributes tab:

Table 3-5 Editable Attributes

Attribute  Description 

Description 

The Description can be changed, using the text box provided. You can search files for the text of the description. 

Expiration Date 

By selecting the Allow File to Expire in check-box, and entering a number of days, you can edit expiration date from the iFS Attributes tab. 

Language 

You can edit the language to be used for indexing. 

Character Set 

You can also edit the character set applied to this file. 

Setting an Expiration Date

If you own the file, or if you have been granted the appropriate permissions, you can set an expiration date for the file on the iFS Attributes tab. The expiration date is the date on which Oracle iFS deletes the file.

To set an expiration date:

  1. On the Oracle iFS Attributes tab of the Windows Properties dialog, click the checkbox next to the Allow File to Expire prompt.

  2. Type the number of days until the file should expire.

  3. Click OK.

On the date of expiration, the file is permanently removed from the Oracle iFS repository. If this is set through the Windows interface, the file will expire at 12:01AM on the expiration date.

If you do not want a file to expire, make sure that the Allow File to Expire check-box is unchecked.

Web: Working with Properties

The file attributes in the Web interface are similar to those in the Windows interface.

This table lists the standard properties you can expect to see in the Web interface for any file.

Table 3-6 File Properties

Attribute  Description 

Document 

The path to the file or object. 

Class Name 

The type of file or object. 

Name 

The name of the file or object.  

Description 

An optional space where the author can place a description of the file or object (may be modified). 

Owner 

A list of users to whom you can assign ownership. Displays as currently selected the user ID of the person or group who currently has ownership of the file or object (may be modified). 

ACL 

The Access Control List currently associated with the file.  

CreateDate 

Date the file was created, in the format appropriate for the language in which your Web interface is displayed. For example, U. S. English dates may be displayed as MMMM DD, YYYY, hh:mm AM/PM. For example, April 1, 2000, 11:45 AM. 

Creator 

The login person who first stored this file in Oracle iFS. 

ExpirationDate 

The date and time that the file will expire and be deleted from the Oracle iFS repository. If an expiration date has been set for the current file or folder, the expiration date is shown. If no expiration date is set, the field displays (null). 

LastModifyDate 

The date the file was last modified, in some combination of DDDD, MMMM DD, YYYY, hh:mm:ss AM/PM, depending on the language of the Web interface you are working with. For example, Sunday, April 2, 2000, 12:15:22 PM. 

LastModifier 

The login of the last person to change the file. 

Deletor 

If the file or object has been deleted, the person who last deleted the file or object. 

LockState 

A code representing whether the file is available for use, or checked out, or locked.

0 = Unlocked; anyone with the proper permissions may use the file.

1 = Locked; no modifications or deletions are allowed, but anyone with lock and update permissions can unlock it.

3 = Locked; no modifications or deletions are allowed by anyone other than the user or administrator holding the lock.

4 = Locked; no modifications or deletions may be made. The administrator may unlock it.  

Read by Owner 

Used by e-mail to show that the file has been read by the owner. 

Language 

The language used in the file. When you specify the language, you enable language-sensitive indexing and searching for this file. 

Character set 

The character set associated with the file. If you upload a file in German, for example, you should change the language to German and choose the appropriate character set. Character set attribute applies only to text-based files such as HTML, XML, .txt, and .eml, not to binary files like Word and Excel. 

Note that the number of properties displayed may vary, depending on whether any custom attributes have been defined for a custom file type.

Viewing and Editing File Properties

To view and edit file properties in the Web interface:

  1. Click the Select check box to the left of the file or folder for which you want to view properties. You can view properties on only one item at a time.

  2. Click the Edit icon and choose Properties.

  3. The Document Properties window is displayed. Attributes that can be changed will have a text box in the right column. You can change these values only.

  4. When you have finished entering your changes, click OK.

  5. Click OK to close the window.

Setting an Expiration Date

If you own a file, or if you have been granted the appropriate permissions, you can set an expiration date for the file on the File Attributes screen.

To set an expiration date:

  1. Click the Select checkbox to the left of the file or folder for which you want to set an expiration date.

  2. Click the Edit icon and choose Properties.

  3. The Document Properties window is displayed. Scroll down to view the Expiration Date field.

  4. Type the new Expiration Date.

    You can also enter the Expiration Date using the Calendar pop-up. This can be convenient when you want to have the file expire, for example, "on a Friday, two months from now," but don't know the precise date.
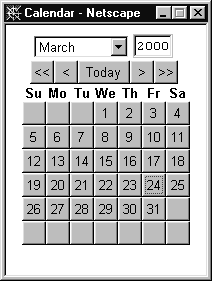
Figure 3-13 Use the Calendar pop-up to set expiration date


Prev Next
Oracle
Copyright © 2000 Oracle Corporation.

All Rights Reserved.

Library

Solution Area

Contents

Index