Release 3.0
Part Number A86707-02
Library |
Service |
Contents |
Index |
| Oracle9i Application Server Oracle Portal Configuration Guide Release 3.0 Part Number A86707-02 |
|
This chapter provides information on setting up built-in search capabilities by using interMedia Text in Oracle Portal.
This chapter contains the following sections:
As a user of Oracle Portal, you can perform a search using Oracle Portal's search capabilities. There are three levels of search provided with Oracle Portal: basic search, advanced search, and interMedia Text search.
Search is performed on item attributes such as display name, description, and keywords of items, as well as the display name and description of folders, categories, and perspectives.
Use basic search to search the current content area for items, folders, categories, and perspectives that contain specific words.
|
See also:
"Performing a Basic Search" and "Setting up the search feature" topics in the Oracle Portal Online Help content area which is installed with the Oracle Portal. |
If you have advanced search capabilities enabled in Oracle Portal, you can:
|
See also:
"Performing an Advanced Search" topic in the Oracle Portal Online Help content area which is installed with the product. |
You use Oracle8i interMedia Text to build a text query application. Oracle8i interMedia Text provides search, retrieval, and viewing capabilities for text. In addition, interMedia Text provides concept searching and theme analysis of English language documents.
To index and query, you use standard SQL with a domain index of type ctxsys.context. You can also use the supplied interMedia Text PL/SQL packages for advanced features such as document presentation and thesaurus maintenance.
If interMedia Text is installed and enabled on Oracle Portal, a basic or advanced search also tries to find the specified search words in the content of uploaded documents and the first pages of URL items.
For example, Oracle Portal searches on files such as PDF, PowerPoint, and Word as well as searches on URLs, text, and HTML.
When interMedia Text is enabled in Oracle Portal and an index is created, a user can perform a search of all uploaded items of type file, text, or URL. From the search page, you can choose any of the following ways to view the resulting search items:
|
Note:: You must be logged on as an Oracle Portal administrator to configure interMedia Text, and create, alter, update, and drop interMedia Text indexes. |
Before using interMedia Text into Oracle Portal, you must perform the following tasks:
text_enable from the init.ora file. It is no longer used in Oracle8i, and will actually prevent 8i from operating properly. The error, "cannot find package DR_REWRITE" may appear.
For the interMedia Text feature to work, the following UNIX environment variables need to be set before starting the Oracle8i database and Net8 Listener.
Korn Shell (ksh):
LD_LIBRARY_PATH=$LD_LIBRARY_PATH:$ORACLE_HOME/ctx/lib
export LD_LIBRARY_PATH
C-Shell (csh):
setenv LD_LIBRARY_PATH ${LD_LIBRARY_PATH}:${ORACLE_HOME}/ctx/lib
There are four main steps for setting up interMedia Text in Oracle Portal:
|
Note:
To obtain additional information for any Oracle Portal configuration page, click the small Help icon |
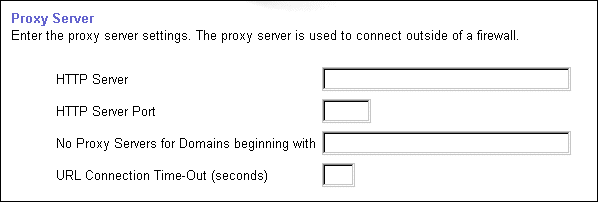
The first step requires you to configure the global page settings in the following way:

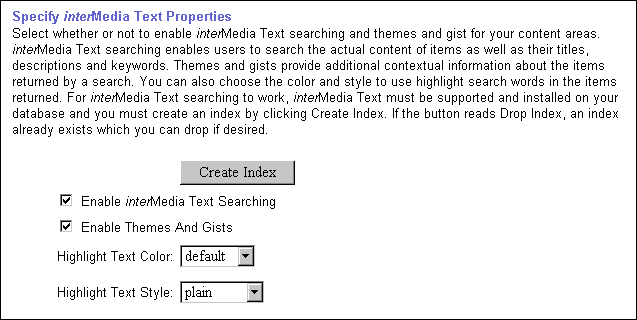
Before creating the interMedia Text indexes, you'll have to configure the interMedia Text settings in Oracle Portal in the following way:

Now that you've enabled interMedia Text, you'll need to create a new interMedia Text index.
To create an interMedia Text index:
|
Notes:
|
The following interMedia Text indexes are created:
Table 4-1 interMedia Text indexes created
interMedia Text lets you create a text index (an inverted index) on documents stored in the database. Updating an inverted index requires heavy processing, so changes to a text column are queued and processed in batch. This is referred to as synchronizing the text index.
interMedia Text gives you full control over how often each text index is synchronized. You can choose to synchronize every five seconds, for example, if it is important for your application to reflect text changes quickly in the index. Or, you can choose to synchronize once a day, for more efficient use of computing resources and a more optimal index.
After creating your interMedia Text index, you'll need to consider a strategy for maintaining the index. For example, if you have many inserts, updates, or deletes (DML) throughout the day, consider synchronizing the interMedia Text index on a daily basis.
The following example, assumes that you've installed ctx_schedule.
exec ctx_schedule.startup ( 'ex1_index', 'SYNC', 1 ) ;
exec ctx_schedule.startup ( 'ex1_index', 'OPTIMIZE FAST', 120 ) ;
In this example, the index ex1_index is synchronized every minute, and optimized every two (2) hours. This is true even if the database is shutdown and restarted.
exec ctx_schedule.stop ( 'ex1_index' ) ;
exec ctx_schedule.stop ( 'ex1_index', 'OPTIMIZE FAST' ) ;
ctx_schedule.stop assumes that the operation to be stopped is 'SYNC', unless you specify otherwise.
|
Note: If you want new text to be searched immediately (every five seconds), consider using the drbgdml.sql script located in:
|
|
See also:
For interMedia Text technical papers, training materials, code samples, and so on, visit:
|
Index maintenance is necessary after your application inserts, updates, or deletes documents in your base table. If your base table is static, that is, you do no updating, inserting or deleting of documents after your initial index, you do not need to update your index.
However, if you perform DML (inserts, updates, or deletes) on your base table, you must update your index. You can synchronize your index manually with ALTER INDEX. You can also run the Context Server in the background which synchronizes the index automatically at regular intervals. See "Starting the Context Server" for more information.
To update your index, enter the following command:
ALTER INDEX [schema.]index REBUILD [online] [parameters (paramstring)] ('SYNC');
where
[online]
Optionally specify the online parameter for non-blocking operation, which allows the index to be queried during an ALTER INDEX synchronize or optimize operation. You cannot specify online for replace, resume, or when adding stopwords or stop sections.
PARAMETERS (paramstring)
Optionally specify paramstring. If you do not specify paramstring, Oracle rebuilds the index with existing preference settings.
The syntax for paramstring is as follows:
paramstring = 'replace [datastore datastore_pref]
                       [filter filter_pref]
                       [lexer lexer_pref]
                       [wordlist wordlist_pref]
                       [storage storage_pref]
                       [stoplist stoplist]
                       [section group section_group]
                          [memory memsize]

           |    resume [memory memsize]
           |    optimize [fast | full [maxtime (time | unlimited)]
           |    sync [memory memsize]
           |    add stopword word
           |    add zone section section_name tag tag
           |    add field section section_name tag tag [(VISIBLE | INVISIBLE)]
           |    add attr section section_name tag tag@attr
           |    add stop section tag'
In situations where you know that a significant amount of new content has been added to your content area, you might consider dropping and recreating your indexes. This of course is a very time-consuming and resource-intensive operation, so you would want to plan this task during non-business hours.
You can drop interMedia Text indexes in the following ways:
The interMedia Text index is dropped from the server.
|
Notes:
|
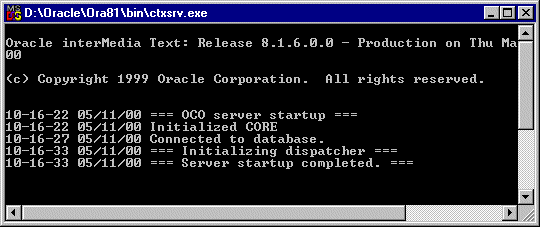
As an alternative to the ALTER INDEX command, you can also run the Context Server (ctxsrv) in the background which synchronizes the index automatically at regular intervals to update your index.
|
IMPORTANT: Every time you restart your machine, you will have to restart the Context Server in the following way. |
To create a bat file to start the Context Server:
On UNIX, open an editor such as the "vi" editor.
ctxsrv -user ctxsys/ctxsys
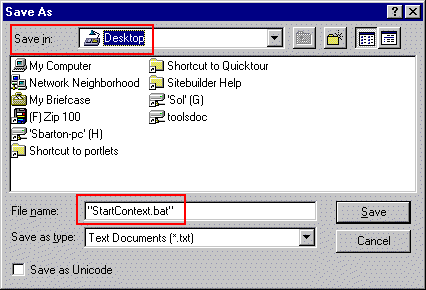
"StartContext.bat" as the filename (include the double-quotes in the filename). Save the file onto your Desktop (Save In field).


|
Note: If you are running Oracle8i Release 8.1.7, you can ignore this section as the database does not use external procedures to perform document filtering. |
For Oracle8i Release 8.1.6.2, you must configure the listener.ora and tnsnames.ora files in your Oracle8i Home directory to support these external procedures. The listener.ora and tnsnames.ora files on your computer should look similar to the following examples:
The following lines define a complete listener definition in your listener.ora file.
LISTENER =
   (DESCRIPTION_LIST =
   (DESCRIPTION =
   (ADDRESS_LIST =
   (ADDRESS = (PROTOCOL = IPC) (KEY = EXTPROC0))
                    )
   (ADDRESS_LIST =
   (ADDRESS = (PROTOCOL = TCP) (HOST = oracle) (PORT=1521))
If you want to add a system identifier (SID) name of PLSExtProc and a program name of EXTPROC in the server's listener.ora file, you can insert the following in the SID_LIST_LISTENER definition:
SID_LIST_LISTENER = (SID_LIST = (SID_DESC = ... (SID_DESC = (SID_NAME=PLSExtProc)(ORACLE_HOME=/oracle/db/dev118) (PROGRAM=extproc)
Add the following lines to the end of your tnsnames.ora file, to add a net service name description entry for EXTPROC0 in the server's tnsnames.ora file, using SID rather than SERVICE_NAME in the CONNECT_DATA section. For example:
          extproc_connection_data =
             (DESCRIPTION=
                (ADDRESS_LIST =
                   (ADDRESS=(PROTOCOL=IPC)(KEY=EXTPROC0))
                )
                (CONNECT_DATA=
                   (SID=PLSExtProc)
                   (PRESENTATION = RO)
                )
             )
Oracle8i (8.1.6 and above) provides multilexer which allows you to use language-specific features on documents of different languages stored in the same table. Multilexer is a feature of the index and is configured during index creation. Multilexer requires an extra column in your table, which identifies the language of each document.
At query time, the multilexer chooses a language-specific lexer to lex the query tokens. This is based on the NLS_LANG setting for the query session. Thus, a query session in the FRENCH language will use the lexer for FRENCH.
During installation of Oracle Portal, the sbrimtlx.sql script is run to create the language-specific lexer preferences and to gather them together under a single multilexer preference. The Oracle Portal installation creates the following procedures in the ctxsys schema.
where <n> is the user_id of the Oracle Portal schema which may be different for each database. This value is the user_id column value from all_users.
|
|
 Copyright © 2000 Oracle Corporation. All Rights Reserved. |
|