Release 2 (9.0.3)
Part Number B10063-01
Core |
Platform |
Contents |
Index |
| Oracle9iAS TopLink Mapping Workbench Reference Guide Release 2 (9.0.3) Part Number B10063-01 |
|
Relational mappings define how persistent objects reference other persistent objects. TopLink provides the following relationship mappings:
TopLink also provides object-relational relationship mappings (see Chapter 5, "Understanding Direct Mappings" and Chapter 7, "Understanding Object Relational Mappings").
All TopLink relationship mappings are uni-directional, from the class being described (the source class) to the class with which it is associated (the target class). The target class does not have a reference to the source class in a uni-directional relationship.
To implement a bi-directional relationship (classes that reference each other) use two unidirectional mappings with the sources and targets reversed.
Persistent objects use relationship mappings to store references to instances of other persistent classes. The appropriate mapping class is chosen primarily by the cardinality of the relationship.
In TopLink, object relationships can be either private or independent.
Aggregate object mappings are private by default, since the target object shares the same row as the source object. One-to-one, one-to-many, and many-to-many mappings can be independent or private, depending upon the application. Normally, many-to-many mappings are independent by definition; however, because a many-to-many mapping can be used to implement a logical one-to-many without requiring a back reference in the target to the source, TopLink allows many-to-many mappings to be private as well as independent.
TopLink uses references to maintain foreign key information. TopLink defines the reference as a property of the table containing the foreign key. This may or may not correspond to an actual constraint that exists on the database.
If you import tables from the database, TopLink creates references that correspond to existing database constraints (if the driver supports this). You can also define any number of references in the Mapping Workbench without creating similar constraints on the database.
TopLink uses these references when defining relationship mappings and descriptors' multiple table associations.
A foreign key is a combination of columns that reference a unique key, usually the primary key, in another table. Foreign keys can be any number of fields (similar to primary key), all of which are treated as a unit. A foreign key and the parent key it references must have the same number and type of fields.
Relationship mappings use foreign keys to find information in the database so that the target object(s) can be instantiated. For example, if every Employee has an attribute address that contains an instance of Address (which has its own descriptor and table), the one-to-one mapping for the address attribute would specify foreign key information to find an address for a particular Employee.
TopLink classifies foreign keys into two categories in mappings -- foreign keys and target foreign keys:
ADDRESS would be in the EMPLOYEE table.
ADDRESS table would have a foreign key to EMPLOYEE.
If you import tables from the database, TopLink creates references that correspond to existing database constraints (if supported by the driver). You can also define references in TopLink without creating similar constraints on the database.
To display existing references for a table, use the References tab. References that contain the On Database option will create a constraint that corresponds to the references.
Use the Source Field and Target Field drop-down lists to select the appropriate fields on the source and target tables.
Repeat step 4 for each foreign key field.
A container policy specifies the concrete class TopLink should use when reading target objects from the database. You can specify a container policy for collection mappings (DirectCollectionMapping, OneToManyMapping, and ManyToManyMapping) and for read-all queries (ReadAllQuery).
Starting with JDK 1.2 the collection mappings can use any concrete class that implements either the java.util.Collection interface or the java.util.Map interface.
When using TopLink with JDK 1.2 (or later), you can map object attributes declared as Collection or Map, or any sub-interface of these two interfaces, or as a class that implements one of these two interfaces. You must specify in the mapping the concrete container class to be used. When TopLink reads objects from the database that contain an attribute mapped with a collection mapping, the attribute is set with an instance of the concrete class specified. By default, a collection mapping's container class is java.util.Vector.
Read-all queries also require a container policy to specify how the result objects are to be returned. The default container is java.util.Vector.
Container policies cannot be used to specify a custom container class when using indirect containers.
For collection mappings, you can specify the container class in the Mapping Workbench (see "Working with Direct Collection Mappings").
To set the container policy without using the Mapping Workbench, the following API is available for both CollectionMapping and ReadAllQuery:
useCollectionClass(Class) - Specifies the concrete Collection class to use as a container for the objects in the collection. In JDK 1.2, the class must implement the java.util.Collection interface.
useMapClass(Class, String) - Specifies the concrete Map class to use as a container for the objects in the collection. In JDK 1.2 the class must implement the java.util.Map interface.
Also specified is the name of the zero argument method whose result, when called on the target object, is used as the key in the Hashtable or Map. This method must return an object that is a valid key in the Hashtable or Map.
Using indirection objects may improve the performance of TopLink object relationships. An indirection object takes the place of an application object so that the application object is not read from the database until it is needed.
Without indirection, when TopLink retrieves a persistent object, it also retrieves all the objects referenced by that object. This may result in lower performance for some applications. Using indirection allows TopLink to create "stand-ins" for related objects, resulting in significant performance improvements, especially when the application is only interested in the contents of the retrieved object rather than the objects to which it is related.
Indirection is available for transformation mappings and for direct collection, one-to-one, one-to-many, and many-to-many relationship mappings.
You can enable or disable indirection for each mapping individually. By default, indirection is enabled for relationship mappings and disabled for transformation mappings. Indirection should only be enabled for transformation mappings if the execution of the transformation method is a resource-intensive task, such as accessing the database.
In addition to this standard version of indirection, collection mappings (direct collection, one-to-many, and many-to-many) can use indirect containers.
Persistent classes that use indirection must replace relationship attributes with value holder attributes. A value holder is an instance of a class that implements the ValueHolderInterface interface, such as ValueHolder. This object stores the information necessary to retrieve the object it is replacing from the database. If the application does not access the value holder, the replaced object is never read from the database.
When using method access, the get and set methods specified for the mapping must access an instance of ValueHolderInterface rather than the object referenced by the value holder.
To obtain the object that the value holder replaces, use the getValue() and setValue() methods of the ValueHolderInterface class. A convenient way of using these methods is to hide the getValue and setValue methods of the ValueHolderInterface inside get and set methods, as in the following example.
The following figure illustrates the Employee object being read from the database. The Address object is not read and will not be created unless it is accessed.
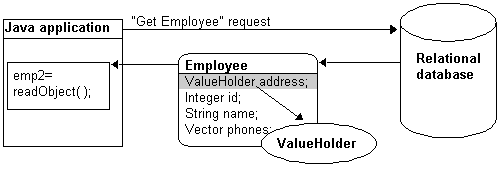
The first time the address is accessed, as in the following figure, the ValueHolder reads and returns the Address object.

Subsequent requests for the address do not access the database, as shown in the following figure.
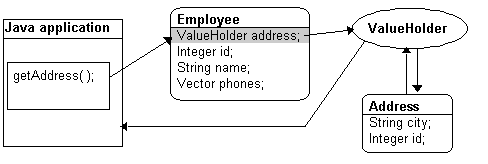
Use this procedure to specify that a mapping uses indirection.
The window appears in the Properties pane.
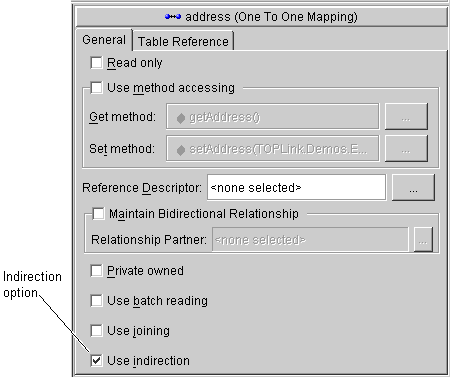
Attributes using indirection must conform to the ValueHolderInterface. You can change your attribute types in the Class Editor without re-importing your Java classes. Ensure that you change the attribute types in your Java code as well. Attributes that are typed incorrectly will be marked as deficient.
In addition to changing the attribute's type, you may also need to change its accessor methods. If you use method access, TopLink requires accessors to the indirection object itself, so your get method returns an instance that conforms to ValueHolderInterface and your set method accepts one argument that conforms to the same. If the instance variable returns a Vector instead of an object then the value holder should be defined in the constructor as follows:
In any case, the application uses the getAddress() and setAddress() methods to access the Address object. With indirection, TopLink uses the getAddressHolder() and setAddressHolder() methods when saving and retrieving instances to and from the database.
Refer to the TopLink: Foundation Library Guide for details.
The following code illustrates the Employee class using indirection with method access for a one-to-one mapping to Address.
The class definition is modified so that the address attribute of Employee is a ValueHolderInterface instead of an Address and appropriate get and set methods are supplied.
// Initialize ValueHolders in Employee Constructor
public Employee() {
address = new ValueHolder();
}
protected ValueHolderInterface address;

// 'Get' and `Set' accessor methods registered with the mapping and used by
Oracle 9iAS TopLink.
public ValueHolderInterface getAddressHolder() {
return address;
}
public void setAddressHolder(ValueHolderInterface holder) {
address = holder;
}

// `Get' and `Set' accessor methods used by the application to access the
attribute.
public Address getAddress() {
return (Address) address.getValue();
}
public void setAddress(Address theAddress) {
address.setValue(theAddress);
}
Transparent indirection allows you to declare any relationship attribute of a persistent class that holds a collection of related objects as a java.util.Collection, java.util.Map, java.util.Vector, or java.util.Hastable. TopLink will use an indirection object that implements the appropriate interface and also performs "just in time" reading of the related objects. When using transparent indirection, you do not have to declare the attributes as ValueHolderInterface.
You can specify transparent indirection from the Mapping Workbench. Newly created collection mappings use transparent indirection by default, if their attribute is not a ValueHolderInterface.
Use this procedure to use transparent indirection.
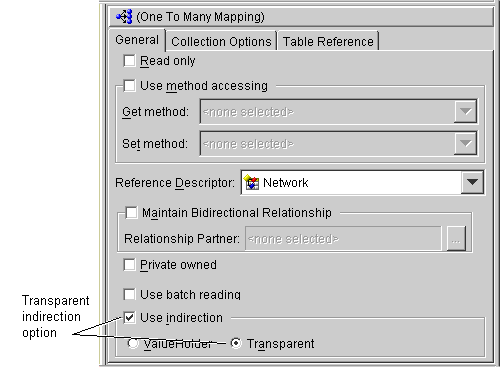
Introduced in JDK 1.3, the Java class Proxy allows you to use dynamic proxy objects as stand-ins for a defined interface. Certain TopLink mappings (OneToOneMapping, VariableOneToOneMapping, ReferenceMapping, and TransformationMapping) can be configured to use proxy indirection which gives you the benefits of TopLink indirection without the need to include TopLink classes in your domain model. Basically, proxy indirection is to one-to-one relationship mappings as indirect containers are to collection mappings.
Although the Mapping Workbench does not support proxy indirection, you can use the useProxyIndirection method in an amendment method.
To use proxy indirection, your domain model must satisfy the following criteria:
get() and set() methods must use the interface
The following code illustrates an Employee->Address one-to-one relationship.
public interface Employee {

   public String getName();
   public Address getAddress();
   public void setName(String value);
   public void setAddress(Address value);
   . . .

}
public class EmployeeImpl implements Employee {

   public String name;
   public Address address;
   . . .
   public Address getAddress() {

      return this.address;

   }
   public void setAddress(Address value) {

      this.address = value;

   }

}
public interface Address {

   public String getStreet();
   public void setStreet(String value);
   . . .

}
public class AddressImpl implements Address {

   public String street;
   . . .

}
In this example, both the EmployeeImpl and the AddressImpl classes implement public interfaces (Employee and Address respectively). Therefore, because the AddressImpl is the target of the one-to-one relationship, it is the only class that must implement an interface. However, if the EmployeeImpl is ever to be the target of another one-to-one relationship using transparent indirection, it must also implement an interface.
The following code illustrates this relationship using proxy indirection.
Employee emp = (Employee) session.readObject(Employee.class);
System.out.println(emp.toString());
System.out.println(emp.getAddress().toString());
// Would print:
[Employee] John Smith
{ IndirectProxy: not instantiated }
String street = emp.getAddress().getStreet();
// Triggers database read to get Address information
System.out.println(emp.toString());
System.out.println(emp.getAddress().toString());
// Would print:
[Employee] John Smith
{ [Address] 123 Main St. }
Using proxy indirection does not change how you instantiate your own domain objects for insert. You still use the following code:
Employee emp = new EmployeeImpl("John Smith");Address add = new AddressImpl("123 Main St.");emp.setAddress(add);
To enable proxy indirection in Java code, use the following API for ObjectReferenceMapping:
useProxyIndirection() - indicates that TopLink should use proxy indirection for this mapping. When the source object is read from the database, a proxy for the target object is created and used in place of the "real" target object. When any method other than g-string() is called on the proxy, the "real" data will be read from the database.
The following code example illustrates using proxy indirection.
// Define the 1:1 mapping, and specify that Proxy Indirection should be used
OneToOneMapping addressMapping = new OneToOneMapping();
addressMapping.setAttributeName("address");
addressMapping.setReferenceClass(AddressImpl.class);
addressMapping.setForeignKeyFieldName("ADDRESS_ID");
addressMapping.setSetMethodName("setAddress");
addressMapping.setGetMethodName("getAddress");
addressMapping.useProxyIndirection();
descriptor.addMapping(addressMapping);
. . .
You can configure query optimization on any relationship mappings. The optimization requires fewer database calls to read a set of objects from the database. Query optimization can be configured on a descriptor's mappings to affect all queries for that class. This can result in a significant system performance gain without changing any application code. Queries can also be optimized on a per-query basis. For more information, see the TopLink: Foundation Library Guide.
TopLink provides two query optimization features on mappings: joining and batch reading.
The following code example illustrates using joining for query optimization.
// Queries for Employee are configured to always join Address
OneToOneMapping addressMapping = new OneToOneMapping();
addressMapping.setReferenceClass(Address.class);
addressMapping.setAttributeName("address");
addressMapping.useJoining();
addressMapping.privateOwnedRelationship();
The following code example illustrates using batch for query optimization.
// Queries on Employee are configured to always batch read Address
OneToManyMapping phoneNumbersMapping = new OneToManyMapping();
phoneNumbersMapping.setReferenceClass("

PhoneNumber.class")
phoneNumbersMapping.setAttributeName("phones");
phoneNumbersMapping.useBatchReading();
phoneNumbersMapping.privateOwnedRelationship();
Two objects are related by aggregation if there is a strict one-to-one relationship between the objects and all the attributes of the second object can be retrieved from the same table(s) as the owning object. This means that if the source (parent) object exists, then the target (child or owned) object must also exist, as illustrated in Figure 6-6.
Aggregate objects are privately owned and should not be shared or referenced by other objects.
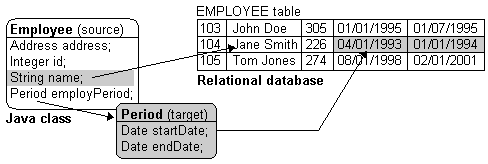
EMPLOYEE table so that the START_DATE and END_DATE fields are available during mapping.
Employee class has an attribute called employPeriod that would be mapped as an aggregate object mapping with Period as the reference class. The source class must ensure that its table has fields that correspond to the field names registered with the target class.
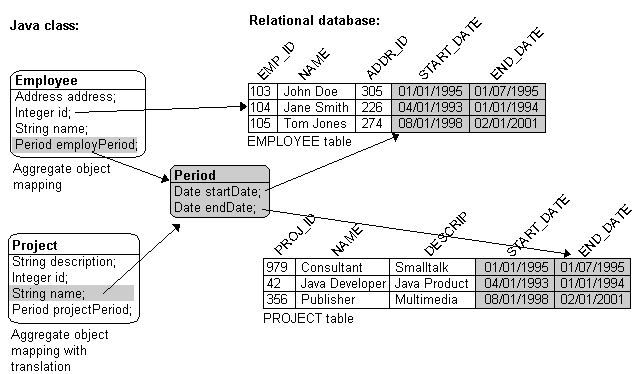
Target objects can also have multiple sources, hence the need to choose a candidate table during its mapping. This allows different source types to store the same target information within their tables. Each source class must have table fields that correspond to the field names registered with the target class. If one of the source tables has different field names than the names registered with the target class, the source class must translate the field names.
In Figure 6-7:
Period class has a direct-to-field mapping between startDate and START_DATE.
Employee class can use the Period class as a normal aggregate to write to its START_DATE column.
PROJECT table does not have a field called START_DATE, so the Project descriptor must provide a field translation on its aggregate object mapping from START_DATE to S_DATE. (If the PROJECT table had a START_DATE column, this field translation would be unnecessary.)
Aggregate target classes that are not shared among multiple source classes can have any type of mapping, including other aggregate object mappings.
Aggregate target classes that are shared with multiple source classes cannot have one-to-many or many-to-many mappings.
Other classes cannot reference the aggregate target with one-to-one, one-to-many, or many-to-many mappings. If the aggregate target has a one-to-many relationship with another class, the other class must provide a one-to-one relationship back to the aggregate's parent class instead of the aggregate child. This is because the source class contains the table and primary key information of the aggregate.
Aggregate descriptors can make use of inheritance. The subclasses must also be declared as aggregate and be contained in the source's table. For more information on inheritance, see "Working with Inheritance".
Use this procedure to create a target descriptor to use with an aggregate mapping. You must configure the target before specifying field translations in the parent descriptor.
 .
.
You can also create the target descriptor by selecting Selected > Aggregate from the menu or by clicking the Aggregate Descriptor button
 .
.
Use this procedure to create an aggregate object mapping. You must also create a target descriptor to use with the aggregate mapping.
 from the mapping toolbar.
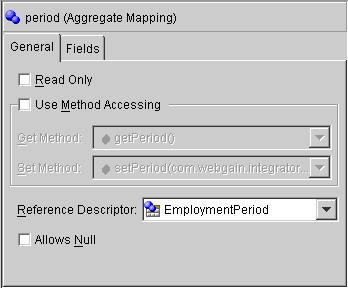
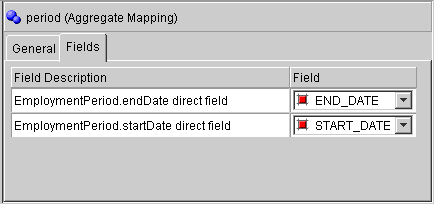
The Aggregate mapping window appears in the Properties pane.
One-to-one mappings represent simple pointer references between two Java objects. In Java, a single pointer stored in an attribute represents the mapping between the source and target objects. Relational database tables implement these mappings using foreign keys.
Figure 6-10 illustrates a one-to-one relationship from the address attribute of an Employee object to an Address object. To store this relationship in the database, create a one-to-one mapping between the address attribute and the Address class. This mapping stores the id of the Address instance in the EMPLOYEE table when the Employee instance is written. It also links the Employee instance to the Address instance when the Employee is read from the database. Since an Address does not have any references to the Employee, it does not have to provide a mapping to Employee.
For one-to-one mappings, the source table normally contains a foreign key reference to a record in the target table. In Figure 6-10, the ADDR_ID field of the EMPLOYEE table is a foreign key.
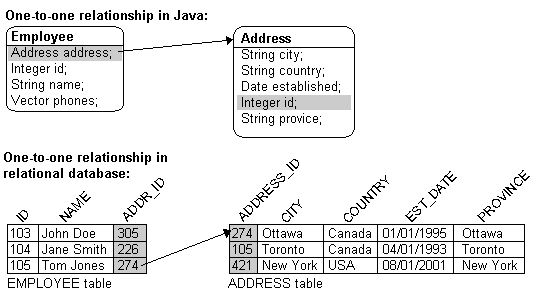
You can also implement a one-to-one mapping where the target table contains a foreign key reference to the source table. In the example, the database design would change such that the ADDRESS row would contain the EMP_ID to identify the Employee to which it belonged. In this case, the target must also have a relationship mapping to the source.
The update, insert and delete operations for privately owned one-to-one relationships, which are normally done for the target before the source, are performed in the opposite order when the target owns the foreign key. Target foreign keys normally occur in bidirectional one-to-one mappings, as one side has a foreign key and the other shares the same foreign key in the other's table.
Target foreign keys can also occur when large cascaded composite primary keys exist (that is, one object's primary key is composed of the primary key of many other objects). In this case it is possible to have a one-to-one mapping that contains both foreign keys and target foreign keys.
In a foreign key, TopLink automatically updates the foreign key value in the object's row. In a target foreign key, it does not. In TopLink, the Target Foreign Key checkbox includes a checkmark when a target foreign key relationship is defined.
When mapping a relationship, it is important to understand these differences between a foreign key and a target foreign key, to ensure that the relationship is defined correctly.
In a bi-directional relationship where the two classes in the relationship reference each other, only one of the mappings should have a foreign key. The other mapping should have a target foreign key. If one of the mappings in a bi-directional relationship is a one-to-many mapping, see "Working with Variable One-to-one Mappings" for details.
Use this procedure to create a one-to-one mapping.
 from the mapping toolbar.
The One-to-one mapping window appears in the Properties pane.
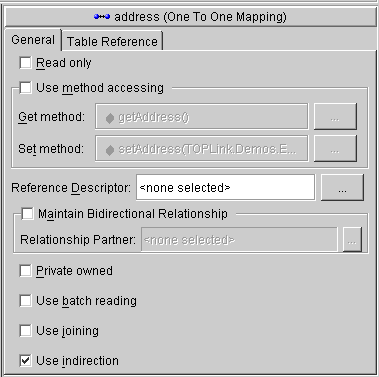
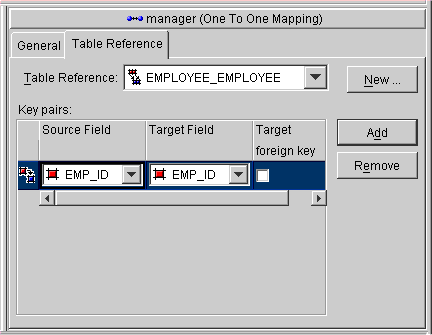
One-to-one target objects mapped as Privately Owned are, by default, verified before deletion or update outside of a unit of work.
Verification is a check for the previous value of the target and is accomplished through joining the source and target tables. Inside a unit of work, verification is accomplished by obtaining the previous value from the back-up clone, so this setting is not used because a database read is not required. You may wish to disable verification outside of a unit of work for performance reasons and can do so by sending the setShouldVerifyDelete() message to the mapping in an amendment method written for the descriptor as follows:
public static void addToDescriptor(Descriptor descriptor){
//Find the one-to-one mapping for the address attribute
OneToOneMapping addressMapping=(OneToOneMapping)
descriptor.getMappingForAttributeName("address");
addressMapping.setShouldVerifyDelete(false);
}
Variable class relationships are similar to polymorphic relationships except that in this case the target classes are not related via inheritance (and thus not good candidates for an abstract table) but via an interface.
To define variable class relationships in TopLink Mapping Workbench, use the variable one-to-one mapping selection but choose the interface as the reference class. This makes the mapping a variable one-to-one. When defining mappings in Java code, use the VariableOneToOneMapping class.
TopLink only supports variable relationship in one to one mappings. It handles this relationship in two ways:
Through the class indicator field, a source table has an indicator column that specifies the target table, as illustrated in the following illustration. The EMPLOYEE table has a TYPE column that indicates the target for the row (either PHONE or EMAIL).
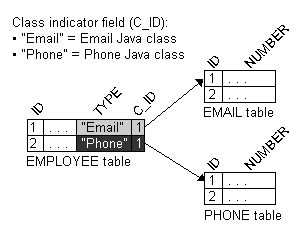
The principles of defining such a variable class relationship are similar to defining a normal one-to-one relationship, except:
As shown in Figure 6-14, the value of the foreign key in the source table mapped to the primary key of the target table is unique. No primary key values among the target tables are the same, so primary key values are not unique just in the table, but also among the tables.
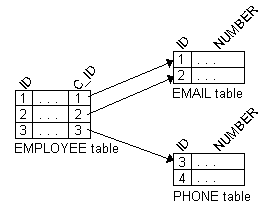
Because there is no indicator stored in the source table, TopLink can not determine to which target table the foreign key value is mapped. Therefore, TopLink reads through all the target tables until it finds an entry in one of the target tables. This is an inefficient way of setting up a relation model, because reading is very expensive. The class indicator is much more efficient and it reduces the number of reads done on the tables to get the data. In the class indicator method, TopLink knows exactly which target table to look into for the data.
The principles of defining such a variable class relationship is similar to defining class indicator variable one-to-one relationships, except:
The type indicator field and its values are not needed, as TopLink will go through all the target tables until data is finally found.
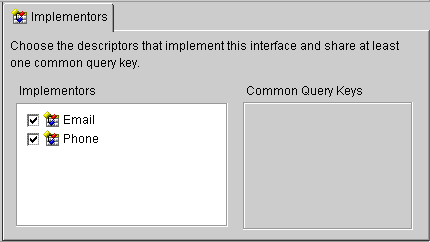
Use this procedure to create a variable one-to-one mapping. You must configure the target descriptor before defining the mapping.
 on the mapping toolbar.
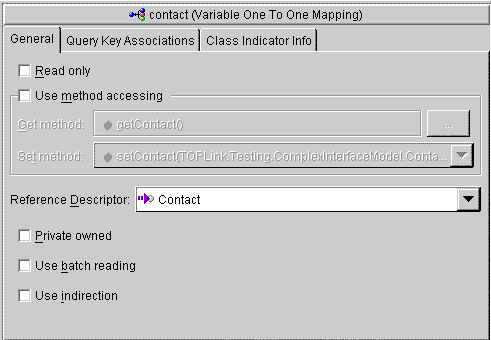
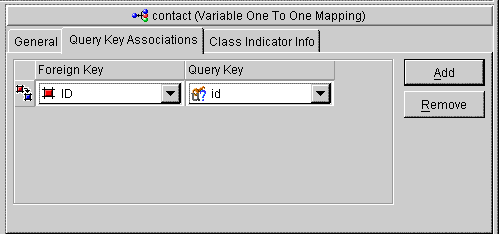
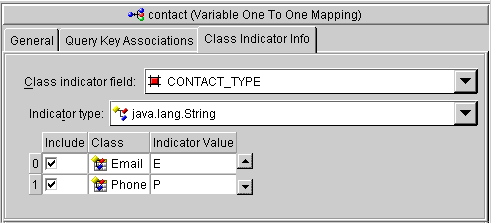
|
Note: If the class does not appear in the Class Information table, you must add the class in the interface descriptor. See "Implementing an Interface" for more information. |
Direct collection mappings store collections of Java objects that are not TopLink-enabled. The object type stored in the direct collection is typically a Java type such as String.
It is also possible to use direct collection mappings to map a collection of non-String objects. For example, it is possible to have an attribute that contains a collection of Integer or Date instances. The instances stored in the collection can be any type supported by the database and has a corresponding wrapper class in Java.
Support for primitive data types such as int is not provided since Java vectors only hold objects.
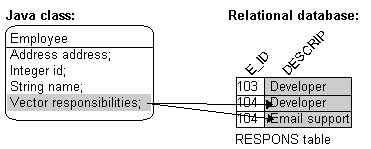
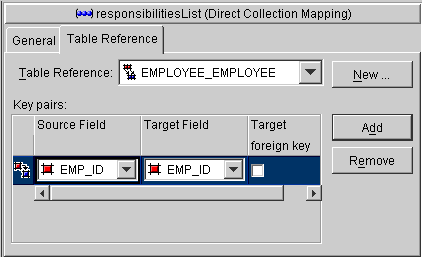
Figure 6-19 illustrates how a direct collection is stored in a separate table with two fields. The first field is the reference key field, which contains a reference to the primary key of the instance owning the collection. The second field contains an object in the collection and is called the direct field. There is one record in the table for each object in the collection.
|
Note:
The "responsibilities" attribute is a |
Maps are not supported for direct collection as there is no key value.
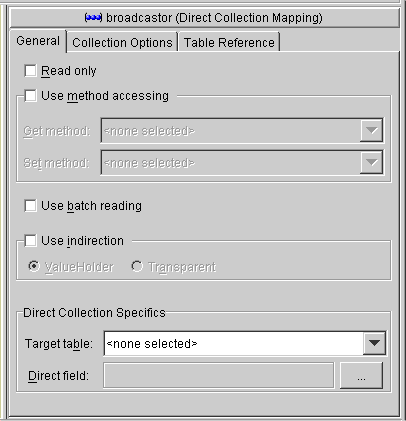
Use this procedure to create a direct collection mapping.
 on the mapping toolbar.
Aggregate collection mappings are used to represent the aggregate relationship between a single-source object and a collection of target objects. Unlike the TopLink one-to-many mappings, in which there should be a one-to-one back reference mapping from the target objects to the source object, there is no back reference required for the aggregate collection mappings because the foreign key relationship is resolved by the aggregation.
|
Caution: Aggregate collections are not directly supported in the Mapping Workbench. You must use an amendment method (see "Amending Descriptors After Loading") or manually edit the project source to add the mapping. |
To implement an aggregate collection mapping:
Aggregate collection descriptors can use inheritance. The subclasses must also be declared as aggregate collection. The subclasses can have their own mapped tables, or share the table with their parent class. For more information on inheritance, see "Working with Inheritance".
In a Java Vector, the owner references its parts. In a relational database, the parts reference their owners. Relational databases use this implementation to make querying more efficient.
One-to-many mappings are used to represent the relationship between a single source object and a collection of target objects. They are a good example of something that is simple to implement in Java using a Vector (or other collection types) of target objects, but difficult to implement using relational databases.
In a Java Vector, the owner references its parts. In a relational database, the parts reference their owner. Relational databases use this implementation to make querying more efficient.
|
Note: See "Working with a Container Policy" for information on using collection classes other than Vector with one-to-many mappings. |
The purpose of creating this one-to-one mapping in the target is so that the foreign key information can be written when the target object is saved. Alternatives to the one-to-one mapping back reference include:
One-to-many mappings must put the foreign key in the target table, rather than the source table. The target class should also implement a one-to-one mapping back to the source object, as illustrated in the following figure.
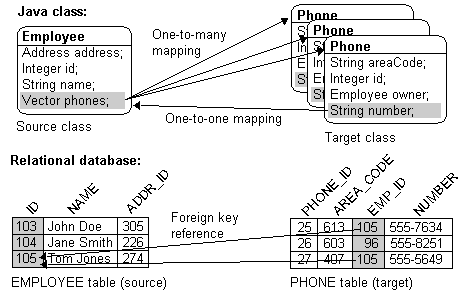
Use this procedure to create a one-to-many mapping in the Mapping Workbench.
 on the mapping toolbar.

Many-to-many mappings represent the relationships between a collection of source objects and a collection of target objects. They require the creation of an intermediate table for managing the associations between the source and target records. Figure 6-24 and Figure 6-24 illustrate a many-to-many mapping in Java and in relational database tables.
Many-to-many mappings are implemented using a relation table. This table contains columns for the primary keys of the source and target tables. Composite primary keys require a column for each field of the composite key. The intermediate table must be created in the database before using the many-to-many mapping.
The target class does not have to implement any behavior for the many-to-many mappings. If the target class also creates a many-to-many mapping back to its source, it can use the same relation table, but one of the mappings must be set to read-only. If both mappings write to the table they can cause collisions.
|
Note: See "Working with a Container Policy" for information on using collection classes other than Vector with one-to-many mappings. |
Indirection is enabled by default in a many-to-many mapping, which requires that the attribute have the ValueHolderInterface type or transparent collections.
The following figures illustrate a many-to-many relationship in both Java and a relational database.
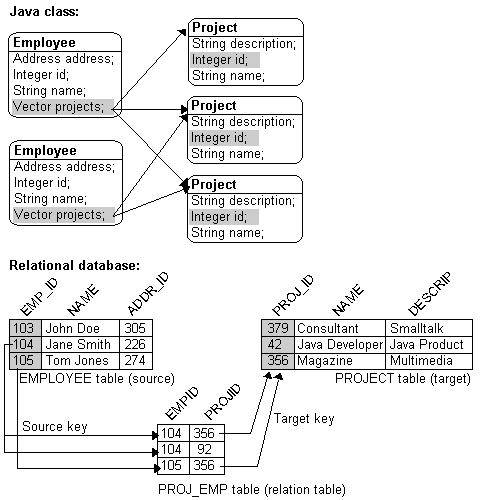
Use this procedure to create a many-to-many mapping.
 in the mapping toolbar.
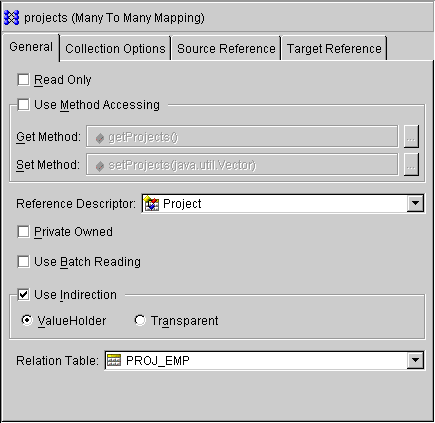
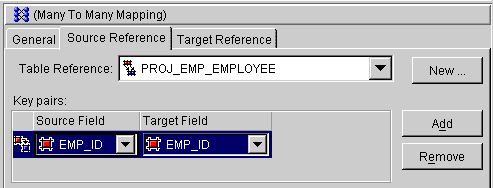
TopLink can populate a collection in ascending or descending order upon your specification. To do this, specify and write an amendment method, sending the addAscendingOrdering() or addDescendingOrdering() to the many-to-many mapping. Both messages expect a string as a parameter, which indicates what attribute from the target object is used for the ordering. This string can be an attribute name or query key from the target's descriptor. Query keys are automatically created for and with the same name as all attributes mapped as direct-to-field, type conversion, object type, and serialized object mappings.
The following code example illustrates returning an Employee's projects in ascending order according to their descriptions
public static void addToDescriptor(Descriptor descriptor)
{
//Find the Many-to-Many mapping for the projects attribute
ManyToManyMapping projectsMapping=(ManyToManyMapping)
descriptor.getMappingForAttributeName("projects");
projectsMapping.addAscendingOrdering("description");
}
Just as a descriptor's query manager generates the default SQL code that is used for database interaction, relationship mappings also generate query information.
Like the queries used by a descriptor's query manager, queries associated with relationship mappings can be customized using SQL strings or query objects. Refer to "Specifying Queries" for more information on customizing queries and the syntax that TopLink supports.
To customize the way a relationship mapping generates SQL:
setSelectionCriteria(), setSelectionSQLString(), and setCustomSelectionQuery() methods of the mapping to customize the selection criteria.
setInsertSQLString() or setCustomInsertQuery() methods of the mapping to customize the insertion criteria.
setDeleteAllSQLString() and setCustomDeleteAllQuery() methods of the mapping to customize the deletion criteria.
setDeleteSQLString() and setCustomDeleteQuery() methods of the mapping to customize the deletion criteria.
A query object that specifies the search criteria must be passed to each of these methods. Because search criteria for these operations usually depend on variables at runtime, the query object must usually be created from a parameterized expression, SQL string, or stored procedure call.
See TopLink: Foundation Library Guide for more information on defining parameterized queries and stored procedure calls.
The following example illustrates selection customization with a parameterized expression using setSelectionCriteria() and deletion customization using setDeleteAllSQLString(). Because the descriptor is passed as the parameter to this amendment method, which has been specified to be called after the descriptor is loaded in the project, we must locate each mapping for which we wish to define a custom query.
The following code illustrates adding a custom query to two different mappings in the Employee descriptor.
// Amendment method in Employee class
public static void addToDescriptor(Descriptor descriptor)
{

//Find the one-to-one mapping for the address attribute
OneToOneMapping addressMapping=(OneToOneMapping)
descriptor.getMappingForAttributeName("homeaddress");

//Create a parameterized Expression and register it as the default selection
criterion for the mapping.
ExpressionBuilder builder = new ExpressionBuilder();
addressMapping.setSelectionCriteria(builder.getField("ADDRESS.ADDRESS_
ID").equal(builder.getParameter("EMP.ADDRESS_
ID")).and(builder.getField("ADDRESS.TYPE").equal("home")));

// Get the direct collection mapping for responsibilitiesList.
DirectCollectionMapping directCollection=(DirectCollectionMapping)
descriptor.getMappingForAttributeName("responsibilitiesList");
directCollection.setDeleteAllSQLString("DELETE FROM RESPONS WHERE EMP_ID = #EMP_
ID");
}
|
|
 Copyright © 2002 Oracle Corporation. All Rights Reserved. |
|