Release 2 (9.0.3)
Part Number B10063-01
Core |
Platform |
Contents |
Index |
| Oracle9iAS TopLink Mapping Workbench Reference Guide Release 2 (9.0.3) Part Number B10063-01 |
|
TopLink uses descriptors to store the information that describes how an instance of a particular class can be represented in a relational database. Most descriptor information can be defined by the Mapping Workbench and read from a project file to be registered with a TopLink Mapping Workbench session.
For complete information on the Oracle9iAS TopLink API, refer to the online API guide installed in the default TopLink directory.
A descriptor stores all of the information describing how an instance of a particular class can be represented in a relational database. The Mapping Workbench reads a project .mwp file to load all of a project's information (including descriptor information).
You may need to amend a descriptor (for example, to specify a property not supported by the Mapping Workbench) after reading a project file (see "Amending Descriptors After Loading"). However, do not modify any descriptors after registering them with the session.
TopLink descriptors contain the following information:
Any class that registers a descriptor with a TopLink Mapping Workbench database session is called a persistent class. TopLink does not require that persistent classes provide public accessor methods for any private or protected attributes stored in the database.
See Appendix A, "Object Model Requirements" for more information on persistent classes object model requirements.
TopLink descriptors can be a class descriptor, an aggregate descriptor, or an EJB descriptor. After creating a descriptor, use this procedure to change the descriptor type.
 , Aggregate
 , or EJB
 ) in the mapping toolbar.
You can also specify descriptor type by choosing the descriptor and selecting Selected > Descriptor Type > specific descriptor type from the menu or by right-clicking on the descriptor in the Project Tree pane and selecting Descriptor Type > specific descriptor type from the pop-up menu.
|
Note: EJB 2.0 descriptors are created only by reading the ejb-jar.xml file. See "Mapping EJB 2.0 Entities" for more information. |
When changing a descriptor's type, the Mapping Workbench will add or remove property tabs, as needed.
Descriptors define mappings between classes and tables. To display the attributes in a specific class, expand the descriptor item in the Project Tree pane.
Use the mapping toolbar to choose a mapping type for each attribute.
Continue with "Working with Mappings" to modify the mapping.
The Mapping Workbench can automatically map class attributes to a similarly named database field. This Automap function only creates mappings for unmapped attributes - it does not change previously defined mappings.
You can automap classes for an entire project or for specific tables.
|
Note: You must associate a descriptor with a database table before using the Automap function. See "Setting Descriptor Information". |
To automap all descriptors in a project, right-click on the project icon in the Project Tree pane and select Automap from the pop-up menu or select Selected > Automap from the menu.
or
To automap a specific descriptor or attribute select the descriptor/attribute(s). Right-click and select Automap from the pop-up menu or select Selected > Automap from the menu.
Use this procedure to generate the Java class code for the selected descriptor or package.
You can also generate Java code by selecting Selected > Generate Code from the menu.
<DescriptorName>.java file in the specified directory.
Each descriptor in the Mapping Workbench contains tabs and specific properties. By default, descriptors contain the following properties:
Use the Set Advanced Properties function (see "Working with Advanced Properties") to specify additional properties for each descriptor.
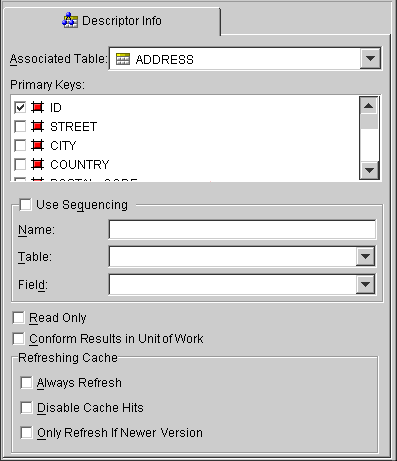
Use the Descriptor Info tab to map a descriptor to a specific table in the database, define primary key(s), specify sequencing information, and set caching options.
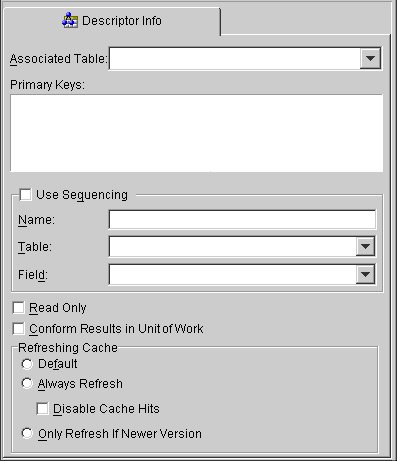
| Field | Description |
|---|---|
|
Associated Table |
Use the drop-down list to select a database table for the descriptor. |
|
Primary Keys |
Specify the primary key(s) for the table. |
|
Use Sequencing |
Specify if this descriptor uses sequencing. If selected, specify the Name, Table, and Field for sequencing. See "Working with Sequencing" for more information. |
|
Read Only |
Specify if this descriptor is read-only. |
|
Conform Results in Unit of Work |
Specify to use the Refer to the Oracle9iAS TopLink: Foundation Library Guide for more information. |
|
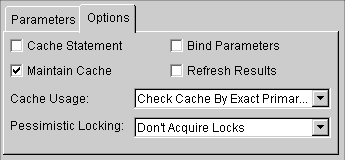
Refreshing Cache |
|
|
Use the project's default caching options. |
|
|
Refreshes the objects in the cache on all queries. Note: Using this property may impact performance. |
|
|
Disables the cache hits on primary key read object queries. |
|
|
Refreshes the cache only if the object in the database is newer than the object in the cache (as determined by the Optimistic Locking field). See "Working with Optimistic Locking" for more information. |
After generating classes and descriptors, use the Class tab to:
To add a new interface to implement, click on Add.
To delete an interface, select the interface and click on Remove.
To generate source code for the descriptor, click on Generate Source Code.

Use this table to enter data in each field:
To add a new attribute, click on Add.
To delete an existing attribute, select the attribute and click on Remove.
To generate a get or set method for an attribute, click on Generate Get/Set Methods.
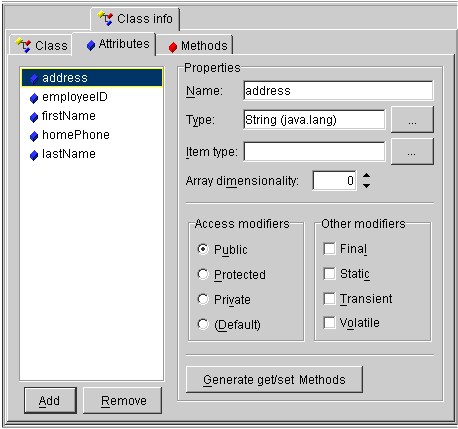
Select an attribute then use this table to enter data in each field.
To add a new method, click on Add.
To delete an existing method, select the method and click on Remove.
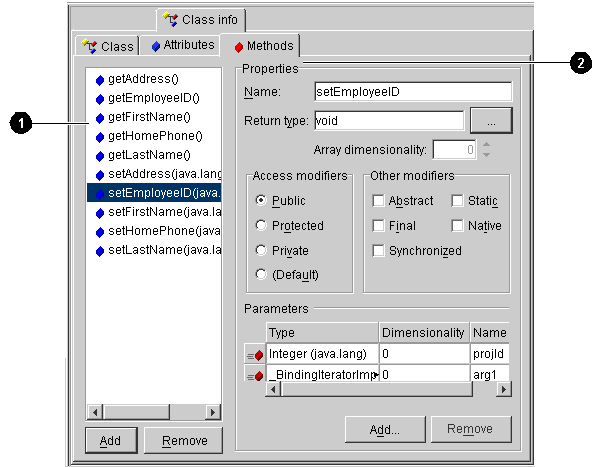
User-interface components called out in Figure 4-4:
Select a method then use this table to enter data in each field:
The Mapping Workbench uses query keys as an alias for a field name. With an alias, TopLink expressions can use the Java names instead of DBMS-specific field names.
Use the Query Keys tab to create user-defined queries or to work with automatically generated query keys.
Use the Query keys tab to specify a query key for a descriptor.
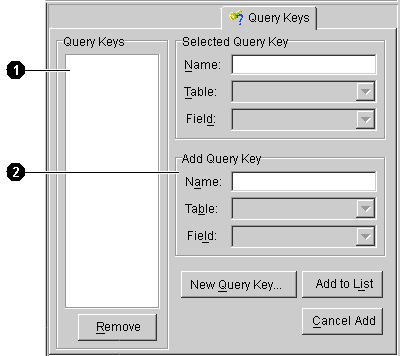
User-interface components called out in Figure 4-5:
| Field | Description |
|---|---|
|
Name |
Name of the query. |
|
Table |
Database table used by the query. |
|
Field |
Field in the table used by the query. |
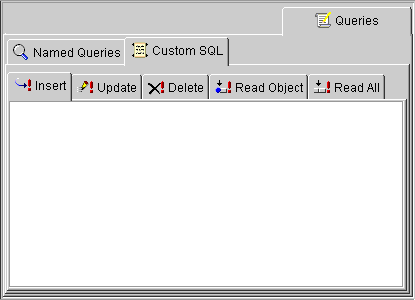
Use the Queries tab to specify EJBQL and SQL queries and finders to use for database access. The Queries tab contains two additional tabs: Named Queries and Custom SQL.
For 2.0 CMP projects, the ejb-jar.xml files stores query lists. You can define the queries in the file and then read them into the Mapping Workbench, or define them on the Queries tab and write them to the file. See "Writing to the ejb-jar.xml File" for more information.
Use this procedure to create custom SQL queries in the Mapping Workbench. For 2.0 CMP projects, the SQL is not written to the ejb-jar.xml file.
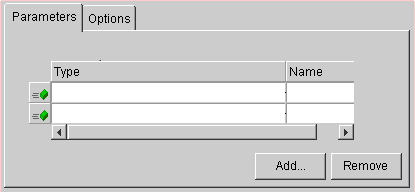
Use named queries to specify SQL or EJBQL queries to access the database. EJBQL is a declarative language used to present queries from an object-model perspective. Refer to the EJB specification for detailed information.
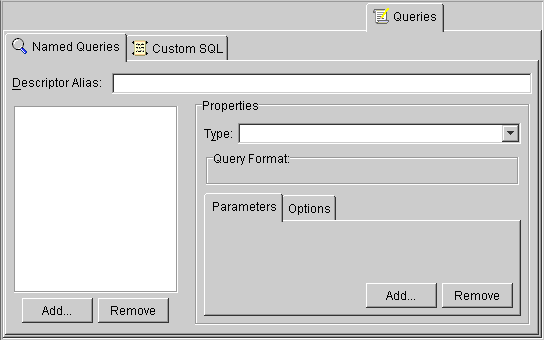
Refer to the Oracle9iAS TopLink Foundation Library Guide for additional information.
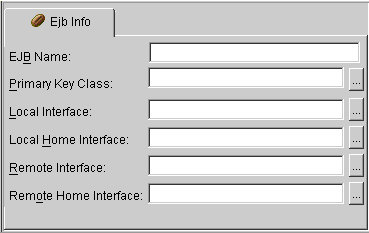
Use the EJB Info tab to display the EJB descriptor's information (from the ejb-jar.xml file). This tab is available only for EJB descriptors.
You can also specify the following advanced properties for each descriptor:
Right-click on a descriptor in the Project Tree pane and select Set Advanced Properties > specific property from the pop-up menu or select Selected > Set Advanced Properties > specific property from the menu.
Some TopLink features cannot be configured from the workbench. To use these features, you must write a Java method to amend the descriptor after it is loaded as part of the project. This method takes the descriptor as a single parameter. You can then send messages to the descriptor or any of its specific mappings to configure advanced features.
If the After load advanced property is not visible for the descriptor, right-click on the descriptor and choose Set Advanced Properties > After Load from pop-up menu or from the Selected menu.

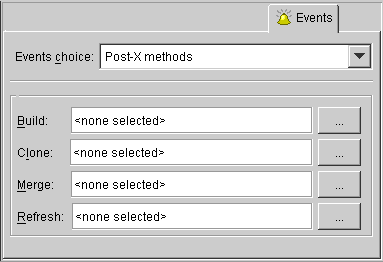
Use the Events tab to specify a descriptor's method to execute when certain events occur.
If the Events advanced property is not visible for the descriptor, right-click on the descriptor and choose Set Advanced Properties > Events from pop-up menu or from the Selected menu.
| Field | Description |
|---|---|
|
Events Choice |
Select an event for this descriptor. |
|
Methods |
Select a method for each event. Note: The methods available will vary, depending on the selected event. |
See "Supported Events" for a complete list of events and methods.
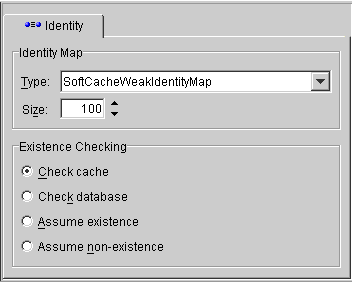
TopLink Mapping Workbench specifies the default identity mapping for each descriptor in the project options (see "Working with Default Properties"). Use the Identity tab to specify identity map and existence checking information for a descriptor.
If the Identity advanced property is not visible for the descriptor, right-click on the descriptor and choose Set Advanced Properties > Identity from the pop-up menu or from the Selected menu.
| Field | Description |
|---|---|
|
Type |
Use the Type drop-down list to select the identity map (see Table 4-2 for details). |
|
Size |
Size of the identity map. |
|
Existence Checking |
Specify the method of existence checking. |
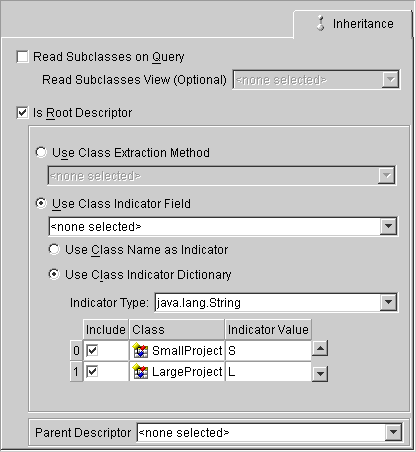
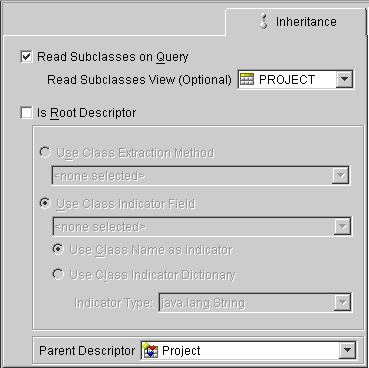
Use the Inheritance tab to specify the descriptor's inheritance properties as either a root or subclass (branch class or leaf class).
Use this procedure to create a root class.
If the Inheritance tab is not visible, right-click on the descriptor and choose Set Advanced Properties > Inheritance.
After setting up the root class for inheritance, you must also specify properties for branch and leaf classes.
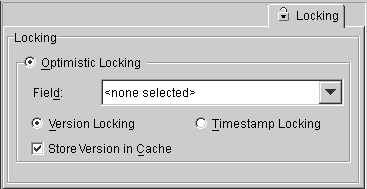
Use the Locking tab to specify if the descriptor uses optimistic locking.
If the Locking advanced property is not visible for the descriptor, right-click on the descriptor and choose Set Advanced Properties > Locking from the pop-up menu or from the Selected menu.
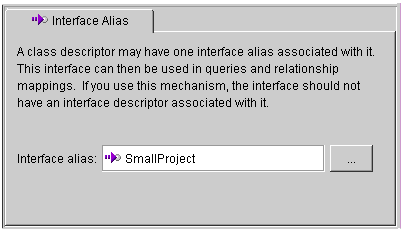
Use the Interface Alias tab to specify a descriptor's alias. Each descriptor may have one interface alias. Use the interface in queries and relationship mappings.
If the Interface Alias advanced property is not visible for the descriptor, right-click on the descriptor and choose Set Advanced Properties > Interface Alias from pop-up menu or from the Selected menu.
A primary key is a column (or a combination of columns) that contains a unique identifier for every record in the table. In the Mapping Workbench, every table that stores persistent objects must have a primary key. Tables that require multiple columns to create an identifier use a composite primary key. Setting the primary key for a table also sets the primary key for the descriptor that uses the table.
The Mapping Workbench implements primary keys using sequence numbers (see "Working with Sequencing").
Each descriptor must provide mappings for its primary key. These mappings may be direct, transformation or one-to-one. The Mapping Workbench does not require you to define a primary key constraint in the database - only that the fields specified for the primary key are unique.
|
Note: Primary keys for classes in an inheritance hierarchy or for descriptors that map to multiple tables have special requirements. Refer to"Working with Inheritance" and "Working with Multiple Tables" for more information. |
Use this procedure to set a primary key for a descriptor.
Sequence numbers are artificial keys that uniquely identify the records in a table. When you define a sequence number field for a descriptor, the Mapping Workbench automatically generates a new sequence number every time you insert a new record into the table.
Use the project's Sequencing tab or the Sequencing area of a descriptor's Descriptor Info tab to specify sequencing information
Database tables often use a sequence number as the primary key. The Mapping Workbench can use the database's native support or a sequence table to maintain sequence numbers.
Other data values may require composite primary keys to make up a unique value, which is less optimal. Additionally, non-artificial values may need to change, and this is not allowed for primary keys.
When implementing sequencing for Entity Beans, you must provide create() methods and the corresponding ejbCreate() and ejbPostCreate() methods for your bean home and bean class.
TopLink creates the primary key value when you first insert the bean in the database. The key value is not passed as a parameter to the create() methods because they do not set the primary key value (the key is generated).
Oracle, Sybase, SQL Server and Informix databases support native sequencing in which the DBMS generates the sequence numbers. However, the Mapping Workbench must still tell the DBMS to assign sequence number values.
If you use native sequencing in these databases, the Mapping Workbench cannot support pre-allocation. Oracle recommends using the sequence table instead. Oracle databases support pre-allocation, but only if the sequence increment matches the pre-allocation size. See "Pre-allocating Sequence Numbers" for more information.
Tip:
If your database does not use native sequencing, you must manually create the sequence table (named SEQUENCE). Use this table to store each table, as illustrated below:
| Field name | Field format | Description |
|---|---|---|
|
SEQ_NAME |
CHAR |
Name of the sequence number |
|
SEQ_COUNT |
NUMERIC |
Current value |
After creating the table, you must initialize the table within the application. The value of the SEQ_COUNT field for each sequence should be zero (0) as in the following table.
| SEQ_NAME | SEQ_COUNT |
|---|---|
|
EMP_SEQ |
0 |
|
PROJ_SEQ |
0 |
To increase the speed of database inserts, obtain a block of sequence numbers (by setting an allocation size) instead of executing a corresponding SELECT statement to obtain the newly assigned sequence number each time you create an object.
TopLink uses a default pre-allocation size of 50 when using a sequence table and 1 when using native sequencing.
INCREMENT is set on the Oracle Sequence object (not the CACHE option). This increment must match the pre-allocation size specified in the Mapping Workbench. If the increment is set incorrectly, invalid and negative sequence numbers could be generated. The CACHE option specifies how many sequences are pre-allocated on the database server, while the INCREMENT specifies the number that can be pre-allocated to the database client.
Normally, the database administrator defines the sequence table or sequencing object. However, you can use TopLink's schema manager to define the sequence numbers using:
You should only execute this command once. The SchemaManager creates a sequence entry for each registered descriptor.
Refer to the TopLink: Foundation Library Guide for more information on using the schema manager to create number information in the database.
Inheritance describes how a child class inherits the characteristics of its parent class. TopLink provides multiple methods to preserve the inheritance relationships. You can override mappings that have been specified in a superclass or map attributes that have not been mapped at all in the superclass.
Although inheritance is a standard tool in object-oriented modeling, the current EJB specification contains only general information regarding inheritance. You should fully understand the current EJB specification before implementing inheritance.
If you are mapping only one class in an inheritance hierarchy, you may map attributes that it inherits from any of its superclasses.
You can map inherited attributes to:
You may also do this if you have a common superclass that stores little or no persistent data. For example, if you were mapping subclasses of java.rmi.RemoteObject, each subclass could be mapped independently.
You can store classes with multiple levels of inheritance in a single table to optimize database access speeds.
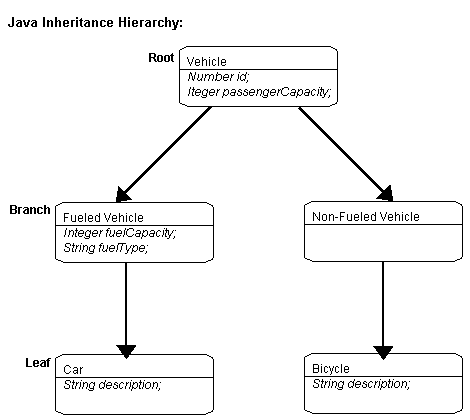
The following diagram illustrates the Vehicle object model.
The entire inheritance hierarchy can share the same table, as in Figure 4-20. The FueledVehicle and NonFueledVehicle subclasses can share the same table even though FueledVehicle has some attributes that NonFueledVehicle does not. The NonFueledVehicle instances waste database resources because the database must still allocate space for the unused portion of its row. However, this approach saves on accessing time because there is no need to join to another table to get the additional FueledVehicle information.
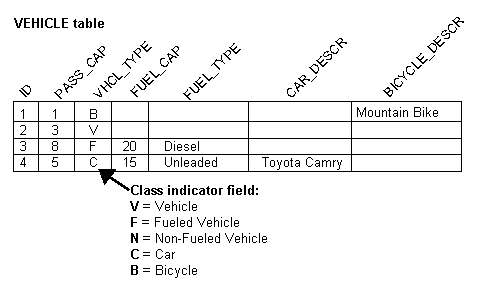
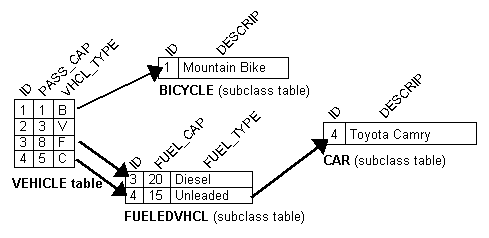
For subclasses that require additional attributes, you can use multiple tables instead of a single superclass table. This optimizes storage space because there are no unused fields in the database. However, this may affect performance because TopLink must read from more than one table before it can instantiate the object. TopLink first looks at the class indicator field to determine the class of object to create, then uses the descriptor for that class to read from the subclass tables.
Figure 4-21 illustrates the TopLink implementation of the FUELEDVHCL, CAR, and BICYCLE tables. All objects are stored in the VEHICLE table. FueledVehicle, Car, and Bicycle information is also stored in the secondary table.
An inheritance mapping for a root class must be able to locate its subclasses by using one of the following methods:
java.lang.Class object
Use a class indicator field in the table of the root class table to indicate which subclass should be instantiated. The indicator field should not have an associated direct mapping unless it is set to read-only.
|
Note: If the indicator field is part of the primary key, define a write-only transformation mapping for the indicator field. Refer to "Working with Transformation Mappings" for more information. |
You can use strings or numbers as values in the class indicator field. The root class descriptor must specify how the value in the class indicator field translates into the class to be instantiated. The following table illustrates the class indicator mapping from the Vehicle class containing four entries.
| Key | Value |
|---|---|
|
F |
FueledVehicle |
|
N |
NonFueledVehicle |
|
C |
Car |
|
B |
Bicycle |
When working with hierarchies more than two levels deep, the class indicator field and the class indicator mapping can only be in the root class.
TopLink allows three types of classes in an inheritance hierarchy:
Vehicle class in Example 4-1, "Vehicle Object Model" is a root class.
FueledVehicle class in Example 4-1, "Vehicle Object Model" is a branch class.
Car class in Example 4-1, "Vehicle Object Model" is a leaf class.
TopLink assumes that all of the classes in an inheritance hierarchy have the same primary key, as set in the root descriptor. Child descriptors associated with tables that have different primary keys must define the mapping between the root primary key and the local one.
For more information on primary keys in an inheritance hierarchy, see "Specifying Multi-table Info".
If you are defining the descriptor for a class that inherits attributes from another class, you can create mappings for those attributes. If you re-map an attribute that was already mapped in the superclass, the new mapping applies to the subclass only. Any other subclasses that inherit the attribute are unaffected.
The mappings list now includes all the attributes from the superclass of this class.
If you leave inherited attributes unmapped, TopLink will use the mapping (if any) from the superclass, if the superclass's descriptor has been designated as the parent descriptor.
An interface is a collection of method declarations and constants used by one or more classes of objects. Domain classes can implement interfaces or can reference existing interfaces. TopLink supports interfaces in the following methods:
An interface descriptor is a descriptor whose reference class is an interface. Each domain class specified in TopLink has a related descriptor. A descriptor is a set of mappings that describe how an object's data is represented in a relational database. It contains mappings from the class instance variable to the table's fields, as well as the transformation routines necessary for storing and retrieving attributes. The descriptor acts as the link between the Java object and its database representation.
An interface is simply a collection of abstract behavior that other classes can use. There is no representation of interfaces on the relational database; an interface is purely a Java object concept. Therefore, a descriptor defined for the interfaces does not map any relational entities on the database.
The components defined in the interface descriptor are:
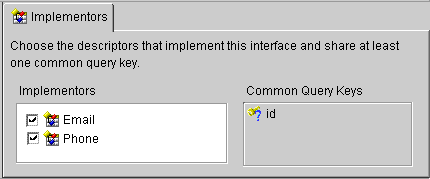
An interface descriptor does not define any mappings, because there is no concrete data or table associated with it. A list of abstract query keys is defined so that one can issue queries on the interfaces. A read query on the interface results in reading one or more of its implementors.
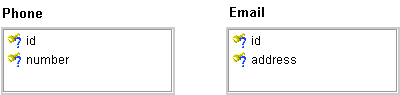
The following illustration shows an interface implemented by two descriptors.
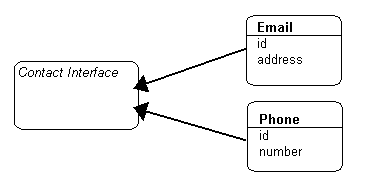
Following is the sample code implementation for the descriptors for Email and Phone:
Descriptor descriptor = new Descriptor();
   descriptor.setJavaInterface(Contact.class);
   descriptor.addAbstractQueryKey("id");
   return descriptor;

Descriptor descriptor = new Descriptor();
   descriptor.setJavaClass(Email.class);
   descriptor.addDirectQueryKey("id", "E_ID");
   descriptor.getInterfacePolicy().addParentInterface(Contact.class);
   descriptor.setTableName("INT_EML");
   descriptor.setPrimaryKeyFieldName("E_ID");
   descriptor.setSequenceNumberName("SEQ");
   descriptor.setSequenceNumberFieldName("E_ID");
   descriptor.addDirectMapping("emailID", "E_ID");
   descriptor.addDirectMapping("address", "ADDR");
   return descriptor;

Descriptor descriptor = new Descriptor();
   descriptor.setJavaClass(Phone.class);
   descriptor.getInterfacePolicy().addParentInterface(Contact.class);
   descriptor.addDirectQueryKey("id", "P_ID");
   descriptor.setTableName("INT_PHN");
   descriptor.setPrimaryKeyFieldName("P_ID");
   descriptor.setSequenceNumberName("SEQ");
   descriptor.setSequenceNumberFieldName("P_ID");
   descriptor.addDirectMapping("phoneID", "P_ID");
   descriptor.addDirectMapping("number", "P_NUM");
   return descriptor;
If the Contact interface extended another interface, you would call the following method to set its parent:
descriptor.getInterfacePolicy().addParentInterface(Interface.class);
Use single implementor interfaces for applications where only the domain objects' interface is visible. Each domain class has its own unique interface and no other domain class implements it. The references to other domain objects are also through interfaces.
In such applications, defining a descriptor for each interface would be expensive and may be unnecessary. TopLink does not force you to define descriptors for such interfaces. The descriptors are defined for the domain classes and the parent interface is set as usual.
During the initializing of a descriptor, the interface is given the descriptor of its implementor. This process allows queries on both the domain class and its interface. The only restriction is that each interface should have a unique implementor. In other words, a descriptor is not needed for an interface unless it has multiple implementors.
One-to-one mappings that reference interfaces that have multiple implementors are known as variable one-to-one mappings. For more information, see Chapter 6, "Understanding Relationship Mappings", and Chapter 4, "Understanding Descriptors".
Use this procedure to implement an interface.
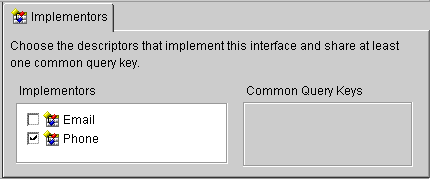
The Common Query Keys area displays all of the query keys for the interface's implementors.
Descriptors can use multiple tables in mappings. Use multiple tables when:
When a descriptor has multiple tables, you must be able to join a row from the primary table to all of the additional tables. By default, TopLink assumes that the primary key of the first, or primary, table is included in the additional tables, thereby joining the tables.
TopLink also supports custom methods for joining tables.
Use the Multi-table Info tab to define multiple tables for a descriptor in the Mapping Workbench.
If the Multi-table Info advanced property is not visible for the descriptor, right-click on the descriptor and choose Set Advanced Properties > Multi-table Info from pop-up menu or from the Selected menu.
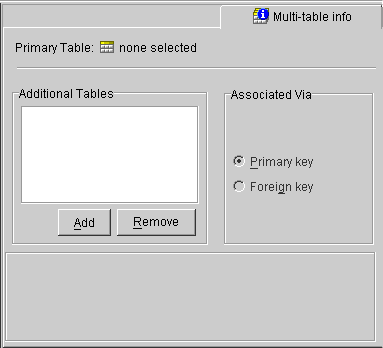
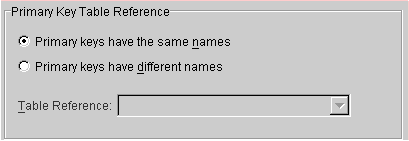
When associating a table via Primary Key, additional options appear on the Multi-table Info tab. Continue with "Primary Keys Match" or "Primary Keys are Named Differently" to assign the primary key.
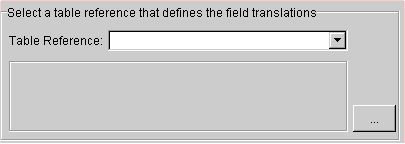
When associating a table via Foreign Key, additional options (shown in Figure 4-25) appear. You must choose a reference that relates the relates the correct fields in the primary table to the primary keys in the selected table. Continue with "Tables are Related by Foreign Key in Primary Table" to assign the foreign key.
When associating a descriptor with multiple tables in which the primary key field names are identically, you do not have to specify any additional information. Simply select the tables from the list of available tables on the Multi-table Info tab. The Mapping Workbench automatically selects the Primary Keys Have the Same Names option.
If the primary keys of the additional table(s) are the same but named differently, you must specify how they relate to the primary key(s) of the default/primary table.
If the primary keys of the additional table are not the same as the primary keys of the primary table, but are instead related to a different set of fields, you must set up a foreign key relation between the tables.
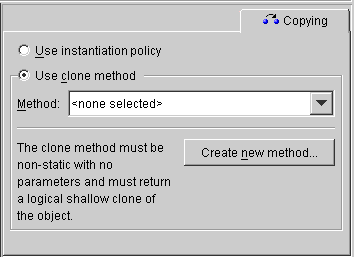
The TopLink unit of work feature must be able to clone persistent objects. TopLink supports two ways of copying objects:
clone
Use the Copying tab to specify how TopLink copies objects. TopLink supports the following methods:
If the Copying advanced property is not visible for the descriptor, right-click on the descriptor and choose Set Advanced Properties > Copying from pop-up menu or from the Selected menu.
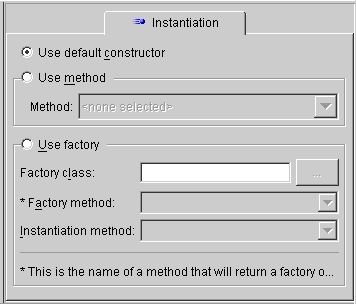
TopLink supports several ways to instantiate objects:
You can use custom Java code to override the instantiation policy. Refer to Oracle9iAS TopLink Foundation Library Guide for details.
Use the Instantiation tab to specify if objects are instantiated by the default constructor, a specific method, or a factory.
If the Instantiation advanced property is not visible for the descriptor, right-click on the descriptor and choose Set Advanced Properties > Instantiation from pop-up menu or from the Selected menu.
TopLink allows you to use "wrappers" (or proxies) in cases where the persistent class is not the same class that is to be presented to users.
For example, in the Enterprise JavaBeans specification, the Entity bean class (the class that implements javax.ejb.EntityBean) is persistent but is hidden from users who interact with a class that implements javax.ejb.EJBObject (the "remote interface" class). In this example, the EJBObject acts as a proxy or wrapper for the EntityBean.
In cases where such a wrapper is used, TopLink continues to make the class specified in the descriptor persistent, but returns the appropriate instance of the wrapper whenever a persistent object is requested.
Use a "wrapper policy" to tell TopLink how to create wrappers for a particular persistent class, and how to obtain the underlying persistent object from a given wrapper instance.
If you specify a wrapper policy, TopLink uses the policy to "wrap" and "unwrap" persistent objects as required:
oracle.toplink.descriptors.WrapperPolicy
The Descriptor class provides methods that are used in conjunction with the wrapper policy:
setWrapperPolicy(oracle.toplink.descriptors.WrapperPolicy) can be invoked to provide a wrapper policy for the descriptor
getWrapperPolicy() returns the wrapper policy for a descriptor
Refer to the Oracle9iAS TopLink Foundation Library Guide for detailed information.
When using caching to provide performance benefits, you should also use a locking policy to manage database record modification in multi-user environments. Without a locking policy, it may be possible for users to see data stored in the cache that is no longer valid (sometimes called stale data).
Databases typically support the following locking policies:
UnitOfWork and updateAndLockObject().
Oracle recommends using optimistic locking to ensure that all users are working with valid data before committing changes. TopLink supports multiple locking policies for optimistic locking:
UnitOfWork in order to be implemented.
For each of the following version locking policies, you must add a specific database field.
TopLink records the version as it reads an object from a table. When the client attempts to write the object, TopLink compares the version of the object with the version in the table record.
The two version locking policies have different ways of writing to database:
VersionLockingPolicy, the number in the version field increments by one
TimestampLockingPolicy, a new timestamp is inserted into the row (this policy can be configured to get the time from the or locally)
For both policies, the values of the write lock field can be the writable mapping within the object.
If the value is stored in the identity map, then by default an the version field. If the application does map the field, it must make mappings read-only to allow TopLink to control writing the fields.
The following locking policies, included in TopLink, do not require any additional fields:
All of these policies compare the current values of certain mapped previous values. When using these policies, a UnitOfWork must be used for updating the database. Each policy handles its specific way the policy.
AllFieldsLockingPolicy is updated or deleted, all the fields in that table are compared in the where clause. If any value in that table has been changed since the object was read, the update or delete fails.
ChangedFieldsLockingPolicy is updated, only the modified fields are compared. This allows for multiple clients to modify different parts of the same row without failure. Using this policy, a delete compares only on the primary
SelectedFieldsLockingPolicy is updated or deleted, a list of selected fields is compared in the statement. Updating these fields must be done by the application manually or though an event.
Whenever any update fails because optimistic locking has been an OptimisticLockException is thrown. This should be handled by the application when performing any database modification The must refresh the object and reapply its changes.
The TopLink optimistic locking policies (described in "Working with Optimistic Locking") implement the OptimisticLockingPolicy interface, referenced throughout the TopLink code. You can create more policies by implementing this interface and implementing the methods defined.
Use the Locking tab (see Figure 4-16) to specify locking policies for the Mapping Workbench, or refer to the Oracle9iAS TopLink Foundation Library Guide for more information.
TopLink uses identity maps to cache objects for performance and maintain object identity. The Mapping Workbench provides the following identity map types on the Identity tab (see Figure 4-13):
The default identity map size is 100.
Use the following guidelines when using an identity map:
SoftCacheWeakIdentityMap or HardCacheWeakIdentityMap policy.
WeakIdentityMap policy.
FullIdentityMap policy.
CacheIdentityMap policy.
NoIdentityMap policy
In a Java application, object identity is preserved if each object in memory is represented by one and only one object instance. Multiple retrievals of the same object return references to the same object instance - not multiple copies of the same object.
Maintaining object identity is extremely important when the application's object model contains circular references between objects. You must ensure that two are referencing each other directly, rather copies of each other. Object identity is important when multiple parts of the application may be modifying the same object simultaneously.
Identity can be turned off when object identity is not important (for example, for read-only objects).
Identity maps maintain client-side object caches which boost by minimizing the number of database reads.
When the cache fills up, TopLink cleans up the cache based on the identity map policy.
Use a direct query key as an alias for a field name. Query keys allow TopLink expressions to refer to a field using Java attribute names (such as firstName) rather than DBMS-specific names (such as F_NAME).
Use query keys to:
TopLink automatically defines direct query keys for all direct mappings a special query key type for each mapping. Typically, use query keys to access fields that do not have direct mappings, such as the version field used for optimistic locking or the type field used for inheritance.
TopLink displays automatically generated query Query Keys tab of the Properties pane (see Figure 4-5). You cannot change these keys.
For example, consider the Employee class in the TopLink tutorial: When you define a direct-to-field mapping from the Employee class, attribute firstName to the EMPLOYEE table, field F_NAME, you get a query key for free - it is automatically generated.
The following code example illustrates using an automatically-generated query key within the TopLink expression framework.
Vector employees = session.readAllObjects(Employee.class, new
ExpressionBuilder().get("firstName").equal("Bob"));
In addition to the automatically generated query keys, you can define query keys for descriptors.
User-interface items called out in Figure 4-29:
Interface descriptors are defined only with query keys that are shared among their implementors. In the descriptor for the interface, only the name of the query key is specified.
In each implementor descriptor, the key must be defined and with appropriate field from one of the implementor descriptor's tables.
This ensures that a single query key can be used to specify foreign key information from a descriptor that contains a mapping to the interface, even if the field names differ.
Consider an Employee that contains a contact, of type Contact. Contact is an interface with two implementors: Phone and EmailAddress. Each class has two attributes. The following figure illustrates the generated keys:
|
Note:
Both classes have an attribute, |
Now that a descriptor with a commonly-shared query key has been defined for Contact, you can use it as the reference class for a variable one-to-one mapping. For example, you can now create a one-to-one mapping for the contact attribute of Employee. When you edit the foreign key field information for the mapping, you must match the Employee descriptor's tables to query keys from the Contact interface descriptor.
For more information see "Working with Interfaces" and "Working with Relationship Mappings".
TopLink supports query keys for relationship mappings and automatically defines them for all relationship mappings. You can use these keys to join across a relationship. One-to-one query keys define a joining relationship and are accessed through the get() method in expressions.
One-to-many and many-to-many query keys define a distinct join across a collection relationship and accessed through the anyOf() method in expressions. You can also define relationship query keys manually if mapping does not exist for the relationship. The relationship defined by the query key is data-level expressions.
The following code example illustrates using a one-to-one query key within the TopLink expression framework
ExpressionBuilder employee = new ExpressionBuilder();
Vector employees = session.readAllObjects(Employee.class,
employee.get("address").get("city").equal("Ottawa"));
Relationship query keys are not supported directly in the Mapping Workbench. To define a relationship query key, you must specify and write an amendment method. Register query keys by sending the addQueryKey() message.
The following code example illustrates how to define a one-to-one query key.
// Static amendment method in Address class, addresses do not know their owners
in the object-model, however you can still query on their owner if a
user-defined query key is defined
public static void addToDescriptor(Descriptor descriptor)
{
OneToOneQueryKey ownerQueryKey = new OneToOneQueryKey();
ownerQueryKey.setName("owner");
ownerQueryKey.setReferenceClass(Employee.class);
ExpressionBuilder builder = new ExpressionBuilder();
ownerQueryKey.setJoinCriteria(builder.getField("EMPLOYEE.ADDRESS_
ID").equal(builder.getParameter("ADDRESS.ADDRESS_ID")));
descriptor.addQueryKey(ownerQueryKey);
}
Use the event manager to specify specific events to occur whenever TopLink performs a read, update, delete, or insert on the database.
Applications can receive descriptor events in the following ways:
DescriptorEventListener interface
DescriptorEventAdapter adapter class
Objects that implement the DescriptorEventListener interface can be registered with the descriptor event manager to be notified when any event occurs for that descriptor.
Alternately, you may wish to use the DescriptorEventAdapter class if your application does not require all of the methods defined in the interface. The DescriptorEventAdapter implements the DescriptorEventListener interface and defines an empty method for each method in the interface. To use the adapter, you must subclass it and then register your new object with the descriptor event manager.
Descriptor events can be used in many ways, including:
Use the descriptor's Event tab (see Figure 4-12) to specify events for a descriptor.
For example, if you want to invoke a method called postBuild() for an Employee object, the postBuild() method must be implemented in the Employee class. This method must also accept one parameter that is an instance of DescriptorEvent fully qualified with a package name.
A persistent class can register a public method as an event method. A descriptor calls the event method when a particular database operation occurs.
Event methods:
DescriptorEvent as a parameter
The following code illustrates an event method definition.
Events supported by the DescriptorEventManager include:
In TopLink, use named queries to represent SQL or EJBQL finders to use in database accesses. You can create these finders within the mapping workbench.
When you create a finder for an EJB, the Mapping Workbench creates a named query and populates the descriptor alias with information from the ejb-jar.xml file.
Reserved finders are valid for projects with CMP persistence.
The object-relational paradigm extends traditional relational databases with object-oriented functionality. Oracle, IBM DB2, Informix and other DBMS databases allow users to store, access, and use complex data in more sophisticated ways.
The object-relational standard is an evolving standard and is mainly concerned with extending the database data structures and the SQL language (SQL 3).
The new features include:
Coinciding with object-relational changes, most database vendors are also extending their server architectures to support features such as:
This section describes how the object-relational features affect TopLink descriptors and mappings. The server architecture changes are discussed in the Oracle9iAS TopLink: Foundation Library Guide.
Object-relational databases introduce several new features that allow more complex data to be stored and accessed. One advantage of object-relational databases is that the differences between the object model and data model can be reduced to the point that the two are almost identical. Although this makes the object-relational mapping process easier, it does not reduce the need for a persistence framework such as TopLink. Although the JDBC standard has been improved to take advantage of object-relational features in JDBC 2.0, it still remains a very low-level database interface. On top of JDBC, frameworks such as TopLink can provide applications with much more sophisticated functionality, including units of work, identity maps, expressions, querying, complex mappings, three-tier and enterprise application support.
TopLink provides object-relational support through a new type of descriptor object and several new types of mappings. See Chapter 7, "Understanding Object Relational Mappings" for more information.
TopLink supports any JDBC 2.0 driver that complies with JDBC's 2.0 object-relational extensions. Contact your database and JDBC vendor to determine which object-relational features they support.
The TopLink Mapping Workbench does not currently support the object-relational descriptor and mappings. Support will be added to the Mapping Workbench in future releases.
You should be able to import most of the simple object-relational table structures into TopLink. Also, you can define the standard non-object-relational descriptor properties and mappings. You can use amendment methods to add any object-relational mappings and features to the descriptors.
In TopLink, mappings define how an object's attributes are represented in the database.
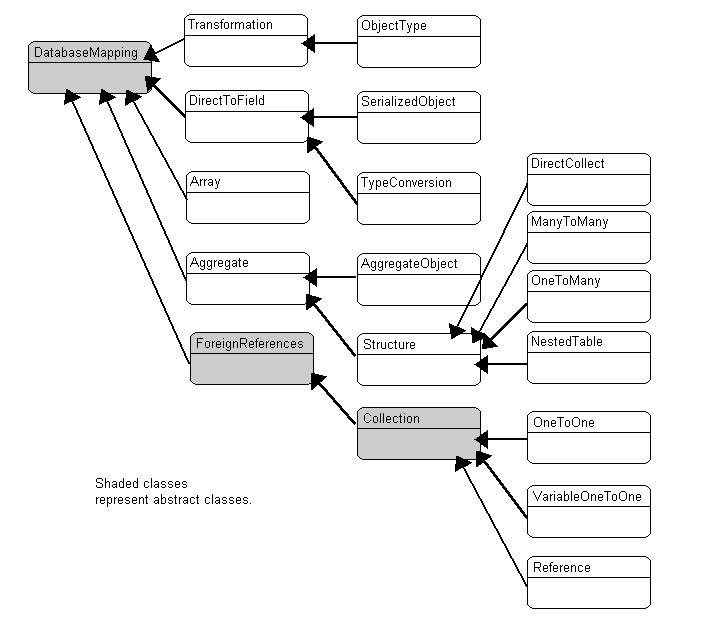
All of the mapping classes are derived from the DatabaseMapping class, as illustrated in Figure 4-32.
TopLink associates each mapping with the attribute whose persistence it describes. To create a mapping in the Mapping Workbench, select the attribute to map from the Project Tree pane and then click on the appropriate button in the mapping toolbar (see Figure 1-5).
Use the mapping's Properties pane to enter specific information for the mapping. Some mappings require more information that others and have multiple tabs in the Properties pane.
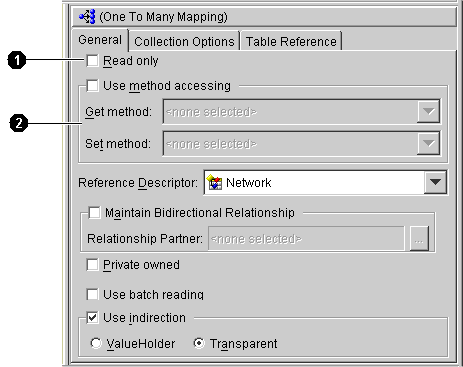
Mapping properties called out in Figure 4-33:
By default, TopLink uses direct access to access public attributes. Alternatively, you can use accessor methods to access object attributes when writing the attributes of the object to the database or reading the attributes of the object from the database. This is called method access.
The attribute's visibility (public, protected, private or package visibility) and the supported version of JDK may restrict the type of access that you can use.
Starting in JDK 1.2, the Java Core Reflection API provides a means to suppress default Java language access control checks when using reflection. TopLink uses reflection to access the application's persistent objects. This means that if you are using a VM that supports the API, then TopLink can access an attribute directly, regardless of its declared visibility.
Oracle recommends using direct access whenever possible to improve performance and avoid executing any application-specific behavior while building objects.
Use the General tab of the mapping Properties pane (see Figure 4-33) to set the access type as direct or method-based
To change the default access type used by all new mappings, use Defaults tab on the project Properties pane. See "Working with Default Properties" for more information.
Use the Read Only check-box on the General tab of the mapping Properties pane (see Figure 4-33) to set a mapping to be read only. TopLink will not consider attributes associated with read-only mappings during update, and delete operations.
Because these operations are not actually performed for the mapping, any processes that are dependent on these operations (such as custom SQL or descriptor events) are not called for read-only. The attributes are still used for read operations.
Mappings defined for the write-lock or class indicator field must be read-only, unless the write-lock is configured not to be stored in the cache and the class indicator is part of the primary key.
Direct mappings include a nullValue attribute. Use this attribute to convert database null values to application-specific values (if application does not allow null values). This applies when typed as primitives. The null value must be set to the desired value, not the database value.
Null values translate in two directions: from null values read from the database to the specified value and from the specified value back to null when writing or querying. You can also use TopLink to set global default null values on a per-class basis. For more information, refer to the Oracle9iAS TopLink: Foundation Library Guide.
Select the Use Default Value when Database Field is Null option on the General tab (see Figure 4-33) and the Type and Value drop-down lists to specify the null value.
Use the Maintain Bidirectional Relationship Only check-box on the General tab of the mapping Properties pane (see Figure 4-33) to maintain a bidirectional relationship for a one-to-one or one-to-many mapping. You can also specify the relationship partner.
When defining mappings in code, TopLink assumes all mappings are in first table specified by the descriptor's setTableName() or addTableName() method. If the persistent class stores information in multiple tables, any messages sent that require field names should implemented to pass fully qualified names (that include the table name). Use the following syntax to fully qualify a field:
someMessage("tablename.fieldname");
Some relationship mapping types (direct collection, one-to-many, and many-to-many) contain a Collection Options tab to allow you to specify collection options.
TopLink can populate a collection in ascending or descending order upon your specification. Query keys are automatically created for and with the same name as all attributes mapped as direct-to-field, type conversion, object type, and serialized object mappings.
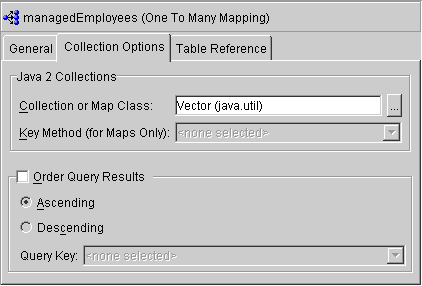
Use this table to enter data in each field:
| Field | Description |
|---|---|
|
Java 2 Collections: |
|
|
Select the collection or map class to use for this collection mapping. |
|
|
Order Query Results |
Specify how the collection results are sorted for queries. |
For 2.0 CMP projects, the ejb-jar.xml files stores information on bean-to-bean relationships (i.e., mappings) in the <relationship> element. By updating this information in the ejb-jar.xml, the Mapping Workbench will create new mappings. You can then update the mapping information (such as reference tables).
If the information does not exist in the ejb-jar.xml file, you can build the mappings in the Mapping Workbench, then write the information to the file. See "Writing to the ejb-jar.xml File" for more information.
|
|
 Copyright © 2002 Oracle Corporation. All Rights Reserved. |
|