Release 2 (9.0.3)
Part Number B10063-01
Core |
Platform |
Contents |
Index |
| Oracle9iAS TopLink Mapping Workbench Reference Guide Release 2 (9.0.3) Part Number B10063-01 |
|
The Mapping Workbench project ( .mwp file) stores the information about how classes map to database tables. These are language independent XML files, different from the deployment XML files generated by the Mapping Workbench, read in by the application using the XMLProjectReader class.
You can edit each component of project, including:
The Mapping Workbench displays projects and their contents in the Project Tree pane. When you select a project, its attributes display in the Properties pane.
The Mapping Workbench can log runtime XML calls (in the mw_xml.log file) to help troubleshoot projects. Refer to the Oracle9iAS TopLink Troubleshooting Guide for additional information.
Use this procedure to create a new Mapping Workbench project.
 in the toolbar. The Create New Project window appears.
You can also create a new project by selecting File > New Project from the menu.
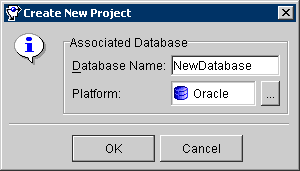
See "Working with Databases" for more information.
Always use a new folder to save a project. After creating the
Note:
.mwp project do not rename the file. See "Saving Projects" to save your project with a different name.
The mapping workbench appears showing the project name in the Project Tree pane. Continue with "Working with Project Properties" to create a project.
Use this procedure to open an existing project.
 in the toolbar. The Choose a File window appears.
You can also open a project by selecting File > Open Project from the menu.
.mwp) to open and click on Open. The Mapping Workbench displays the project information.
If you open a 3.x Mapping Workbench project that contains EJBs, the Potential EJB Descriptors window appears.
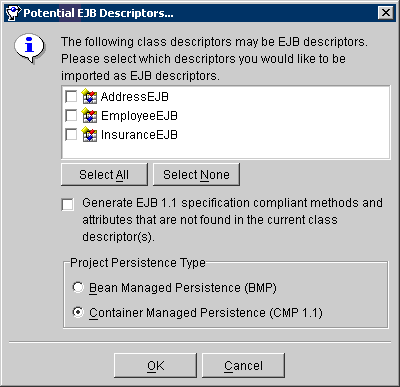
You can also specify if the Mapping Workbench generates methods and attributes that comply with the EJB specification if they are not found within the current class descriptor(s).
The Mapping Workbench does not automatically save your project. Be sure to save your project often to avoid losing data.
Click on the Save Selected Project button
 or Save All Projects button
 to save your project(s).
You can also save a project by selecting File > Save Project or File > Save All from the menu.
If the Mapping Workbench interface becomes corrupt, use the Refresh Tree option to redraw the Project Tree.
Right-click on the project icon in the Project Tree pane and select Refresh from the pop-up panel.
You can also refresh the project tree by choosing the project icon and selecting File > Refresh from the menu or pressing Ctrl+T.
Each project in the Project Tree pane contains various editable parameters. To edit the project's properties, select the project object in the Project Tree pane. The following tabs appear in the Properties pane.
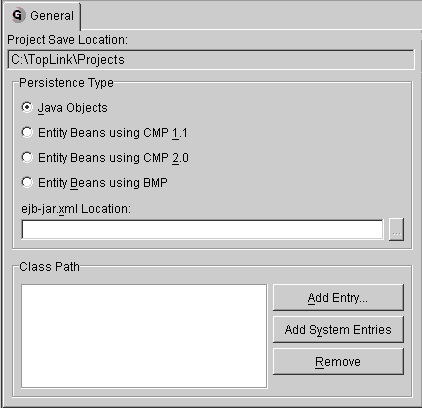
Use the project's General tab to specify the default persistence type and classpath information.
Each TopLink project uses a classpath - a set of directories, .jar files, and .zip files - when importing Java classes and defining object types.
To create a descriptor for a persistent class, the Mapping Workbench reads a compiled Java .class file to read its attributes and relationships.
ejb-jar.xml file. See "Mapping EJB 2.0 Entities" and "Working with the ejb-jar.xml File" for more information.
.jar file, or .zip file to add.
To add the system's classpath entries to the project, click on Add System Entries.
To remove a classpath entry, select the entry and click on Remove.
To create a relative classpath, select an entry and edit the path, as necessary. The path will be relative to the Project Save Location.
See "Working with Classes" for information.
You can create a Mapping Workbench project based on information in the ejb-jar.xml file. Use this file to map the EJB 2.0 CMP entity beans' virtual fields (called Container Managed Fields, defined by <cmp-field> tag) or relationships (called Container Managed Relationship, defined by <cmr-field> tag) to database tables. You must specify an .xml file or a .jar file that contains an ejb-jar.xml file.
The Mapping Workbench defines all descriptors for entity classes (as defined in the ejb-jar.xml file) as EJB descriptors
 . The Mapping Workbench does not create (or remove) descriptors for the interfaces and primary key class for the entity when refreshing from the
 ejb-jar.xml.
|
Note:
The Mapping Workbench creates class descriptors for entity classes not defined in the |
To update your project from the .xml file, right-click on an EJB descriptor and select Update Descriptors from ebj-jar.xml. You can also update the project by selecting Selected > Update Descriptors from ebj-jar.xml from the menu. See "Working with the ejb-jar.xml File" for more information.
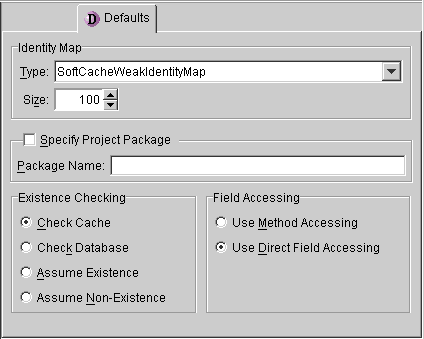
Use the project's Default tab to specify the default:
| Field | Description |
|---|---|
|
Identity Map |
Use the Type drop-down list to select the default identity map and its size for descriptors in this project (see "Working with Identity Maps"). |
|
Specify Project Package |
Default package to use for this project. See "Renaming Packages" for information on renaming packages. |
|
Existence Checking |
Specify the type of existence checking to use. |
|
Field Accessing |
Specify if the descriptors use Method or Direct field accessing (see "Specifying Direct Access and Method Access"). |
To rename your packages, you must edit each of the project's associated .xml files in the following sub-directories:
You must also edit the package and class names in the .mwp file. After changing the package names in all files, open the project in the Mapping Workbench. TopLink will now use the new package name.
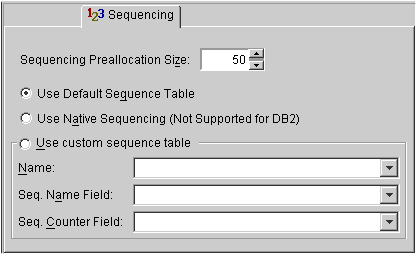
Sequence numbers are artificial keys that uniquely identify the records in a table. Use the project's Sequencing tab to specify default sequencing properties for all descriptors in the project.
Use the project's Table Generation tab to specify the default primary key name and primary key search pattern (database schema) to use when generating tables. The resulting tables and columns will conform to the naming restrictions of the project's target database.
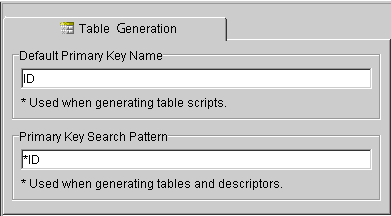
| Field | Description |
|---|---|
|
Default Primary Key Name |
Default name to use when generating primary keys. |
|
Primary Key Search Pattern |
Default search pattern to use when generating primary keys. |
In addition to a descriptor's standard property tabs, you can specify advanced properties for each descriptor. You can also specify which of these advanced properties appear, by default, for new descriptors.
You can also set the default advanced properties by choosing the project object and selecting Selected > Set Advanced Property Defaults from the menu.

The Mapping Workbench creates descriptors from Java classes and packages.
Use this procedure to create a new class and/or package from within the Mapping Workbench.
You can also create a new class by clicking on the Create Class button
 or select the project and select Selected > Create New Class from the menu.
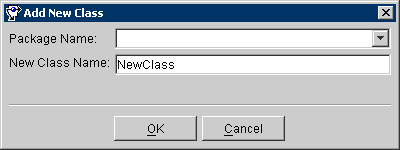
. The Select Classes window appears.
You can also update the classes by selecting Selected > Add/Refresh Classes from the menu.

The Mapping Workbench creates class descriptors for each package/class. You must manually change the descriptor type, if needed (see "Specifying Descriptor Types").
Note:
Select on the descriptor and click on the Remove Class button
 or select Selected > Remove Class from the menu.
To use your project with the TopLink Foundation Library, you must either generate deployment XML or export the project to Java source code.
Use this procedure to convert the project to Java code. Generally, this generated code executes faster and deploys easier than XML files.
You can also export the project by clicking on the Export to Java Source button
 or by selecting File > Export to Java Source or Selected > Export to Java Source from the menu.
.java), and click on OK.
Use this procedure to create Java source code to generate database tables.
You can also export the table creator files by selecting File > Export Table Creator Java Source or Selected > Export Table Creator Java Source from the menu.
.java), and click on OK.
Use this procedure to generate XML files from your project that can be read by the TopLink Foundation Library. Using this option reduces development time by eliminating the need to regenerate and recompile Java code each time the project changes.
You can also export the project by selecting File > Generate Deployment XML or Selected > Generate Deployment XML from the menu.
.xml), and click on OK.
For Mapping Workbench projects that use EJB 2.0 CMP persistence, use the ejb-jar.xml file to store persistence information for the application server. With the Mapping Workbench, you can import information from an existing ejb-jar.xml file into your project, or you can create/update the ejb-jar.xml from your project.
Each Mapping Workbench project uses a single ejb-jar.xml file. For each entities from the file you should have an EJB descriptors in the project. All entities must use the same persistence type.
As you make changes in your project, you can update the ejb-jar.xml file to reflect your project. Also, if you edit the ejb-jar.xml file outside of the Mapping Workbench, you can update your project to reflect the current file.
The following table describes how fields in the ejb-jar.xml file correspond to specific functions in the Mapping Workbench:
| ejb-jar.xml | Mapping Workbench |
|---|---|
|
|
Bean attribute mapped to the primary key in the database table (see "Setting Descriptor Information") |
|
ejb-name, prim-key-class, local, local-home, remote, home, and ejb-class |
EJB descriptor information on the EJB Info tab (see "Displaying EJB descriptor Information") |
|
|
Descriptor Alias field on the Name Queries tab (see "Named Queries") |
|
|
Non-relational attributes on the Descriptor Info tab (see "Setting Descriptor Information") |
|
|
Persistence Type field on the General tab (see "Working with General Project Properties") The persistence-type is set to container. |
|
|
Queries listed in Queries tab (see "Specifying Queries") Note: The findByPrimaryKey query is not in the ejb-jar.xml file, as per the EJB 2.0 specification. |
|
|
One-to-one, one-to-many, and many-to-many mappings (see "Working with Relationship Mappings") |
Use this procedure to update the ejb-jar.xml file, based on the current Mapping Workbench information. Use the EJB preferences to specify if the Mapping Workbench automatically updates the ejb-jar.xml file when you save the project.
Select Selected > Write Project to ejb-jar.xml from the menu. You can also write the ejb-jar.xml file by right-clicking on the project in the Project Tree pane and select Write Project to ejb-jar.xml from the pop-up menu.
ejb-jar.xml, the system prompts you to create a new file.
ejb-jar.xml file but not yet read into the Mapping Workbench (i.e., you changed the file outside of the Mapping Workbench), the system prompts you to read the file before writing the changes.
Use this procedure to read the ejb-jar.xml information and update your Mapping Workbench project.
Select Selected > Update Project from ejb-jar.xml from the menu. You can also read the ejb-jar.xml file by right-clicking on the project in the Project Tree pane and select Update Project from ejb-jar.xml from the pop-up menu.
|
|
 Copyright © 2002 Oracle Corporation. All Rights Reserved. |
|