Release 2 (9.0.3) for Microsoft Windows
Part Number B10005-01
Core |
Platform |
Contents |
Index |
| Oracle9i Application Server Installation Guide Release 2 (9.0.3) for Microsoft Windows Part Number B10005-01 |
|
This chapter guides you through the steps for the Oracle9i Application Server Release 2 (9.0.3) (Oracle9iAS 9.0.3) installation. The topics include:
The following instructions guide you through the installation steps for Oracle9iAS 9.0.3.
During the Oracle9iAS 9.0.3 installation, you will be asked if you want to use single sign-on or clustering. If you want to use either single sign-on or enable cluster management, then you need to install Oracle9iAS Infrastructure 9.0.2. Oracle9iAS 9.0.3 is compatible with Oracle9iAS Infrastructure 9.0.2.
When you are installing Oracle9iAS 9.0.3 and will be using an existing Oracle9iAS Infrastructure 9.0.2, ensure that the following components are running on the infrastructure host:
If you will be using Oracle9iAS 9.0.3 on the same host or farm as Oracle9iAS 9.0.2, then you must install the Oracle9i Application Server 9.0.2.1 patch. See Section 2.7.2.1, "Installing the Oracle9i Application Server 9.0.2.1 Patch" for more information.
Note:
See Also:
Table 3-1 lists required information for Oracle9iAS 9.0.3 installation. Enter your values for the listed information in the Your Information column before beginning.
| Information | Example Values | Your Information |
|---|---|---|
|
Oracle home location (Section 2.5.2.1, "Oracle Home") |
|
|
|
Instance Name (Section 2.5.2.1, "Oracle Home") |
|
|
|
ias_admin Password (Section 2.5.2.1, "Oracle Home") |
|
|
|
Oracle9iAS Single Sign-On Server Host NameFoot 1 (Oracle9i Application Server 9.0.2 Installation Guide) |
|
|
|
Oracle9iAS Single Sign-On Port NumberFootref 1 (Oracle9i Application Server 9.0.2 Installation Guide) |
|
|
|
Oracle Internet Directory UsernameFootref 1(Oracle9i Application Server 9.0.2 Installation Guide) |
|
|
|
Oracle Internet Directory PasswordFootref 1(Oracle9i Application Server 9.0.2 Installation Guide) |
|
|
|
Oracle9iAS Metadata RepositoryFoot 3 (Oracle9i Application Server 9.0.2 Installation Guide) |
iasdocs.us.oracle.com |
|
The Welcome screen provides information about the Oracle Universal Installer.
The following buttons appear on the installation screens:

The File Locations screen allows you to enter the full path for the source and destination locations for your installation.
products.jar file from which the product will be installed. The installer detects and uses the default values of the products.jar file of the installation program. Do not change the path.
Oracle homes are identified by name. The Oracle home name identifies the program group associated with a specific Oracle home and the installed Oracle services associated with the home.
The Oracle home name must consist of 1 to 16 characters and can only include alphanumeric characters and underscores; spaces are not allowed.
Do not install Oracle9iAS 9.0.3 into any existing Oracle directories. For example:
If you want to migrate applications and configuration data from an existing Oracle9iAS 9.0.2 J2EE and Web Cache mid-tier, you install Oracle9iAS 9.0.3 in a separate directory, then migrate your applications from 9.0.2 to 9.0.3. You cannot migrate by installing 9.0.3 in the 9.0.2 directory. See the Oracle9i Application Server Migrating to Release 2 (9.0.3) guide for details.
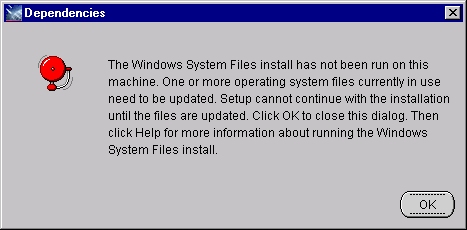
If you see this dialog:
Click Next to start the file copying process.
When wsf.exe is complete, it restarts Windows automatically, if required; otherwise the Windows System Files installation will end without displaying any Installation Finished dialog.
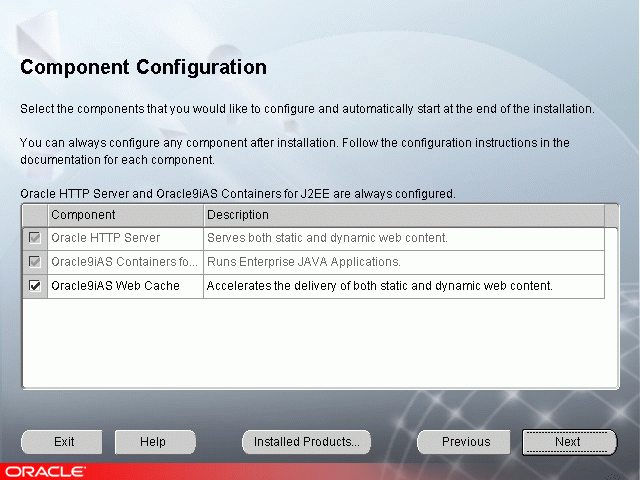
If you de-select a component here, the installer still installs it, but does not configure or start it. After installation, the installer starts the selected Oracle9iAS 9.0.3 components. If you decide to use the Oracle9iAS 9.0.3 component at a later time, launch the Oracle Enterprise Manager Web site and click Configure Component on the Instance Home Page.
To associate an instance of Oracle9iAS 9.0.3 with an Infrastructure, make sure the required Infrastructure components are running. See Section 3.1, "Installation" for details.
Note:
The Oracle9iAS Infrastructure Use screen appears to enable single sign-on or clustering functionality on the Oracle9iAS 9.0.3 installation host. Oracle9iAS Infrastructure 9.0.2 enables management of the application server cluster. Select whether to use an existing Oracle9iAS Infrastructure 9.0.2 and click Next.
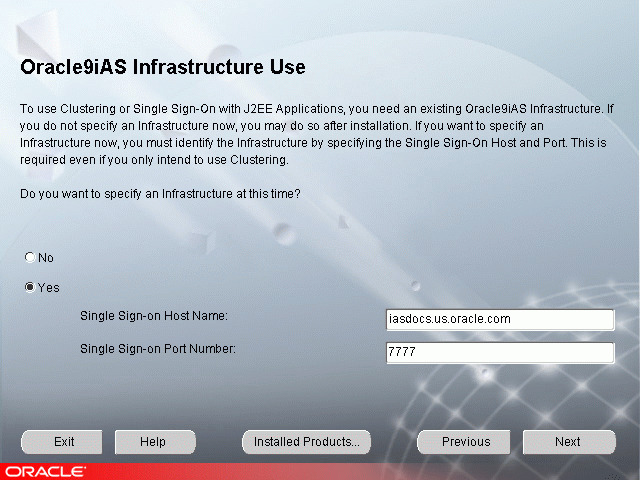
Oracle9iAS Single Sign-On is installed as part of the Oracle9iAS Infrastructure 9.0.2 installation. The single sign-on host name refers to the existing Oracle9iAS Infrastructure 9.0.2.
The Oracle9iAS Infrastructure Use screen allows you to select whether or not you will use Oracle9iAS Infrastructure 9.0.2 with this installation of Oracle9iAS 9.0.3. This screen offers two options:
In order to use Oracle9iAS Single Sign-On you must have the following information:
Oracle9iAS Single Sign-On is installed as part of the Oracle9iAS Infrastructure 9.0.2.
|
See Also:
|
Review the Infrastructure Summary screen and click Next.
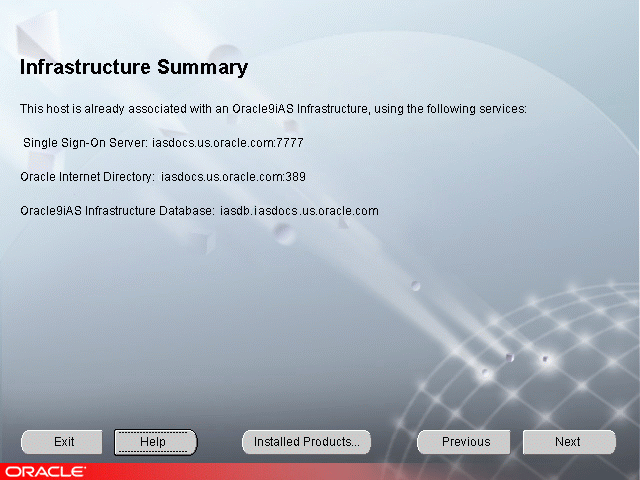
If you have an installation of Oracle9iAS 9.0.3 on the install host that is already associated with an Oracle9iAS Infrastructure 9.0.2, the Infrastructure Summary screen appears.
The Infrastructure Summary screen provides you with the following information about the associated Oracle9iAS Infrastructure 9.0.2:
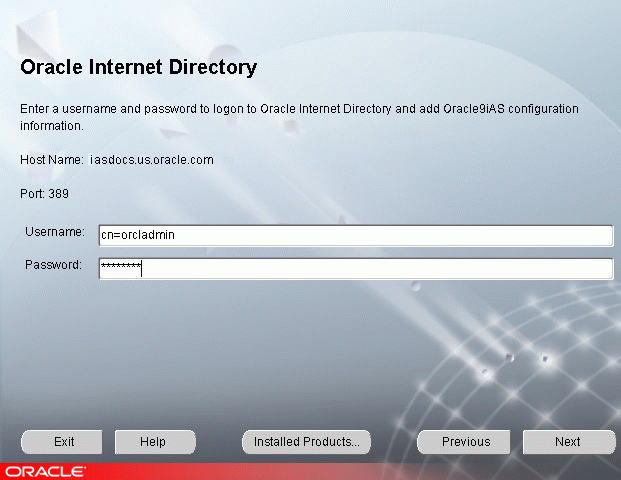
In order to associate an instance of Oracle9iAS 9.0.3 with an Infrastructure, the instance must be registered in the Oracle Internet Directory associated with the Infrastructure.
Oracle Internet Directory enables retrieval of shared information about users and network resources. Oracle Internet Directory implements the Lightweight Directory Access Protocol (LDAP), version 3.
You need the following information to add information about an Oracle9iAS 9.0.3 instance into Oracle Internet Directory:
The username and password are defined in Oracle Internet Directory as one of the following:
For additional Oracle9iAS 9.0.3 installations using Oracle Internet Directory, you must use a username that is a member of the IASAdmins group. By default, orcladmin (the Oracle Internet Directory administrator) is also a member of the IASAdmins group. If the Oracle Internet Directory administrator does not wish to give out the orcladmin password, the administrator creates a user and password. The administrator then adds this user to the IASAdmins group.
You are prompted to enter username and password during subsequent Oracle9iAS 9.0.3 installs that use Oracle Internet Directory. The username and password you enter enables the registration of Oracle9iAS 9.0.3 configuration information into Oracle Internet Directory.
The default user is orcladmin. The default password for the orcladmin user is the same as the password for the ias_admin user on the host where Oracle Internet Directory is configured. The Oracle Internet Directory administrator may add other users and assign a different password for this group.
Enter a unique Oracle9iAS 9.0.3 instance name and ias_admin password and click Next.
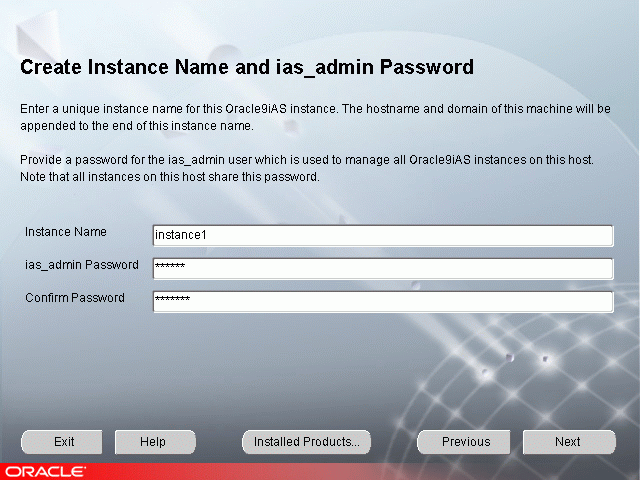
This screen appears if this is a first time installation of Oracle9iAS (9.0.2 or 9.0.3) on this host.
Instance Name: Enter an instance name for this installation of Oracle9iAS 9.0.3. The instance name must contain alphanumeric and underscore characters only.
The instance name identifies this instance of Oracle9iAS 9.0.3 on this host. Instance names are unique for each host.
ias_admin Password: Enter a password for the ias_admin user for this instance of Oracle9iAS 9.0.3, and then re-enter the password for confirmation. The ias_admin user's password must consist of at least five alphanumeric characters. Additionally, at least one of the characters must be a number.
The ias_admin user's password enables you to:
If you forget your ias_admin user's password following installation, refer to the Oracle9i Application Server Administrator's Guide for the steps you can follow to reset the password.
Enter a unique Oracle9iAS 9.0.3 instance name and the ias_admin password and click Next.
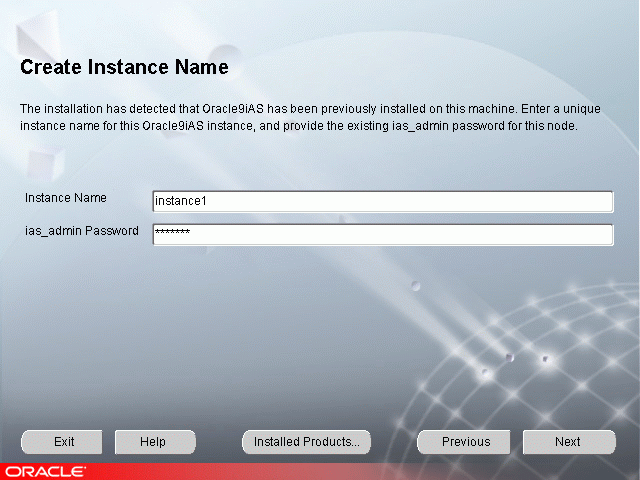
If the Oracle Universal Installer has detected a previous installation of Oracle9iAS 9.0.3 or another Oracle9i Application Server product on this host but in a different Oracle home, this screen appears.
Instance Name: Enter the instance name for this installation of Oracle9iAS 9.0.3. Because instance names identify instances of Oracle9iAS on a host, the instance name must be unique on each host.
Instance names can only contain alphanumeric and underscore characters.
ias_admin Password: Enter the existing password for the ias_admin user for this host.
If you forget your ias_admin user's password following installation, refer to the Oracle9i Application Server Administrator's Guide for the steps you can follow to reset the password.
Select the Oracle9iAS Metadata Repository you would like to use for this Oracle9iAS 9.0.3 installation and click Next.
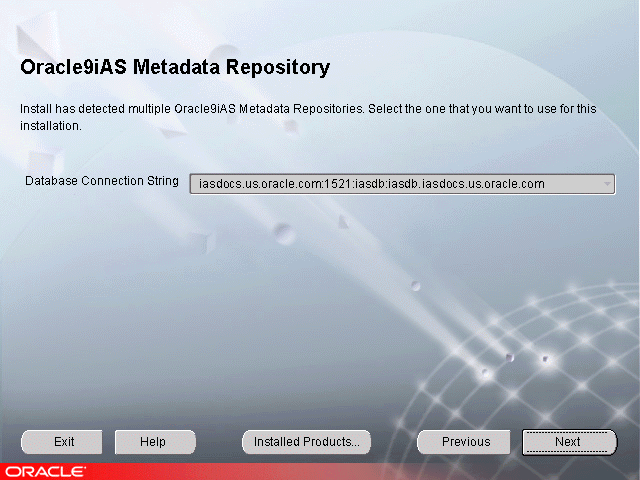
Oracle Universal Installer has detected multiple Oracle9iAS Metadata Repositories registered in your Oracle Internet Directory. Select the Oracle9iAS Metadata Repository that you want to use with this installation of Oracle9iAS 9.0.3.
Chapter 10, "Reconfiguring the Application Server", in the Oracle9i Application Server Administrator's Guide describes how to create a configuration with multiple metadata repositories.
If you want to use application server instance clustering, you must select the metadata repository used by other Oracle9iAS 9.0.3 instances in your network.
If you do not want to use clustering, select any listed metadata repository. Your selection will be the default location for Oracle9iAS 9.0.3 component metadata.
If you want an Oracle9iAS 9.0.3 component within this installation to use a different database, use the Oracle Enterprise Manager Home Page after installation to change database connectivity.
|
See Also:
|
The Summary screen allows you to review all the settings before the installation begins. These settings include source, destination, installation type, product language, install file sizes, and a list of components.
When you click Install, the installation process begins.
The Install screen appears while the product is installing. The Install screen shows installation operations, including executing actions such as file copy and linking, and executing decision points and calculations. It displays the full path of the installation log.
For more information about the installation log, refer to Section 2.6.3, "Oracle Universal Installer Inventory Directory"
The Component Configuration screen appears and displays Oracle9iAS 9.0.3 components that will be configured and started. The screen lists the configuration tools for all installed components.
Depending on the configurations selected, you will see some component configuration screens, but no input is required.
Monitor the progress of each configuration tool by scrolling down the tools list to review the configuration status of each tool. The status changes as each component is configured.
The installer performs the following functions in this screen:
If you want to install additional instances of Oracle9iAS 9.0.3 on the same machine, exit the installer first, then restart it. This method is recommended over clicking the Next Install button.
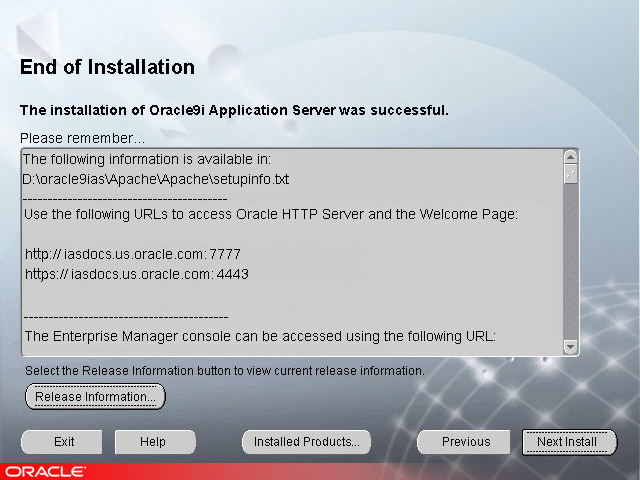
The End of Installation screen appears at the end of the installation process. It notifies you whether the installation was successful or unsuccessful and provides information about accessing the Oracle9iAS 9.0.3 instance.
The End of Installation screen displays the URL and port number for accessing the Oracle HTTP Server page and the Oracle Enterprise Manager Web site. The default Oracle HTTP Server page is the Oracle9iAS Welcome page. The Oracle9iAS Welcome page provides links to demonstrations and information about new features.
See Also:
You can view the Install Log for the completed installation at:
date_time is the date and time of installation.
A complete listing of log files is included in the Oracle9i Application Server Administrator's Guide.
You have successfully installed Oracle9iAS 9.0.3. Proceed to Section 3.2, "Postinstallation" to complete the installation process.
The following instructions guide you through the postinstallation tasks for Oracle9iAS 9.0.3.
The postinstallation section contains the following topics:
If you will be using Oracle9iAS 9.0.3 on the same host or farm as Oracle9iAS 9.0.2, then you must apply the Oracle9i Application Server 9.0.2.1 patch to all Oracle9iAS 9.0.2 instances, either before or after your installation of Oracle9iAS 9.0.3. You can download the patch from:
http://metalink.oracle.com
Select the Patches link. On the patch download form, select Oracle9i Application Server in the Product Family field and then submit the form.
In earlier releases of Oracle9iAS, you could run the set-permission tool (ORACLE_HOME\bin\setPmsn) to allow only users in the Administrators group to access the Oracle9iAS files.
In this release of Oracle9iAS, you do not have to run the set-permission tool because, by default, only users in the Administrators group have access to the files.
The Oracle Enterprise Manager Web site is available after Oracle9iAS 9.0.3 installation and component configuration. The Oracle Enterprise Manager Web site is comprised of Oracle Enterprise Manager Home Pages. Each Oracle Enterprise Manager Home Page is used to manage an installed Oracle9iAS 9.0.3 component or instance.
Oracle strongly recommends that you use the Secure Socket Layer (SSL) protocol and HTTPS for all connections to the Oracle Enterprise Manager Web site. Refer to the Oracle9i Application Server Administrator's Guide for setup information.
When you install a 9.0.3 instance on a machine that already has 9.0.2 instances, the installer automatically switches the active Oracle Enterprise Manager to the 9.0.3 instance.
This means that you need to start up Oracle Enterprise Manager from the 9.0.3 Oracle home.
If you start up Oracle Enterprise Manager using the Services panel, you would see the name of the 9.0.3 ORACLE_HOME in the service name (OracleORACLE_HOMEEMWebsite). Verify the start-up type (manual or automatic) and status (running or not) of the service. Also verify that the old service (from 9.0.2) is no longer running.
To determine the instance that contains the active Oracle Enterprise Manager, see the first step in Section 3.2.8, "Multi-User Installations".
If you have an Oracle9iAS 9.0.3 instance that is not associated with an infrastructure and you would like to use Oracle9iAS Single Sign-On or clustering, you can associate the instance with an existing infrastructure using the Oracle Enterprise Manager Web site. Refer to the Oracle9i Application Server Administrator's Guide for more information.
Interdependencies between Oracle9iAS 9.0.3 components and component configuration dependencies can be found in the Oracle9i Application Server Administrator's Guide.
You can configure additional Oracle9iAS 9.0.3 components following installation. Configuration of additional Oracle9iAS 9.0.3 components is described in the Oracle9i Application Server Administrator's Guide.
You can perform multiple Oracle9iAS 9.0.3 installs on the same host but as different users. However, the users must be members of the Administrators group. If you have installed one or more installations of Oracle9iAS 9.0.3, you must complete the following steps before enabling multi-user installations.
The Registry Editor is displayed.
You need to know the location of the active Enterprise Manager if you are going to stop it from the command-line. You do not need to know it if you are going to stop it using the Services panel (this is the recommended method).
(Windows NT) Go to Start > Settings > Control Panel > Services. Highlight the Oracle Enterprise Manager Web site (OracleORACLE_HOMEEMWebsite). Click the Stop button.
(Windows 2000) Go to Start > Programs > Administrative Tools > Services. Highlight the Oracle Enterprise Manager Web site (OracleORACLE_HOMEEMWebsite). Click the Stop icon.
(Windows NT) Go to Start > Settings > Control Panel > Services. Highlight the Oracle Enterprise Manager Web site (OracleORACLE_HOMEEMWebsite). Click the Start button.
(Windows 2000) Go to Start > Programs > Administrative Tools > Services. Highlight the Oracle Enterprise Manager Web site (OracleORACLE_HOMEEMWebsite). Click the Start icon.
This section includes postinstallation configuration tasks for the following:
You must configure Oracle9iAS Java Authentication and Authorization Service (JAAS) components before using applications that use JAAS. JAAS configuration tasks are described in the Oracle9i Application Server Security Guide.
This section applies only if your Oracle9iAS 9.0.3 instance is associated with an Infrastructure.
When the Oracle Universal Installer initially registers mod_osso with Oracle9iAS Single Sign-On, it passes the registration URLs containing the port number of Oracle HTTP Server, instead of the port number of Oracle9iAS Web Cache. Because Oracle Universal Installer passes the incorrect port number, it bypasses Oracle9iAS Web Cache.
In order for mod_osso to work correctly, you must manually re-register mod_osso using URLs that have the Oracle9iAS Web Cache port.
For more information refer to the Oracle9i Application Server Administrator's Guide.
Oracle9iAS 9.0.3 components can be started and stopped using the Oracle Enterprise Manager Web site. For information on manually starting and stopping of Oracle9iAS 9.0.3 components, refer to Oracle9i Application Server Administrator's Guide.
Following installation, the Oracle Universal Installer creates a file showing the port assignments during installation of Oracle9iAS 9.0.3 components. The installation process automatically detects any port conflicts and chooses an alternative port in the range allocated for that component. The portlist.ini file is located at:
This file lists component entries as "port name = port value". For example:
Oracle HTTP Server port = 7777
Oracle HTTP Server SSL port = 4443
Oracle HTTP Server listen port = 7778
Oracle HTTP Server SSL listen port = 4444
Oracle HTTP Server Jserv port = 8007
Enterprise Manager Servlet port = 1810
You can also view the port numbers by pointing your browser to the Oracle9iAS Welcome page and selecting the Ports tab.
|
See Also:
|
Oracle9iAS 9.0.3 provides demonstration applications for Oracle9iAS 9.0.3 components.
In order to run a demonstration for an Oracle9iAS 9.0.3 component, you must have an Oracle9iAS 9.0.3 installation that contains the component, the component must be configured, and the required component instances must be running.
For more information and to run the demonstration applications, go to the Welcome Page and click Demonstrations.
Oracle9iAS TopLink enables you to map a Java object model to a relational database and non-relational data sources. This bridges the gap between objects and the relations that exist among them and relational databases. Objects are a very flexible way of storing data and relationships between data, so representing objects in a relational database can be complicated. Oracle9iAS TopLink is supported by Oracle9iAS 9.0.3 and Oracle9iAS 9.0.2. Oracle9iAS TopLink is available in the Oracle9iAS CD pack. Refer to the Oracle9iAS TopLink CD for more information.
The Oracle9iAS Portal Developer Kit for J2EE and Web Services (9.0.2.0.2) can be used to develop portlets based upon J2EE 1.3 applications running in Oracle9iAS 9.0.3. You can also develop portlets from available Web Services. These portlets can be registered with an Oracle9iAS Portal 9.0.2 environment. The Oracle9iAS Portal Developer Kit for J2EE and Web Services is available for download from
http://portalstudio.oracle.com.
For information on installing additional Oracle9iAS 9.0.3 installations, refer to Section 2.7.3, "Additional Oracle9iAS 9.0.3 Installations".
For further information on postinstallation and configuration tasks, refer to the Oracle9i Application Server Administrator's Guide and component-specific documentation.
|
|
 Copyright © 2002 Oracle Corporation. All Rights Reserved. |
|