10g (9.0.4)
Part Number B10273-01
Contents |
Home | Solution Area | Index |
| Oracle Application Server Discoverer Configuration Guide 10g (9.0.4) Part Number B10273-01 |
|
This chapter explains how to configure OracleAS Discoverer in a multiple machine environment, and contains the following topics:
A multiple machine Discoverer environment is a Discoverer deployment that contains two or more machines running OracleAS Discoverer.
A typical multiple machine Discoverer environment uses a standard commercial hardware router to distribute Discoverer Web traffic to other Discoverer machines. This is commonly known as load balancing.
However, you can also provide load balancing using OracleAS Web Cache as a proxy server to distribute Discoverer Web traffic to other Discoverer machines.
Load balancing improves OracleAS Discoverer's performance, scalability, and availability.
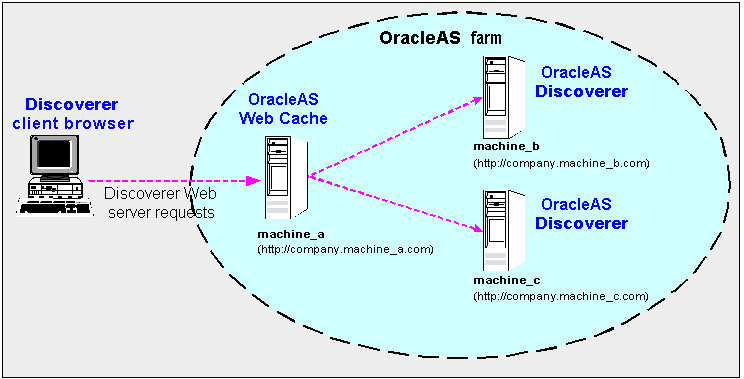
In the diagram above, OracleAS Web Cache on machine_a (URL http://company.machine_a.com) distributes Discoverer Web traffic to machine_b (http://company.machine_b.com) and machine_c (http://company.machine_b.com). In other words, you can have a single Discoverer URL for multiple Discoverer machines.
For more information about using OracleAS Web Cache to load balance, see Section 5.6.2, "How to configure OracleAS Web Cache for load balancing".
Before you can deploy OracleAS Discoverer on multiple machines, you need a basic understanding of OracleAS Discoverer installations (if you are already familiar with OracleAS installations, skip to Section 5.4, "What are the pre-requisites for using OracleAS Web Cache to provide load balancing for OracleAS Discoverer").
A typical OracleAS Discoverer installation comprises the following:
Note: There is one OracleAS infrastructure installation per OracleAS farm.
An OracleAS instance is a single OracleAS installation in one Oracle home. For example, an OracleAS Business Intelligence and Forms type installation.
You can have more than one instance on one machine. For example, you might have one OracleAS infrastructure installation and one OracleAS Business Intelligence and Forms type installation on the same machine, but in different Oracle homes. For more information, see Section 5.3.1, "About installing Discoverer on a single machine".
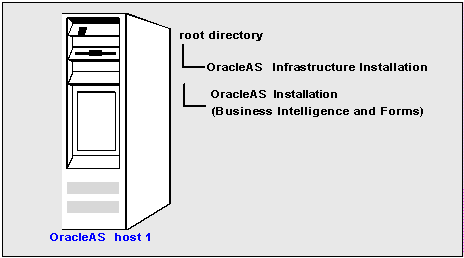
When Discoverer is deployed on a single machine, the OracleAS infrastructure installation and the OracleAS Business Intelligence and Forms type installation are located on the same machine but in separate Oracle homes (see diagram below).
When Discoverer is deployed on multiple machines, the OracleAS infrastructure installation and an OracleAS Business Intelligence and Forms type installation are typically installed on one machine, and one or more OracleAS Business Intelligence and Forms type installations are installed on other machines. These standalone OracleAS components are typically linked together in an OracleAS farm.
Note: An OracleAS farm is a collection of OracleAS instances that share the same OracleAS infrastructure instance.
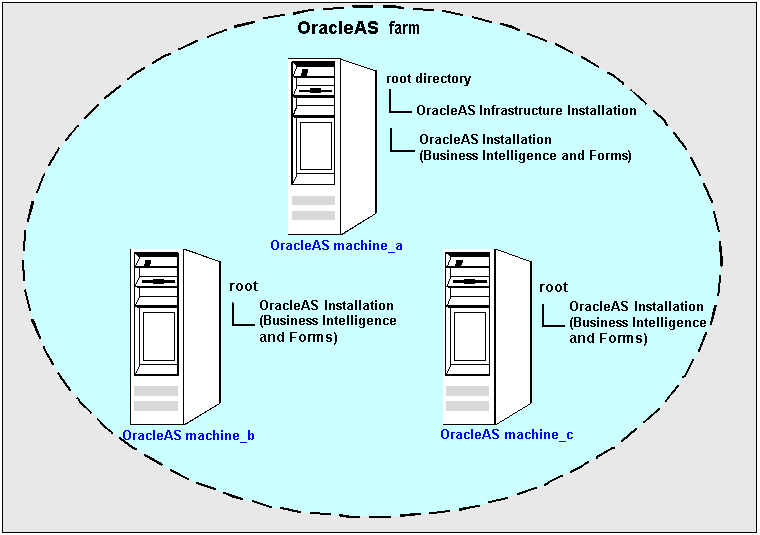
In the diagram below, OracleAS machine_a contains the OracleAS infrastructure installation and an OracleAS Business Intelligence and Forms type installation. OracleAS machine_b and OracleAS machine_c contain OracleAS Business Intelligence and Forms type installations. The three machines are linked together in an OracleAS farm.
You might use OracleAS Web Cache as a proxy server to distribute Discoverer Web server requests to other Discoverer machines in an OracleAS farm. For more information about using OracleAS Web Cache to load balance, see Section 5.6.2, "How to configure OracleAS Web Cache for load balancing".
When you choose the OracleAS installation type during installation and select the Business Intelligence and Forms option, OracleAS Discoverer is installed on that machine. You can subsequently install a Business Intelligence and Forms instance on other machines and link instances together in an OracleAS farm.
For example, you might have installed the following:
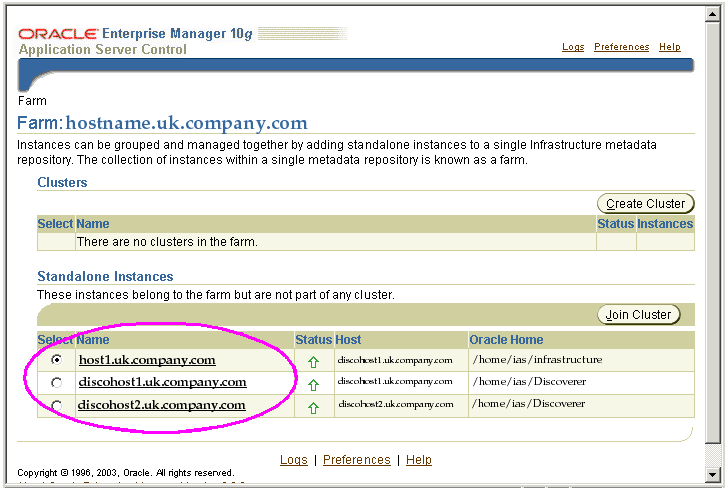
You use Application Server Control to manage OracleAS farms. The screen below shows how the above scenario is represented in Application Server Control. Each machine is represented as a row in the Standalone Instances table.
Before you can configure OracleAS Discoverer for load balancing using OracleAS Web Cache, you must have the following installed:
You can use OracleAS Web Cache Manager to configure load balancing for OracleAS Discoverer across multiple machines. For example, you might have the following:
Note: OracleAS Web Cache might also be running on machine_b and machine_c but is not used to load balance the machines.
Configuring OracleAS Web Cache for load balancing involves the following tasks:
For more information about using OracleAS Web Cache Manager to provide load balancing with OracleAS Discoverer, see Section 5.6.2, "How to configure OracleAS Web Cache for load balancing".
You deploy OracleAS Discoverer with load balancing to increase the number of supported Discoverer end users and improve Discoverer performance.
To deploy OracleAS Discoverer with load balancing using OracleAS, do the following:
Note: Turned on does not necessarily mean that OracleAS Web Cache is running (i.e. OracleAS Web Cache is set to UP in Application Server Control). When you do an OracleAS install, OracleAS Web Cache is turned off by default (i.e. the 'webcache' attribute of the Discoverer configuration element in configuration.xml is set to 'false').
Hint: Make sure that you can run Discoverer directly from a machine before trying to load balance to that machine. For example, if you want to load balance OracleAS Discoverer installed on machine_b, start a Web browser and enter the Discoverer URL for that machine (e.g. http://machine_b:7779/discoverer/viewer) to make sure that Discoverer works correctly.
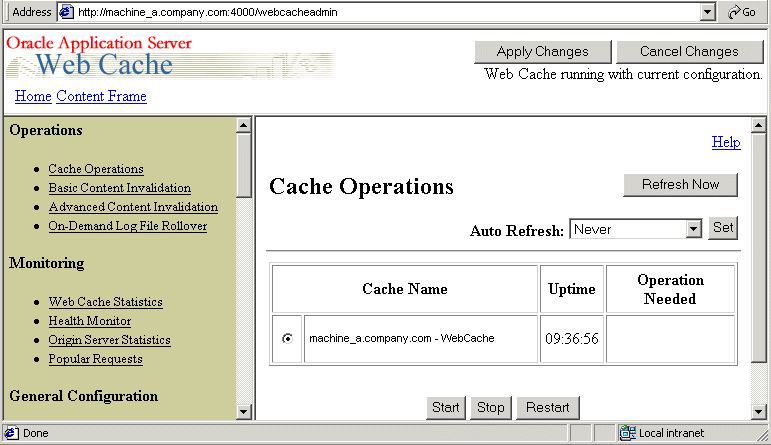
You start OracleAS Web Cache Manager on a machine when you want to configure and monitor OracleAS Web Cache on that machine. For example, you might want to configure a machine as a proxy machine to route OracleAS Discoverer Web traffic to multiple machines.
To start OracleAS Web Cache Manager:
For example:
http://<host.domain>:4000/Webcacheadmin
Note: The default port number for OracleAS Web Cache is 4000. You can obtain the port number from the OracleAS Ports page (for more information, see Section 4.10, "How to list ports used by OracleAS").
The Enter Network Password page is displayed.
You can now configure OracleAS Web Cache for load balancing (for more information, see Section 5.6.2, "How to configure OracleAS Web Cache for load balancing").
You can use OracleAS Web Cache Manager to configure load balancing for Web applications such as OracleAS Discoverer. OracleAS Web Cache Manager has pages for each aspect of OracleAS Web Cache that you can configure.
For example, the Origin Servers page in the Origin Servers, Sites, and Load Balancing area enables you to specify which machines you want to use to provide load balancing for a Web application.
Note: Before you start, make sure you have the necessary OracleAS components installed (for more information, see Section 5.4, "What are the pre-requisites for using OracleAS Web Cache to provide load balancing for OracleAS Discoverer").
To configure OracleAS Web Cache for load balancing:
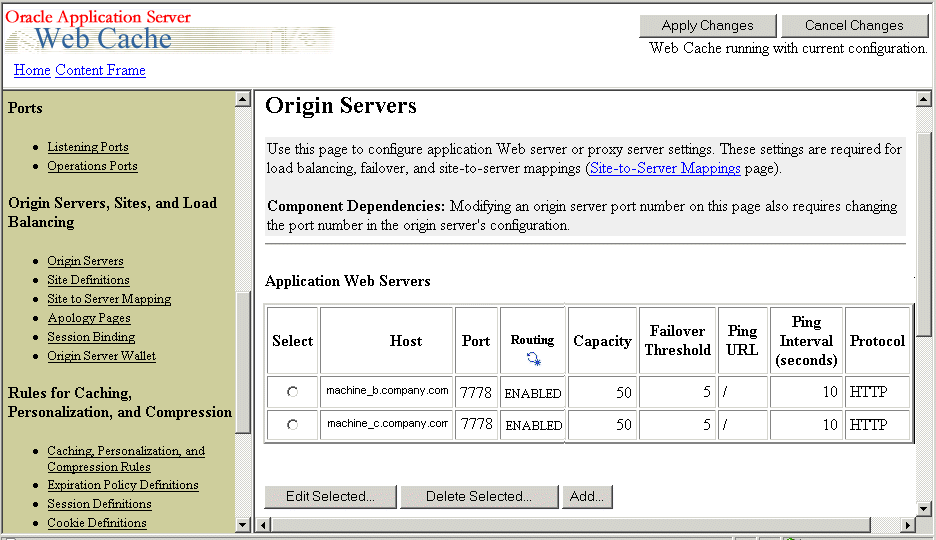
Text description of the illustration mm6.gif
Note: You select the Origin Servers link in OracleAS Web Cache Manager, not Application Server Control.
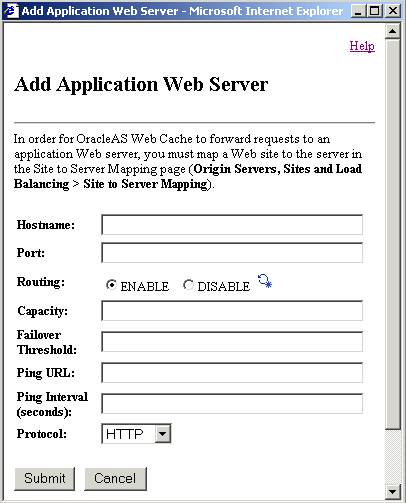
You use the Origin Servers page to specify and manage the OracleAS machines that you want to use to provide load balancing. For example, if you want to use OracleAS Discoverer installed on machine_b and machine_c, you need to add entries for machine_b and machine_c to the Application Web Servers table.
Text description of the illustration mm13.gif
Note: You can obtain these port numbers from the OracleAS Ports page (for more information, see Section 4.10, "How to list ports used by OracleAS").
Hint: Display the portlist page for the Discoverer BI and Forms installation, not the OracleAS infrastructure installation.
50 into the Capacity field (recommended setting).
Note: For more information about specifying the capacity, see Oracle Application Server Web Cache Administration and Deployment Guide.
5 into the Threshold field (recommended setting).
/ in the Ping URL field (recommended setting).
10 in the Ping Interval field (recommended setting).
Note: You might want to fine tune OracleAS Web Cache later if necessary. For more information about the Create Application Web Server page, see OracleAS Web Cache Help. For more information about specifying Origin Servers, see Oracle Application Server Web Cache Administration and Deployment Guide.
Note: If you are using the OracleAS Web Cache HTTP Listen (non-SSL) port, select HTTP. If you are using the OracleAS Web Cache HTTPS Listen (SSL) port, select HTTPS.
Having defined the OracleAS machines that you want to load balance, you now define the load balancing relationship between OracleAS Web Cache and the OracleAS machines. For example, you might want to specify that machine_a directs Discoverer Web server requests to machine_b and machine_c.
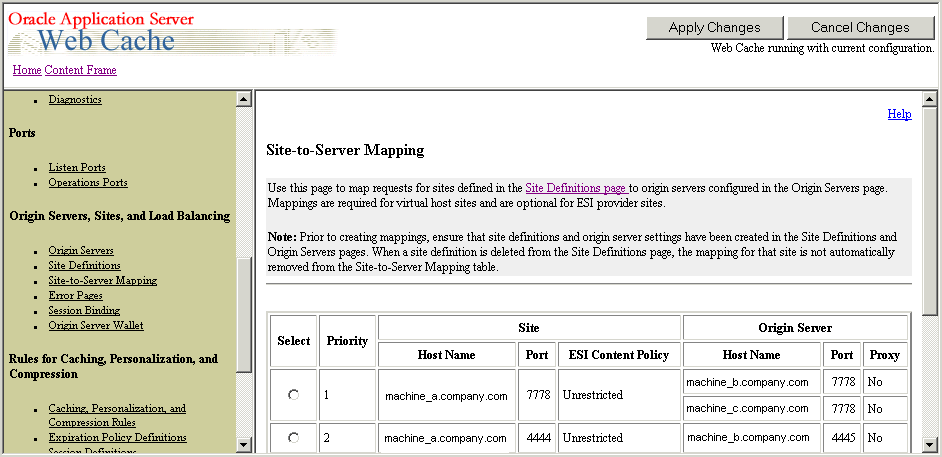
Text description of the illustration mm7.gif
The Site to Server Mapping page has an entry for the machine on which you are running OracleAS Web Cache. For example, if you are running OracleAS Web Cache on machine_a, you will see a row for machine_a with default settings.
Hint: The Port Number field under the Enter Site Name area should contain the OracleAS Web Cache listening port number that is displayed on the Listening Ports page in the Ports area.
The next step is to specify which OracleAS Discoverer machines you want to load balance.
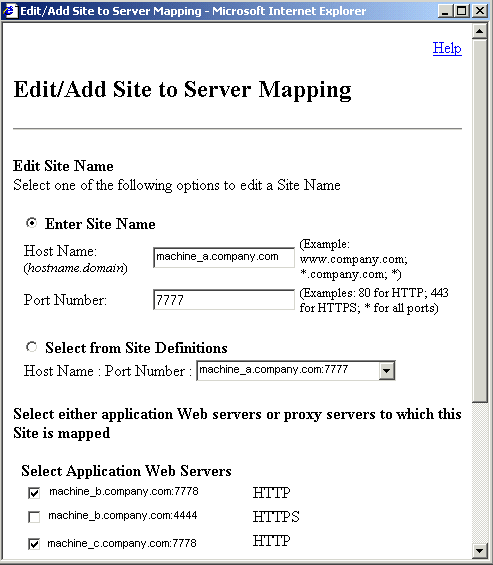
Text description of the illustration mm8.gif
You should see the machines that you defined in the Application Web Servers table on the Origin Servers page.
For example, if you have installed OracleAS Discoverer on machine_b and machine_c, select the check boxes next to machine_b and machine_c.
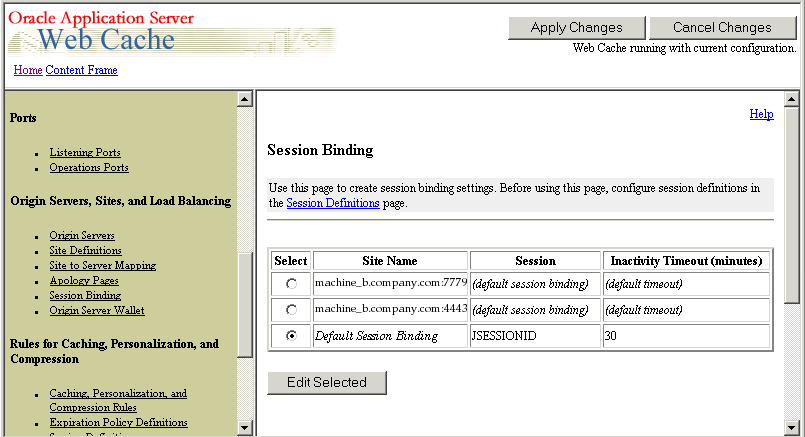
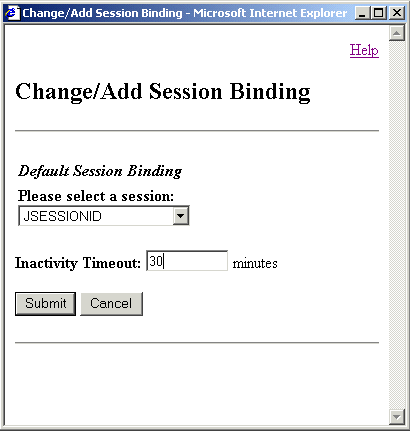
The next step is to specify the session binding value, which specifies how a user session is bound to a particular application Web server.
30 in the Inactivity Timeout field (recommended setting).
The next step is to apply the changes you have made and restart OracleAS Web Cache.
When OracleAS Web Cache has restarted, the Success page is displayed.
You can now verify that browser sessions connecting to the OracleAS Web Cache machine are routed to one of the OracleAS Discoverer machines specified for load balance. For more information, see Section 5.6.3, "How to verify that OracleAS Web Cache is configured correctly for load balancing".
Hint: If the changes that you apply are not accepted, you might find that the capacity that you have defined on one or more of the load balancing machines is too high. For example, when you click Restart you might get an error message similar to the following:
opmnctl: stopping opmn managed processes... opmnctl: starting opmn managed processes... Request failure: 0 of 1 processes started.
To change the capacity value of load balanced machines:
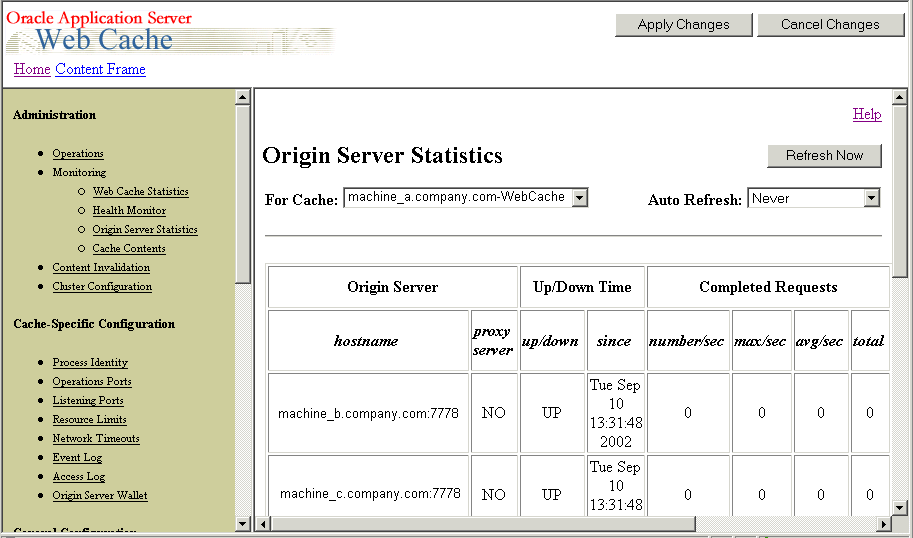
You can verify that OracleAS Web Cache is configured correctly for load balancing by confirming that OracleAS Discoverer Web traffic is being routed to the correct machines.
For example, you might want to confirm that Discoverer browser sessions connecting to:
http://machine_a.company.com:7777/discoverer/viewer
are routed to:
http://machine_b.company.com:7778/discoverer/viewer
Or
http://machine_c.company.com:7778/discoverer/viewer
To verify that OracleAS Web Cache is configured correctly for load balancing:
For example, if you have Discoverer sessions running on machine_a and machine_b, the Origin Server Statistics will contain a row for machine_a and a row for machine_b.
For example, if you have ten Discoverer sessions running on machine_a and machine_b, the Active Sessions-now column might contain the value 6 for machine_a and the value 4 for machine_b (i.e. ten sessions in total).
For example, if you have 100 Discoverer sessions running on machine_a and machine_b, the Active Sessions-now column might should reflect a similar number of sessions for each machine.
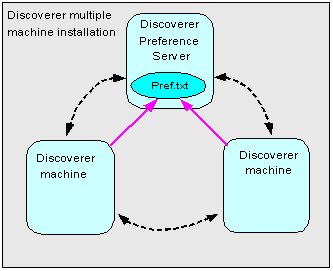
Each Discoverer instance includes a Discoverer Preference component. The Discoverer Preference component stores preference settings (e.g. worksheet axis style, default EUL, auto-query enable) for OracleAS Discoverer users accessing that Discoverer instance (for more information, see Section 1.10.2.2, "What is the Discoverer Preferences component?").
In a multiple machine environment, you might want to store all Discoverer end user preferences in a single location. In other words, you want to each Discoverer instance to use the same Discoverer Preference component. To store all Discoverer end user preferences in a single location, you specify a centralized Discoverer Preferences component (for more information, see Section 5.7.1, "How to specify a centralized Discoverer Preferences component").
If you want to store all Discoverer end user preferences in a single location, you configure each Discoverer instance to use the Preferences component running on the Preference Server machine, instead of running their own Preferences component. The diagram below shows how additional Discoverer machines reference the preferences on the Preference Server machine.
To specify a centralized Discoverer Preferences component, you:
To find out the instance name of the machine that you want to run the Preferences component (i.e. to designate the Discoverer Preference Server machine):
You use the instance name value in register session scripts of other machines in the multiple machine environment.
You now need to modify the register session scripts of other machines in the multiple machine environment to use the instance name of the Discoverer Preference Server machine (for more information, see Section 5.7.3, "How to modify the register session scripts of other machines in the multiple machine environment to use the Discoverer Preference Server machine").
Having identified the instance name of the machine that is going to run the Preferences component (i.e. the Discoverer Preference Server machine), you must now make sure that other machines use the Preferences component on the Discoverer Preference Server machine.
To modify the register session scripts of other machines in the multiple machine environment to use the Discoverer Preference Server machine, on every other machine in the installation do the following:
To find out the location of the file, see Section A.2, "List of Discoverer file locations".
... -a -preference -a ${INSTANCE_NAME}OracleDiscovererPreferences9
For example, if the Discoverer Preference Server machine with the instance name machine_a.us.company.com, you would change the register session script to:
... -a -preference -a machine_a.us.company.comOracleDiscovererPreferences9
You now need to disable the preferences component on all machines except the Discoverer Preference Server machine (for more information, see Section 5.7.4, "How to disable the preferences component on a machine".
When you configure Discoverer to use a single Preference Server machine in a multiple machine environment, you must disable the preferences component on all Discoverer machines except the Preferences Server machine.
To disable the preferences component on all machines except the Preference Server machine:
For more information about the location of the opmn.xml file, see Section A.2, "List of Discoverer file locations").
For example, you might change:
<ias-component id="Disco_PreferenceServer" status="enabled">
to:
<ias-component id="Disco_PreferenceServer" status="disabled">
To verify that Discoverer is using a single set of preferences, run Discoverer directly from a machine and check that preferences applied are those on the Discoverer Preference Server machine. For example, if the Discoverer Preference Server machine is machine_a, run Discoverer Viewer directly from machine_b and machine_c (e.g. on the URL http://machine_b.us.company.com:7779 or http://machine_b.us.company.com:7779) and verify that Discoverer applies preferences on machine_a.
The tnsnames.ora file contains the names and aliases of all the databases that users can access using OracleAS Discoverer.
Each machine in a multiple machine Discoverer installation must have the same tnsnames.ora file or must point to a centralized tnsnames.ora file (to find out the location of this file, see Section A.2, "List of Discoverer file locations").
To must make sure that the tnsnames.ora files on the different machines are the same, do one of the following:
Hint: Several versions of the tnsnames.ora file might exist on a machine. Make sure that you use the tnsnames.ora file listed in Section A.2, "List of Discoverer file locations".
|
|
 Copyright © 2003 Oracle Corporation. All Rights Reserved. |
|