4
Maintaining OracleAS Discoverer
4.1 Maintaining OracleAS Discoverer
This chapter explains how to maintain OracleAS Discoverer, and includes the following topics:
- Section 4.2, "About Oracle Enterprise Manager Application Server Control"
- Section 4.3, "About using Application Server Control to manage Discoverer components"
- Section 4.4, "About starting and stopping the Discoverer Service"
- Section 4.5, "About disabling and enabling Discoverer client tier components"
- Section 4.6, "About starting the Discoverer Service and the Discoverer servlets without using Application Server Control"
- Section 4.7, "How to start and stop the Discoverer servlets"
- Section 4.8, "About configuring options for the Discoverer Service and the Discoverer client tier components"
- Section 4.9, "About monitoring Discoverer metrics"
- Section 4.10, "How to list ports used by OracleAS"
- Section 4.11, "About Discoverer diagnostics and logging"
- Section 4.12, "About running Discoverer Plus with different Java Virtual Machines"
4.2 About Oracle Enterprise Manager Application Server Control
Oracle Enterprise Manager Application Server Control is part of Oracle Enterprise Manager, which provides a comprehensive systems management platform for managing Oracle products.
Application Server Control provides Web-based management tools that enable you to monitor and configure the components (e.g. OracleAS Discoverer, OracleAS Portal, OracleAS HTTP Server) of your Oracle Application Server installations. You can deploy applications, manage security, and create Oracle Application Server clusters.
The figure below shows the Application Server Control main page.
Figure 4-1 Application Server Control main page
Text description of the illustration oem1.gif
Notes
4.2.1 Why use Application Server Control with Discoverer?
You use Application Server Control with Discoverer to:
- manage availability
- set configuration options
- monitor performance
- diagnose problems
The following table lists some of the Discoverer configuration tasks that you might perform using Application Server Control:
4.2.2 How to display Application Server Control
You use Application Server Control to configure OracleAS components (e.g. OracleAS Discoverer, OracleAS Portal). For example, if you want to start or stop the Discoverer Service, view current session details, or configure default user preferences for all users.
To display Application Server Control:
- Start a Web browser and enter the Application Server Control URL containing the fully qualified host name and domain used by your own OracleAS installation.
For example:
http://<host.domain>:1810
- When prompted, enter an Application Server Control user name and password.
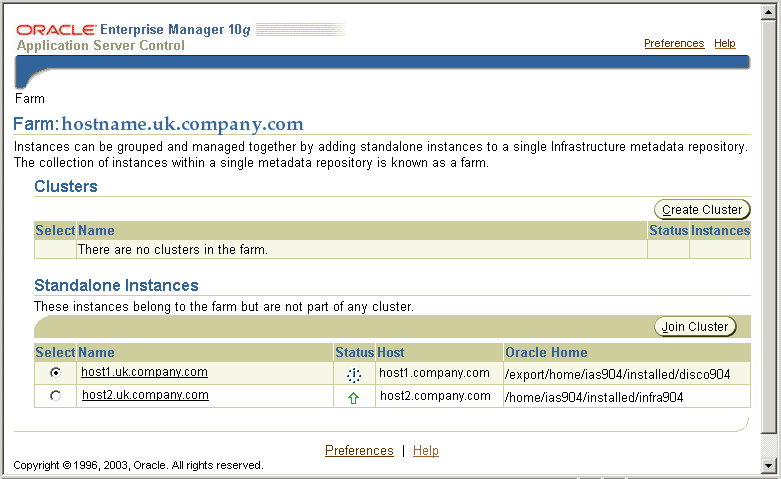
- Click OK to display the Application Server Control Home page, where you monitor OracleAS and manage the instances (i.e. OracleAS installations) on your network.

Text description of the illustration oem1.gif
The Standalone Instances table lists OracleAS instances available. For example, in the screenshot above, the Standalone Instances table contains the following two instances:
- 'host1.uk.oracle.com' is the OracleAS Business Intelligence and Forms installation, containing OracleAS Discoverer (specified in the Oracle Home column as being located in the /disco904 directory).
- 'host2.uk.oracle.com' is the OracleAS infrastructure installation (specified in the Oracle Home column as being located in the /infra904 directory).
Notes
- For a brief overview of OracleAS installations, see Section 5.3, "About OracleAS installations".
- Experienced administrators can modify the default port, but in most cases the port specified for Application Server Control is 1810.
- For more information about using Application Server Control, see Application Server Control Help, and Oracle Enterprise Manager Administrator's Guide.
4.2.3 How to display the Application Server Control Discoverer Home page
You display the Application Server Control Discoverer Home page to configure and manage Discoverer.
To display the Application Server Control Discoverer home page:
- Display Application Server Control (for more information, see Section 4.2.2, "How to display Application Server Control").
Application Server Control displays a list of OracleAS instances available.
- In the Name column, select the OracleAS instance containing the OracleAS Business Intelligence and Forms installation where OracleAS Discoverer is installed.
- If prompted, enter an Application Server Control user name and password.
Application Server Control displays a list of OracleAS System Components available for the OracleAS Business Intelligence and Forms installation (e.g. Discoverer, Forms, HTTP Server).
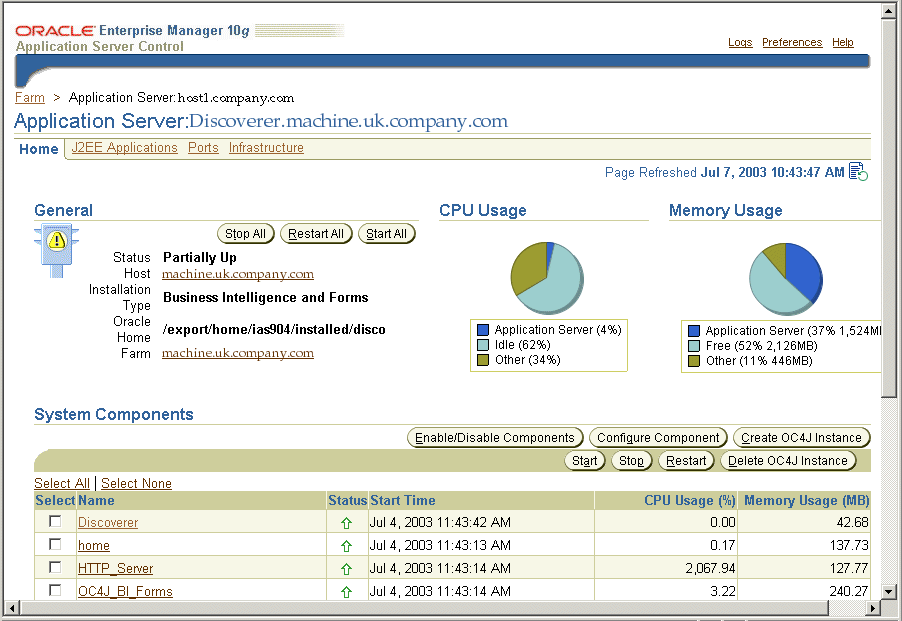
Text description of the illustration oem2.gif
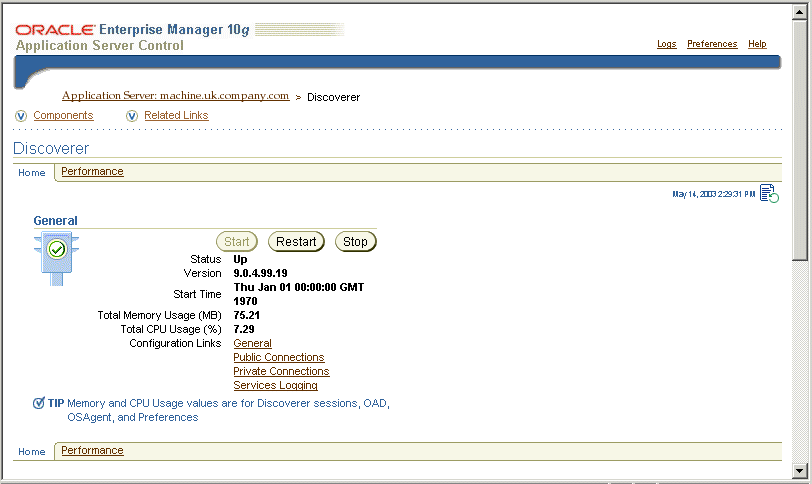
- In the Name column, select the Discoverer link to display the Application Server Control Discoverer Home page.
Text description of the illustration em_main.gif
You can now start and stop Discoverer client tier components, and manage all aspects of Discoverer (see figure below).
Notes:
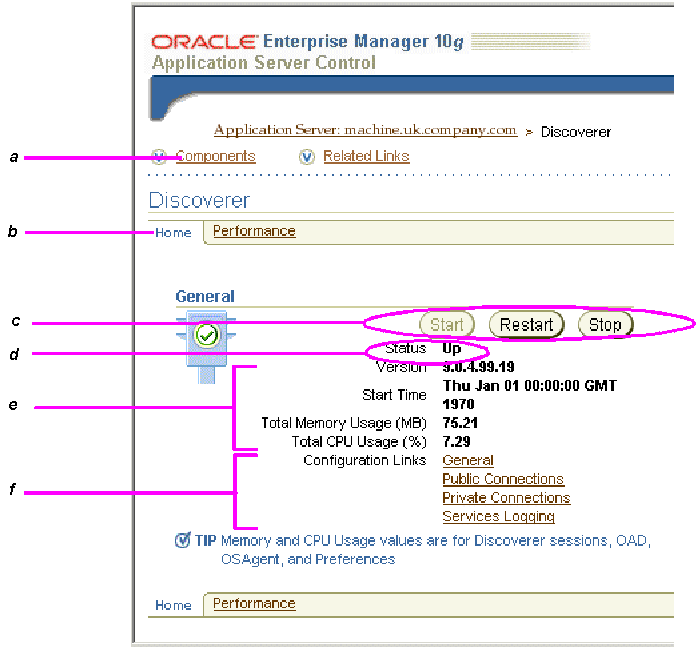
- The figure below describes the Application Server Control Discoverer Home page.
Figure 4-2 Application Server Control Discoverer Home page
Text description of the illustration oem8.gif
Key to figure:
- Link to the Discoverer Components area (for more information, see Section 4.3, "About using Application Server Control to manage Discoverer components")
- The Home tab of the Application Server Control Discoverer page.
- Buttons to start and stop the Discoverer Service.
- Current Status indicator, which shows whether the Discoverer Service is running (i.e. Up) or not running (i.e. Down).
- General information about the Discoverer component (e.g. memory and CPU usage).
- Links to Discoverer configuration pages.
4.3 About using Application Server Control to manage Discoverer components
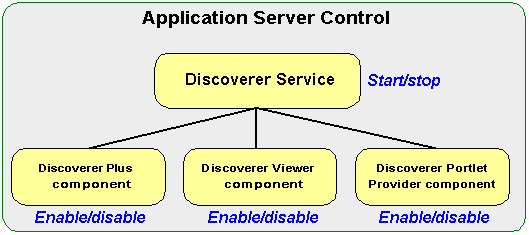
As a middle tier manager, you use Application Server Control to manage the following Discoverer components:
The main tasks that you perform using Application Server Control are (see figure below):
- stopping and starting the Discoverer Service
- enabling and disabling the Discoverer Plus component, Discoverer Viewer component, and Discoverer Portlet Provider component
Figure 4-3 Using Application Server Control to mange Discoverer components
Text description of the illustration darch.gif
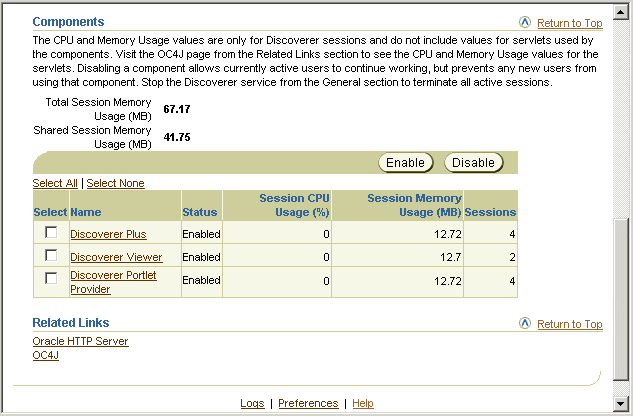
The figure below shows the Discoverer Plus component, Discoverer Viewer component, and Discoverer Portlet Provider component displayed in the Application Server Control Discoverer Home page.
Figure 4-4 Discoverer components displayed in the Application Server Control Discoverer Home page
Text description of the illustration oem21.gif
Notes
4.3.1 What happens when you enable or disable Discoverer client tier components?
What happens when you enable or disable Discoverer client tier components depends on whether the Discoverer Service is running, as show below:
4.4 About starting and stopping the Discoverer Service
The Discoverer Service comprises the following:
- Discoverer Session
- Discoverer Preference
- Object Activation Daemon (OAD) and SmartAgent
For more information about the Discoverer Service, see Section 1.10.2, "About the Discoverer CORBA components (Discoverer Service)".
You use Application Server Control to start, stop and monitor the Discoverer Service running on a machine. For example, you might need to start and stop the Discoverer Service for maintenance (e.g. when you apply a Discoverer patch).
Figure 4-5 The Application Server Control Discoverer Home page displaying the Discoverer Service options

Text description of the illustration em_main.gif
This section describes how to start and stop the Discoverer Service, and contains the following topics:
Notes
- You can also start, stop and restart the Discoverer Service in the Application Server Control Application Server page (i.e. before you display the Application Server Control Discoverer Home page).
- If you want to stop and start the Discoverer Service in one operation, you can also use the Restart button.
- When you start the Discoverer Service, note the following:
- If all Discoverer servlets are running and are not disabled, Discoverer Viewer, Discoverer Plus, and Discoverer Portlet Provider can connect to Discoverer sessions and begin to serve requests (e.g. users can open workbooks using Discoverer Viewer, build worksheets using Discoverer Plus, and create portlets using Discoverer Portlet Provider).
- the Current Status indicator shows that the Discoverer Service is running (i.e. set to 'Up')
- If the Discoverer Service is already running, no action is performed.
- If the Discoverer Service fails to start:
- the Current Status indicator shows that the Discoverer Service is not running (i.e. set to 'Down')
- Application Server Control displays an error message indicating why the Discoverer Service failed to start
- When you stop the Discoverer Service, note the following:
- Discoverer Plus users cannot access the Discoverer Plus URL and an information message is displayed informing users that the Discoverer Service is down (i.e. a No Response from Application Web Server).
- Discoverer Viewer users cannot access the Discoverer servlet URL and an error message is displayed that the Discoverer Service is down (i.e. No Response from Application Web).
- Discoverer Portlet Provider users cannot publish new portlets, edit defaults, customize or refresh portlets, and an information message is displayed informing users that the Discoverer Service is down (i.e. a No Response from Application Web Server).
- Discoverer servlets release system resources that they are using
- Discoverer displays existing portlets in Portal pages using cached data.
- All Discoverer sessions are terminated.
- The following processes are terminated (if running):
- Discoverer Plus, Discoverer Viewer, and Discoverer Portlet Provider cannot connect to Discoverer sessions or serve requests (e.g. users cannot open workbooks using Discoverer Viewer, build worksheets using Discoverer Plus, or create portlets using Discoverer Portlet Provider).
- the Current Status indicator shows that the Discoverer Service is not running (i.e. set to 'Down')
- If the Discoverer Service fails to stop:
- and all components are still running, the Status indicator indicates that the Discoverer Service is up
- and not all components are running, the Status indicator indicates that the Discoverer Service is in an unknown state
- Discoverer displays an error message that indicates why the Discoverer Service failed to stop
4.4.1 How to start the Discoverer Service on a machine
You might want to start the Discoverer Service after maintenance. For example, after the Discoverer Service has been stopped to apply a Discoverer patch.
Hint: If the Discoverer Service is already running, you might want to restart the Discoverer Service by clicking Restart.
Note: The Discoverer Service is started automatically as part of the BI_Forms instance.
To start the Discoverer Service:
- Display Application Server Control (for more information, see Section 4.2.2, "How to display Application Server Control").
- Display the Application Server Control Discoverer Home page for the machine that you want to configure (for more information, see Section 4.2.3, "How to display the Application Server Control Discoverer Home page").

Text description of the illustration em_main.gif
- Click Start to start the Discoverer Service.
- Click Yes at the confirmation page.
4.4.2 How to stop the Discoverer Service on a machine
You might want to stop Discoverer Service to perform maintenance. For example, to apply a Discoverer patch.
To stop the Discoverer Service:
- Display Application Server Control (for more information, see Section 4.2.2, "How to display Application Server Control").
- Display the Application Server Control Discoverer Home page for the machine that you want to configure (for more information, see Section 4.2.3, "How to display the Application Server Control Discoverer Home page").

Text description of the illustration em_main.gif
- Click Stop.
Application Server Control displays a warning message.
- Click Yes to begin the process that stops the Discoverer Service.
Hint: To stop and start the Discoverer Service, click Restart instead of clicking Stop then Start.
4.5 About disabling and enabling Discoverer client tier components
Sometimes you will want to disable and enable end user access to Discoverer client tier components (i.e. Discoverer Plus, Discoverer Viewer, and Discoverer Portlet Provider).
For example, you might want to:
- prevent new users from connecting to Discoverer
However, existing users can still complete their work. When all users have disconnected, you can stop the Discoverer Service.
- restrict access to Discoverer components
You might disable Discoverer Plus, Discoverer Viewer, or Discoverer Portlet Provider to prevent users from connecting, due to security restrictions or other policies.
The Discoverer client tier components behave differently when you disable them, as follows:
- You cannot start or stop the Discoverer Service for a single Discoverer component because all the components share a single Discoverer Service (for more information about the Discoverer Service, see "About the Discoverer CORBA components (Discoverer Service)").
- When you disable the Discoverer Plus and Discoverer Viewer components, Discoverer behaves as follows:
- When you disable the Discoverer Portlet Provider component, Discoverer behaves as follows:
- New Discoverer portlets cannot be added to Portal pages.
- A user cannot use the Edit Defaults option or the Customize option for existing portlets.
- If a user is already editing defaults or customizing a portlet when the component is disabled, they can finish the task.
- Scheduled refreshes that are running can complete. However, scheduled refreshes that have not yet run, will not run until you enable the Portlet Provider component.
- If a user attempts to add a new portlet, edit defaults, or customize an existing portlet, Discoverer displays a message explaining that the service is not available.
4.5.1 How to disable Discoverer client tier components
You might need to disable one or more Discoverer client tier components to perform maintenance. For example, to apply a Discoverer patch, or to restrict user access to a Discoverer component.
To disable Discoverer client tier components:
- Display Application Server Control (for more information, see Section 4.2.2, "How to display Application Server Control").
- Display the Application Server Control Discoverer Home page (for more information, see Section 4.2.3, "How to display the Application Server Control Discoverer Home page").
- Select the Components link to display the Components area.

Text description of the illustration oem21.gif
- In the Components area, select the check box in the Select column for the Discoverer component(s) that you want to disable.
For example, to disable Discoverer Plus, select the Discoverer Plus check box.
Note: Alternatively, click a link in the Name column to display the Home page for the component you selected and click Disable or Enable.
- Complete the following steps to disable the Discoverer component:
- Click Disable.
Application Server Control displays a warning message.
- Click Yes to begin the process that disables the Discoverer component.
Application Server Control displays a Processing message.
The Status column displays 'Disabled' for the Discoverer component(s) that you selected.
4.5.2 How to enable Discoverer client tier components
You might need to enable one or more Discoverer client tier components after performing maintenance. For example, after you have applied a Discoverer patch, or to enable user access to a Discoverer component.
Note: The Discoverer client tier components are started automatically as part of the BI_Forms instance.
To enable Discoverer client tier components:
- Display Application Server Control (for more information, see Section 4.2.2, "How to display Application Server Control").
- Display the Application Server Control Discoverer Home page (for more information, see Section 4.2.3, "How to display the Application Server Control Discoverer Home page").
- Select the Components link to display the Components area.

Text description of the illustration oem21.gif
- In the Components area, select a check box in the Select column for the Discoverer component(s) that you want to disable or enable.
For example, to enable Discoverer Plus, select the Discoverer Plus check box.
Note: Alternatively, click a link in the Name column to display the Home page for the component you selected and click Disable or Enable.
- Complete the following steps to enable the Discoverer component:
- Click Enable.
Application Server Control displays a warning message.
- Click Yes to begin the process that enables the Discoverer component.
Application Server Control displays a warning message.
The Status column displays 'Enabled' for the Discoverer component(s) that you selected.
4.6 About starting the Discoverer Service and the Discoverer servlets without using Application Server Control
This section explains why you might want to manage Discoverer without using Application Server Control, and how you stop and start the Discoverer Service without using Application Server Control.
4.6.1 Managing Discoverer in a high availability environment
A high availability environment is an environment in which middle tier processes must have as little downtime as possible. If any middle tier processes fail or become unresponsive, those processes must be restarted as quickly as possible.
OPMN (Oracle Process Monitoring and Notification) is an OracleAS component for managing OracleAS middle tier processes (including Discoverer) in a high availability environment.
OPMN periodically checks the processes it manages, and automatically restarts any processes that have failed or become unresponsive.
You specify how OPMN manages Discoverer processes by changing the settings in the opmn.xml configuration file. For more information about the options that are available in the opmn.xml file, see Section A.6, "List of configuration settings in opmn.xml".
4.7 How to start and stop the Discoverer servlets
You can start and stop the Discoverer servlets (i.e. the Discoverer J2EE components) running on a standalone machine in an OracleAS component farm from any machine in the farm. For example, you might want to perform maintenance tasks on a machine and need to stop the Discoverer servlets.
Note: This task also stops the OracleAS Reports component and the OracleAS Forms component.
For more information about the Discoverer servlets, see Section 1.10.1, "About the Discoverer J2EE components".
To start and stop the Discoverer servlets:
- Display Application Server Control (for more information, see Section 4.2.2, "How to display Application Server Control").
Application Server Control displays a list of OracleAS instances available.
- In the Name column, select the OracleAS instance that you want to configure.
Application Server Control displays a list of OracleAS System Components available (e.g. Discoverer, Forms, HTTP Server).

Text description of the illustration oem2.gif
- In the Name column, select the OC4J_BI_Forms link to display the OC4J_BI_Forms page.
- Do one of the following:
Notes
- If you want to stop and start the servlets in one operation, you can also use the Restart button.
4.8 About configuring options for the Discoverer Service and the Discoverer client tier components
You use Application Server Control to configure options for the Discoverer Service and the Discoverer client tier component as follows:
- using the Discoverer Service options, you can:
- set the default locale (e.g. language setting) for Discoverer connections
- enable graph support for Discoverer Viewer and Discoverer Portlet Provider
- manage public connections (i.e. create, edit, and delete connections)
- enable users to create their own private connections
- set Discoverer session logging
- using the Discoverer client tier component options, you can:
- specify the communication protocol and servlet logging settings for Discoverer Plus
- specify caching, servlet logging, stylesheet pool, and delay time settings for Discoverer Viewer
- specify session, servlet logging, and stylesheet pool settings for Discoverer Portlet Provider
For more information about how to configure Discoverer and Discoverer component options, see:
4.8.1 How to change configuration options for all Discoverer client tier components
You might want to change configuration settings that apply to all Discoverer client tier components. For example, to set the default locale or to edit public connections.
To change configuration options for all Discoverer client tier components:
- Display Application Server Control (for more information, see Section 4.2.2, "How to display Application Server Control").
- Display the Application Server Control Discoverer Home page (for more information, see Section 4.2.3, "How to display the Application Server Control Discoverer Home page").

Text description of the illustration em_main.gif
- In the General area, next to Configuration, click one of the links to display the appropriate Discoverer Configuration page, as follows:
- Click General to display the General area.
Use this page to select a locale, enable or disable graphs for Discoverer Viewer and Discoverer Portlets.
- Click Public Connections to display the Public Connections area.
Use this page to create and update public connection details
- Click Private Connections to display the Private Connections area.
Use this page to enable private connections for Discoverer Plus and Discoverer Viewer.
- Click Services Logging to display the Services Logging area.
Use this page to maintain Discoverer Services logging options
Note: For more information about each option, see Application Server Control Help.
- Modify the configuration options as required.
- Click OK to save the changes you have made.
Note: Configuration changes take effect when Discoverer users next log in to Discoverer. You do not have to restart the Discoverer Service or the Discoverer servlets.
4.8.2 How to change configuration options for individual Discoverer client tier components
You might want to change configuration settings that apply to individual Discoverer client tier components (i.e. Discoverer Plus, Discoverer Viewer, or Discoverer Portlet Provider). For example, to select the communication protocol for Discoverer Plus.
To change configuration options for individual Discoverer client tier components:
- Display Application Server Control (for more information, see Section 4.2.2, "How to display Application Server Control").
- Display the Application Server Control Discoverer Home page (for more information, see Section 4.2.3, "How to display the Application Server Control Discoverer Home page").

Text description of the illustration em_main.gif
- Select the Components link to display the Components area.

Text description of the illustration oem21.gif
- In the Components area, in the Name column, select the Discoverer link for the component that you want to configure.
For example, select the Discoverer Plus link to display the Home page for Discoverer Plus.
- In the General area, next to Configuration Links, select a link to display the Configuration options for the component you selected, as follows:
- Discoverer Plus options:
- Discoverer Viewer options
- Caching enables you enable and disable OracleAS Web Cache
- Logging enables you to maintain Viewer logging options
- Stylesheet Pool enables you to specify the number of stylesheets to store in memory to maximize Discoverer performance (for more information, see Section 10.5.2, "How to enhance Discoverer Viewer scalability using XSL stylesheet pooling")
- Delay Times enables you to specify how long to wait before Discoverer Viewer displays a query progress page, or the frequency for checking for export completion
- Discoverer Portlet Provider options:
- Sessions enables you to specify the number of sessions to cache for Discoverer portlets to maximize Discoverer performance
- Logging enables you to maintain Discoverer Portlet Provider logging options
- Stylesheet Pool enables you to specify the number of stylesheets to store in memory to maximize Discoverer Portlet Provider performance
Note: For more information about each option, see Application Server Control Help.
- Modify the configuration options as required.
For more information about each option, see Application Server Control Help.
- Click OK to save the changes you have made.
Note: Configuration changes take effect when Discoverer users next log in to Discoverer. You do not have to restart the Discoverer Service or the Discoverer servlets.
4.9 About monitoring Discoverer metrics
As the Discoverer middle tier administrator, you will typically want to analyze system performance by monitoring a number of statistics or metrics. This enables an you to easily compare the total resources used by Discoverer with other installed applications and services.
You can use Application Server Control to monitor the following Discoverer metrics:
- current status
- uptime
- CPU usage
- session information
You can view the Discoverer metrics in two different ways:
- you can view summary metrics for all Discoverer client tier components
- you can view individual metrics for particular client tier components
For more information about how to monitor Discoverer metrics, see:
Notes
- Metrics are a snapshot taken at the time displayed on the Application Server Control page and do not update automatically. To get up-to-date metrics, click Refresh.
4.9.1 How to monitor summary metrics for all Discoverer client tier components
You might want to monitor metrics for all Discoverer client tier components. For example, to view the total amount of memory or CPU that the Discoverer system is using.
To monitor metrics for all Discoverer client tier components:
- Display Application Server Control (for more information, see Section 4.2.2, "How to display Application Server Control").
- Display the Application Server Control Discoverer Home page (for more information, see Section 4.2.3, "How to display the Application Server Control Discoverer Home page").

Text description of the illustration em_main.gif
The Application Server Control Discoverer Home page displays general information and summary metrics.
Note the following:
- The CPU and memory consumption of the Discoverer servlets are not included in this figure (i.e. the Discoverer Viewer, Plus and Portlet Provider servlets).
- If the Current Status indicator is Down, Application Server Control does not display figures for the Uptime, CPU Usage and Memory Usage.
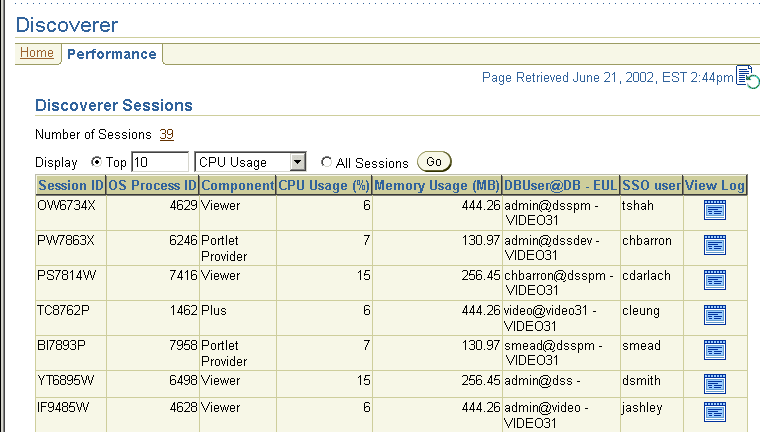
- (optional) Display the Performance tab to show session details for all Discoverer client tier components.
Text description of the illustration em2.gif
The Performance page displays:
- the total number of sessions
- a list of the top N sessions ordered by either CPU usage or memory usage
For more information about the Discoverer session details displayed on this page, see Application Server Control Help.
- (optional) Click the file icon in the View Log column on the Performance page to display the View Logs page.
The View Logs page displays all the log information for the selected Discoverer session.
4.9.2 How to monitor metrics for a single Discoverer client tier component
You might want to monitor metrics for a single Discoverer component (i.e. Discoverer Plus, Discoverer Viewer or Discoverer Portlet Provider). For example, For example, you mind want to find out exactly how many sessions are currently used by Discoverer Plus users compared to Discoverer Viewer users.
To monitor metrics for a single Discoverer client tier component:
- Display Application Server Control (for more information, see Section 4.2.2, "How to display Application Server Control").
- Display the Application Server Control Discoverer Home page (for more information, see Section 4.2.3, "How to display the Application Server Control Discoverer Home page").

Text description of the illustration em_main.gif
- Select the Components link to display the Components area.

Text description of the illustration oem21.gif
- In the Name column of the Components area, select the Discoverer link for the component that you want to monitor.
For example, select the Discoverer Plus link to display the Home page for Discoverer Plus.
Application Server Control displays the Home page for the Discoverer component that you selected.
Each Discoverer component home page displays general information and summary metrics. The Discoverer component home page is similar to the metrics on the Application Server Control Discoverer Home page, except that the metrics are specific to the displayed Discoverer component.
- (optional) Display the Performance tab to show session details for the selected Discoverer component.
The Performance page displays:
- the total number of sessions for this Discoverer component
- a list of the top N sessions for this Discoverer component, ordered by either CPU usage or memory usage
For more information about the Discoverer session details displayed on this page, see Application Server Control Help.
- (optional) Click the file icon in the View Log column on the Performance page to display the View Logs page.
The View Logs page displays log information for the selected Discoverer session.
Notes
- The CPU and memory consumption of the Discoverer servlets (i.e. the Discoverer Viewer, Plus and Portlet Provider servlets) are not included in this figure.
- If the Current Status indicator is Down, Application Server Control does not display figures for the Uptime, CPU Usage and Memory Usage.
4.10 How to list ports used by OracleAS
Discoverer uses the same port(s) as the Oracle HTTP Server.
To see a list of ports used by OracleAS:
- Display Application Server Control (for more information, see Section 4.2.2, "How to display Application Server Control").
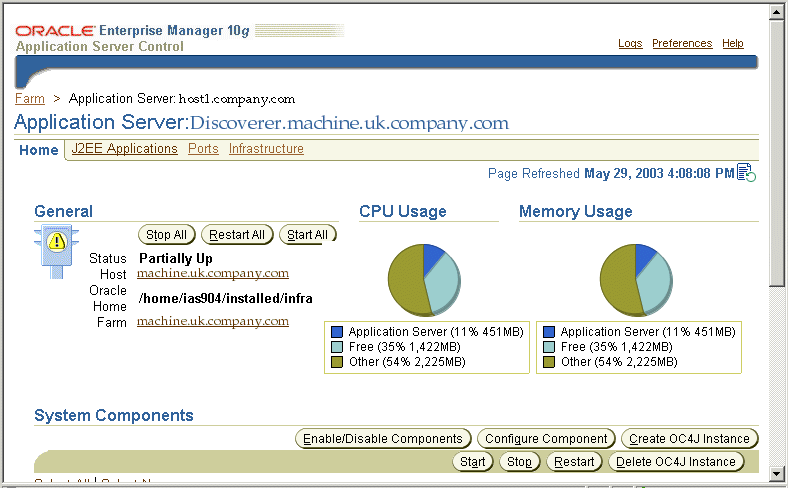
- In the Name column, select the OracleAS instance containing the OracleAS infrastructure installation where OracleAS Discoverer is installed.
Text description of the illustration infra3.gif
- Display the Ports tab.
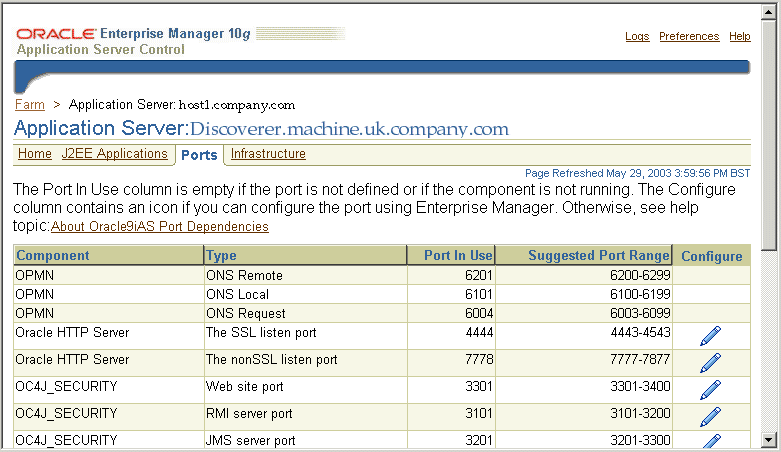
Text description of the illustration ports.gif
For information about changing the default OracleAS ports for OracleAS components, see Section 4.10.1, "How to change the port on which Discoverer is deployed".
Note: For more information about which port Discoverer is installed on by default, see Section 2.5, "Which port number is Discoverer installed on?".
4.10.1 How to change the port on which Discoverer is deployed
To change the port on which Discoverer is deployed:
- Display Application Server Control (for more information, see Section 4.2.2, "How to display Application Server Control").
- In the Name column, select the OracleAS instance containing the OracleAS infrastructure installation where OracleAS Discoverer is installed.

Text description of the illustration infra3.gif
- Display the Ports tab.

Text description of the illustration ports.gif
- In the rows containing the Oracle HTTP Server component, select the edit icon in the Configure column to display the Server Properties page for that component.
For example, to change the Discoverer HTTP port, select the edit icon in the Configure column where the Type column displays 'The nonSSL listen port'. To change the Discoverer HTTPS port, select the edit icon in the Configure column where the Type column displays 'The SSL listen port'.
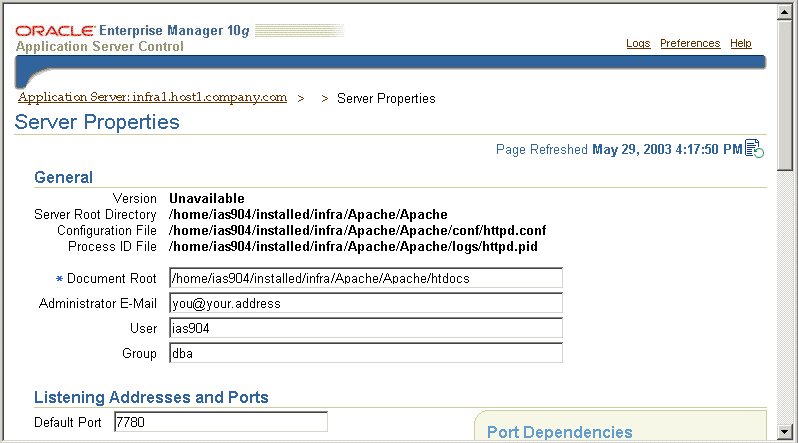
Text description of the illustration infra4.gif
- Scroll down to the Listening Addresses and Ports area and change the port number in the Default Port field.
- Click OK.
- When you are prompted to restart the Oracle HTTP Server, click Yes.
For more information about the Server Properties page in Application Server Control, see Application Server Control Help.
Hint: If you change a Discoverer port number, make sure that any other OracleAS components that use that Discoverer port number are synchronized.
4.11 About Discoverer diagnostics and logging
This explains describes the server diagnostic and logging facilities that are available in Discoverer, and contains the following topics:
4.11.1 What Discoverer diagnostics and logging facilities are available
You use Discoverer's diagnostics facilities to trace and diagnose problems with Discoverer. For example, if Discoverer's performance is slow, you might want to check that Discoverer's middle tier components are correctly configured.
The following Discoverer diagnostic facilities are available:
Notes
- When diagnosing Discoverer session information, you often need to know the session ID of the Discoverer Plus session that you want to monitor. A session ID uniquely identifies a session, which starts when an end user logs in to Discoverer and finishes when an end users logs out of Discoverer. You can then use this session ID to locate the corresponding server log.
If single sign-on is deployed, you can use the single sign-on username to monitor Discoverer sessions.
To find out the session ID of a Discoverer Plus user's session, access the JInitiator console of the Discoverer Plus user and note the Session ID: <number> value.
4.11.2 What is the checkdiscoverer utility?
The checkdiscoverer utility is a script that checks the configuration of the Discoverer middle tier and middle tier components, and reports any failures or anomalies.
For more information about the checkdiscoverer utility, see Section A.2, "List of Discoverer file locations".
4.11.3 About using the OracleAS View Logs facility
The OracleAS View Logs facility enables you to query and view log files from OracleAS applications. For example, you might want to produce a list of all Discoverer sessions running on a particular Discoverer middle tier machine.
Note: The OracleAS View Log facility is an alternative to using the Services Logging link on the Application Server Control Discoverer Home page, or the View Log link on the Performance page for each Discoverer servlet.
4.11.4 How to use OracleAS View Logs to view Discoverer log files
You use the OracleAS View Logs facility when you want to search for particular Discoverer logs. For example, you might want to look at session log files for a particular Discoverer component.
To use OracleAS View Logs to view Discoverer log files:
- Display Application Server Control (for more information, see Section 4.2.2, "How to display Application Server Control").
- In the Name column, select the OracleAS instance containing the OracleAS Business Intelligence and Forms installation where OracleAS Discoverer is installed.
- If prompted, enter an Application Server Control user name and password.
Application Server Control displays a list of OracleAS System Components available for the OracleAS Business Intelligence and Forms installation (e.g. Discoverer, Forms, HTTP Server).
- Select the Logs link in the Application Server Control header to display the View Logs page.
- Add Discoverer to the Selected Components list.
- Click Search to display all Discoverer Services log files for that machine.
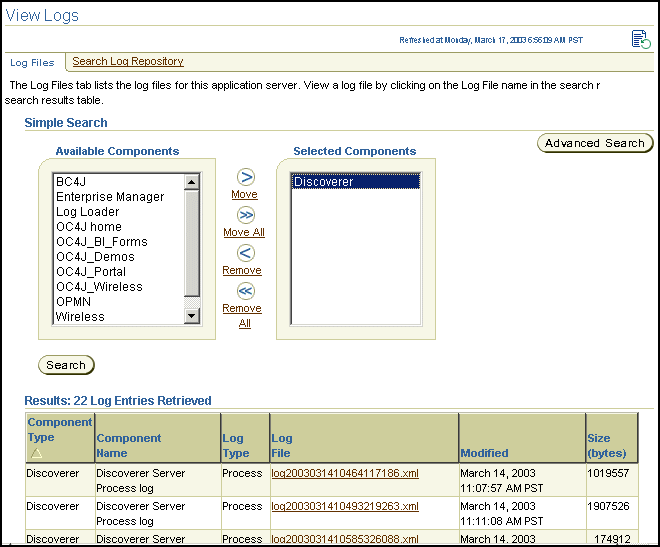
Text description of the illustration log3.gif
- Select a link in the Log File column to display that log in detail.
Hint: For find more specific logging information, click Advanced Search to search by log file attributes, or display the Search Log Repository tab to search all logs.
4.11.5 How to enable the Discoverer Services log file
You enable the Discoverer Services log file when you want to monitor Discoverer session processes.
To enable the Discoverer Services log file:
- Display Application Server Control (for more information, see Section 4.2.2, "How to display Application Server Control").
- Display the Application Server Control Discoverer Home page (for more information, see Section 4.2.3, "How to display the Application Server Control Discoverer Home page").
- Select the Services Logging link to display the Discoverer Services Logging area.

Text description of the illustration log1.gif
- Enable the Discoverer Services log file as follows:
- Select a logging level from the Logging Level drop down list.
You can now monitor the Discoverer Services log file (for more information, see Section 4.11.7, "How to view the Discoverer Services log file").
- Click OK.
Notes
- To enable OAD logging, do the following:
- Open the opmn.xml file (for more information about the location of configuration files, see Section A.2, "List of Discoverer file locations").
Replace the value of the OAD_VERBOSE_LOGGING variable with the logging level to use.
For example:
<variable id="OAD_VERBOSE_LOGGING" value="-verbose">
- Save the opmn.xml file.
4.11.6 How to enable the Discoverer Servlet log files
You enable the Discoverer Servlet log files when you want to monitor Discoverer servlet activity.
To enable the Discoverer Servlet log files:
- Display Application Server Control (for more information, see Section 4.2.2, "How to display Application Server Control").
- Display the Application Server Control Discoverer Home page (for more information, see Section 4.2.3, "How to display the Application Server Control Discoverer Home page").
- Select the Components link to display the Components area.
- Display the home page for the Discoverer servlet for which you want to enable log files, select one of the following links in the Name column:
- for the Discoverer Plus servlet log file, select the Discoverer Plus link
- for the Discoverer Viewer servlet log file, select the Discoverer Viewer link
- for the Discoverer Portlet Provider servlet log file, select the Discoverer Portlet Provider link
- Select the Logging link to display the Logging area.
- Select a logging level from the Logging Level drop down list.
For example, the figure below shows a logging level being selected for Discoverer Plus.

Text description of the illustration log2.gif
- Click OK.
You can now monitor the Discoverer servlet log file that you enabled (for more information, see Section 4.11.8, "How to view Discoverer Servlet log files").
4.11.7 How to view the Discoverer Services log file
You view the Discoverer Services log file when you want to monitor Discoverer.
Note: The Discoverer Services log file must first be enabled (for more information, see Section 4.11.5, "How to enable the Discoverer Services log file").
Hint: You can also use the OracleAS View Log facility to search for and view Discoverer log files (for more information, see Section 4.11.4, "How to use OracleAS View Logs to view Discoverer log files").
To view the Discoverer Services log file:
- Display Application Server Control (for more information, see Section 4.2.2, "How to display Application Server Control").
- Display the Application Server Control Discoverer Home page (for more information, see Section 4.2.3, "How to display the Application Server Control Discoverer Home page").
- Display the Performance tab.
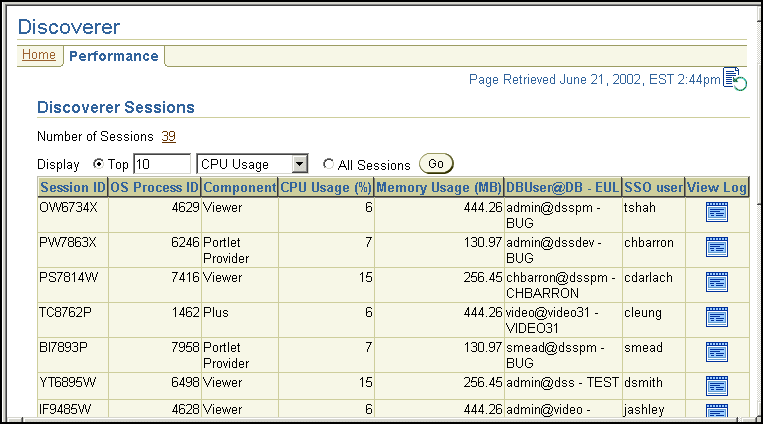
Text description of the illustration oem7.gif
- Click a file icon in the View Log column on the Performance page to display the View Logs page.
4.11.8 How to view Discoverer Servlet log files
You view the Discoverer Servlet log files when you want to monitor Discoverer servlets.
Note: The Discoverer Servlet logs must first be enabled (for more information, see Section 4.11.6, "How to enable the Discoverer Servlet log files").
Hint: You can also use the OracleAS View Log facility to search for and view Discoverer log files (for more information, see Section 4.11.4, "How to use OracleAS View Logs to view Discoverer log files").
To view the Discoverer Servlet log files:
- Display Application Server Control (for more information, see Section 4.2.2, "How to display Application Server Control").
- Display the Application Server Control Discoverer Home page (for more information, see Section 4.2.3, "How to display the Application Server Control Discoverer Home page").
- Display the Performance tab for the Discoverer servlet that you want to monitor, as follows.
- to monitor Discoverer Plus - select the Discoverer Plus link, display the Performance tab, then click the View Log icon for the session that you want to monitor.
- to monitor Discoverer Viewer - select the Discoverer Viewer link, display the Performance tab, then click the View Log icon for the session that you want to monitor.
- to monitor Discoverer Portlet Provider - select the Discoverer Portlet Provider link, display the Performance tab, then click the View Log icon for the session that you want to monitor.
4.11.9 How to copy Discoverer log files
You might want to copy all Discoverer logs into a single location. For example, to provide a snap-shot of a Discoverer middle tier machine, or to provide an archive of Discoverer log files.
You use the collectlogs utility to copy Discoverer logs into a single location.
For more information about the collectlogs utility, see Section A.2, "List of Discoverer file locations".
To copy Discoverer log files to a single location:
- On the Discoverer middle tier machine, navigate to the /discoverer/util/ directory and type the following at a command prompt:
collectlogs <logs target location>
where <logs target location> is either a TAR filename (UNIX) or a folder name (Windows).
The Discoverer log files are copied to the specified location.
Notes
- The collectlogs script collects the following information:
- Middle tier Discoverer logs
- application.log
- .reg_key.dc
- env
- Discoverer server files (i.e. all files in <ORACLE_HOME>/discoverer/bin and <ORACLE_HOME>/discoverer/lib)
- UNIX specific system parameters (e.g. /etc.hosts, ifconfig output, showrev -p output, uname -a output, ulimit -a output)
4.12 About running Discoverer Plus with different Java Virtual Machines
OracleAS supports the following default Java Virtual Machines (JVMs):
- Oracle JInitiator 1.3 for Windows (i.e. Internet Explorer or Netscape Navigator)
- Sun Java Plug-in 1.4.1 for other browsers on other platforms (e.g. Netscape Navigator for UNIX)
You might want to use a different JVM in the following circumstances:
- if you want to use a newer version of the JVM to improve performance
- if a different JVM is already installed and you want to use that JVM
- if you want to deploy Discoverer Plus on a non-Windows browser that requires a different JVM (e.g. for which JInitiator is not available)
- if you want to standardize on using the Sun Java Plug-in 1.4.1 across both Windows and non-Windows clients
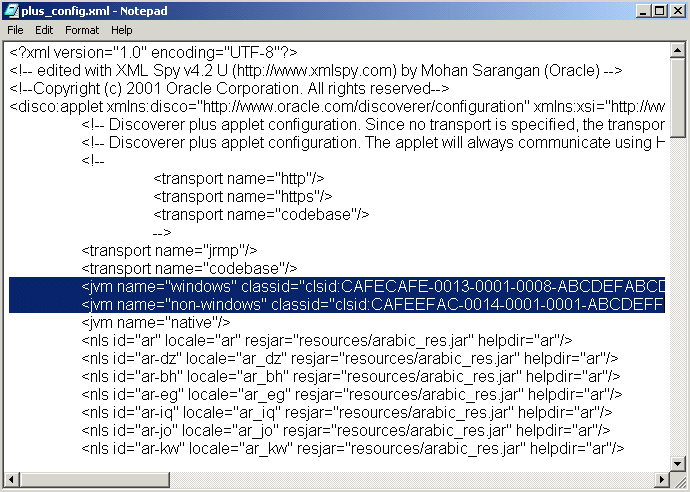
The plus_config.xml Discoverer configuration file that is installed with OracleAS contains details of the recommended JVMs that are compatible with Discoverer (for more information about the location of configuration files, see Section A.2, "List of Discoverer file locations"). The list of JVMs in plug_config.xml is pre-populated with JVM details for JInitiator 1.3 and Sun Java Plug-in 1.4.1.
In the figure below, the plus_config.xml file contains two JVM tags (highlighted):
- <jvm name = "windows" ...> - JVM tag for the JInitiator 1.3 JVM
- <jvm name = "non-windows"...> - JVM tag for the Sun Java Plug-in 1.4.1 JVM
Figure 4-6 Plus_config.xml showing the JVM parameters (highlighted)
Text description of the illustration pxml.gif
Notes
- Do not specify JDK 1.4.1 as the JVM on machines running Windows NT version 4. For more information, see the Oracle Application Server Discoverer Release Notes.
- The values "windows" and "non-windows" are the default JVMs that must be included in the plus_config.xml file.
4.12.1 How to change the JVMs specified in the plus_config.xml file
You change the JVMs specified in the plus_config.xml file when you want to use a different JVM from the default JVMs installed with Discoverer.
Hint: Make a backup copy of the plus_config.xml file before making amendments.
To change the JVMs specified in the plus_config.xml file:
- Open the plus_config.xml file in a text editor (for more information about the location of the plus_config.xml file, see Section A.2, "List of Discoverer file locations").
- Change the details of the default JVMs (i.e. "windows" and "non-windows") as required.
4.12.2 How to specify a Java Virtual Machine
If you want to specify a JVM globally for Discoverer Plus sessions, you must modify JVM entries for 'windows' or 'non-windows'. For example, you might want Windows clients to use the Sun Java Plug-in 1.4.1 instead of the default JInitator 1.3 JVM.
To specify a Java Virtual Machine:
- Open the plus_config.xml file in a text editor or XML editor (for more information about the location of configuration files, see Section A.2, "List of Discoverer file locations").
- Remove (or comment out) the existing JVM tag for the JVM that you want to stop using.
For example, if you want to stop using the JInitator 1.3 JVM for Windows clients, remove (or comment out) the following 'oracle' JVM tag:
<jvm name="windows" classid="clsid:CAFECAFE-0013-0001-0008-ABCDEFABCDEF" plugin_setup="plus_files/plugin/jinit1318.exe" version="1.3.1.9" versionie="1,3,1,9" type="application/x-jinit-applet" plugin_page="" archive="disco5i.jar"/>
- Cut and paste the JVM tag for the JVM that you want to use into the plus_config.xml file.
For example, if you want to start using the Sun Java Plug-in 1.4.1 JVM for Windows clients, cut and paste the following 'non-windows' JVM tag:
<jvm name="non-windows" classid="clsid:CAFEEFAC-0014-0001-0002-ABCDEFFEDCBA" plugin_setup="/plus_files/plugin/j2re-1_4_1_02-windows-i586-i.exe" version="1.4.1" versionie="1,4,1,2" type="application/x-java-applet" plugin_page> ="http://java.sun.com/products/archive/j2se/1.4.1/index.html" archive="disco5i.jar"/>
Note: The JVM tag that you paste must be one continuous line with no carriage returns or breaks.
- In the new JVM tag that created in the previous step, change the jvm name= value to the value of the JVM that you want to use.
For example, if you want to start using the Sun Java Plug-in 1.4.1 JVM for Windows clients, change the value 'non-windows' to the value 'windows'.
- Save the plug_config.xml file.
The specified JVM will now be used for Discoverer Plus sessions for the specified browser platforms.
Example
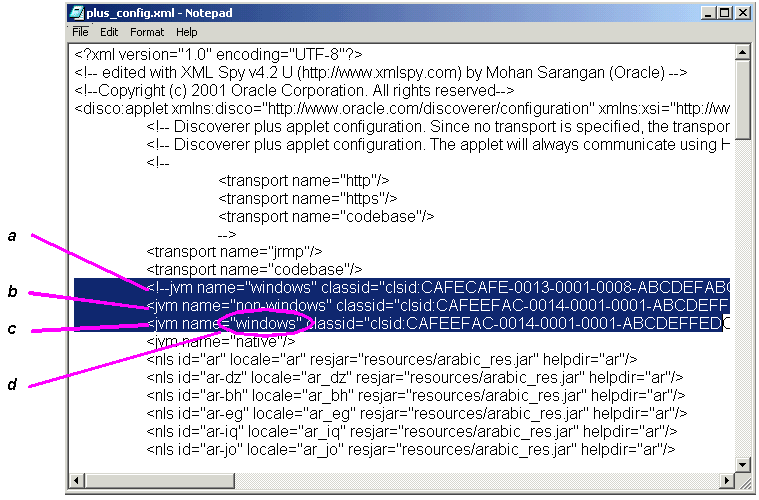
The figure below shows an example of a plus_config.xml file after changes are made to specify the Sun Java Plug-in 1.4.1 JVM for Windows clients.
Figure 4-7 Specifying a JVM for all sessions
Text description of the illustration pxml2.gif
Key to figure above:
- Original Windows JVM tag commented out.
- Original non-Windows JVM tag.
- Copy of the non-Windows JVM tag with "non-windows" changed to "windows".
- The JVM name value that is changed from "non-windows" to "windows".


