10g (9.0.4)
Part Number B10273-01
Contents |
Home | Solution Area | Index |
| Oracle Application Server Discoverer Configuration Guide 10g (9.0.4) Part Number B10273-01 |
|
This chapter explains how to create and manage OracleAS Discoverer connections, and includes the following topics:
An OracleAS Discoverer connection is a stored set of database login details, comprising:
Discoverer connections enable Discoverer end users to start Discoverer without having to re-enter database login details each time the connect to Discoverer.
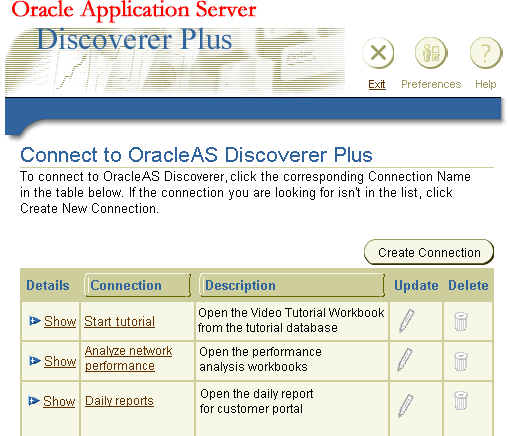
In the example below, a connection called Start Tutorial has been created that contains login information to connect to the Discoverer tutorial database. This enables a Discoverer Plus user to select the Start Tutorial link in the Name column to start Discoverer Plus and access the Discoverer tutorial database without having to enter login details.
If OracleAS Single Sign-On is enabled, Discoverer connections work as follows:
Note: For more information about OracleAS Single Sign-On, see Section 12.8.1, "Using Discoverer with OracleAS Single Sign-On").
There are two types of Discoverer connections:
Private connections are created and maintained by Discoverer end users.
Private connections have the following characteristics:
For more information about controlling what types of connection Discoverer end users can use, see "About specifying whether Discoverer end users can create their own private connections".
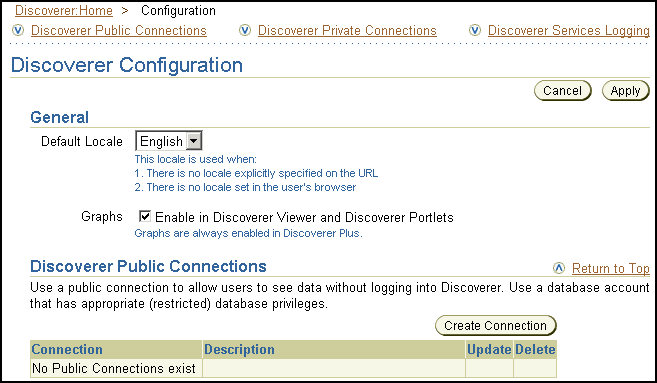
Public connections are created and maintained by Discoverer middle tier managers. Public connections enable you to provide pre-defined login details to Discoverer end users.
For example, if you want to provide the Discoverer Plus tutorial to Discoverer end users, you might create a public connection called 'Start tutorial', which connects to the tutorial database as a tutorial user.
Public connections have the following characteristics:
For more information about how to create public connections, see "How to create a public connection".
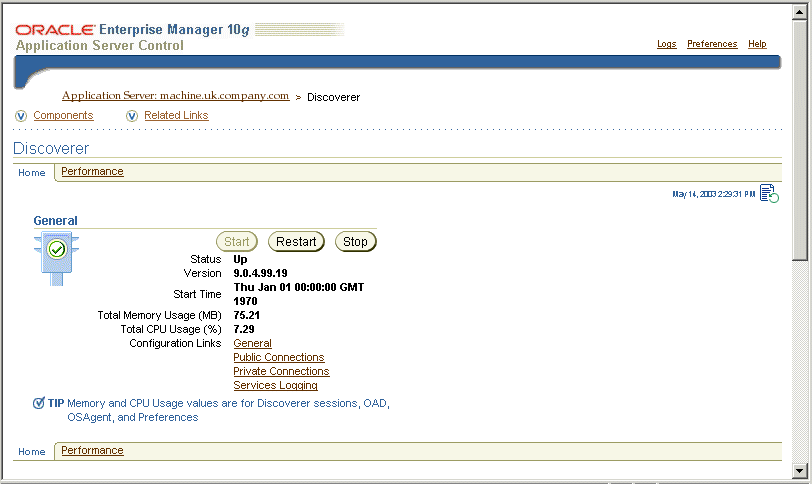
As a middle tier manager, you use Application Server Control to manage Discoverer connections, as follows:
You might also want to migrate Discoverer connections from one OracleAS instance to another (for more information, see Section D.2.1, "About migrating Discoverer connections").
There are two Discoverer connections pages:
The figure below shows the Connect to Discoverer Plus page. In this example, there are three connections available in the Connection column (called Start tutorial, Analyze network performance, and Daily reports). To start Discoverer Plus using database login details stored in the 'Daily reports' connection, the Discoverer end-user selects the Daily reports link in the Connection column.

You can specify whether Discoverer end users can create their own private connections (for more information, see Section 3.8, "How to specify whether Discoverer end users can create private connections").
If you enable Discoverer end users to create their own private connections:
If you prevent Discoverer end users from creating their own private connections, they will only have access to the workbooks that are accessible to the public connections that you create.
For more information about the location of the tnsnames.ora file, see Section A.2, "List of Discoverer file locations".
You create a public connection when you want to provide pre-defined login details to Discoverer Plus and Discoverer Viewer users. For example, you might create a public connection called 'Start tutorial', which connects to the tutorial database as a tutorial user.
Hint: In a secure Discoverer environment you might want to use only public connections, so that you can restrict database access to login details that you specify. In other words, you might also disallow Discoverer end users from creating private connections (for more information, see Section 3.6, "About specifying whether Discoverer end users can create their own private connections").
To create a public connection:
The new connection that you created is displayed in the Discoverer Public Connections list.
When Discoverer end users connect to Discoverer Plus or Discoverer Viewer, they will be able to select the connection that you have just created.
In the example below, the three connections (Start tutorial, Analyze network performance, and Daily reports) are public connections that are available to all Discoverer end users. Notice that the Update and Delete icons are grayed out, indicating that Discoverer end users cannot change or delete them.
To specify whether Discoverer Plus and Discoverer Viewer users can create private connections:
If you enable Discoverer end users to create private connections, they will see a Create Connection button on the Discoverer Connections page. For example, in the figure below the Create Connection button is available.
|
|
 Copyright © 2003 Oracle Corporation. All Rights Reserved. |
|