2
Running OracleAS Discoverer
2.1 Running OracleAS Discoverer
This chapter explains how to run OracleAS Discoverer after you have completed an OracleAS installation, and contains the following topics:
- Section 2.2, "General information about running OracleAS Discoverer"
- Section 2.3, "What are the supported Web browser versions for Discoverer?"
- Section 2.4, "About restricting how users can run Discoverer"
- Section 2.5, "Which port number is Discoverer installed on?"
- Section 2.6, "What are the memory requirements and privileges required to run Discoverer Plus and Discoverer Viewer?"
- Section 2.7, "About running Discoverer Plus over HTTP for the first time on a client machine"
- Section 2.8, "About running Discoverer over HTTPS"
- Section 2.9, "How to run Discoverer Plus over HTTP in Microsoft Internet Explorer for the first time on a Windows client machine"
- Section 2.10, "How to run Discoverer Plus over HTTP in Netscape Navigator for the first time on a Windows client machine"
- Section 2.11, "How to run Discoverer Plus over HTTP in Netscape Navigator for the first time on a UNIX client machine"
- Section 2.12, "How to run Discoverer Viewer over HTTP"
For more information about installing Oracle Application Server, see the Oracle Application Server Installation Guide.
Notes
2.2 General information about running OracleAS Discoverer
To run Discoverer Viewer, you just need an Internet browser, as follows:
To run Discoverer Plus, you need an Internet browser, and possibly the following additional software, as follows:
2.3 What are the supported Web browser versions for Discoverer?
The preferred browsers for Discoverer are:
- Windows - Microsoft Internet Explorer versions 5.5 and 6.0 (version 6.0 is the preferred version)
- Windows - Netscape Navigator 4.79 and 6.0
- UNIX - Netscape Navigator 4.7 and 6.0
Discoverer Viewer will also run with Internet Explorer 5.0. However, note the following:
2.4 About restricting how users can run Discoverer
In a secure Discoverer environment you want to enable only authorized end users to access Discoverer. For example, you might want to limit users to read-only access to Discoverer workbooks using Discoverer Viewer.
Depending on your security requirements, you might do any of the following to provide a secure Discoverer environment:
- You might prevent Discoverer users creating their own connections. If you disable private connections, Discoverer end users can only start Discoverer using public connections (i.e. login information) that you specify.
For more information, see Section 3.6, "About specifying whether Discoverer end users can create their own private connections".
- You might prevent users using Discoverer Plus to modify workbooks. If you disable Discoverer Plus, users only have read-only access to workbooks using Discoverer Viewer.
You disable Discoverer Plus using Application Server Control (for more information, see Section 4.5, "About disabling and enabling Discoverer client tier components").
- you might run Discoverer Plus in read-only mode for specified Discoverer end users by removing the Create/Edit Query privilege in Oracle Discoverer Administrator (for more information, see Oracle Discoverer Administrator Administration Guide)
- You might enable Oracle Advanced Security (formerly Advanced Security Option) encryption between the middle tier and the database.
For more information about other Discoverer security features, see Section 12.1, "Maintaining security with OracleAS Discoverer".
2.5 Which port number is Discoverer installed on?
When you perform an OracleAS installation of type Business Intelligence and Forms (i.e. a Discoverer installation) Discoverer is installed on port 7777 or the next available port.
For example, an OracleAS infrastructure installation uses port 7777. Therefore, if you have an OracleAS installation of type Business Intelligence and Forms on the same machine as the infrastructure install, Discoverer will typically use a port in the range 7778 - 7877.
Hint: If you are not sure which default ports Discoverer is using, display the OracleAS ports list page (for more information, see Section 4.10, "How to list ports used by OracleAS").
For information about changing default OracleAS ports for Discoverer, see Section 4.10.1, "How to change the port on which Discoverer is deployed".
2.6 What are the memory requirements and privileges required to run Discoverer Plus and Discoverer Viewer?
To run OracleAS Discoverer Plus, you require the following on the Discoverer Plus client machine (i.e. the browser machine):
- administrative privileges on the client machine, because you need to be able to install a Java Virtual Machine (e.g. Oracle JInitiator)
- at least 15KB of Users Personal Profile Space for the Oracle Jar Cache
- a minimum of between 25 - 50 MB of available disk space to install a JVM
To run OracleAS Discoverer Viewer, you need only to be able to run a standard Web browser (e.g. Microsoft Internet Explorer) that has JavaScript and cookies enabled.
2.7 About running Discoverer Plus over HTTP for the first time on a client machine
When you run Discoverer Plus for the first time on a client machine, you perform a one-time setup process to install a Java Virtual Machine (e.g. Oracle JInitiator) and initialize the Discoverer Plus software. This process is typically performed when:
- you have installed OracleAS and want to test that Discoverer is working
- a Discoverer end user wants to run Discoverer Plus for the first time on a client machine
If you upgrade Discoverer, you might have to repeat the setup process. For example, you might install a new version of Discoverer Plus that requires a new version of Oracle JInitiator, or a new version of the applet.
The Discoverer Plus initialization procedure is different for Microsoft Internet Explorer and Netscape Navigator. Refer to the appropriate task below:
Notes
Figure 2-1 Security Warning dialog
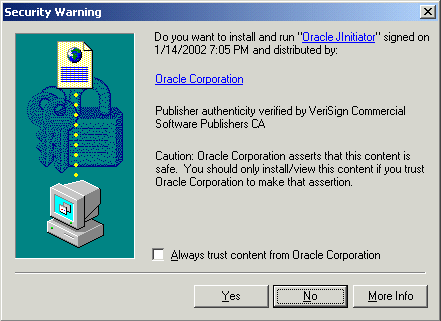
Text description of the illustration jinit1.gif
Note: Discoverer Viewer requires no additional software to be installed on the client machine.
2.8 About running Discoverer over HTTPS
Before you can run Discoverer over HTTPS (i.e. in Secure Sockets Layer (SSL) mode), you must have installed a security certificate from a Certificate Authority (e.g. Verisign) on the Oracle HTTP server on the OracleAS instance. For more information about installing security certificates, see Oracle Application Server Administrator's Guide and Oracle Application Server Security Guide.
An OracleAS installation includes a dummy certificate on the OracleAS instance that you can use to confirm that HTTPS is deployed. You must install a valid security certificate to make sure that communication with the OracleAS instance is secure.
A security certificate confirms to the Discoverer client machine that the holder of the security certificate is who they say they are.
How to run Discoverer over HTTPS is different for Discoverer Viewer and Discoverer Plus, as follows:
- To run Discoverer Viewer over HTTPS, simply specify HTTPS on the Discoverer Viewer URL.
For example:
https://<host.domain>:4443/discoverer/viewer
When the Security Alert dialog is displayed, click Yes to accept the security certificate issued by the certificate authority you are using. Discoverer Viewer then starts in HTTPS mode. For more information about starting Discoverer Viewer, see Section 2.12, "How to run Discoverer Viewer over HTTP".
- To run Discoverer Plus over HTTPS, you install the Web server's security certificate into the Java Virtual Machine (JVM) certificate store in all client machines that will run Discoverer Plus. For more information, see Section 2.8.1, "How to install a security certificate on a Discoverer Plus client machine".
Notes
- When you install OracleAS, SSL is installed automatically, but it is not enabled by default. To deploy Discoverer using SSL, make sure that SSL is enabled (i.e. make sure that the start-mode parameter in opmn.xml is set to 'ssl-enabled'). For more information, see Oracle HTTP Server Administrator's Guide.
2.8.1 How to install a security certificate on a Discoverer Plus client machine
You install a security certificate on a Discoverer client machine when you run Discoverer Plus for the first time over HTTPS (i.e. in Secure Sockets Layer (SSL) mode).
Hint: If you do not have a JVM installed on the client machine, before you try to run Discoverer for the first time in Secure Sockets Layer (SSL) mode, do one of the following:
To install a Discoverer Plus security certificate:
- Start a Web browser and enter the Discoverer Plus HTTPS URL containing the fully qualified host name (including port number if necessary) used by your own OracleAS installation.
For example:
https://<host.domain>:<port>/discoverer/plus
where:
- <host.domain> is the server name and domain on which the Oracle HTTP Server is installed
- <port> is the HTTPS port number (default 4443) on which Discoverer is installed
- /discoverer/plus is the URL command that starts Discoverer Plus
The Security Alert dialog is displayed.
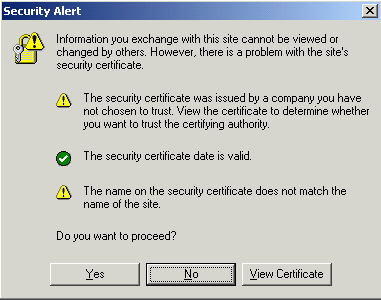
Text description of the illustration ssl1.gif
- Click View Certificate to display the Certificate dialog.
- Display the Details tab.
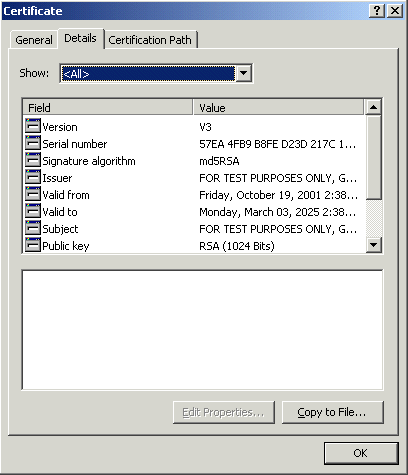
Text description of the illustration ssl2.gif
- Click Copy to File to start the Certificate Export Wizard.
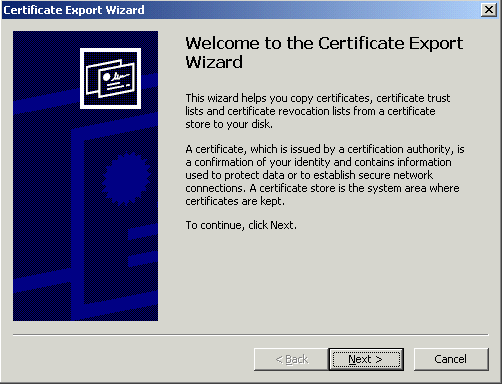
Text description of the illustration ssl3.gif
- Click Next to display the Export File Format page in the Certificate Export Wizard.
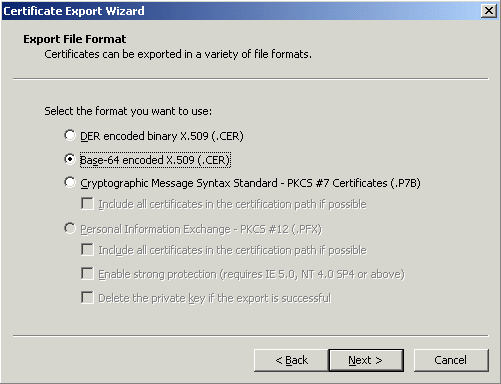
Text description of the illustration ssl4.gif
- Select the Base-64 encoded X.509 (.CER) radio button.
- Click Next to display the File to Export page in the Certificate Export Wizard.

Text description of the illustration ssl5.gif
You now choose a temporary name and location for the exported certificate file.
- Enter a file location and file name (with a '.cer' extension) for the exported certificate file in the File name field (e.g. c:\tmp\mycertificate.cer).
- Click Next to display the final page of the Certificate Export Wizard dialog.
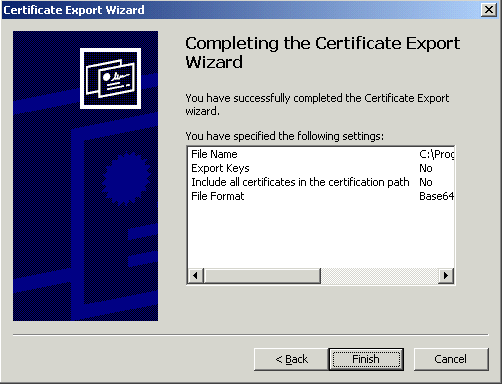
Text description of the illustration ssl6.gif
- Click Finish to complete the certificate installation.
A confirmation dialog is displayed.
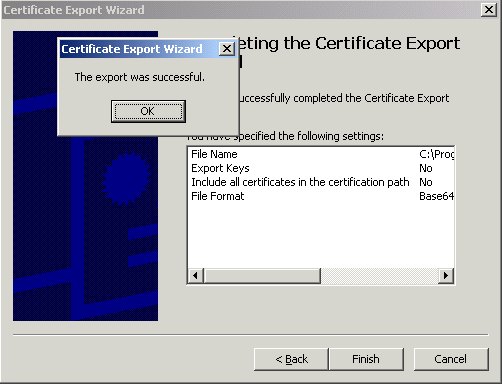
Text description of the illustration ssl7.gif
- Click OK to close the confirmation dialog and the Certificate Export Wizard and return to the Details tab of the Certificate dialog.
- Click OK in the Details tab of the Certificate dialog to return to the Security Alert dialog.

Text description of the illustration ssl1a.gif
- Leave the Security Alert dialog displayed.
- Import the security certificate file that you saved earlier into the certificate store of the JVM you are using, as follows:
- (optional) Delete the certificate file that you saved earlier (e.g. c:\tmp\mycertificate.cer).
- At the Security Alert dialog, click Yes to accept the security certificate and start Discoverer Plus.
Discoverer Plus starts in HTTPS mode and displays the Connect to Discoverer Plus page.
Text description of the illustration connect2.gif
Note: Notice the padlock symbol displayed on the status bar of the browser, which indicates that the Web session is secure.
Notes
- For information about installing security certificates with a JVM other than Oracle JInitiator and Java Plug-in 1.4, consult the JVM's proprietary documentation.
- If you install a new JVM when you start Discoverer Plus, you must reinstall the Web server's security certificate into the JVM certificate store on all client machines that run Discoverer Plus.
2.8.2 How to import certificate details into the JInitiator certificate store
When configuring Discoverer Plus to run over HTTPS using JInitiator, you import the certificate details into the JInitiator certificate store after you have used the Certificate Export Wizard to export a certificate file (for more information, see Section 2.8.1, "How to install a security certificate on a Discoverer Plus client machine").
To import certificate details into the JInitiator certificate store:
- Open the certificate file that you saved in Section 2.8.1, "How to install a security certificate on a Discoverer Plus client machine" in a text editor (e.g. c:\tmp\mycertificate.cer).
The screenshot below shows a certificate file called mycertificate.cer opened in a text editor.
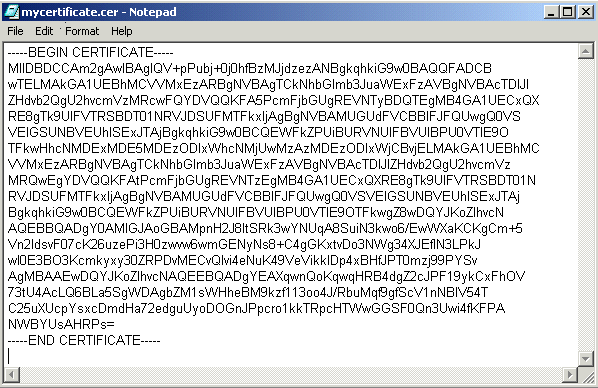
Text description of the illustration ssl8.gif
JInitiator's certificate store is contained in a file called certdb.txt
- Open the certdb.txt file in a separate text editor (for more information about the location of configuration files, see Section A.2, "List of Discoverer file locations").
- Copy the entire contents (including the '-----BEGIN CERTIFICATE-----' and '-----END CERTIFICATE-----' text) of the certificate file (e.g. c:\tmp\mycertificate.cer) to the end of the certdb.txt file.
- Save the certdb.txt file.
2.8.3 How to import certificate details into the Java Plug-in 1.4 certificate store
When configuring Discoverer Plus to run over HTTPS using Java Plug-in 1.4, you import the certificate details into the Java Plug-in 1.4 certificate store after you have used the Certificate Export Wizard to export a certificate file.
- Display the Java Plug-In Control Panel.
For example, on Windows choose Start | Settings | Control Panel to display the Windows Control Panel, then select the Java Plugin icon.
- Display the Certificates tab.
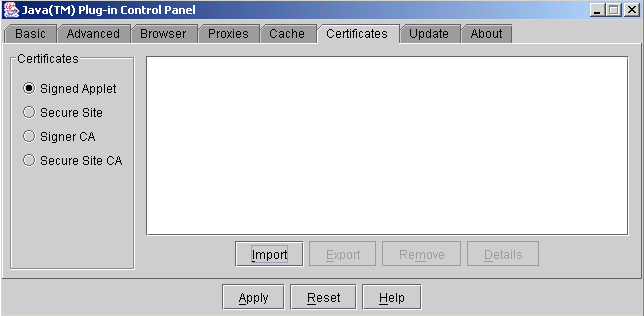
Text description of the illustration ssl9.gif
- Select the Signed Applet radio button in the Certificates panel (if it is not selected already).
- Click Import and import the certificate file that you saved in Section 2.8.1, "How to install a security certificate on a Discoverer Plus client machine" (e.g. c:\tmp\mycertificate.cer).
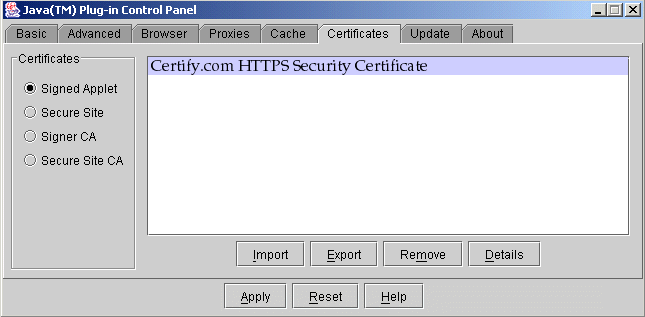
Text description of the illustration ssl9a.gif
The security certificate is displayed in the list of certificates in the Java Plug-in 1.4 certificate store.
- Click Apply.
2.9 How to run Discoverer Plus over HTTP in Microsoft Internet Explorer for the first time on a Windows client machine
You might run Discoverer Plus for the first time on a client machine if you:
- have installed OracleAS and want to test that Discoverer is working
- want to set up a client machine to use Discoverer Plus
To run Discoverer Plus in Microsoft Internet Explorer for the first time on a Windows client machine:
- Start a Web browser and enter the Discoverer Plus URL containing the fully qualified host name (including port number if necessary) used by your own OracleAS installation.
For example:
http://<host.domain>:<port>/discoverer/plus
where:
- <host.domain> is the server name and domain on which the Oracle HTTP Server is installed
- <port> is the port number (typically 7777 or 7778) on which Discoverer is installed (for more information, see Section 2.5, "Which port number is Discoverer installed on?")
- /discoverer/plus is the URL command that starts Discoverer Plus
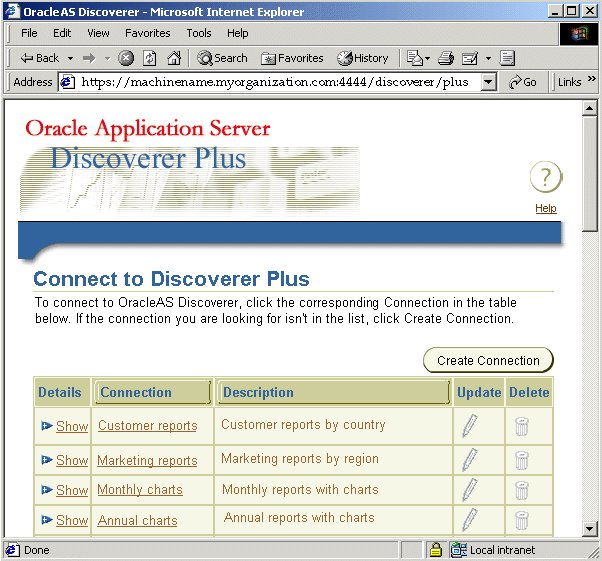
The Connect to Discoverer Plus page is displayed.
Figure 2-2 Connect to Discoverer Plus page
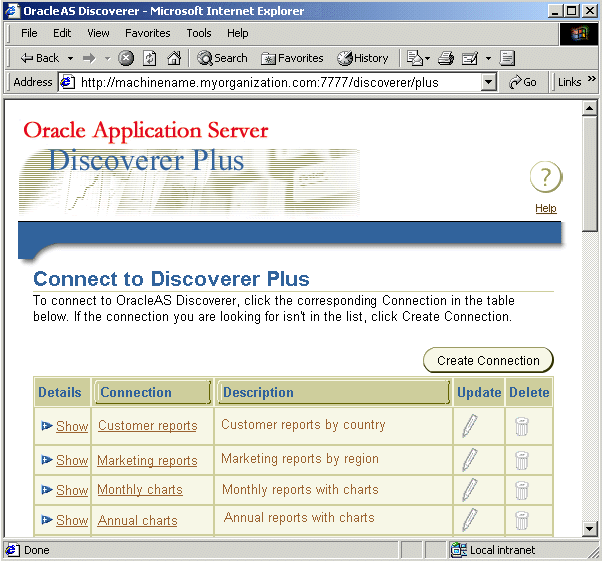
Text description of the illustration connect.gif
Note: If Single Sign-On is enabled, you will first be asked to authenticate as a single sign-on user.
- Select a connection in the Connection column.
Hint: If no connections are displayed in the Connection column, you will have to create a new connection before continuing. For more information about creating private connections, see Oracle Application Server Discoverer Plus User's Guide. You can also use public connections that have been created by the Discoverer manager (for more information, see Section 3.7, "How to create a public connection").
Depending on the software already installed on the client machine, you might have to download and install a Java Virtual Machine (JVM) (e.g. Oracle JInitiator). If you are not prompted to download and install a JVM, go straight to step 5.
Hint: If the JVM installation process fails, close down extraneous processes on the client machine, then re-try.
If you have to download and install Oracle JInitiator, the Oracle JInitiator Choose Destination Location dialog page is displayed.
Figure 2-3 Choose Destination Location dialog
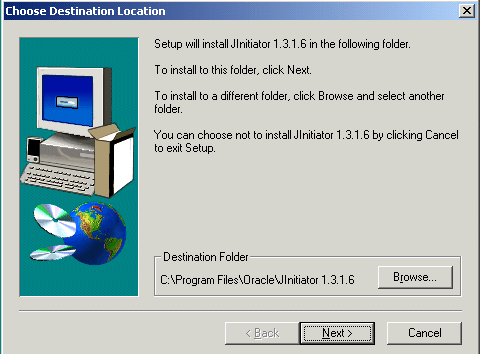
Text description of the illustration jinit3.gif
- Click Next to accept the default Destination Folder (or change the default Destination Folder and click Next).
Oracle JInitiator is installed in the location you specified. When the Oracle JInitiator installation is complete, the Installation Complete dialog is displayed.
Figure 2-4 Installation Complete dialog
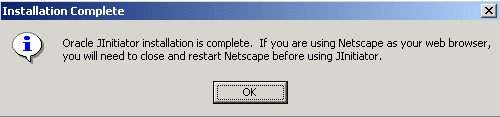
Text description of the illustration jinit4.gif
- Click OK to close the Installation Complete dialog.
Oracle JInitiator is now installed on the client machine.
- Wait for the Discoverer Plus applet to initialize.
When the Discoverer Plus applet is initialized and cached, the Workbook Wizard dialog is displayed.
Figure 2-5 Discoverer Plus Workbook Wizard: Create/Open Workbook dialog
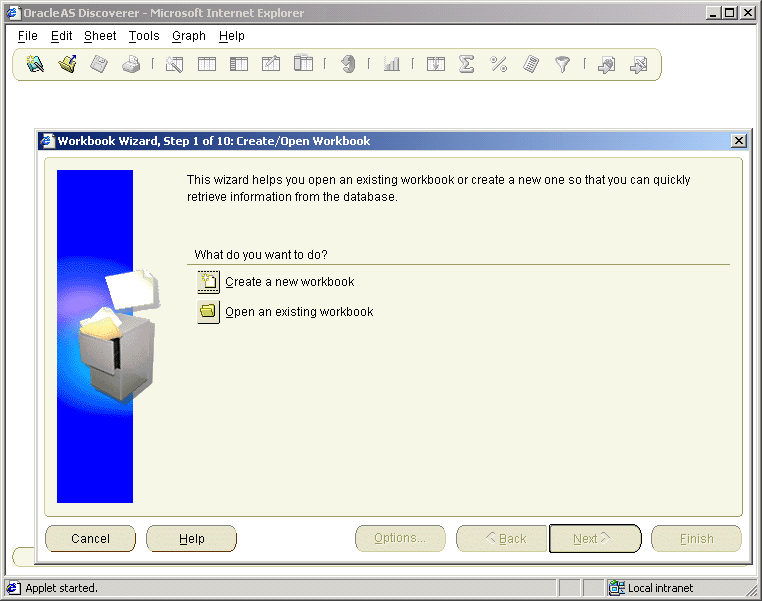
Text description of the illustration wbkwiz2.gif
You are now running Discoverer Plus.
2.10 How to run Discoverer Plus over HTTP in Netscape Navigator for the first time on a Windows client machine
You might run Discoverer Plus for the first time on a client machine if you:
- have installed OracleAS and want to test that Discoverer is working
- want to set up a client machine to use Discoverer Plus
To run Discoverer Plus in Netscape Navigator for the first time on a Windows client machine:
- Start a Web browser and enter the Discoverer Plus URL containing the fully qualified host name (including port number if necessary) used by your own OracleAS installation.
For example:
http://<host.domain>:<port>/discoverer/plus
where:
- <host.domain> is the server name and domain on which the Oracle HTTP Server is installed
- <port> is the port number (typically 7777 or 7778) on which Discoverer is installed (for more information, see Section 2.5, "Which port number is Discoverer installed on?")
- /discoverer/plus is the URL command that starts Discoverer Plus
The Connect to Discoverer Plus page is displayed.
Figure 2-6 Connect to Discoverer Plus page
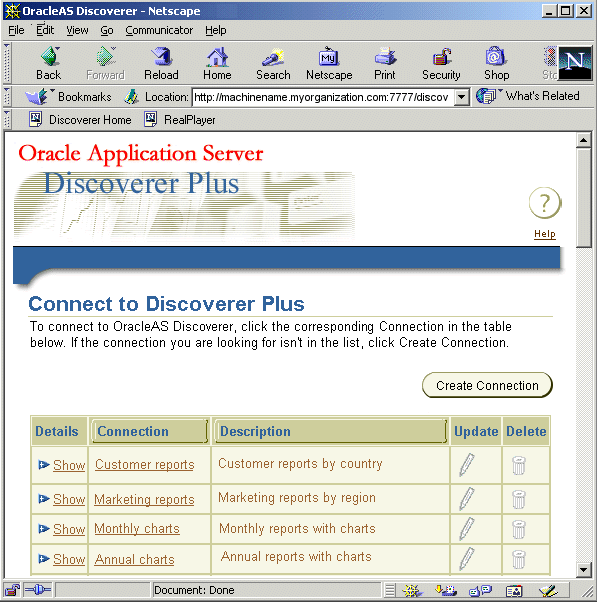
Text description of the illustration con_nn.gif
Note: If Single Sign-On is enabled, you will first be asked to authenticate as a single sign-on user.
- Select a connection in the Connection column.
Hint: If no connections are displayed in the Connection column, you will have to create a new connection before continuing. For more information about creating private connections, see Oracle Application Server Discoverer Plus User's Guide. You can also use public connections that have been created by the Discoverer manager (for more information, see Section 3.7, "How to create a public connection").
Depending on the software already installed on the client machine, you might have to download and install Oracle JInitiator. If you are not prompted to download and install Oracle JInitiator, go straight to step 10.
Hint: If the JVM installation process fails, close down extraneous processes on the client machine, then re-try.
When you are using Netscape Navigator, if you have to download and install Oracle JInitiator, the OracleAS Discoverer - Netscape page is displayed.
Figure 2-7 OracleAS Discoverer - Netscape page
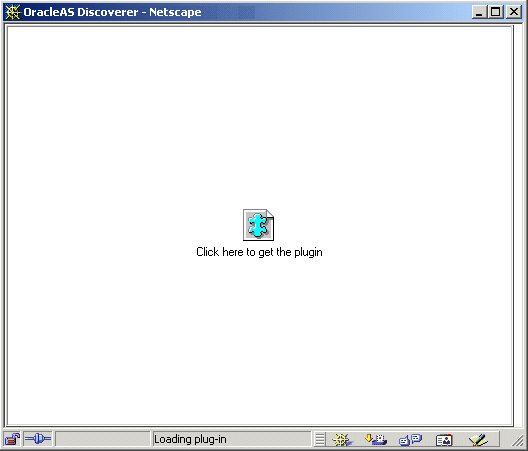
Text description of the illustration jinit5.gif
Then the Plug-in not Loaded page is displayed.
Figure 2-8 Plug-In Not Loaded dialog
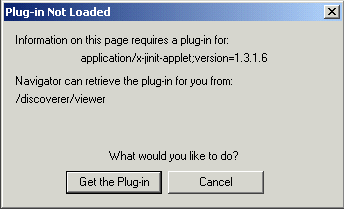
Text description of the illustration jinit6.gif
- Click Get the Plug-in to display the Setting Up OracleAS Discoverer Plus page.
Figure 2-9 Setting Up OracleAS Discoverer Plus page
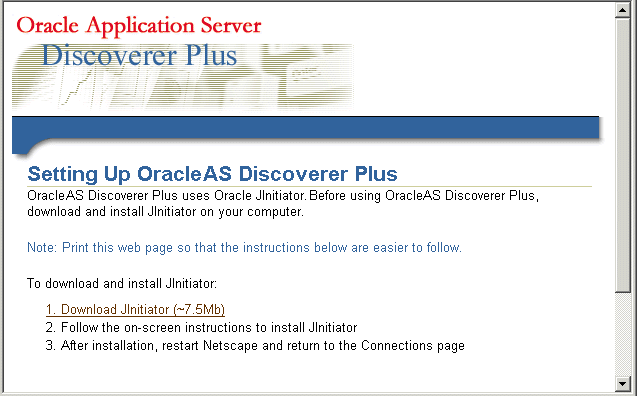
Text description of the illustration jinit7.gif
- Select the Download JInitiator (~<size> Mb) link to display the Save as... dialog.
Figure 2-10 Save As... dialog for Oracle JInitiator
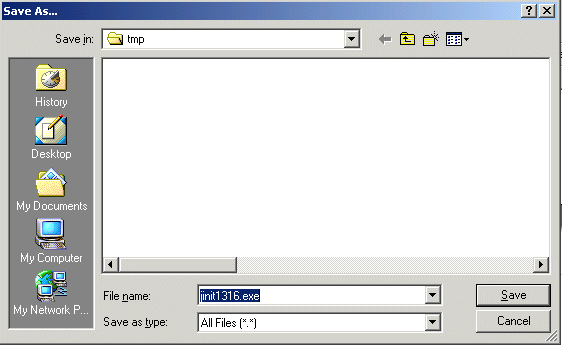
Text description of the illustration jinit8.gif
- Click Save to save the Oracle JInitiator installation file to the default save location (or change the default save location and click Save).
While the Oracle JInitiator installation file is being saved, the Saving Location dialog is displayed.
Figure 2-11 Saving Location dialog
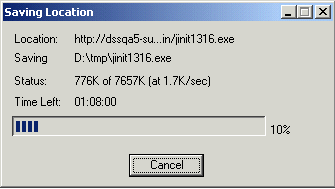
Text description of the illustration jinit9.gif
- When the Oracle JInitiator installation file has been saved, open the file, as follows:
- Open a file browser and navigate to where the Oracle JInitiator installation file was saved in the previous step.
- Double-click the Oracle JInitiator installation file to display the Choose Destination Location dialog.
- Click Next to accept the default Destination Folder (or change the default Destination Folder and click Next).
Oracle JInitiator is installed in location you specified. When the Oracle JInitiator installation is complete, the Installation Complete dialog is displayed.
- Click OK to close the Installation Complete dialog.
Oracle JInitiator is now installed on the client machine.
- Shut down the machine, then restart the machine.
- Start Netscape and enter the Discoverer Plus URL containing the fully qualified host name.
- Select a connection in the Connection column.
- Wait for the Discoverer Plus applet to initialize.
While the Discoverer Plus applet initializes, the Starting product: Discoverer Plus page is displayed.
When the Discoverer Plus applet is initialized and cached, the Workbook Wizard dialog is displayed.
Figure 2-12 Discoverer Plus Workbook Wizard: Create/Open Workbook dialog
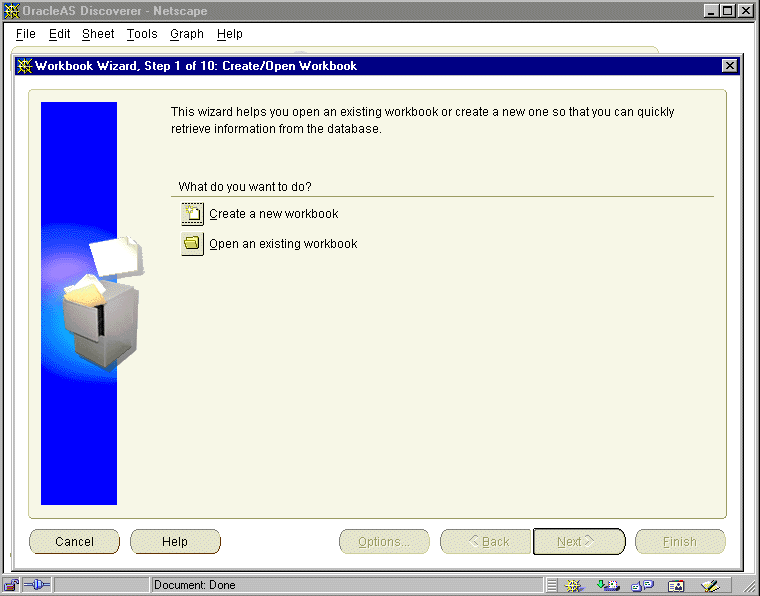
Text description of the illustration wbkwiz1.gif
You are now running Discoverer Plus.
2.11 How to run Discoverer Plus over HTTP in Netscape Navigator for the first time on a UNIX client machine
You might run Discoverer Plus for the first time on a client machine if you:
- have installed OracleAS and want to test that Discoverer is working
- want to set up a client machine to use Discoverer Plus
To run Discoverer Plus in Netscape Navigator for the first time on a UNIX client machine:
- Start a Web browser and enter the Discoverer Plus URL containing the fully qualified host name (including port number if necessary) used by your own OracleAS installation.
For example:
http://<host.domain>:<port>/discoverer/plus
where:
- <host.domain> is the server name and domain on which the Oracle HTTP Server is installed
- <port> is the port number (typically 7777 or 7778) on which Discoverer is installed (for more information, see Section 2.5, "Which port number is Discoverer installed on?")
- /discoverer/plus is the URL command that starts Discoverer Plus
The Connect to Discoverer Plus page is displayed.
Figure 2-13 Connect to Discoverer Plus page
Text description of the illustration con_nn.gif
Note: If Single Sign-On is enabled, you will first be asked to authenticate as a single sign-on user.
- Select a connection in the Connection column.
Hint: If no connections are displayed in the Connection column, you will have to create a new connection before continuing. For more information about creating private connections, see Oracle Application Server Discoverer Plus User's Guide. You can also use public connections that have been created by the Discoverer manager (for more information, see Section 3.7, "How to create a public connection").
Depending on the software already installed on the client machine, you might have to download and install Sun Java Plug-In. If you are not prompted to download and install Sun Java Plug-In, go straight to step 7.
Hint: If the JVM installation process fails, close down extraneous processes on the client machine, then re-try.
When you are using Netscape Navigator, if you have to download and install Sun Java Plug-In, the OracleAS Discoverer - Netscape page is displayed.
Figure 2-14 OracleAS Discoverer - Netscape page
Text description of the illustration jinit5.gif
Then the Plug-in not Loaded page is displayed.
Figure 2-15 Plug-In Not Loaded dialog
Text description of the illustration jinit6.gif
- Click Get the Plug-in to display the Setting Up OracleAS Discoverer Plus page.
Note: If you are using a Netscape Navigator on a UNIX client machine, you must have the Java Plug-in 1.4.1 installed on your machine. The Connect to Discoverer Plus page that is displayed when you start Discoverer contains instructions on how to install the necessary files (see screenshot below).
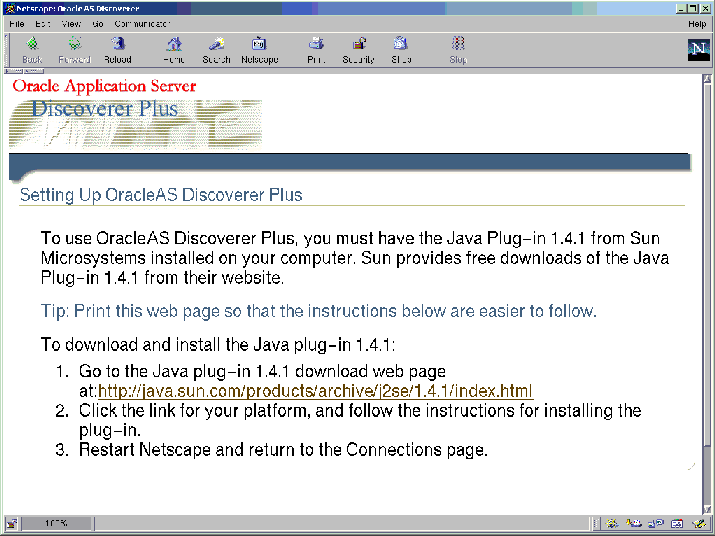
Text description of the illustration unix_br.gif
- Follow the instructions on the Setting Up OracleAS Discoverer Plus page.
- Start Netscape and enter the Discoverer Plus URL containing the fully qualified host name.
- Select a connection in the Connection column.
- Wait for the Discoverer Plus applet to initialize.
While the Discoverer Plus applet initializes, the Starting product: Discoverer Plus page is displayed.
The Discoverer Plus applet is initialized and cached, then the Workbook Wizard dialog is displayed.
Figure 2-16 Discoverer Plus Workbook Wizard: Create/Open Workbook dialog
Text description of the illustration wbkwiz1.gif
You are now running Discoverer Plus.
2.12 How to run Discoverer Viewer over HTTP
You might run Discoverer Viewer if you have installed OracleAS and want to test that Discoverer is working.
To run Discoverer Viewer:
- Start a Web browser and enter the Discoverer Viewer URL containing the fully qualified host name (including port number) used by your own OracleAS installation.
For example:
http://<host.domain>:<port>/discoverer/viewer
where:
- <host.domain> is the server name and domain on which the Oracle HTTP Server is installed
- <port> is the port number (typically 7777 or 7778) on which Discoverer is installed (for more information, see Section 2.5, "Which port number is Discoverer installed on?")
- /discoverer/viewer is the URL command that starts Discoverer Viewer
The Connect to Discoverer Viewer page is displayed.
Figure 2-17 Connect to Discoverer Viewer page
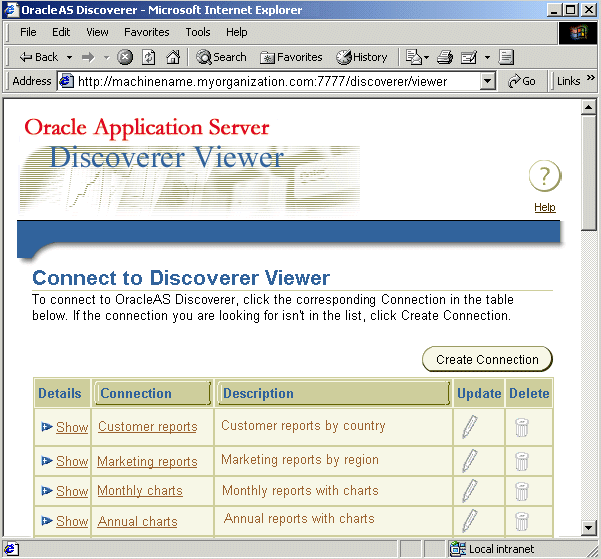
Text description of the illustration vlogin.gif
Note: If Single Sign-On is enabled, you will first be asked to authenticate as a single sign-on user.
- Select a connection in the Connection column.
Hint: If no connections are displayed in the Connection column, you will have to create a new connection before continuing. For more information about creating private connections, see Oracle Application Server Discoverer Plus User's Guide. You can also use public connections that have been created by the Discoverer manager (for more information, see Section 3.7, "How to create a public connection").
The List of Workbooks page is displayed.
Figure 2-18 List of Workbooks page
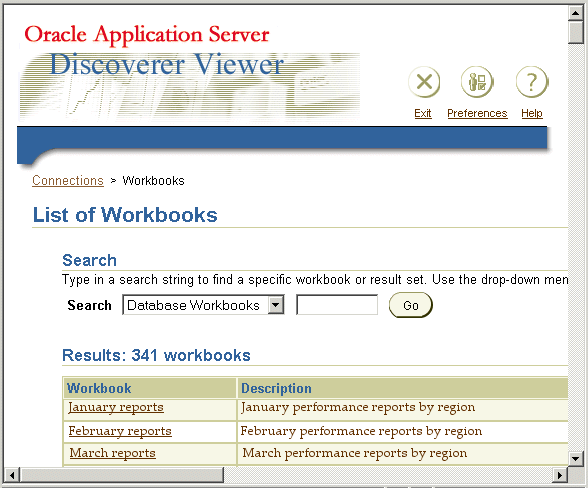
Text description of the illustration lowbs.gif
You are now running Discoverer Viewer.
- Select a workbook from the Workbook list to display the workbook in Discoverer Viewer.
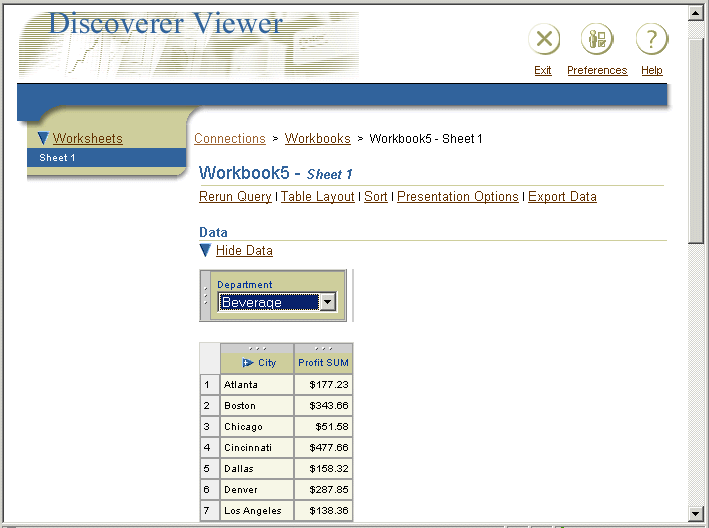
Text description of the illustration viewer.gif
Notes
- To run Discoverer Viewer over HTTPS, enter the Discoverer Viewer HTTPS URL (e.g. https://<host.domain>:<HTTPS port>/discoverer/viewer). For more information about running Discoverer Viewer over HTTPS, see Section 2.8, "About running Discoverer over HTTPS".
- If you install OracleAS in a UNIX environment, an XWindow display must be available to the Discoverer servlet to support Discoverer Viewer's graphing and charting functionality. For more information about setting the DISPLAY environment variable to refer to the X Server, see the Oracle Application Server Installation Guide.
