10g (9.0.4)
Part Number B10376-01
Home |
Solution Area |
Contents |
Index |
| Oracle Application Server 10g Administrator's Guide 10g (9.0.4) Part Number B10376-01 |
|
This appendix contains auxiliary procedures that are referred to in Chapter 8, "Changing Infrastructure Services".
It contains the following topics:
This section describes how to install and configure an LDAP-based Replica, specifically for use by the following procedures:
Oracle Internet Directory replication is the process of copying and maintaining the same data (or naming context) on multiple directory servers. Simply put, replication is a means of having two identical directories that contain the same information. One directory is called the master (or supplier). This directory contains the master copy of the naming context. The other directory is called the replica (or consumer). The master supplies replication updates to the replica, which keeps the master and replica in sync.
There are different types of replicas. This procedure uses an LDAP-based Replica, which means the protocol for transferring data between the master and the replica is LDAP.
|
See Also:
Oracle Internet Directory Administrator's Guide for more information on directory replication and LDAP-based Replicas |
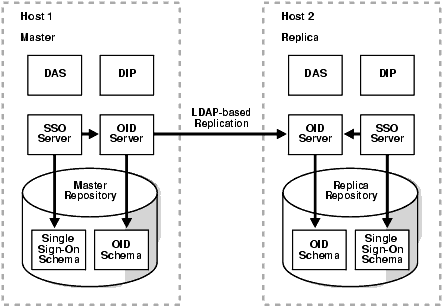
For the purposes of this procedure, the master and replica directories are part of a larger environment that includes the Identity Management installations that contain the directories, and the Metadata Repositories that support them. This is called the LDAP-based Replica Environment, and it contains the following:
Master--The Identity Management installation containing the Oracle Internet Directory that holds the master copy of the naming context. It supplies replication updates to the Replica.
Master Repository--The Metadata Repository that the Master uses to store its Identity Management schemas.
Replica--The Identity Management installation containing the replicated Oracle Internet Directory.
Replica Repository--The Metadata Repository that the Replica uses to store its Identity Management schemas.
Figure F-1 illustrates the LDAP-based Replica environment.
Typically, an LDAP-based Replica is used to provide high availability and improved performance for directory users. For the purposes of changing Infrastructure services, the LDAP-based Replica is used as follows:
This section describes how to install and set up an LDAP-based Replica environment.
You should be aware of these important items before you start the procedure:
ORACLE_HOME/install/portlist.ini. Make sure no other processes are using ports 389 and 636 on the Replica host before you start the procedure.
ldapsearch and ldapmodify commands that are in ORACLE_HOME/bin. (Some operating systems ship their own version of these commands--do not use those.)
Table F-1 Parameters for Setting Up an LDAP-based Replica
This section contains the procedure for setting up an LDAP-based Replica. It contains the following tasks:
Most likely, you already have your Master and Master Repository.
If you are starting from scratch, you can install a Master and Master Repository as follows:
Most likely, you already have middle-tier instances using the Master for Identity Management services. This is fine, and, if desired, you can install and configure additional instances to use the Master now, or at the end of this procedure after you have configured the Replica, or both.
These middle-tier instances can use the Master Repository for their product metadata, or they can use a different repository.
In this task, you install and configure the Replica and Replica Repository. The general procedure is to install an Infrastructure and choose Identity Management and Metadata Repository. However, you deselect all Identity Management components (OID, SSO, DAS, and DIP). After installation, you perform manual steps to configure and start up OID, SSO, DAS, and DIP.
Be sure to install the Replica on a different host than the Master.
REPLICA_HOME/bin/oidpasswd connect=replica_db_name create_wallet=TRUE
current_password=replica_ods_passwd
REPLICA_HOME/opmn/bin/opmnctl ping
If OPMN is not running, start it:
REPLICA_HOME/opmn/bin/opmnctl start
REPLICA_HOME/opmn/conf/opmn.xml
Modify the ias-component entry for OID so the status is enabled, as follows:
<ias-component id="OID" status="enabled">
Save and close the file.
REPLICA_HOME/dcm/bin/dcmctl updateConfig
REPLICA_HOME/opmn/bin/opmnctl reload
REPLICA_HOME/opmn/bin/opmnctl startproc ias-component=OID
REPLICA_HOME/bin/ldapbind -D cn=orcladmin -wreplica_orcladmin_passwd-preplica_oid_port
If the command fails, check the following files for information on why the server did not start:
REPLICA_HOME/ldap/log/oidmon.logREPLICA_HOME/ldap/log/oidldap01*.log
You can check the files manually, or use Log Viewer (refer to Section 4.2, "Listing and Viewing Log Files With Enterprise Manager")
|
See Also:
Oracle Internet Directory Administrator's Guide, appendix on Syntax for LDIF and Command Line Tools, for more information |
mod.ldif that contains the following lines:
dn:cn=configset0,cn=osdldapd,cn=subconfigsubentry
changetype:modify
replace:orclsslenable
orclsslenable:2
REPLICA_HOME/bin/ldapmodify -D cn=orcladmin -wreplica_orcladmin_passwd-preplica_oid_port-v -f mod.ldif
REPLICA_HOME/opmn/bin/opmnctl restartproc ias-component=OID
REPLICA_HOME/bin/ldapbind -D cn=orcladmin -wreplica_orcladmin_passwd-U 1 -preplica_ssl_oid_port
If the command fails, perform Step 4, "Enable SSL for OID" again.
In this task, you register the Replica with the Master.
REPLICA_HOME/ldap/bin/remtool -paddnode
The tool prompts for information, as shown Table F-2.
REPLICA_HOME/bin/ldapsearch -D cn=orcladmin -wreplica_orcladmin_passwd-hreplica_host-preplica_oid_port-b "cn=replication configuration" -s sub "objectclass=orclreplnamectxconfig" dn orclincludednamingcontexts
This command should return two entries of the following types:
orclincludednamingcontexts=cn=oraclecontext
orclincludednamingcontexts=*
If it only returns one entry, and it is of the first listed type, there was a problem configuring replication. To recover, delete the Replica and repeat step 2, "Run the following command to configure replication".
To delete the Replica:
REPLICA_HOME/ldap/bin/remtool -pdelnode
|
See Also:
Oracle Internet Directory Administrator's Guide, appendix on Syntax for LDIF and Command Line Tools, for more information on |
MASTER_HOME/bin/ldapsearch -hmaster_host-pmaster_oid_port-D cn=orcladmin -wmaster_orcladmin_passwd-b "" -s base "objectclass=*" orclreplicaid
The replica ID will look something like "myhost_asdb".
MASTER_HOME/bin/ldapsearch -hmaster_host-pmaster_oid_port-D cn=orcladmin -wmaster_orcladmin_passwd-b "orclreplicaid=master_replicaid,cn=replication configuration" -s sub "objectclass=orclreplagreemententry" dn
Where master_replicaid is the Master replica ID you obtained in the previous step.
The agreement identifier will look something like "000002".
mod.ldif that contains the following lines:
dn:cn=includednamingcontext000001,cn=replication namecontext,
orclagreementid=master_agreementid,orclreplicaid=master_replicaid,cn=rep
lication configuration
changetype:modify
replace:orclexcludednamingcontexts
orclexcludednamingcontexts:orclapplicationcommonname=orasso_ssoserver,cn
=sso,cn=products,cn=oraclecontext
Where master_agreementid is the Master agreement identifier and master_replicaid is the Master replica ID you obtained in the previous steps.
Note that in the above code example, the first 3 lines should be a single line in your file; the next line is a single line; the next line is a single line; and the final two lines should be a single line in your file.
MASTER_HOME/bin/ldapmodify -D cn=orcladmin -wmaster_orcladmin_passwd-pmaster_oid_port-v -f mod.ldif
REPLICA_HOME/bin/ldapsearch -hreplica_host-preplica_oid_port-D cn=orcladmin -wreplica_orcladmin_passwd-b "" -s base "objectclass=*" orclreplicaid
The replica ID will look something like "myhost_asdb".
mod.ldif that contains the following lines:
dn:orclreplicaid=replica_replicaid,cn=replication configuration
changetype:modify
replace:orclreplicastate
orclreplicastate:0
replica_replicaid is the Replica replica ID you obtained in the previous step.
REPLICA_HOME/bin/ldapmodify -D cn=orcladmin -wreplica_orcladmin_passwd-preplica_port-v -f mod.ldif
REPLICA_HOME/bin/oidctl connect=replica_db_nameserver=oidrepld instance=1 flags='-preplica_oid_port' start
Wait for the Replica to bootstrap before proceeding to the next step. You can monitor the progress of the bootstrap by watching the messages appended to the oidrepld log file with the following command:
tail -fREPLICA_HOME/ldap/log/oidrepld00.log
For example:
Starting scheduler...
Start to BootStrap from supplier=pdsun-qa5_orcl to consumer=pdsun-qa8_repsid
gslrbssSyncDIT:Replicating namingcontext=cn=oraclecontext......
gslrbssSyncDIT:Sync done successfully for cn=oraclecontext, 266 entries
matched
gslrbssSyncDIT:Replicating namingcontext=dc=com ......
gslrbssSyncDIT:Sync done successfully for dc=com, 197 entries matched
gslrbssSyncDIT:Replicating namingcontext=cn=oracleschemaversion ......
gslrbssSyncDIT:Sync done successfully for cn=oracleschemaversion, 10 entries
matched
Note that if you cannot locate the above log file, the Replica may have failed to start. Check the command you used at the beginning of this step to start the Replica and retry if you find any problems.
The following commands should each return entries:
REPLICA_HOME/bin/ldapsearch -D cn=orcladmin -wreplica_orcladmin_passwd-hreplica_host-preplica_oid_port-b "dc=com" -s sub "objectclass=*" dnREPLICA_HOME/bin/ldapsearch -D cn=orcladmin -wreplica_orcladmin_passwd-hreplica_host-preplica_oid_port-b "cn=oraclecontext" -s sub "objectclass=*" dn
If either of the above commands does not return entries then there was a problem with the bootstrap.
The following search against the Replica should not return an entry. It should return two entries: "No such object" and a matched entry.
REPLICA_HOME/bin/ldapsearch -D cn=orcladmin -wreplica_orcladmin_passwd-hreplica_host-preplica_oid_port-b "orclapplicationcommonname=orasso_ssoserver, cn=sso, cn=products, cn=oraclecontext" -s base "objectclass=*" dn
The same search, when performed against the Master, should return an entry.
MASTER_HOME/bin/ldapsearch -D cn=orcladmin -wmaster_orcladmin_passwd-hmaster_host-pmaster_oid_port-b "orclapplicationcommonname=orasso_ssoserver, cn=sso, cn=products, cn=oraclecontext" -s base "objectclass=*" dn
If there are any problems, repeat steps 7, 8, and 9 in Task 4, then restart the Replica as follows:
REPLICA_HOME/bin/oidctl connect=replica_db_nameserver=oidrepld instance=1 flags='-preplica_oid_port' restart
In this task, you enable the Replica OID to show up in Application Server Control.
ldaptarget.xml file by making a copy of the template:
cd REPLICA_HOME/ldap/templates
cp ldaptarget.xml.template ldaptarget.xml
ldaptarget.xml file and replace the following variables with values for your installation:
s_instanceName is the instance name of the Replica. You can obtain this name with the following command:
REPLICA_HOME/dcm/bin/dcmctl whichInstance
s_hostName is the fully qualified Replica host name--the same value as replica_host.
ORACLE_HOME is the Replica Oracle home--the same value as REPLICA_HOME.
s_odsPwd is the password for the Replica ODS schema--the same value as replica_ods_passwd.
s_tnsAddress is the Net Description string for the Replica repository. You can obtain this from REPLICA_HOME/network/admin/tnsnames.ora. For example:
(DESCRIPTION=(ADDRESS_LIST=(ADDRESS=(PROTOCOL=TCP)(HOST=myhost.myco.com)
(PORT=1521)))(CONNECT_DATA=(SERVICE_NAME=infra.myco.com)))
Note you should enter the entire string with no new-line characters and no white-space characters.
For example:
<Target TYPE="oracle_ldap" NAME="infra.myhost.myco.com_LDAP"
DISPLAY_NAME="OID" VERSION="2.5" ON_HOST="myhost.myco.com">
  <Property NAME="OracleHome" VALUE="/home/infra"/>
  <Property NAME="password" VALUE="ods" ENCRYPTED="FALSE"/>
  <Property NAME="LDAPScriptsPath" VALUE="/sysman/admin/scripts"/>
  <Property NAME="host" VALUE="myhost.myco.com"/>
  <Property NAME="UserName" VALUE="ods" ENCRYPTED="FALSE"/>
  <Property NAME="LDAPBindDN" VALUE="cn=emd admin,cn=oracle internet
directory" ENCRYPTED="FALSE"/>
  <Property NAME="LDAPBindPwd" VALUE=""/>
  <Property NAME="version" VALUE="9.0.4"/>
  <Property NAME="ConnectDescriptor"
VALUE="(DESCRIPTION=(ADDRESS_LIST=(ADDRESS=(PROTOCOL=TCP)(HOST=myhost.myco.c
om)(PORT=1521)))(CONNECT_DATA=(SERVICE_NAME=asdb.myco.com)))"/>
  <CompositeMembership>
     <MemberOf TYPE="oracle_ias" NAME="infra.myhost.myco.com" ASSOCIATION="
"/>
  </CompositeMembership>
</Target>
REPLICA_HOME/bin/emctl config addtargetREPLICA_HOME/ldap/templates/ldaptarget.xmlREPLICA_HOME
REPLICA_HOME/bin/emctl startifdown iasconsole
http://replica_host:replica_em_port
The ias_admin password on the Replica is set to the same value as the ias_admin password on the Master.
ldaptarget.xml file; it contains secure information such as the ODS schema password:
rm REPLICA_HOME/ldap/templates/ldaptarget.xml
In this task, you enable SSO, DAS, and DIP on the Replica.
REPLICA_HOME/bin/ldapsearch -hreplica_host-preplica_oid_port-D cn=orcladmin -wreplica_orcladmin_passwd-b "cn=oraclecontext" -s one "objectclass=orcldbserver" dn
This command will return two DNs in the form of:
cn=short_gdbname,cn=oraclecontext
Find the one that corresponds to the Replica Repository.
Note that if this command returns the error "ldap_search: No such object" you should go back to the previous step and make sure the Replica was started properly.
mod.ldif that contains the following lines:
dn:orclreplicaid=replica_replicaid,cn=replication configuration
changetype:modify
replace:seeAlso
seeAlso:replica_repository_dn
Where replica_repository_dn is the Replica Repository dn you obtained in the previous step.
REPLICA_HOME/bin/ldapmodify -D cn=orcladmin -wreplica_orcladmin_passwd-preplica_oid_port-v -f mod.ldif
REPLICA_HOME/config/ias.properties to reflect the Replica OID server host and port. Change the following lines:
OIDhost=replica_hostOIDport=replica_oid_portOIDsslport=replica_ssl_oid_portVirtualHostName=replica_host
REPLICA_HOME/network/admin/ldap.ora to reflect the Replica OID server host and port. Change the following line:
DIRECTORY_SERVERS = (replica_host:replica_oid_port:replica_ssl_oid_port)
REPLICA_HOME/bin/emctl startifdown iasconsole
http://replica_host:replica_em_port
REPLICA_HOME/sysman/log/emias.logREPLICA_HOME/sso/log/ssoem.logREPLICA_HOME/opmn/logs/OC4J~OC4J_SECURITY~default_island~1
REPLICA_HOME/opmn/conf/opmn.xml
OC4J_SECURITY.
LD_LIBRARY_PATH with SHLIB_PATH. For example, change:
<process-type id="OC4J_SECURITY" module-id="OC4J">
  <environment>
    <variable id="LD_LIBRARY_PATH" value="/private/oracleas/lib"/>
To:
<process-type id="OC4J_SECURITY" module-id="OC4J">
  <environment>
    <variable id="SHLIB_PATH" value="/private/oracleas/lib32"/>
REPLICA_HOME/dcm/bin/dcmctl updateConfig
REPLICA_HOME/opmn/bin/opmnctl reload
mod_osso.
REPLICA_HOME/jdk/bin/java -jarREPLICA_HOME/sso/lib/ossoreg.jar -oracle_home_pathREPLICA_HOME-site_namereplica_host-config_mod_osso TRUE -mod_osso_url http://replica_host:replica_http_port-uuser
Note that user is the user that starts Oracle HTTP Server. By default, this is the user that installed Oracle Application Server. If you have changed the Oracle HTTP Server listen port number to a value < 1024, then this user is root.
http://replica_host:replica_em_port
mod.ldif with the following lines:
dn:cn=OperationURLs,cn=DAS,cn=Products,cn=OracleContext
changetype:modify
replace:orcldasurlbase
orcldasurlbase:http://replica_host:replica_http_port/
Note the slash at the end of the URL.
REPLICA_HOME/bin/ldapmodify -D cn=orcladmin -wreplica_orcladmin_passwd-preplica_oid_port-v -f mod.ldif
REPLICA_HOME/opmn/bin/opmnctl stopallREPLICA_HOME/opmn/bin/opmnctl startall
Navigate to the following URL and click Login:
http://replica_host:replica_http_port/pls/orasso
Log in as orcladmin and use the password you specified during the installation of the Master. If the page does not appear or the login fails, check the following log files:
REPLICA_HOME/Apache/Apache/logs/error_log.most_recent_timestampREPLICA_HOME/sso/log/ssoServer.log
Using Application Server Control, navigate to the Instance Home Page where DAS is running. Verify that OC4J_SECURITY is listed in the System Components section. Verify that the Farm value displayed on the page is the Replica Repository.
Verify DAS is running properly:
http://replica_host:replica_http_port/oiddas
If these steps fail, turn on DAS debugging mode by setting the DEBUG flag to true in the following file:
REPLICA_HOME/ldap/das/das.properties
and restart DAS as follows:
REPLICA_HOME/opmn/bin/opmnctl stopproc process-type=OC4J_SECURITYREPLICA_HOME/opmn/bin/opmnctl startproc process-type=OC4J_SECURITY
Repeat the steps for verifying DAS is running properly to reproduce the problem. Examine the errors in the DAS log file:
REPLICA_HOME/ldap/log/das.log
MASTER_HOME/bin/dipassistant reassociate -src_ldap_hostmaster_host-src_ldap_portmaster_oid_port-dst_ldap_hostreplica_host-dst_ldap_portreplica_oid_port-src_ldap_passwdmaster_orcladmin_passwd-dst_ldap_passwdreplica_orcladmin_passwd
This command prints log messages to:
MASTER_HOME/ldap/odi/log/reassociate.log
http://replica_host:replica_em_port
REPLICA_HOME/bin/oidctl server=odisrv instance=1
flags='port=replica_oid_port' start
Navigate to the Directory Integration Page on Application Server Control. The DIP server instance "1" should have a status of "UP", the DIP host should be the Replica host, and the OID node should be the Replica host. If this is not the case, the DIP server was not registered and brought up on the Replica host successfully. To debug this problem, check the DIP server log file:
REPLICA_HOME/ldap/log/odisrv01.log
All provisioning profiles should be getting executed successfully. If any of the profiles show a "Database connection error" in the errors field, then the reassociation of the profiles was not successful. To debug this problem, check the application-specific trace file in this directory:
REPLICA_HOME/ldap/odi/log
The trace file names are of the form application_name_realm_name_E.trc or application_name_realm_name_E.aud.
You have finished setting up an LDAP-based Replica. You can return the main procedure you are following in either Section 8.4, "Moving Identity Management to a New Host" or Section 8.5, "Changing from a Test to a Production Environment".
This procedure describes how to migrate SSO and DIP data from a source Infrastructure to a target Infrastructure.
In this case, the Master is the source and the Replica is the target. You can convert the parameters in the procedure as follows:
In this case, the Replica is the source and the Master is the target. You can convert the parameters in the procedure as follows:
Refer to Table F-1 to obtain the values for the various parameters used in this procedure.
This procedure contains the following tasks:
ORASSO schema password on the source:
SOURCE_HOME/bin/ldapsearch -psource_oid_port-hsource_host-D "cn=orcladmin" -wsource_orcladmin_password-b "orclresourcename=orasso, orclreferencename=source_db_name, cn=ias infrastructure databases, cn=ias, cn=products, cn=oraclecontext" -s base "objectclass=*" orclpasswordattribute
This command prints the ORASSO password in a line like the following:
orclpasswordattribute=LAetjdQ5
SOURCE_HOME/sso/bin/ssomig -export -s orasso -psource_orasso_passwd-csource_db_name-log_d $SOURCE_HOME/sso/log
source_orasso_passwd is the ORASSO password obtained in the previous step.
ssomig.dmp and ssoconf.log files from the source to the target, preserving the exact full path for each file:
cpSOURCE_HOME/sso/log/ssomig.dmpTARGET_HOME/sso/log/ssomig.dmp cpSOURCE_HOME/sso/log/ssoconf.logTARGET_HOME/sso/log/ssoconf.log
ORASSO schema password on the target:
TARGET_HOME/bin/ldapsearch -ptarget_oid_port-htarget_host-D "cn=orcladmin" -wtarget_orcladmin_password-b "orclresourcename=orasso, orclreferencename=target_db_name, cn=ias infrastructure databases, cn=ias, cn=products, cn=oraclecontext" -s base "objectclass=*" orclpasswordattribute
TARGET_HOME/sso/bin/ssomig -import -overwrite -s orasso -ptarget_orasso_password-ctarget_db_name-log_d $TARGET_HOME/sso/log -discoforce
target_orasso_passwd is the ORASSO password obtained in the previous step.
Verify that the SSO migration tool reported success. You can also check the following log files for errors:
SOURCE_HOME/sso/log/ssomig.logTARGET_HOME/sso/log/ssomig.log
|
See Also:
Oracle Application Server Single Sign-On Administrator's Guide for information on interpreting messages in the log files |
SOURCE_HOME/bin/oidctl server=odisrv instance=1 stop
SOURCE_HOME/bin/dipassistant reassociate -src_ldap_hostsource_host-src_ldap_portsource_oid_port-dst_ldap_hosttarget_host-dst_ldap_porttarget_oid_port-src_ldap_passwdsource_orcladmin_passwd-dst_ldap_passwdtarget_orcladmin_passwd
This command prints log messages to:
SOURCE_HOME/ldap/odi/log/reassociate.log
TARGET_HOME/bin/odisrvreg -D "cn=orcladmin" -wtarget_orcladmin_password-htarget_host-ptarget_oid_port
TARGET_HOME/bin/oidctl server=odisrv instance=1 flags='port=target_oid_port'
start
This section describes how to migrate Oracle Internet Directory data from an Replica (Test) to the Master (Production). This procedure is used in conjunction with the procedure in Section 8.5, "Changing from a Test to a Production Environment".
Refer to Table F-1 to obtain the values for the various parameters used in this procedure.
REPLICA_HOME/bin/ldapsearch -hreplica_host-preplica_oid_port-D cn=orcladmin -wreplica_orcladmin_passwd-b "" -s base "objectclass=*" orclreplicaid
The replica ID will look something like "myhost_asdb".
mod.ldif that contains the following lines:
dn:orclreplicaid=replica_replicaid,cn=replication configuration
changetype:modify
replace:orclpilotmode
orclpilotmode:0
Where replica_replicaid is the Replica replica ID obtained in the previous step.
REPLICA_HOME/bin/ldapmodify -preplica_oid_port-D cn=orcladmin -wreplica_orcladmin_passwd-v -f mod.ldif
REPLICA_HOME/opmn/bin/opmnctl stopproc ias-component=OIDREPLICA_HOME/opmn/bin/opmnctl startproc ias-component=OID
You can clean up (delete) the data that is modified or added on the Test (Replica) OID so that it is not migrated to the Production (Master) OID. This might be a requirement of a middle-tier component or might be desired by the administrator who maintains OID consistency in the Production OID.
To clean up the data, use the ldapdelete command-line utility and delete entries that should not be migrated.
|
See Also:
Oracle Internet Directory Administrator's Guide for more information on the |
It is very important to quiesce the Distributed Directory environment while the data migration from the Replica (Test) to the Master (Production) takes place. This ensures that there are no conflicting updates, and therefore no data loss or corruption.
However, if you feel the data operated on by middle-tier components is isolated and cannot be modified by any processes in the Master (Production) environment, then it is safe to skip this step and proceed to the next step.
To quiesce the Distributed Directory Environment:
On the Replica host, create a file named mod.ldif that contains the following lines:
dn:
changetype:modify
replace:orclservermode
orclservermode:r
Run the following command:
REPLICA_HOME/bin/ldapmodify -preplica_oid_port-D cn=orcladmin -wreplica_orcladmin_passwd-v -f mod.ldif
Once middle-tier component testing is complete, you must identify the Database Access Descriptor (DAD) that has been modified or added locally at the Replica (Test) directory and move this data to the Master (Production) directory. This step describes how to back up the data from the Replica into a flat file.
modifytimestamp and modifiersname attributes:
REPLICA_HOME/ldap/bin/catalog.sh -connectreplica_db_name-add -attr modifytimestampREPLICA_HOME/ldap/bin/catalog.sh -connectreplica_db_name-add -attr modifiersname
Enter "ODS" when the script requests the OID Database user name.
REPLICA_HOME/opmn/bin/opmnctl stopproc ias-component=OIDREPLICA_HOME/opmn/bin/opmnctl startproc ias-component=OID
REPLICA_HOME/bin/ldapsearch -hreplica_host-preplica_oid_port-D cn=orcladmin -wreplica_orcladmin_passwd-b "orclreplicaid=replica_replicaid,cn=replication configuration" -s base "objectclass=*" pilotstarttime
Where replica_replicaid is the Replica replica ID you obtained earlier in the procedure.
This command returns something like:
orclreplicaid=myhost_asdb,cn=replication configuration
pilotstarttime=20031119120647z
migrate.ldif). Note that the following command should be typed all on one line.
REPLICA_HOME/bin/ldapsearch -L -hreplica_host-preplica_oid_port-D cn=orcladmin -wreplica_orcladmin_passwd-b "" -s sub "(&(modifytimestamp >=pilot_start_time) (!(modifiersname=cn=replicationdn, orclreplicaid=replica_replicaid, cn=replication configuration)))" \* orclguid > migrate.ldif
pilot_start_time is the Pilot Start Time obtained in a previous step.
replica_replicaid is the Replica replica ID obtained at the beginning of this procedure.
Run the following command to migrate data to the Master. Make sure you use the -r flag. Specify the migrate.ldif file created in the previous step.
MASTER_HOME/bin/ldapaddmt -hmaster_host-pmaster_oid_port-D "cn=orcladmin" -wmaster_orcladmin_passwd-r -f migrate.ldif
Verify that ldapaddmt reported success. You can check the add.log file for errors, which is created in the directory from which you ran the ldapaddmt command.
If the command succeeded, add.log will be empty. If add.log contains errors, preserve it by renaming it.
|
See Also:
Oracle Internet Directory Administrator's Guide for information on interpreting messages in log files |
Some middle-tier components might have special cleanup requirements after you have changed to the Master (Production). You can perform these cleanup tasks on the Replica (Test) after the middle-tier instances have been changed to the Production Node.
|
|
 Copyright © 2002, 2003 Oracle Corporation. All Rights Reserved. |
|