10g (9.0.4)
Part Number B10376-01
Home |
Solution Area |
Contents |
Index |
| Oracle Application Server 10g Administrator's Guide 10g (9.0.4) Part Number B10376-01 |
|
This chapter provides procedures for changing the Infrastructure Services used by a middle-tier instance.
It contains the following topics:
Most middle-tier instances use Infrastructure Services, such as Identity Management Services and the Metadata Repository. These services are usually assigned during installation.
After installation, you may want to change the Infrastructure Services used by a middle-tier instance. For example, you may want to use an Identity Management Service on a different host. Or, you may want to use a different Metadata Repository.
You can change Infrastructure services using the Infrastructure Page on Oracle Enterprise Manager Application Server Control, shown in figure Figure 8-1. Notice that the page allows you to change the Identity Management or the Metadata Repository used by a middle-tier instance.
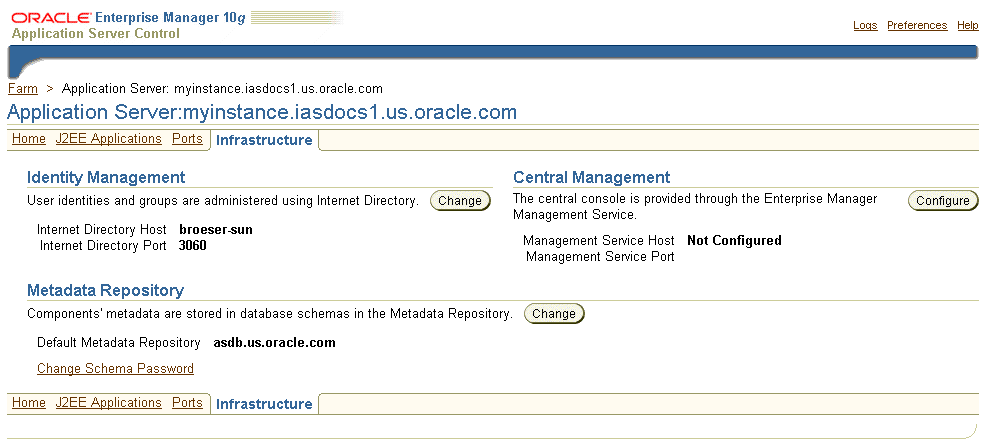
You must change Infrastructure Services when you change any of the following:
You cannot simply use the wizard to change from one Infrastructure service to another. You must first perform manual tasks in order to create and prepare the new Infrastructure service. This chapter provides the following supported procedures for changing Infrastructure services:
Use this procedure if you need to change the OID or HTTP listener ports on an Identity Management installation. In addition to changing the port numbers, you must update middle-tier instances with the new port information, which requires changing Infrastructure services.
Use this procedure if you would like to change the Oracle Internet Directory mode from non-SSL to SSL. In addition to changing the mode, you must update middle-tier instances with the new mode, which requires changing Infrastructure services.
Use this procedure if you would like to move your Identity Management installation, and its associated Metadata Repository, to a new host. After you perform the move, you must update middle-tier instances with the new host information for Identity Management, which requires changing Infrastructure services.
This procedure describes how to set up an environment that allows you to develop and test applications in a test environment, then move them into a production environment.
Use this procedure if you would like to move the Metadata Repository used for product metadata by middle-tier instances to a new host.
If you would like to change the Oracle Internet Directory non-SSL or SSL port on an Identity Management installation, refer to Section 5.6.2, "Changing Oracle Internet Directory Ports".
If you would like to change the Oracle HTTP Server non-SSL or SSL listen port on an Identity Management installation, which effectively changes the SSO port, refer to Section 5.6.3, "Changing the HTTP Server (SSO) Port on Identity Management".
When you install Identity Management, you are asked to choose a mode for Oracle Internet Directory. The default mode is dual mode, which allows some components to access Oracle Internet Directory using non-SSL connections. During the installation, you can choose SSL mode, which specifies that all components must use SSL when connecting to the directory.
If you did not choose SSL mode during the installation, and would like to change to SSL mode after installation, you can follow the procedure in this section. It includes changing the mode of the Oracle Internet Directory, and updating middle-tier instances to use the new mode.
Perform this task on the Infrastructure that contains Oracle Internet Directory.
mod.ldif that contains the following lines:
dn:cn=configset0,cn=osdldapd,cn=subconfigsubentry
changetype:modify
replace:orclsslenable
orclsslenable:1
ORACLE_HOME/bin/ldapmodify -D cn=orcladmin -worcladmin_passwd-poid_port-v -f mod.ldif
oid_port is the non-SSL OID port. This is listed as OIDport in ORACLE_HOME/config/ias.properties.
ORACLE_HOME/network/admin/ldap.ora
ORACLE_HOME/config/ias.properties
ORASSO schema password:
ORACLE_HOME/bin/ldapsearch -poid_port-hhostname-D "cn=orcladmin" -worcladmin_password-b "orclresourcename=orasso, orclreferencename=global_db_name, cn=ias infrastructure databases, cn=ias, cn=products, cn=oraclecontext" -s base "objectclass=*" orclpasswordattribute
oid_port is the non-SSL OID port. This is listed as OIDport in ORACLE_HOME/config/ias.properties.
global_db_name is the name of the entry for the Metadata Repository in ORACLE_HOME/network/admin/tnsnames.ora. For example: asdb.myco.com.
This command prints the ORASSO password in a line like the following:
orclpasswordattribute=LAetjdQ5
cd ORACLE_HOME/sso/admin/plsql/sso
sqlplus orasso/orasso_password @ssooconf.sql
Where orasso_password is the ORASSO schema password you obtained in the previous step.
The following prompts appear:
Press return to move through this and similar attributes you do not need to change, and enter the new value for the attributes that have changed. When you reach the following prompt:
Enter Y in this field, then press return. A message appears indicating that the value new_ldapusessl has been updated.
ORACLE_HOME/opmn/bin/opmnctl stopallORACLE_HOME/opmn/bin/opmnctl startall
In each middle-tier instance, run the Change Identity Management wizard and restart the instance:
Click Next.
cn=orcladmin, or the distinguished name of a user in the iASAdmins group.
Click Next.
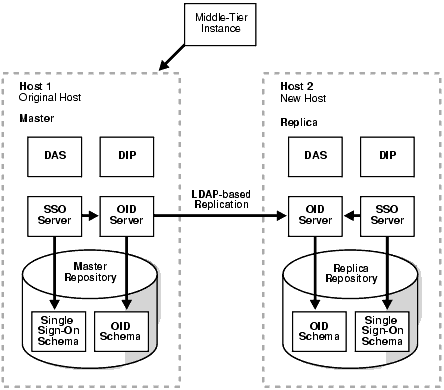
This section provides a procedure for moving Identity Management to a new host. This procedure involves creating a replica (or copy) of the original Identity Management on a different host, along with its own new Metadata Repository, and then changing the middle-tier instance to use the new Identity Management.
The following are sample uses for this procedure:
Oracle Application Server Certificate Authority Administrator's Guide for information on updating OracleAS Certificate Authority when changing Identity Management services
See Also:
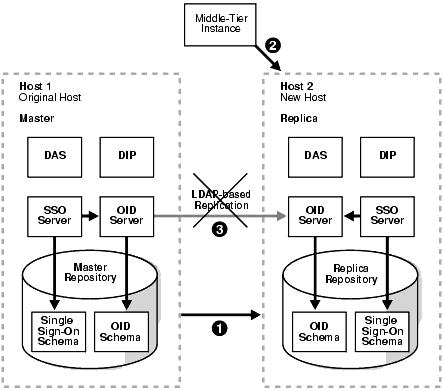
An overview of the procedure is as follows:
Figure 8-2 shows a sample of this setup.
This procedure contains the following tasks:
In this task, you install and set up the new Identity Management and its associated Metadata Repository. The new Identity Management is an LDAP-based replica of the original Identity Management.
In this task, you migrate the SSO and DIP data from the original Metadata Repository to the new Metadata Repository.
Follow the procedure in Section F.3, "Migrating SSO and DIP Data". The source for the migration is the original Metadata Repository (Master) and the target for the migration is the new Metadata Repository (Replica).
In each middle-tier instance, run the Change Identity Management wizard and restart the instance:
If you have a problem changing the middle-tier instances to the new host, check to make sure replication is running and try again.
Stop the replication between the original Identity Management and the new Identity Management (replica) by running the following command in the new Identity Management Oracle home:
ORACLE_HOME/bin/oidctl connect=global_db_nameserver=oidrepld instance=1 flags='-poid_port' stop
global_db_name is the global db name of the new Identity Management. (This is referred to as replica_db_name in Section F.2.)
oid_port is the non-SSL OID port in the new Identity Management. (This is referred to as replica_oid_port in Section F.2.)
As mentioned in Section 8.4.1, "Sample Uses for this Procedure", you can modify this procedure to perform failover for Identity Management. This enables you to move your middle-tier instances to the new Identity Management in case the original is lost.
To perform failover:
This section provides a procedure for changing from a test to production environment. This allows you to have a test environment for your applications, and then move your test applications and, optionally, test data into your production environment.
The following are sample uses for this procedure:
Oracle Application Server 10g Upgrading to 10g (9.0.4) for compatibility rules for different versions of Oracle9iAS and Oracle Application Server
See Also:
An overview of the procedure is as follows:
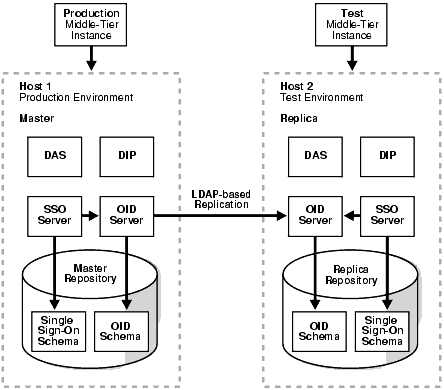
You create a test environment by installing and setting up a replica (or copy) of the production Identity Management. This Identity Management has its own Metadata Repository. The Oracle Internet Directory in the test Identity Management is an LDAP-based Replica of the production OID. Replication takes place constantly from the production OID to the test OID.This replica has its own Metadata Repository. You then install test middle-tier instances to use the test Identity Management. These middle-tier instances use a separate Metadata Repository for their product metadata. You can develop and test your applications in the test environment.
Figure 8-4 shows a sample production and test environment.
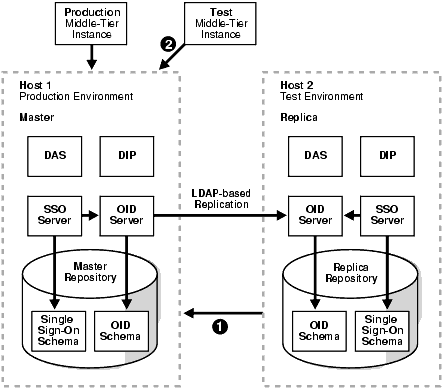
You cannot copy parts of a product Metadata Repository to another Metadata Repository; you must copy the entire database. Therefore, it is not possible to migrate only some of your test product metadata to the production environment. You must copy the entire Metadata Repository. Refer to Section 8.6, "Changing the Metadata Repository Used by a Middle-Tier Instance".
Note:
This procedure contains the following tasks:
In this task, you install and set up the test Identity Management and its associated Metadata Repository. The test Identity Management is an LDAP-based replica of the original Identity Management.
Perform this task in the Oracle home of the test (replica) Oracle Internet Directory:
mod.ldif that contains the following lines:
dn:orclreplicaid=replica_replicaid,cn=replication configuration
changetype:modify
replace:orclreplicatype
orclreplicatype:2
Where replica_replicaid is the test (replica) replica ID you obtained in Section F.2, "Installing and Setting Up an LDAP-based Replica".
ORACLE_HOME/bin/ldapmodify -D cn=orcladmin -wreplica_orcladmin_passwd-preplica_oid_port-v -f mod.ldif
Where replica_orcladmin_passwd is the test (replica) orcladmin password and replica_oid_port is the test (replica) non-SSL OID port you obtained in Section F.2, "Installing and Setting Up an LDAP-based Replica".
Perform this task in the Oracle home of the test (replica) Oracle Internet Directory:
mod.ldif that contains the following lines:
dn:orclreplicaid=replica_replicaid,cn=replication configuration
changetype:modify
replace:orclpilotmode
orclpilotmode:1
Where replica_replicaid is the test (replica) replica ID you obtained in Section F.2, "Installing and Setting Up an LDAP-based Replica".
ORACLE_HOME/bin/ldapmodify -D cn=orcladmin -wreplica_orcladmin_passwd-preplica_oid_port-v -f mod.ldif
Where replica_orcladmin_passwd is the test (replica) orcladmin password and replica_oid_port is the test (replica) non-SSL OID port you obtained in Section F.2, "Installing and Setting Up an LDAP-based Replica".
ORACLE_HOME/opmn/bin/opmnctl stopproc ias-component=OIDORACLE_HOME/opmn/bin/opmnctl startproc ias-component=OID
Install your test middle-tier instances and configure them to use the test Identity Management. You should use a separate Metadata Repository for the product metadata.
Develop and test application in your test environment.
When you are ready to move your applications from your test to production environment, you must migrate data.
Follow the procedure in Section F.4, "Migrating Oracle Internet Directory Data".
In each middle-tier instance, run the Change Identity Management wizard and restart the instance:
You have several options for moving your test product Metadata Repository to your production environment:
In this case, no further action is required.
Follow the procedure in Section 8.6, "Changing the Metadata Repository Used by a Middle-Tier Instance".
Install an Infrastructure using Oracle Universal Installer. Select the Metadata Repository only option. Register the Metadata Repository with the production Identity Management.
Change each of the former test middle-tier instances to use the new Metadata Repository. On each middle-tier instance:
You can continue to use your test environment by installing new middle-tier instances against the test Identity Management.
This section provides a procedure for changing the Metadata Repository used by a middle-tier instance. This procedure involves making a copy of the original Metadata Repository on a different host, and then changing the middle-tier instance to use the new Metadata Repository.
The following are sample uses for this procedure:
Oracle Application Server Certificate Authority Administrator's Guide for information on updating OracleAS Certificate Authority when changing Metadata Repository services
See Also:
An overview of the procedure is as follows:
Figure 8-6 shows a sample original Metadata Repository (asdb1.myco.com).
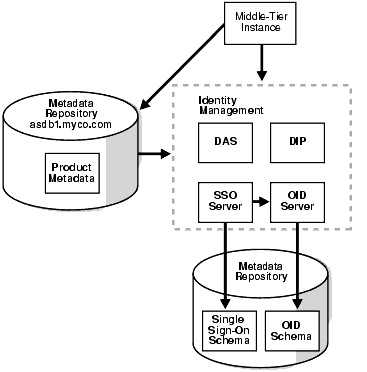
The following table shows sample attributes for the original Metadata Repository:
Figure 8-7 shows sample original and new Metadata Repositories.
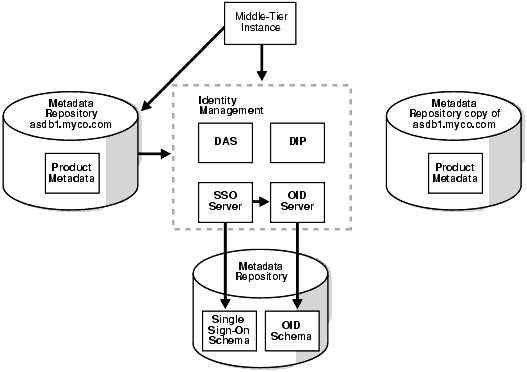
The following table shows sample attributes for the original and new Metadata Repositories:
asdb2.myco.com).
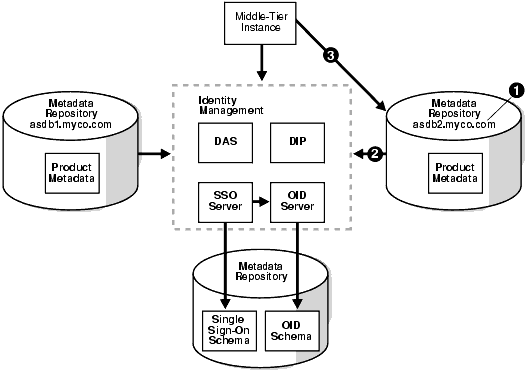
The following table shows sample attributes for the original and new Metadata Repositories after performing the change:
This procedure contains the following tasks:
If your middle-tier instances use OracleAS Portal and Oracle Ultra Search, you will need to supply the WKSYS schema password later in this procedure in Task 4: Configure Ultra Search Metadata in the New Metadata Repository. You should obtain this password now from the old Metadata Repository.
Install the new Metadata Repository as follows:
In this task, you create a backup of the original Metadata Repository. This task provides the steps for doing this using RMAN, however, if you are an experience DBA, you can back up the Metadata Repository according to your standard practices.
Perform all of the steps in this task on the original Metadata Repository host.
mkdir -pBACKUP_DIR/log_files mkdir -pBACKUP_DIR/db_files
ORACLE_HOME and ORACLE_SID environment variables you run the SQL*Plus command.
SQL> SELECT DBID FROM v$database;
Make note of this value; you will use it later in the procedure.
BACKUP_DIR/cold_backup.rcv that contains the following lines. In the file, substitute the full path for BACKUP_DIR.
shutdown immediate;
startup mount;
configure controlfile autobackup on;
configure controlfile autobackup format for device type disk to
'BACKUP_DIR/db_files/%F';

run {
allocate channel dev1 device type disk format
'BACKUP_DIR/db_files/%U';
backup database plus archivelog;
release channel dev1;
}
ORACLE_HOME/bin/rman target / cmdfile=BACKUP_DIR/cold_backup.rcv >BACKUP_DIR/log_files/backup.log
BACKUP_DIR on the new host.
BACKUP_DIR/log_filesBACKUP_DIR/db_files
In this task you restore the backup to the new Metadata Repository.
Perform all of the steps in this task on the new Metadata Repository host.
sqlplus "sys/SYS_PASSWORD as sysdba"
SQL> shutdown immediate;
prompt> mvORACLE_HOME/dbs/orapwORACLE_SIDORACLE_HOME/dbs/orapwORACLE_SID.oldprompt>ORACLE_HOME/bin/orapwd file=ORACLE_HOME/dbs/orapwORACLE_SIDpassword=new_password
new_password is the new SYS password. You can use the old SYS password, or set it to a new password.
SQL> startup nomount;
BACKUP_DIR/restore.rcv that contains the following lines. In the file, substitute the full path for BACKUP_DIR and the DBID obtained in the previous task.
set dbid=DBID;
connect target /;
set controlfile autobackup format for device type disk to
'BACKUP_DIR/db_files/%F';
restore controlfile from autobackup;
startup mount force;

run {
allocate channel dev1 device type disk format
'BACKUP_DIR/db_files/%U';
restore database;
release channel dev1;
alter database open resetlogs;
}
prompt>ORACLE_HOME/bin/rman cmdfile=BACKUP_DIR/restore.rcv >BACKUP_DIR/log_files/restore.log
TEMP tablespace has a datafile by running the following command in SQL*Plus:
SQL> select file_name from dba_temp_files where tablespace_name like 'TEMP';
If the preceding command does not return any files, add a datafile:
SQL> alter tablespace "TEMP" add tempfile
'ORACLE_HOME/oradata/GDB/temp01.dbf' size 5120K autoextend on next 8k
maxsize unlimited;
GDB is the first part of the global database name.
Note that the above command creates a file called temp01.dbf and adds it to the TEMP tablespace. If the temp01.dbf file already exists in the directory, add a "reuse" clause to the command:
SQL> alter tablespace "TEMP" add tempfile
'ORACLE_HOME/oradata/GDB/temp01.dbf' size 5120K reuse autoextend on next 8k
maxsize unlimited;
GDB is the first part of the global database name.
Perform this task on the new Metadata Repository.
ORACLE_HOME and ORACLE_SID environment variables are set.
cdORACLE_HOME/ultrasearch/admin sqlplus "sys/SYS_PASSWORDas sysdba" SQL> @wk0config.sqlWKSYSPWJDBC_CONNSTRLAUNCH_ANYWHERE""
Where:
WKSYSPW is the password of the WKSYS schema that you obtained at the beginning of this procedure.
JDBC_CONNSTR is the JDBC connection string host:port:SID, for example: myhost:1521:testdb.
LAUNCH_ANYWHERE is TRUE if the Metadata Repository is in Real Application Cluster mode, otherwise FALSE. For this procedure, you should set it to FALSE.
In this task, you change the global db name of the new Metadata Repository to a new, unique name so you can register it with OID.
|
See Also:
You can find more information on changing the global db name in article 137483.1 at |
Perform all of the steps in this task on the new Metadata Repository host.
sqlplus "sys/SYS_PASSWORD as sysdba"
SQL> alter system switch logfile;
SQL> alter database backup controlfile to trace resetlogs;
SQL> select value from v$parameter where name='spfile';
If the previous command returns output like the following:
VALUE
----------------------------------
?/dbs/spfile@.ora
run the following command to create a pfile from the spfile:
SQL> create pfile='initORACLE_SID.ora' from spfile;
Where ORACLE_SID is the SID of the original and new Metadata Repository.
SQL> shutdown immediate;
The database must be shut down with SHUTDOWN NORMAL or SHUTDOWN IMMEDIATE. You should not use SHUTDOWN ABORT.
cdORACLE_HOME/dbs mv spfileORACLE_SID.ora spfileORACLE_SID.ora.save
ORACLE_HOME/dbs/initORACLE_SID.ora
Update the db_name to the new db name (the first portion of the new global db name). For example, if the new global db name is asdb1.myco.com, the value of db_name should be asdb1. Note that this is not necessarily (nor likely) the same value as the SID on the new Metadata Repository.
cdORACLE_HOME/oradata/GDB
Where GDB is the first part of the global database name.
mv control01.ctl control01.ctl.old
mv control02.ctl control02.ctl.old
mv control03.ctl control03.ctl.old
cdORACLE_HOME/admin/GDB/udump
Note that the above is the default location for the trace file directory. This location can be overridden by the user_dump_dest parameter in initORACLE_SID.ora or spfileORACLE_SID.ora.
NNNN.trc, where NNNN is a number. Choose the trace file with the most recent modification date.
STARTUP NOMOUNT" down to the end of the file, into a new file named BACKUP_DIR/ccf.sql.
BACKUP_DIR/ccf.sql as follows (an example of ccf.sql after performing the edits in this step is shown in Example 8-1.)
REUSE" to "SET":
Before modification:
CREATE CONTROLFILE REUSE DATABASE "OLD_GLOBAL_DB_NAME" RESETLOGS ...
After modification:
CREATE CONTROLFILE SET DATABASE "NEW_GLOBAL_DB_NAME" RESETLOGS ...
# STANDBY LOGFILE
REM RECOVER DATABASE USING BACKUP CONTROLFILE
REM VARIABLE RECNO NUMBER;
REM EXECUTE :RECNO := SYS.DBMS_BACKUP_RESTORE.SETCONFIG('CONTROLFILE
AUTOBACKUP','ON');
REM VARIABLE RECNO NUMBER;
REM EXECUTE :RECNO :=
SYS.DBMS_BACKUP_RESTORE.SETCONFIG('CONTROLFILEAUTOBACKUP FORMAT FOR
DEVICE TYPE','DISK TO BACKUP_DIR/db_files/%F');
ALTER DATABASE OPEN RESETLOGS
STARTUP NOMOUNT
CREATE CONTROLFILE set DATABASE "<NEW DATABASE>" RESETLOGS ARCHIVELOG
   MAXLOGFILES 50
   MAXLOGMEMBERS 5
   MAXDATAFILES 100
   MAXINSTANCES 1
   MAXLOGHISTORY 226
LOGFILE
 GROUP 1 '/private1/inst/oradata/asdb/redo01.log'  SIZE 50M,
 GROUP 2 '/private1/inst/oradata/asdb/redo02.log'  SIZE 50M,
 GROUP 3 '/private1/inst/oradata/asdb/redo03.log'  SIZE 50M
DATAFILE
 '/private1/inst/oradata/asdb/system01.dbf',
 '/private1/inst/oradata/asdb/undotbs01.dbf',
 '/private1/inst/oradata/asdb/drsys01.dbf',
 '/private1/inst/oradata/asdb/dcm.dbf',
 '/private1/inst/oradata/asdb/portal.dbf',
 '/private1/inst/oradata/asdb/ptldoc.dbf',
 '/private1/inst/oradata/asdb/ptlidx.dbf',
 '/private1/inst/oradata/asdb/ptllog.dbf',
 '/private1/inst/oradata/asdb/oca.dbf',
 '/private1/inst/oradata/asdb/discopltc1.dbf',
 '/private1/inst/oradata/asdb/discopltm1.dbf',
 '/private1/inst/oradata/asdb/oss_sys01.dbf',
 '/private1/inst/oradata/asdb/wcrsys01.dbf',
 '/private1/inst/oradata/asdb/uddisys01.dbf',
 '/private1/inst/oradata/asdb/ip_dt.dbf',
 '/private1/inst/oradata/asdb/ip_rt.dbf',
 '/private1/inst/oradata/asdb/ip_idx.dbf',
 '/private1/inst/oradata/asdb/ip_lob.dbf',
 '/private1/inst/oradata/asdb/attrs1_oid.dbf',
 '/private1/inst/oradata/asdb/battrs1_oid.dbf',
 '/private1/inst/oradata/asdb/gcats1_oid.dbf',
 '/private1/inst/oradata/asdb/gdefault1_oid.dbf',
 '/private1/inst/oradata/asdb/svrmg1_oid.dbf',
 '/private1/inst/oradata/asdb/ias_meta01.dbf'
CHARACTER SET WE8MSWIN1252
;
REM Configure RMAN configuration record 1
REM VARIABLE RECNO NUMBER;
REM EXECUTE :RECNO := SYS.DBMS_BACKUP_RESTORE.SETCONFIG('CONTROLFILE
AUTOBACKUP','ON');
REM Configure RMAN configuration record 2
REM VARIABLE RECNO NUMBER;
REM EXECUTE :RECNO := SYS.DBMS_BACKUP_RESTORE.SETCONFIG('CONTROLFILE AUTOBACKUP
FORMAT FOR DEVICE TYPE','DISK TO /private1/inst/backup_dir/db_files/%F');
REM Recovery is required if any of the datafiles are restored backups,
REM or if the last shutdown was not normal or immediate.
REM RECOVER DATABASE USING BACKUP CONTROLFILE
REM Database can now be opened zeroing the online logs.
ALTER DATABASE OPEN RESETLOGS;
REM No tempfile entries found to add.
ccf.sql script:
SQL> @BACKUP_DIR/ccf.sql
SQL> alter database rename global_name toNEW_GLOBAL_DB_NAME;
ORACLE_HOME/network/admin/tnsnames.oraORACLE_HOME/network/admin/listener.ora
Note that you should not change the SID.
In this task, you register the new Metadata Repository with the same OID used by the original Metadata Repository. To do this, you run Oracle Application Server Repository Creation Assistant (OracleAS RepCA), a wizard that guides you through the registration.
To register the new Metadata Repository with Oracle Internet Directory, start up OracleAS RepCA on the host where the new Metadata Repository is installed:
runRepca -OH ORACLE_HOME -REGISTER
Where ORACLE_HOME is the new Metadata Repository Oracle home.
The wizard will guide you through the process.
|
See Also:
Oracle Application Server 10g Installation Guide for more information on registering the OracleAS Metadata Repository with Oracle Internet Directory |
On each middle-tier instance you want to change to the new Metadata Repository, run the Change Metadata Repository wizard and restart the instance:
|
|
 Copyright © 2002, 2003 Oracle Corporation. All Rights Reserved. |
|