10g (9.0.4)
Part Number B10410-01
Home |
Solution Area |
Contents |
Index |
| Oracle Application Server InterConnect Adapter for CICS Installation and User's Guide 10g (9.0.4) Part Number B10410-01 |
|
This chapter discusses the following:
In CICS, both partners (CICS and the CICS adapter) must define the content of the CICS buffer. When this is done, it is possible to exchange data.
The CICS adapter provides the OracleAS InterConnect system with the ability to interact with CICS. To make the CICS buffer description visible to OracleAS InterConnect, the adapter specifies how to format data (representing a call) on a communication line by describing the format of the data being passed. The format is described in an Message Description Language (MDL) file. It abstracts a method call as input and output messages. A normal method call has arguments passed from the Agent (caller) to CICS (callee) represented as synchronous or asynchronous messages going up and back from arbitrary services.
Individual message reply and request pairs (each request message can have a reply message) describe interactions between clients and servers.
The CICS adapter represents a method call as a pair of messages:
Message-oriented technology does not have any type description which object-technologies require. A language specification, the Message Description Language, describes the internal data format of each message buffer.
The CICS adapter uses the Message Description Language to describe the CICS buffer.
Message Description Language elements are message buffers, sent or received by the CICS adapter, mapped as Message Description Language method arguments. The mapping allows object-oriented technologies to have a familiar view of the message buffers; with each message treated as a single argument or separated into multiple arguments. The CICS adapter automatically concatenates the arguments at run-time. The request and reply messages are grouped as a single method with input and output arguments. One Message Description Language interface groups Message Description Language methods (performing similar tasks) for a specific message queue.
To make CICS servers visible as components to OracleAS InterConnect applications, you first describe a set of methods using adapter's message formats. A method call translates into a request message and a reply message. The request message contains all the input arguments and the reply message contains all the output arguments.
The CICS adapter uses Message Description Language *.cls files as the representation of component interfaces with methods having elements as arguments. For example, the message definition:
method GetBalance
   in BankName bank
   in CustName customer
   out Balance balance
   out CustStatus status
end method
defines a method containing four arguments with the type defined using Message Description Language fixed length string types:
typedef string(54,' ',tail) BankName
typedef string(30,' ',tail) CustName
typedef string(20,' ',head) Balance
typedef string(20,' ',tail) CustStatus
The following is an example of a Message Description Language file for CPI-C LU6.2 SNA protocol. This file must be named cics62b.cls (this is the class name and the cls extension):
#cics62b.CLS # Class for CICS A62B transaction invoking ACTB62P1 Program # Note the ACTB62P1 program is invoking (CICS LINK) ACTBNKP1 Programclass cics62b (lu62cpic://CICSVIET)struct dfhcommarea string(8,' ',tail) transCode number(5,0,none) in string(5,'0',head) acctNumber string(20,' ',tail) clientName number(6,2,none) in string(8,'0',head) Amount number(8,2,none) in string(10,'0',head) Balance string(3,' ',tail) ReturnCode string(80,' ',tail) Information end structmethod AB62 return void inout dfhcommarea programdata end method end class# 01 IOAREA.# 05 TRANSACTION-CODE PIC X(8).# 05 ACCOUNT-NUMBER PIC 9(5).# 05 CLIENT-NAME PIC X(20).# 05 TRANSACTION-AMOUNT PIC 9(6)V99.# 05 ACCOUNT-BALANCE PIC 9(8)V99.# 05 APPL-RETURN-CODE PIC X(3).# 05 APPL-ERROR-MESSAGE PIC X(80).
At run-time, the CICS adapter interacts with the communication framework to pass along data over the adapter CPI-C protocol stack or the ECI protocol API. You can use either of these protocol stacks with the CICS adapter.
Both the ECI protocol API and the CPI-C protocol stack (CPI-C LU6.2 SNA protocol API) defines the transport layer used to communicate data between CICS applications and adapter. Just as the metadata describes how to format documents, the protocol stack defines the shipping mechanism.
Message Description Language class files must specify a URL in the class definition. URLs specify routing information when describing destinations within the CICS world. The URL contains CPI-C transport, ECI transport, and protocol under the form of a protocol stack identifier, as well as transport specific server identification. The following is an example using the CPI-C LU6.2 SNA protocol API:
lu62cpic://luname/tpname
where:
The following is an example using the ECI protocol API:
eci://cicsservername/cicsprogramname
where:
The CICS adapter uses either a SNA LU62 CPI-C interface or ECI protocol application to communicate with CICS.
To achieve the communication, install the CICS adapter on a machine that has the IBM eNetwork communication server or the IBM eNetwork communication client, or on a machine having a Microsoft SNA server or Microsoft SNA client.
Install all the required definitions in the following locations:
To communicate with CICS, the CICS adapter needs two pieces of information:
The URL specified in the Message Description Language class definition provides this information.
To achieve the communication, install the CICS adapter on a machine that has the IBM CICS Universal Client. This software may require one of the following pieces of software to communicate with the CICS server:
To communicate with CICS, the CICS adapter needs two pieces of information:
The URL specified in the Message Description Language class definition provides this information.
Security is provided by the CICS adapter and by the different software needed by the protocols.
There are different levels of security when using the CICS adapter with the SNA LU 6.2 CPI-C protocol. Security may be optional, but it is almost always used in mainframe applications. You may also have security between the SNA Client and the SNA server (if you are using a SNA client) and security between SNA servers (the mainframe SNA server and the SNA server used by the CICS adapter to communicate. For more details refer to your system administrator or to the SNA (Microsoft or IBM) books for the CICS LU6.2 CPI-C protocol and to the IBM SNA and CICS mainframe books.
Security can be specified in the user profile. If you are using security, you must provide a user identification and a password that your mainframe application accepts.
There are different levels of security when using the CICS adapter with the ECI protocol. Security may be optional, but it is almost used in mainframe applications. The security used in the CICS Universal agent depends on which communication protocol is used. For more details, refer to your system administrator or to the CICS Universal Agent documentation.
Security can be specified in the user profile. If you are using security, you must provide a user identification and a password that your mainframe application accepts.
There are two parts in the implementation:
LU 6.2 provides the services required to establish a conversation with the Remote partner of the CICS adapter, the Mainframe CICS region. The services related to a transaction program are:
ECI provides the service requires to establish a Distributed Program Link (DPL) call to a CICS program running in a CICS region, through the Commarea. The services related to a Distributed Program Link call are:
The CICS adapter in inbound mode does the following:
If using services provided by the SNA LU 6.2 CPI-C protocol, the following is achieved:
If using services provide by the ECI protocol:
The following is the CICS adapter information flow:
The Communication Layer manages physical communication with the mainframe (physical links, PUs and logical units activation/deactivation, and link security). It sends and receives data received from the CICS adapter.
The following are multi-threaded for SNA LU62 CPI-C:
The SNA API DLLs support multiple calls from a program using APPC or CPI-C SNA APIs.
More than one instance of the CICS adapter are possible:
It is possible for one instance of the CICS adapter to have more than one conversation with multiple remote transaction programs.
The following are multi-threaded for ECI:
The CICS Universal Agent DLLs support multiple calls from a program using ECI API.
More than one instance of the CICS adapter is possible. The possibilities are:
It is possible for one instance of the CICS adapter to have more than one program call to multiple CICS regions.
Implementation of security and/or implementation of multi-threading is specific to the CICS Universal Agent and to the functions provided by the API.
Sending messages inbound means that the CICS adapter is the client and CICS is the server. To send messages to CICS using the CPI-C LU 6.2 SNA protocol, ensure that the SNA client and the adapter configuration settings are setup properly. To use an ECI protocol, ensure that the IBM Universal client and adapter settings are set up properly.
Before using the CICS adapter, you must prepare your environment. For example:
Launch the CICS adapter. In its initialization process, the CICS adapter sends a TP_START APPC verb. The SNA returns a TP_id. All conversations and commands sent to the SNA controller use this TP_id. It is valid until the adapter issues a TP_END later in the allocation of a conversation.
When the CICS adapter receives a request, complete the following:
UserID and Password.
NONE or CONFIRM.
confirmation command if CONFIRM is set as synchronization level.
receive command to receive the reply from the CICS transaction.
When all the data is received, the session will be de-allocated and the CICS adapter receives notification. With the data, the CICS adapter builds back a reply to the requestor.
Before using the CICS adapter, you must prepare your environment. For example:
To start the application, launch the CICS adapter.
When the CICS adapter receives a request, complete the following:
Create an Message Description Language *.cls file describing the messages buffer format to send and receive as Message Description Language method argument parameters.
|
See Also:
|
Create a new sub-directory under config/CICS and copy the Message Description Language class file into the new directory. After the Message Description Language files have been copied into the directory, the interfaces are visible to OracleAS InterConnect. iStudio can be used in the normal manner to create definitions, procedures, and events.
You use the CICS adapter to:
Performing a call requires a bidirectional exchange of information with the CICS servers. On performing a call, the CICS adapter extracts all input information from the passed in arguments; it uses information within the Message Description Language to format these arguments into an input message. The CICS adapter uses the URL provided in the Message Description Language file to connect to the service.
To create an implemented procedure using iStudio:
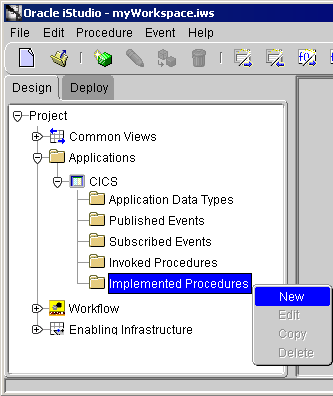
Text description of the illustration newimplementedprocedure.gif
The Implement Wizard--Select a Procedure dialog displays.
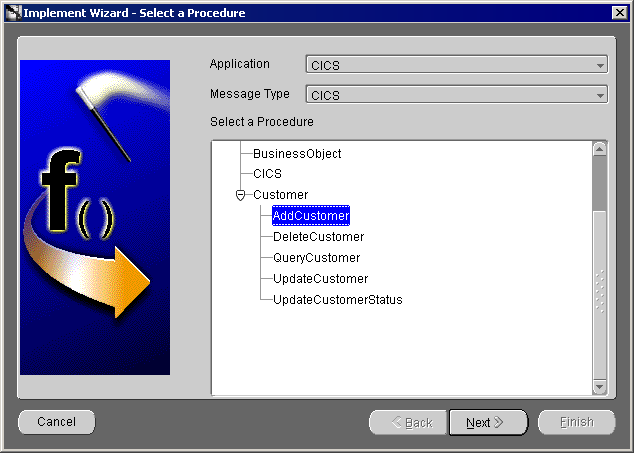
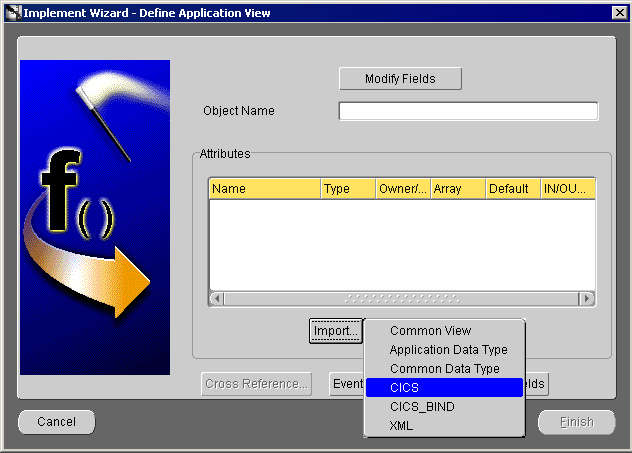
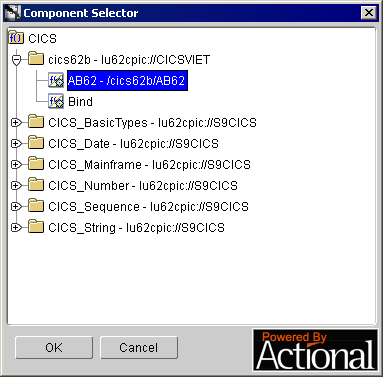
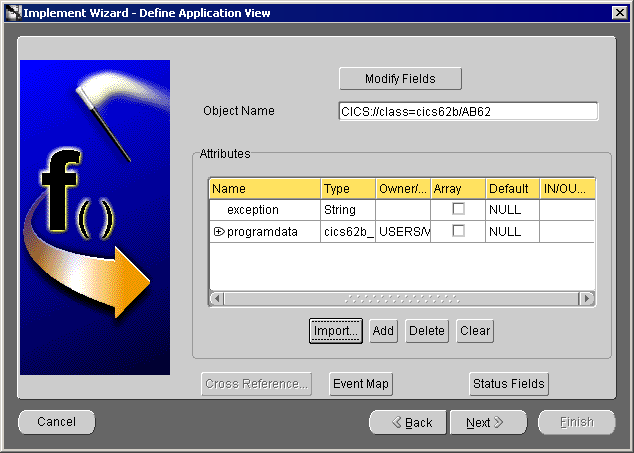
Text description of the illustration implpopulateddefineapp.gif
The Define Mappings dialog displays.
The new populated event displays in the right panel of iStudio.
To create a subscribed event in iStudio:
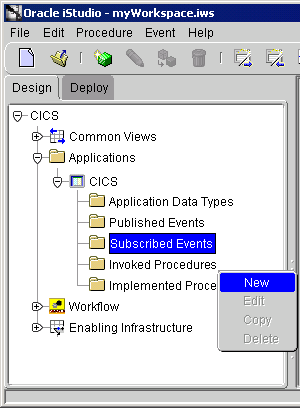
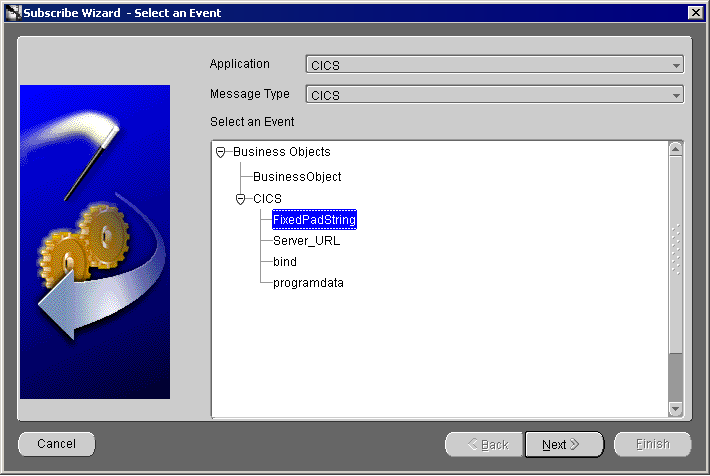
The Subscribe Wizard--Select an Event dialog displays.
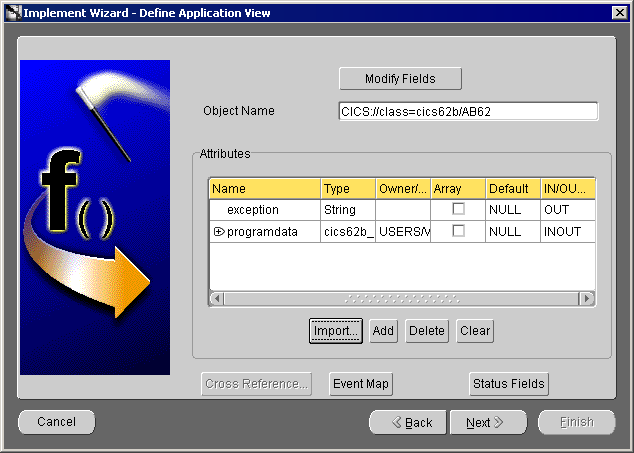
The Define Application View dialog displays.
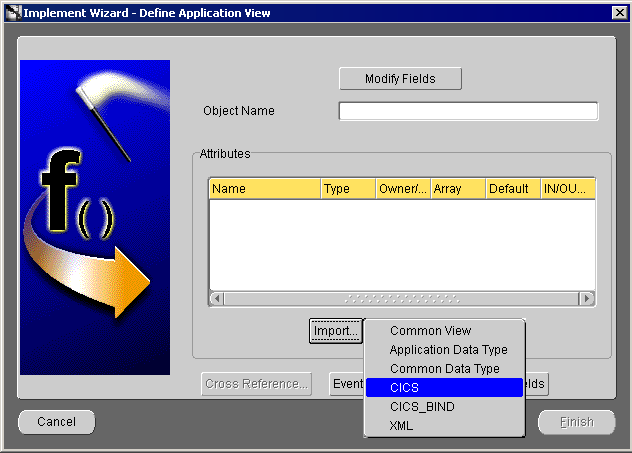
Text description of the illustration defineapplicationview.gif

The Define Mappings dialog displays
The new populated event displays in the right panel of iStudio.
|
|
 Copyright © 2002, 2003 Oracle Corporation. All Rights Reserved. |
|