Skip Headers

Oracle Application Server InterConnect Configuration Editor User's Guide
10g (9.0.4)

Part Number B10420-01
Go To Documentation Library
Home
Go To Product List
Solution Area
Go To Table Of Contents
Contents
Go To Index
Index

Go to previous page Go to next page

2
Using the Configuration Editor

This chapter describes how to use the Configuration Editor to create and edit profiles. The following topics are discussed:

Starting the Configuration Editor

To start the Configuration Editor using a command prompt:

  1. Change directories to the installation directory.

  2. Type configeditor.

  3. Press Enter.

    The Configuration Editor displays.

    Figure 2-1 Configuration Editor Main Menu

    Text description of globalsetting.gif follows.

    Text description of the illustration globalsetting.gif

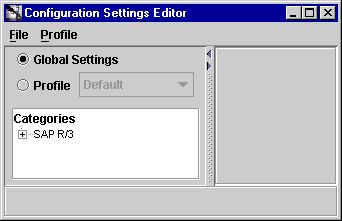
The following list describes the components on this dialog:

Getting Help

In any dialog displayed by the Configuration Editor help is available to explain the fields in all of the dialogs. To activate help:

  1. Click in a field for which you need an explanation.

  2. Click F1.

    A dialog containing a description of the field(s) displays.

    Figure 2-2 Help Dialog

    Text description of helpfile.gif follows.

    Text description of the illustration helpfile.gif

Menu Items

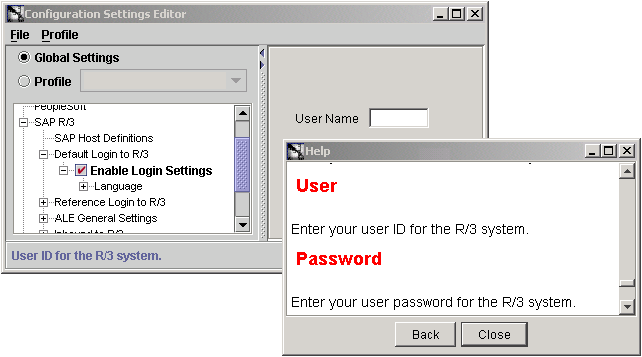
At the top of the dialog are two menu items. Table 2-1 describes the menu items and their submenus.

Table 2-1 Menu Items

Menu Selection Description

File

Save Settings

Save the current change.

Save All Settings

Save multiple changes at the same time.

Revert

Restore original settings. If you modify a setting and it is not incorrect, use revert to back out of the modification.

Import Profile

Import previously exported profiles.

Export Profile

Export the profile. Also used to save profile configuration data to import after a product upgrade.

Exit

Exit the Configuration Editor.

Profile

Create a Profile

Create new profiles.

Delete a Profile

Delete an existing profile.

Set as Default Profile

Set a profile as the start-up profile.

Creating a Profile

To create a new profile:

  1. Select Profile->Create a Profile from the dropdown menu.

    The Create Profile dialog displays.

    Figure 2-3 Create Profile Dialog

    Text description of newprofiledialog.gif follows.

    Text description of the illustration newprofiledialog.gif

  2. Enter a profile name in the Create Profile field.

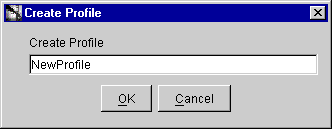
    A profile name is any combination of alpha or numeric characters to a length of 32 characters. Spaces are not allowed.

  3. Click OK.

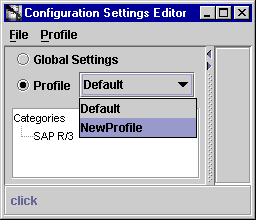
    The new empty profile displays in the Profile dropdown list and in the settings database.

    Figure 2-4 New Profile Drop Down List

    Text description of newprofilelist.gif follows.

    Text description of the illustration newprofilelist.gif


    Note:

    Currently running services are not affected by any change to the profiles. After editing an existing profile, restart any application using the service to update the resources.


Exporting a Profile

An exported profile contains all the configuration settings previously set. It also contains the Master Key code to unlock password protected values if the Master Key was set on the machine.

  1. Select File->Export Profile to export your profile.

    The Select Profile to Export dialog displays.
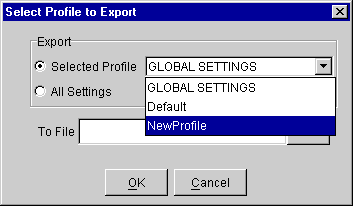
  2. Select a specific profile to export using the dropdown list or click All Settings to export all profiles.

    Figure 2-5 Select a Profile for Export

    Text description of exporprofiledialog.gif follows.

    Text description of the illustration exporprofiledialog.gif

  3. Enter a filename to save the parameters in the To File field. For exmaple, parameters.txt.

  4. Click OK to save the profile to a file and exit the dialog.

Importing a Profile

Importing a profile is useful if you want other machines to have the same setup as your development machine. To import a profile:

  1. Select File->Import Profile to import your profile.

    The Import Profile dialog displays.

    Figure 2-6 Importing a Profile Dialog

    Text description of importfiledialog.gif follows.

    Text description of the illustration importfiledialog.gif

  2. Enter a file name containing the export configuration parameters in the File field.

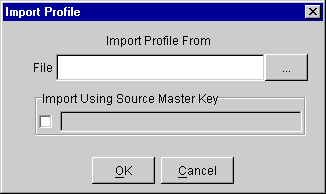
    To browse for a file, click ... (browse). The File Selection dialog displays.

    Figure 2-7 File Selection Dialog

    Text description of fileselectiondialog.gif follows.

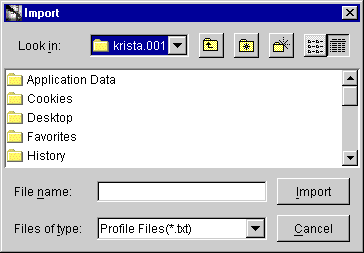
    Text description of the illustration fileselectiondialog.gif

  3. Select a profile and click Import to return to the Import Profile dialog.

  4. Check Import Using Source Master Key if the machine from which you are importing has a Master Key set.

  5. Enter the same Master Key as set on the machine from which you are importing the profile.

  6. Click OK.


Go to previous page Go to next page
Oracle
Copyright © 2002, 2003 Oracle Corporation.

All Rights Reserved.
Go To Documentation Library
Home
Go To Product List
Solution Area
Go To Table Of Contents
Contents
Go To Index
Index