10g (9.0.4)
Part Number B10559-01
Home |
Solution Area |
Contents |
Index |
| Oracle® Application Server 10g MapViewer User's Guide 10g (9.0.4) Part Number B10559-01 |
|
This appendix explains how to use MapViewer to display maps within Macromedia Flash applications.
MapViewer provides limited Flash support through a mapping client that is a Macromedia Flash SWF file. This Flash mapping client is shipped only as a demonstration application. Its capabilities are limited and its performance has not been tuned.
The Flash mapping client can send map requests to MapViewer, load vector map data from MapViewer, and display map data. The client SWF file is named flashmap.swf. It is installed in the %MAPVIEWER_HOME%/demo directory, where %MAPVIEWER_HOME% is the top directory of the unpacked MapViewer files (such as /oracle/lbs/MapViewer). To use this client, you must copy the flashmap.swf file to the following directory:
%MAPVIEWER_HOME%/web
This SWF file can be referred to in Web pages, so that users can interact with maps in a Web browser.
The Flash mapping client works with MapViewer by sending an XML request and receiving vector map data (represented by an XML document) from MapViewer. Most MapViewer style types are supported by the Flash mapping client. You cannot use image markers with the Flash mapping client, except for SVG and Flash markers, as explained in Section C.4.
Maps are represented by vectors inside the Flash mapping client. All vector graphic components are drawn locally by the client. The Flash mapping client has full control over the map data, which makes rich client-side mapping capabilities possible. Mapping operations such as zooming in, zooming out, and panning can be handled locally without sending new requests to the MapViewer server, if the necessary map data is already loaded on the client system.
To provide clickable map features, you can associate any styled feature (geometry) with a hidden information string, which can specify nonspatial columns in the geometry table. The associated information can be displayed when a user clicks on or moves the mouse pointer over the styled feature. To associate styled features and attributes, use the <hidden_info> element in the styling rules definition of a theme, as explained in Section C.3.
To display maps without clickable features, you can use your existing base map, theme, and style definitions, although you may need to modify styles that are used in relevant themes to use styles based on SVG markers or Flash markers, as explained in Section C.4.
You can group features into themes, and you can allow users to select which themes are to be displayed.
To embed the Flash mapping client in a Web page, insert the following lines in the source HTML file. Replace the strings in the square bracket pairs with the actual attribute values, to set the map size, data source, base map, and map center. (These attributes are described in Section 3.2.2.) Replace [flashmap.swf URL] with the value for %MAPVIEWER_HOME%/web/flashmap.swf, where %MAPVIEWER_HOME% is the name of the home directory where MapViewer is deployed.
<OBJECT id=Flashmap codeBase=http://download.macromedia.com/pub/shockwave/cabs/Flash/swFlash.cab#version=6,0,0,0 height=[height of map in pixels]width=[width of map in pixels]classid=clsid:D27CDB6E-AE6D-11cf-96B8-444553540000> <PARAM NAME="Movie" VALUE="flashmap.swf?"> <PARAM NAME="Src" VALUE="[flashmap.swf URL]?serverurl=[MapViewer URL]&datasource=[map data source]&basemap=[base map name]¢erx=[map center X]¢ery=[map center Y]&mapsize=[map size]"> <PARAM NAME="Quality" VALUE="High"> <EMBED src="[flashmap.swf URL]?serverurl=[MapViewer URL]&datasource=[map data source]&basemap=[base map name]¢erx=[map center X]¢ery=[map center Y]&mapsize=[map size]" quality=high HEIGHT =[height of map in pixels]WIDTH =[width of map in pixels]
NAME="Flashmap"
    TYPE="application/x-shockwave-Flash"
    PLUGINSPAGE="http://www.macromedia.com/go/getFlashplayer">
  </EMBED>
</OBJECT>
Example C-1 shows an excerpt from an HTML file in which the MapViewer Flash mapping client is included in a table.
<TABLE cellSpacing=1 cellPadding=1 width="500" border=1> <TR> <TD> <OBJECT id=Flashmap codeBase=http://download.macromedia.com/pub/shockwave/cabs/Flash/swFlash.cab#version=6,0,0,0 height=400 width=500 classid=clsid:D27CDB6E-AE6D-11cf-96B8-444553540000> <PARAM NAME="Movie" VALUE="flashmap.swf?"> <PARAM NAME="Src" VALUE="http://www.xyzcorp.com:8888/MapViewer/flashmap.swf?datasource=mvdemo&basemap=Flash_ demo¢erx=-122.3615¢ery=37.82660&mapsize=1.0"> <PARAM NAME="Quality" VALUE="High"> <EMBED src="http://www.xyzcorp.com:8888/MapViewer/flashmap.swf?datasource=mvdemo&basemap=Flash_ demo¢erx=-122.3615¢ery=37.82660&mapsize=1.0" quality=high WIDTH=500 HEIGHT=400 NAME="Flashmap" TYPE="application/x-shockwave-Flash" PLUGINSPAGE="http://www.macromedia.com/go/getFlashplayer"> </EMBED> </OBJECT> </TD> </TR> </TABLE>
You can associate each styled feature (geometry) of a theme with attributes, which can be dynamically displayed when the user's mouse cursor moves over the feature. To do this, include a <hidden_info> element in the styling rules of the theme. The attributes to the <hidden_info> element must specify columns in the same table on which the theme definition is based. You must insert the theme with clickable styled features in the USER_SDO_THEMES view; you cannot use the Map Definition Tool to create this theme.
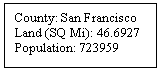
Example C-2 creates a theme that allows users to click on a county in the map to see the name, area in square miles, and population of the county.
<?xml version="1.0" standalone="yes"?>
<styling_rules >
  <hidden_info>
    <field column="COUNTY" name="County"/>
    <field column="LANDSQMI" name="Land (SQ Mi)"/>
    <field column="TOTPOP" name="Population"/>
  </hidden_info>
  <rule >
    <features style="SCOTT:C.COUNTIES">  </features>
  </rule>
</styling_rules>
In Example C-2, the column attribute of the <hidden_info> element associates the COUNTY, LANDSQMI, and TOTPOP columns with the theme, and the name attribute associates a label with the column value. Figure C-1 shows the display when the user clicks on San Francisco county.
Two types of image-related markers can be used in the Flash mapping client: SVG markers and Flash markers; otherwise, image markers are not supported with the Flash mapping client.
SVG markers are defined using a scalable vector graphics (SVG) string. An example of an SVG marker is M.STAR, which is one of the default styles created by the defaultstyles.sql file (see Section 1.4.2.3). The M.STAR marker has the following definition:
<?xml version="1.0" standalone="yes"?>
<svg width="1in" height="1in">
<desc></desc>
<g class="marker"  style="stroke:#000000;fill:#ff0000;width:15;height:15">
<polygon points="138.0,123.0, 161.0,198.0, 100.0,152.0, 38.0,198.0, 61.0,123.0,
0.0,76.0, 76.0,76.0, 100.0,0.0, 123.0,76.0, 199.0,76.0" />
</g>
</svg>
Flash markers are predefined in the Flash mapping client SWF file. The following Flash markers are currently supported:
To use these Flash markers, you must insert an entry for each one in the USER_SDO_STYLES view. Example C-3 inserts an entry for a style named M.FLASH_PIN based on the MARKER_PIN Flash marker.
INSERT INTO
  user_sdo_styles(name, definition, type)
  values(
    'M.FLASH_PIN',
    '<Flash_marker name="MARKER_PIN" height="18" width="14" />',
    'FLASH_MARKER') ;
The name attribute value must be a Flash marker name as defined in the Flash mapping client SWF file (MARKER_PIN in Example C-3). You can use the height and width attributes to specify the size of the marker.
After a style based on a Flash marker is inserted into the USER_SDO_STYLES view, you can use it in theme definitions.
Simplifying (sometimes referred to as generalizing) a map geometry refers to reducing the number of vertices to produce a displayed geometry with less fine resolution than the original geometry. For example, if users do not need to see the hundreds or thousands of turns in the course of a river or a highway, you can get better performance and acceptable displays if the map geometry is simplified to show only the "major" turns.
You can use the min_dist attribute in the <styling_rules> element to simplify map geometries. The min_dist attribute specifies the minimum distance (in pixels) between two adjacent shape points in a polygon or line string geometry. Any two shape points that are within the min_dist distance are drawn as a single point by the Flash map client.
The value of the min_dist attribute must be a number greater than or equal to 1. A small value results in greater map detail, while a large value results in less map detail but faster performance.
|
Note:
Do not use the |
Example C-4 is the styling rules definition of a theme that simplifies the geometries by specifying 5 pixels as the minimum distance between adjacent shape points.
<?xml version="1.0" standalone="yes"?>
<styling_rules min_dist="5">
  <rule >
    <features style="SCOTT:L.PH">  </features>
    <label column="ROUTEN" style="SCOTT:M.FLASH_SHIELD1"> 1 </label>
  </rule>
</styling_rules>
|
|
 Copyright © 2001, 2003 Oracle Corporation. All Rights Reserved. |
|