10g (9.0.4)
Part Number B10188-01
Home |
Solution Area |
Contents |
Index |
| Oracle Application Server Wireless Administrator's Guide 10g (9.0.4) Part Number B10188-01 |
|
This chapter includes the following sections
The Foundation Manager enables you to create and modify the such objects as devices, transformers, adapters, regions, digital rights policies, and API scan policies in the Wireless repository. Table 7-1 describes these objects.
The Foundation Manager provides a set of wizards that enable you to create these objects quickly and with a minimum of information. Each of these wizards break down the creation process into series of steps.
To use the Foundation Manager, you must first access the login page to the Webtool using the following URL:
http://<host>:<port>/webtool/login.uix
For example, you access the login page by entering the following URL into a browser:
http://hostname:7777/webtool/login.uix
Enter your user name and password. If you are an administrator, enter orcladmin as your user name. (The password is set during installation, but can be changed from the User Manager.)
After you successfully login, select the Foundation tab, the Foundation Manager's browsing screen appears. From the Foundation Manager, you can administer the following repository objects:
The Foundation Manager provides a tab for each of these repository objects. Each has a browsing screen, which enables you to search for an object, as well as access to functions for creating, editing, deleting, and testing.
A device is an object in the Wireless repository that represents either a physical device, such as a Nokia mobile phone, or an abstract device, such as email, which link Wireless transformers and the runtime device by recognizing the user-agent, the MIME type, and other HTTP headers.
HTTP headers enable a repository device to map to an actual device. Through the repository device, the Wireless server determines the appropriate transformer for rendering the device result for a variety of browsers, voice gateways, or message clients. For example, if the Wireless server recognizes a device with multi-media display capability, the XMS center (XMSC) renders the multi-media messages bound for the device in images rather than in plain text. Likewise, when delivering a J2ME MIDlet application to a user device, the J2ME provisioning server delivers a version the MIDlet application which is appropriate to the device. For more information on the XMSC, see Section 3.6.2.5.
The Devices tab enables you to create a device in the repository. Clicking this tab invokes the device browsing page (Figure 7-1), which displays a list of devices in the repository. From this screen, you can search for, create, clone, delete, and edit a device.
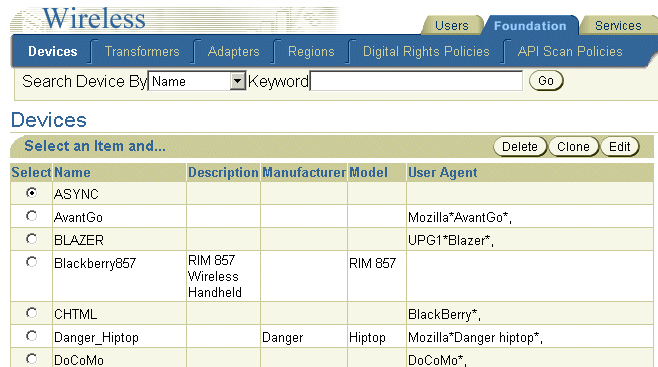
From the Device browsing screen, you can search for devices by keyword, name, manufacturer, model, user agent, or transformer.
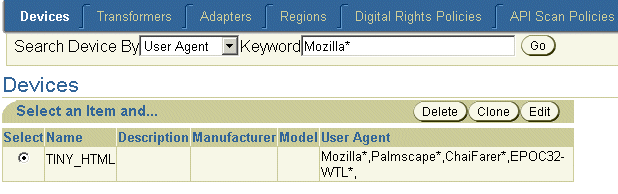
To search for a device:
Select one of the following search options:
Enter the keyword for your search.
Click Go. The Search Results screen appears (Figure 7-2).
The device creation wizard enables you to create a device by prompting you through each step in the creation process. The wizard dedicates a screen to each of these steps; you progress through the wizard by clicking Next after completing each step. At any point in the wizard, you can click the Back button to return to the preceding screens to change values. You can skip any of the screens in this wizard which contain parameters which do not apply to the device. After you have entered the required information, click Finish to complete the device.You can also edit the device to add, remove, or change the parameter values.
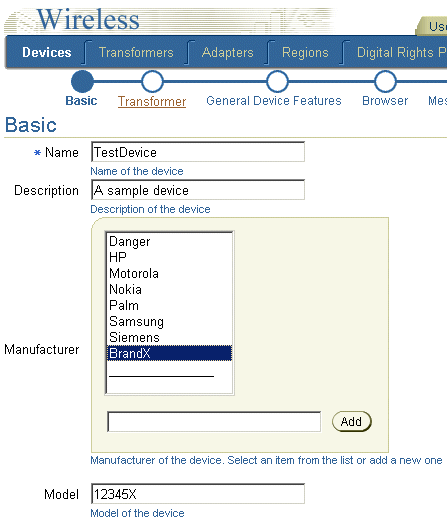
To access the wizard, click Create in the device browsing screen. The wizard appears, defaulting to its first screen, where you enter the basic information for the device.
The Basic Info. screen (Figure 7-3) enables you to define the general information of the device, such as the device name. Table 7-2 describes the parameters of the Basic Info. screen.
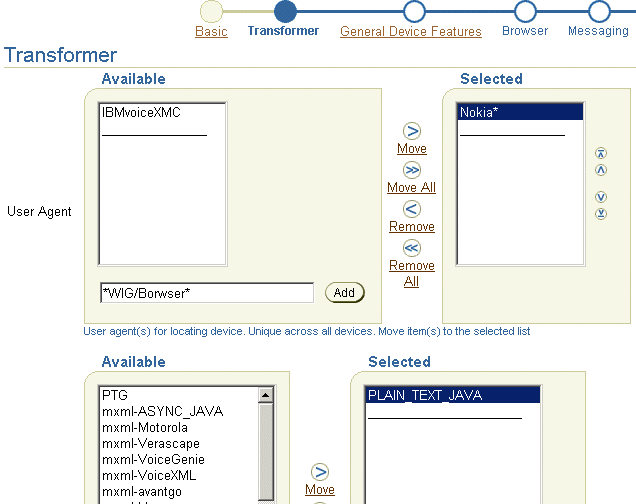
Clicking Next in the Basic Info. screen invokes the Transformer screen (Figure 7-4). Using this screen, you add the transformers and all of the appropriate user agents to the device.
To add user agents, enter the user agents supported by the device and then click Add. Continue until you have added all possible user agents for the device.You then select the user agents supported by the device by using the Move or Move All functions (> and >>) to transfer the user agents from the Available pane to the Selected pane.
To select transformers for the device, use the Move or Move All functions (> and >>) to shuttle the transformers from the Available List pane to the Selected List pane.
Click Next after you have selected the user agents and transformers to continue to the next step of the wizard where you device capabilities. Click Finish to complete the device.
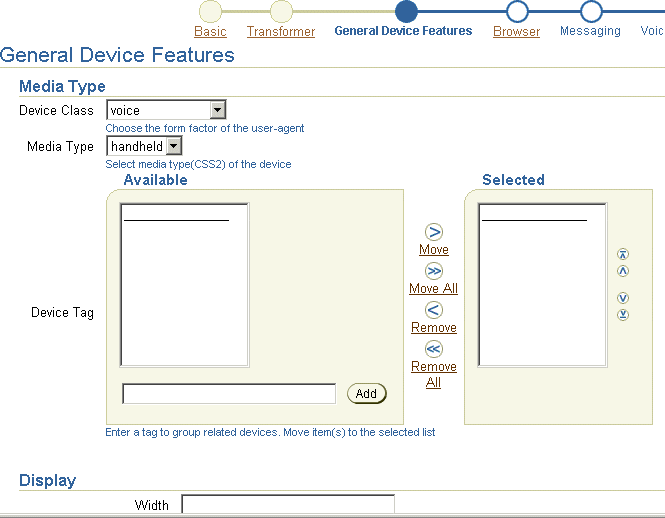
Device capabilities are categorized into several groups, including general device attributes (media type, display, text input), browser attributes, messaging attributes, voice-grammar attributes, and J2ME attributes (Figure 7-5). Wireless examines the values for the device capabilities during the runtime, when the wireless server renders the device-oriented markup languages, provisions J2ME applications, or sends device-oriented messages. For the detailed explanation of the syntax and semantics of device capabilities, refer to the discussion of device network adaptation included in the Oracle Application Server Wireless Developer's Guide.
Although the device creation wizard provides separate screens for the device capabilities, none of these related parameters are required; you can successfully complete a device if you do not define any of these parameters.
To help you enter the values for the device capabilities parameters, the Device Capabilities screens include in-line help as hints under each of the inputting fields.You can also refer to the online help. On any of the Device Capabilities screens, you can click Finish to complete the device and skip the remaining steps.
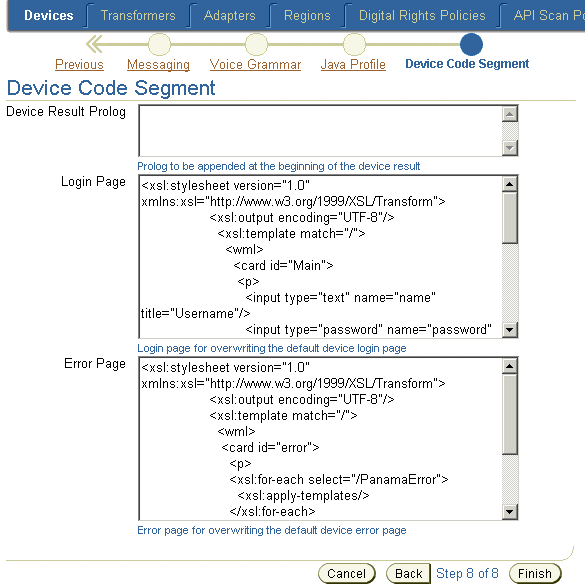
Using the Device Code Segment screen (Figure 7-6), you enter the device result prolog, the login page, and the error page.
For the device result prolog, you enter the code segment which is added to all the rendering results for this device. Entering a login page replaces the device's default login page. Likewise, entering an error page replaces the default error page for the device. Click Finish to complete the device
The Edit button in the device browsing screen enables you to edit all of the information of a device. To edit a device, first select the device and then click the Edit button. The editing screen appears and defaults to the parameters defined for the basic information of the device (Figure 7-7). You can select other device properties by selecting the appropriate links in the menu on the left side of the editing screen. Click Apply to save any changes that you make to the parameters. Clicking Cancel returns you to the device browsing page.
Refer to the steps described in Section 7.3.2 for descriptions of the parameters for creating a device.

You delete devices from the repository by selecting a device from the browsing screen and then clicking Delete.
The Clone function enables you to create a new device from an existing device in the repository. This function enables you to create a new device with properties similar to an existing device, as the new device inherits all of the capabilities from the existing device from which it was copied. Unlike creating a new device as described in Section 7.3.2, you need only enter a name for the device.You can later edit the parameters for the cloned device.
To clone a device, you select a device from the browsing screen and then click Clone. Enter a name for the new device and then click Finish.
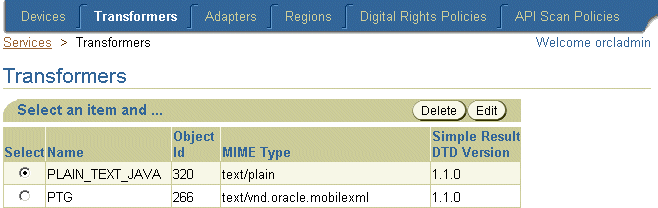
Clicking the Transformers tab displays the browsing screen for transformers, which includes a table that lists the current transformers in the repository by name, object ID in the repository, the MIME type supported by the transformer, and the Simple Result DTD version. Figure 7-8 illustrates this browsing screen.
From this screen you can delete, edit, and create transformers.
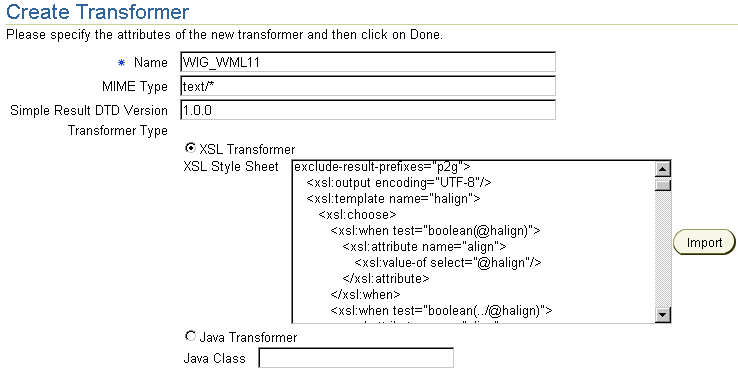
To create a transformer, click the Create Transformer button to invoke the Create Transformer screen (Figure 7-9). To complete the transformer, you must define the following parameters, described in Table 7-3. Click Finish to complete the transformer.
To edit a transformer, select a transformer from the browsing screen and then click Edit. The editing screen appears, with its fields populated with the values defined for the selected transformer. Clicking Apply saves any changes. Clicking Cancel sets the parameters back to their previous values and returns you to the browsing screen.
To delete a transformer, select a transformer from the browsing screen and then click Delete.
Selecting the Adapters tab invokes the browsing screen for the adapters (Figure 7-10). This screen includes a table which lists the current adapters by their object IDs in the repository, their status as valid adapters (that is, available to master applications) and by the Java class that either implements the adapter, or serves as an entry point to the classes that implement the adapter.
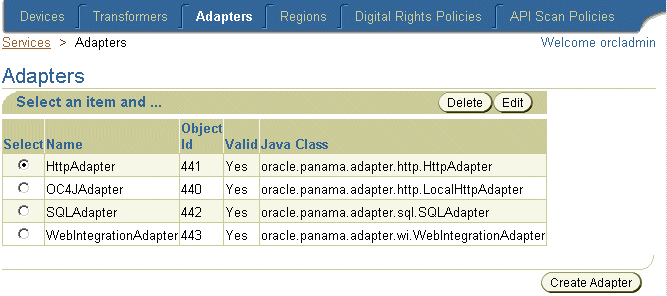
You use this screen to create, edit, and delete adapters.
To create an adapter, click Create Adapter in the browsing screen. The Create Adapter screen appears. To create an adapter, you must define the following parameters, which are described in Table 7-4.
After you enter the needed parameters, click Create. The browsing screen reappears, displaying the new adapter. Clicking Cancel clears any values entered and returns you to the browsing screen.
To edit an adapter, select the adapter from the browsing screen and then click Edit. The Edit Adapters screen appears, displaying the values for the selected adapter.Click Apply to commit your changes. Clicking Cancel clears any values entered and returns you to the browsing screen.
To delete an adapter from the repository, select the adapter and then click Delete.
The following sections describe the uses and parameters of the Wireless adapters.
When you create a non-HTTP master application, the Init Parameters screen of the Master Application Creation Wizard shows the initialization (init) parameters specific to the type of adapter selected for the master application. When Wireless first invokes the adapter, it passes the values that you set in the Init Parameters screen to the adapter.
The SQL adapter retrieves and adapts content from any JDBC-enabled data source for a master application based on the SQL adapter, the Init Parameters panel includes the following parameters, which are described in Table 7-5.
The Web Integration adapter retrieves and adapts Web content. The Web Integration adapter works with Web Interface Definition Language (WIDL) files to map source content to Wireless XML. Typically, the source format for the Web Integration adapter is HTML, but developers can also use the adapter to retrieve content in other formats, such as XML.
Table 7-6 describes the initialization (init) parameters for a master application based on the Web Integration adapter.
The master application determines the parameters that display in the panel by querying the adapter. Every input parameter defined in the WIDL interface appears in the Inputs panel, including parameters for other WIDL applications within the WIDL interface.
In addition to the custom input parameters that you create, Web Integration applications provide these parameters:
The OutputType specifies the type of XML output that the adapter should return. You can specify RawResult, to return content in Adapter Result format, or SimpleResult, to return content in Simple Result format. For returning the raw result format, you must create a result transformer that converts the result into Simple Result for the device transformer. The result transformer should have the same name as the value you use for the PAsection parameter; that is, it should have the same name as the WIDL application.You use RawResult for chained services.
PAsection is the name of the WIDL application that you want the master application to invoke. A WIDL interface can include more than one WIDL application. Wireless lists the WIDL application names in a selection list in the value field.
InputEncoding specifies the encoding used to encode the source document. The source document is the URL that was used to create the WIDL file for this application. The default value of this parameter is UTF-8. If the language of the source document is an Asian language, you can change the default encoding to the appropriate multi-byte encoding according to the IANA standards for the particular Asian language that is used in the source document. The InputEncoding parameter enables you to specify or change the encoding as part of the multi-byte character support.
The Input Parameters screen displays the input parameters for the adapter. The Content Manager Tool queries the adapter definition to determine the parameters that appear in this panel. The master application passes the input parameter values to the adapter's invoke method every time the adapter executes.
Some parameters rely on user input for values. The values for other parameters, such as name of the WIDL application in the WIDL interface (PAsection), are set by the master application or application link. PAsection is an internal parameter, not exposed to the end user. In addition to PAsection, Wireless provides these input parameters, which are described in Table 7-7.
Table 7-8 describes the Wireless input parameters.
From the Input Screen of the Master Application Creation Wizard, click Add Another Row. A blank row appears. Define the name for the input parameter and any other needed parameters in this row, which are described in Table 7-8.
The AppsFramework adapter enables the development of enterprise applications on top of Wireless. It provides system-wide standard application look and feel, enhanced application widgets support and data binding to enterprise data.
The AppsFramework adapter includes the input parameter classname which must be the package and class of the implementation of the MobileApplicationHandler interface.
The Mobile Application Framework adapter uses style and color mappings to provide a uniform look and feel that can be customized across all applications running on the server. In addition, carrier-specific information can be specified to the Mobile Application Framework adapter to optimize the content delivered by the adapter. The StyleColorLoader command-line utility is used to modify the style, color, and SDU size information used by the Mobile Applications Framework adapter.
To download the Style/Color/SDU Repository:
To upload the Style/Color/SDU/Repository:
To modify the Style/Color/SDU XML repository file:
<StyleSet>, <ColorSet>, <SDUSize>. After making modifications, you then upload the file back into the repository.
The <StyleSet> elements help the renderers for a given device render application styles into markup language, as described above. For example, if you want to create a prompt- style "Prompt" and bind the style to the text of the prompt, you create a "Prompt" style in the style repository.
Each <StyleSet> element contains a number of <Style> elements. Each <Style> element contains a name, a font face, font size, font style, and font color. Table 7-9 describes the style element properties.
In addition to the <Style> element, the StyleSet contains elements described in Table 7-10.
By modifying application style definitions in a given <StyleSet>, the system administrator can control how the given application style is rendered on the device to which the style set is bound across the whole system. For example, if a PDA device is bound to the StyleSet Default, then changing the prompt style in the default StyleSet to bold from plain results in all prompts appearing in bold rather than in plain when rendered on client devices in the PDA device grouping.
The <ColorSet> element helps the renderers for a device render application colors into markup language. For a given device, this application color is mapped to a color code, which can be modified by the system administrator to produce the optimal rendering. For example, if a PDA device is bound to the ColorSet, Default, then changing the background color in the default ColorSet to grey from white results in the background color for all applications on client devices in the PDA device grouping to be grey rather than white.
A <ColorSet> element consists of multiple <Color> elements. The following table describes the propertis common to each <ColorSet>.
A <ColorSet> element consists of multiple <Color> elements. The following table describes the properties common to all <Color> elements.
| Property Name | Required? | Multiple? | Description |
|---|---|---|---|
|
Name |
Y |
N |
The name of the Style. |
|
ColorDesc |
Y |
N |
The 24-bit color code of the given color, for example White = #FFFFFF. |
The <SDUSize> element enables the renderers for a given device to render an optimized amount of information on pages. For a given device, the SDUSize is the upper limit on the amount of information (in bytes) that the network can carry to this device.
A <SDUSize> element consists of two child elements. The following table lists their properties.
You can configure SQL input parameters in the same way that you configure the Web service parameters. You specify input parameters in the SQL statement you use to implement the service.
When you click the Regions tab in the Foundation Manager, the main display of the region modeling tool appears (Figure 7-11).
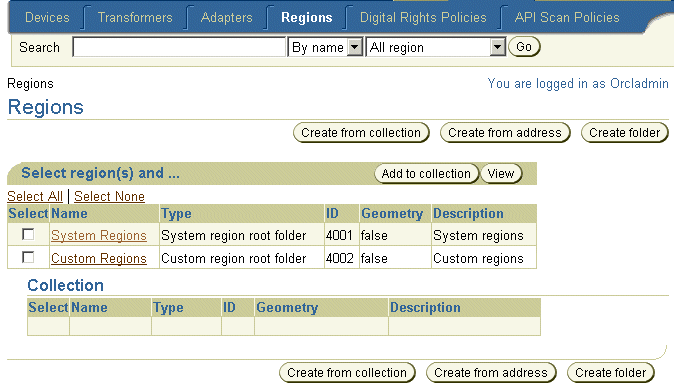
The region modeling tool enables administrators of a wireless portals to create custom regions that can be associated with location-based applications.
You create a location dependent application by specifying a region. This region can be a system-defined region (one provided out-of-the-box with Wireless) or a custom region, one created with the region modeling tool.
A region is a geographic entity, or location. A region can be small (such as a street address) or large (such as a country). A region can be represented by a point, as is often done for addresses and locations of interest (such as airports and museums), or by a polygon, as is usually done for states and countries. For detailed information about using the region modeling tool, refer to the chapter on Location Services in the Oracle Application Server Wireless Developer's Guide.
A digital rights policy restricts the execution of J2ME applications on mobile devices. Out-of-the-box, Wireless provides two types of digital rights management (DRM) policies that can be used to package J2ME applications: Count DRM policy, and Interval DRM policy.
The Count DRM policy restricts the number of times that a downloaded J2ME application can be run on a device. The Interval DRM policy sets the period in which a downloaded J2ME application can be run on a device from the time the user downloads the application. In addition,Wireless provides a platform to create a customized digital rights policy.
All digital rights policies created using the Foundation Manager can be selected from the Content Manager when creating an application link based on a J2ME application. For more information, see Section 5.3.4.
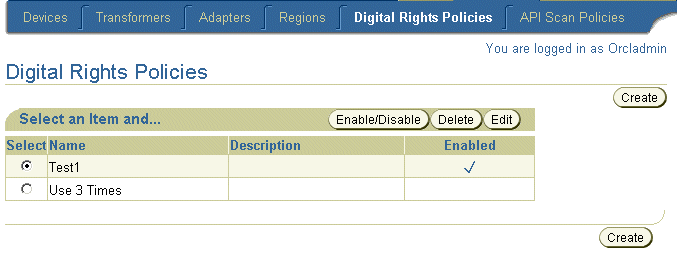
You use the Digital Rights Policy subtab to manage the digital rights policies. When you click the Digital Rights Policy subtab, the browsing screen for digital rights policies appears (Figure 7-12), displaying a list policies in the repository.
Wireless provides a two-step wizard which enables you to create a digital rights policy. To access this wizard, click Create in the browsing screen.
There are two types of digital rights policy packages: one is a default package provided by Wireless. The other is a customized package that you can plug into the Wireless platform. If you select this customized package, then you must specify the full class name of the packaging class, which implements the oracle.wireless.me.server.tools.drm.DRMPackager interface.
To create a digital rights policy, click Create. The Digital Rights Policy detail attributes page appears (Figure 7-13).
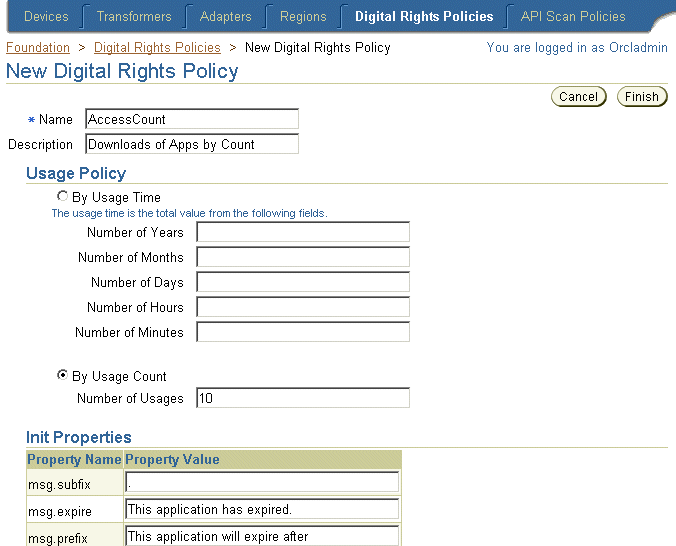
If you selected the Default Package, then you must specify the following attributes:
You can opt to limit the number of times that a user can execute a downloaded J2ME application by defining the values for the Usage Time, or Usage Count options.
For the Usage Time option, specify the number of years, months, days, hours or minutes that the user can execute the downloaded application. Define the Usage Count option by specifying the number of times that a user can execute a downloaded J2ME application.
Each time that the user executes an application, a message displays on the user's device informing the user of the number of times, or the amount of time, that the user has to access the application. To create such a message, you define the msg.subfix, msg.expire, and msg.prefix parameters.
Table 7-14 describes these parameters, which enclose the usage count display presented to the user for each download.
Click Create to complete the policy.
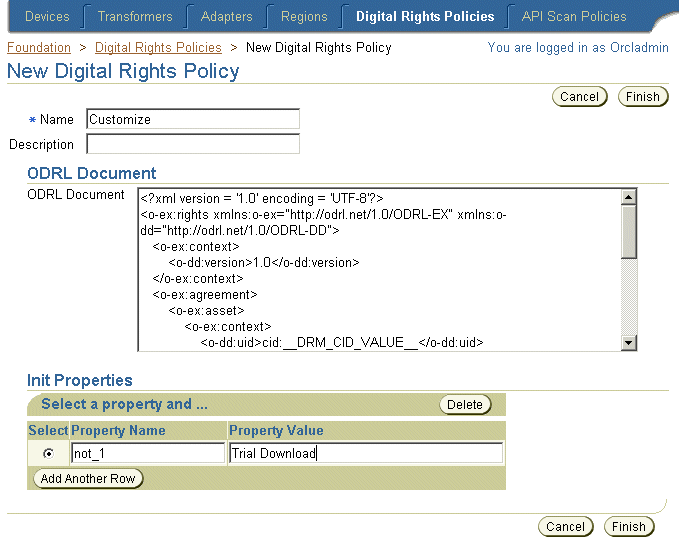
If you selected the Customized Package option in Step 2, then you must define a name for the digital rights policy and optionally enter a description for the policy in the New Digital Rights Policy screen (Figure 7-14).
You also enter an Open Digital Rights Language (ORDL) document, an XML document which expresses the Digital Rights Policy. This ODRL document is consumed by the packaging object which implements oracle.wireless.me.server.tools.drm.DRMPackager.
In addition, you enter the initialization (init) properties associated with the policy. The init property name and value pairs are passed to Custom Digital Right implementation class. This implementation class uses these value pairs.
Click Finish to complete the policy. For details on implementing a customized digital rights policy, refer to the Oracle Application Server Wireless Developer's Guide.
The Edit button in the digital rights policy browsing screen enables you to edit all the parameters of a selected digital rights policy.
To edit a digital rights policy, select the digital rights policy from the browsing screen and the click the Edit button.Clicking Finish saves the changes to the policy. Clicking Cancel sets the parameters back to their previous values and returns you to the browsing screen.
Refer to Section 7.7.1 for descriptions of the parameters that you can edit.
To delete a digital rights policy from the repository, select a policy from the browsing screen and then click Delete.
To enable or disable a digital rights policy from the repository, select a policy from the browsing screen and then click Enable/Disable.
An API scan policy defines the malicious APIs which can be invoked from a J2ME application that compromise a user's device. The API scan policy definition includes the malicious API package as well as the class and method names. During the certification process, the Wireless server references the API scan policy objects when scanning a J2ME application for the APIs defined in the API scan policies. For information on how to scan a J2ME application, refer to Section 5.3.5.1.
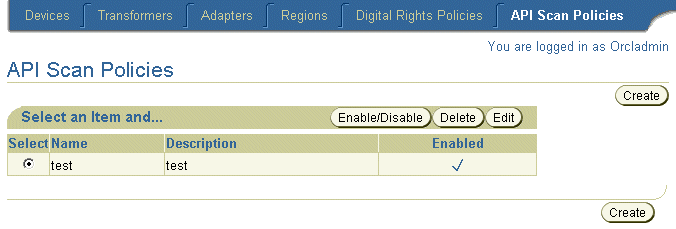
You use the API Scan Policy subtab to manage the API scan policies. When you click the API Scan Policy subtab, the API scan policy browsing page appears (Figure 7-15), displaying a list of the API Scan Policies in the repository.
The API scan policy creation wizard enables you to create a policy. To access this wizard, click the Create button on the browsing screen.
To define a policy, you must provide a name for the policy and then optionally enter a description.
Enter the XML Document which defines the malicious APIs. This XML document is based on Oracle Application Server Wireless Filter XML Schema. The text area of the Create API Scan screen displays a sample API scan document which defines the package, classes, and methods of the API that the Wireless server references when scanning the J2ME application.
Click Finish to complete the API scan policy.
The Edit button in the API scan policy browsing screen enables you to edit the description of an API scan policy. To edit an API scan policy, first select the policy from the browsing screen and then click Edit.
To delete an API scan policy from the repository, select the policy from the browsing screen and then click Delete.
To enable or disable an API scan policy from the repository, select the policy and then click Enable/Disable.
|
|
 Copyright © 2003 Oracle Corporation. All Rights Reserved. |
|