10g (9.0.4)
Part Number B10188-01
Home |
Solution Area |
Contents |
Index |
| Oracle Application Server Wireless Administrator's Guide 10g (9.0.4) Part Number B10188-01 |
|
This chapter describes the Content Manager. Each section describes how to use this tool. These sections include:
Using the Content Manager, you can publish Wireless applications to user groups and to manage user groups. The Content Manager's step-by-step wizards enable you to create the following objects:
The Content Manager enables you to publish the master applications as an application link. This pointer inherits the parameters of a master application, but can also be used to tailor the core application to the needs of a particular user group or situation. For example, for a master application to deliver restaurant information for an entire city, its adapter takes a single parameter (a location), and returns a list of restaurants throughout the city. While the master application can specify a broad location, such as the city itself, you can create application links based on a specific parameter, such as a district or area within that city. You can then distribute the application links, as appropriate, to user groups that you assemble based on the users' locations.
Folders enable you to organize application links and bookmarks. When you assign a folder to a user group, you make its subfolders, application links and bookmarks within it accessible to that user group.
Modules or moduable application are reusable Wireless and Voice applications that can be invoked as a normal application, or by another application to return a result. Wireless provides several applications that are ready for deployment, including the Collaboration Applications (that is, PIM tools such as calendar, address book, fax, and mail). For more information on these pre-configured applications, see Chapter 8, "Configuring the Out-of-the-Box Applications".
The Content Manager enables you to create a bookmark, a link enabling the user to quickly access an external resource, such as Web page. In addition to providing the user this shortcut, however, Wireless enables you to create bookmarks that render their content equally well on a variety of devices. End users can set bookmarks in the Wireless Customization Portal. The bookmark appears as a menu selection on the mobile device. Wireless does not process the content of the URL target. The format of the target content must be supported by the user's device.
An alert (notification) is an application delivered to users based on the trigger conditions they set when subscribing to the alert. An alert inherits the parameters from a master alert, which is created using the Service Manager. Content Managers organize alerts by topics, containers that group alerts.
The Content Manager provides you to distribute these repository objects to user groups, organize them in a business context appropriate to each user group, and assign them to different categories so that they can only be accessed through specified access points.
After you log in to the Wireless Tools, you select the Content Manager by clicking the Content tab.
|
Note: You must be granted either the Superuser or Content Manager roles to access the Content Manager. |
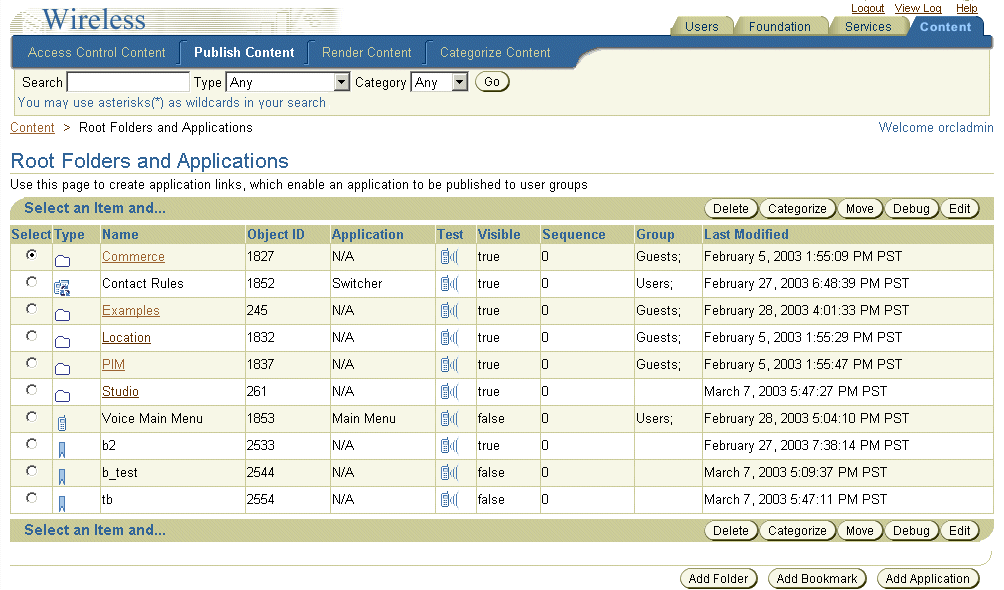
The Content Manager defaults to the Publish Content tab (Figure 5-1). The Content Manager organizes the creation, distribution, and publishing of applications into the following tabs (described in Table 5-1):
Each of these tabs includes a browsing screen, which enables you to create, edit, or delete an object.
The Publish Content tab of the Content Manager enables you to manage application links, bookmarks, and folders.
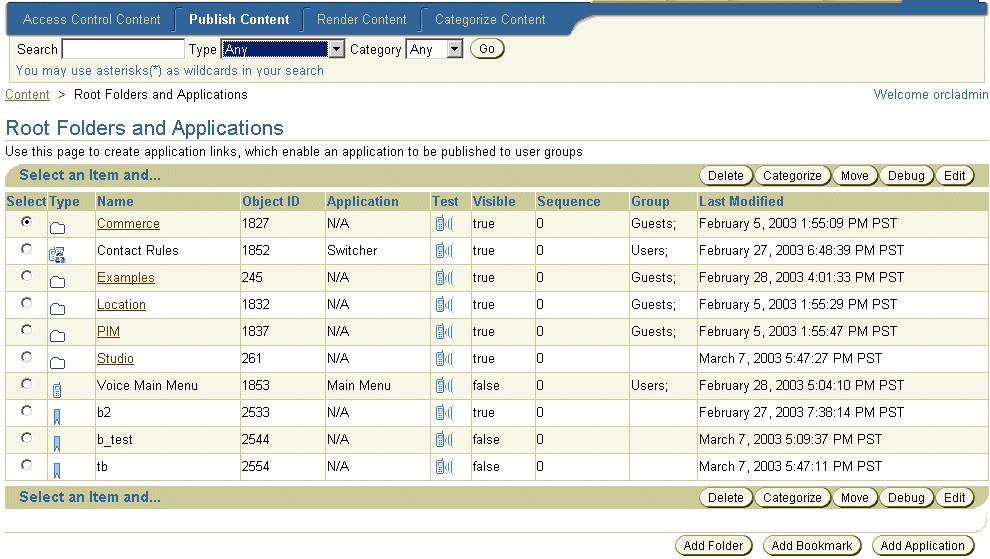
Clicking the Publish Content tab displays the browsing screen for application links. When you first access the Publish Content tab after logging in, the browsing screen displays the folders and applications at the root level (Figure 5-2).
Using this screen, you can search for folders, bookmarks, and application links (including applications, modules, and Async applications). Clicking the Add Application button in this screen, you can access a wizard that enables you to create an application link based on an existing master application. In addition, this screen includes buttons that enable you to add folders and bookmarks. You can also use the browsing screen to delete, debug, move, and edit these objects.
For more information on developing multi-channel applications (master applications), see the Oracle Application Server Wireless Developer's Guide.
The browsing screen screen's search function enables you to search for and display the following repository objects:
The search field, when used in conjunction with two drop-down lists, the Type and Category lists, enable you to narrow your searches to a specific type and category. The results display in the Search Result screen, which is described by Table 5-2.
|
Note:
In the Search field, you can find an object by entering a SQL |
You can organize your repository objects into a hierarchy by creating subfolders. These subfolders, which can represent topic areas, can be nested into other subfolders. When you create a subfolder, the Content Manager displays it as a hyperlink in the screen, allowing you to "drill down" or traverse deeper into the hierarchy with each successive click. Wireless displays the structure of the hierarchy as a navigation path (Figure 5-3), enabling you to see the level that you currently access and move to back to any parent folder in the hierarchy.

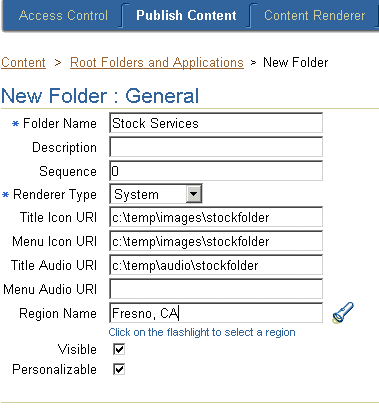
Creating a folder is a two-step process; you first define the basic parameters for a folder, such as its name, and then you assign the rendering options that dictate the display style for the folder and its contents.
From the browsing screen, click Add Folder. The General screen appears, displaying the basic parameters of the folder. These parameters include:
The Rendering screen displays options specific to the rendering type you selected when setting the basic parameters for the folder.
If you select System as the rendering option, then you can select from among the following sorting options that include ascending and descending sorting style for folders by:
By default, folders appear by sequence number, then by name.
If you select the Custom rendering options, then you select a folder or application with the appropriate rendering style.
If the folder is not a child of another folder (or if none of its ancestor folders have a customized renderer), then Wireless notes the inherited renderer as N/A until the folder is moved under a parent folder with a customized renderer. Use the Move function to place the folder within a folder configured with the appropriate rendering style. See Section 5.3.10 for information on moving objects.

You use the Edit button to edit the values for a selected folder. After you have modified the appropriate values, click Apply to commit your changes. Clicking Cancel sets the parameters back to their original values and returns you to the browse screen. See Section 5.3.2.1 for information on the basic folder parameters. See Section 5.3.2.2 for information on the folder rendering options.
You create an application link to publish a master application to users. By clicking Add Application, you create an application link using a wizard which guides you through each step of the creation process, from the first step of basing the application link on an existing master application, to the steps that follow for setting the general information for the application and editing or adding input parameters.
If you base the application link on an Async-enabled application, then you assign Async Agent properties to the application link, thus enabling customers to access the application using asynchronous messaging technologies such as SMS, Email or two-way pagers.
You use the Master Application screen to select an existing master application or modulable application on which to create the application link.
The General screen enables you to set such basic information for the application link, such as the name for the application and the short names for the application (if it is based upon an Async-enabled master application). A short name is an easily referenced name for the application entered by end users when accessing applications from asynchronous devices. Use the Up and Down arrows to prioritize the order in which these short names appear in a help message.
If you opted to create a modular application link, then you must enter the OMP URL address of the module application called in the Master Application screen (Step 1 in the application link creation sequence). All module applications are identified by the OracleMobile protocol (OMP) URL. To create a modular application link, you must define the following two parameters:
If this application link is based on a J2ME application, then you can also select a DRM (digital rights management) policy, which controls the digital rights of the J2ME application by defining the user access to the application. For example, a digital rights policy can restrict the user's access to a downloaded application to a certain time period, (as in the case of a trial period), or can limit the number of times a user can download an application. The DRM policies are created by Foundation Developers using the Foundation Manager. For more information, see Section 7.7.
The Input Parameters screen enables you to set the input parameters for your application link. The input parameters for the application link are those set for the master application on which you based your application link. You can only change the parameters which the Application Developer designated as Modifiable. For more information on creating master applications, see the Oracle Application Server Wireless Developer's Guide.
Table 5-4 describes the input parameters included in the Input Parameters screen.
You use this screen to assign the Async Agent capabilities to application. To use this screen, you must base your application link on an Async-enabled master application.
Table 5-5 describes the parameters for Async Agents.
| Parameter | Value |
|---|---|
|
Async Command Line Syntax Help |
The command syntax or usage text. This text is returned to the user when the user issues an application help command to the Async Server. |
|
Routing Information |
Select an item and click Edit to access the editing function for the routing presets. For more information, see Section 5.3.4.1. |
|
Application-Specific Address List |
The application-specific address to which users send the service invocation messages. Enter this address in the format appropriate to the following device types (SMS or Email). For example, enter stock@oraclemobile.com as the service address for email. This is an optional parameter. |
|
Async Application Argument List |
The default value for each argument. Use the Move Up and Move Down functions to map the Async application arguments to the input arguments. |
Wireless includes a pre-seeded preset, _MESSAGE_ROUTE_, whose attributes set the routing information for an Async application.
Routing information, along with application link categories, supports PremiumSMS and ReverseCharge. The routing information enables such information as billing (the Large Account) to be associated with the application, so that the value is returned with the result message. This information is eventually carried over to a PremiumSMS or ReverseCharge operator so that the correct account is charged for the message. For more information on application link categories, see Section 5.6.1.
To edit the routing information, select the routing method (from the Async Agent Information screen) and then click Edit. Enter the values for the routing options as needed. Table 5-6 describes the routing options.
In the final screen of the wizard, you define optional parameters for menu list configuration and user-form submission type. Table 5-7 describes the parameters for this screen.
| Parameter | Value |
|---|---|
|
Description |
A description of the application link. |
|
Sequence |
The order in which application links appear on output devices. By default, these appear in order by sequence number and then by name. You can enter values in the sequence fields to rearrange the order in which the application links appear and then set parent folder renderer type as System, and the parent folder sorting option as Sequence Number. By default, Wireless sorts applications in ascending order by sequence number, then by name. See Section 5.3.2.2 for more information on setting the System folder rendering option. |
|
Cost |
The invocation cost to the user for accessing the application link. If the cost of the application link is not zero (0), then Wireless logs the application link cost invocation in the tx_panama.log file. |
|
Language |
A drop-down list of display languages for the application link. Users cannot access an application link if their display language differs from that associated with this application link. |
|
Title Icon URI |
The URI of an image used as the icon that appears on top of the screen when this application link becomes the current application. You do not need to specify the format type in this URI, as Wireless selects the image format appropriate to the user's device. |
|
Menu Icon URI |
The URI of an image used as the icon that appears next to the application link in a menu listing. You do not need to specify the format type in this URI, as Wireless selects the image format appropriate to the user's device. |
|
Title Audio URI |
The URI of the audio file (for example, a .wav file) read aloud by voice-reader software when users access a service. You do not need to specify the format type in this URI, as Wireless selects the audio file format appropriate to the user's device. |
|
Menu Audio URI |
The URI of the audio file (for example, a .wav file) read aloud by voice-reader software along with the service in a menu listing. You do not need to specify the format type in this URI, as Wireless selects the audio file format appropriate to the user's device. |
|
Region Name |
The area, such as a continent, country, or city, that is associated with the application. If you assign a region to an application link, then users can only view that application link when they are in the assigned region. |
|
Visible |
Select this option to make the application link visible (and therefore accessible) to the end user. If you do not select this option, then end users cannot see (or access) this application link. You can opt not to select this option for application links which are under construction. |
|
Personalizable |
Selecting this option enables end users to customize their user views in the Wireless Customization Portal or on the mobile device for reordering, hiding, or showing this application link. |
The editing screen enables you to change or update the parameter values for a selected application link. To access the editing screen, select the application link in the browsing screen and then click the Edit button. From the menu on the editing screen, you can select the values that you want to edit, such as those for the general parameters, the input parameters, the Async-agent parameters (if applicable), and the additional parameters (Step 2 through Step 4 of the wizard).
When editing an application based on a J2ME (Java 2 Micro Edition) master application, the menu of the editing screen includes another option, API Scan. This option enables you to select an API scan policy that checks the application for malicious APIs calls which may damage a user's device. These policies are defined using the Foundation Manager. For more information, see Section 7.8.
To scan a policy, select API Scan and then the appropriate version of an API scan policy and then click Certify.
You can configure a modulable application link by entering the URL of its configuration page in the Module Configure URL field of the application link creation wizard's Master Application screen (Step 1 in the wizard). To access this configuration page, select Master Application from the editing screen's menu. From the Master Application editing screen, click Configure. The configuration screen appears.
The Content Manager enables you to test a service and display it on a phone simulator.
To test an application link:
The Content Manager enables you to simultaneously view an application link on a phone simulator, in Wireless XML, or device markup languages.
Transformers, in the form of XSLT style sheets or Java classes, convert the content returned by Wireless adapters into the format best suited to a particular platform.
To test a service:
Selecting this result type enables you to see Wireless source content in the AdapterResult format, the intermediary format between the source and the target output device. Source content in the AdapterResult format must be converted into SimpleResult format before it can be delivered to a target device. If no text displays in the The Result panel, then no AdapterResult has been produced.
Selecting Wireless XML Result displays the source content in Wireless' SimpleResult format of the output that is returned by an adapter.
The Device Transformer drop-down menu lists the devices in the repository. Selecting a device enables you to see the final markup language for that device.
The System Log section enables you to set the number of lines from the end of the server's system log file that you want to see.
To set the number of lines from the server: displays from the end of the system log.
The Content Manager enables you to create a bookmark, a link enabling the user to quickly access an external resource, such as Web page. In addition to providing the user a this shortcut, however, Wireless enables you to create bookmarks that render their content on a variety of devices.
With Wireless, a bookmark displays equally well on all of the different devices registered to a Wireless user, because you can associate multiple URLs with a single bookmark. Each of these URLs supplies the markup suitable to the content type supported by the requesting device.
For example, you create a bookmark, myoracleBK, which has the following two URLs:
Logging in through a desktop browser, a user sees myoracleBK. Clicking this bookmark reveals the page www.oracle.com.
A user logging in from a device supporting the text/hdml MIME type also sees myoracleBK, but clicking this bookmark reveals the page wap.oracle.com
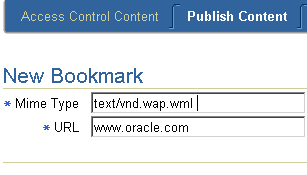
Clicking Add Bookmark in the browsing screen invokes the New Bookmark screen, which includes the parameters described in Table 5-8.
In addition to these parameters, whose values define the basic settings for the bookmark, the New Bookmark screen also includes a table listing URLs and MIME types to which you can associate with this bookmark. This table also notes the default MIME type, which you can set by selecting a MIME type and then by clicking Set Default.
You can add other URLs or MIME types to the table by clicking Add button and then by defining the values for URL and MIME type in the following page (Figure 5-6.)
You can edit the values for a bookmark using the Edit Bookmark screen, which you access by selecting a bookmark and then by clicking Edit.
You can organize application links, folders, and bookmarks in a business context appropriate to a user group by using the Content Manager's Move function.
To move application links, folders, or bookmarks:
The Content Manager enables you to create, edit, and delete user groups. Using the Content Manager, you can publish application links to users by assigning them to user groups.When an object, such as a folder, has been published to a user group, an end user belonging to that group can access the object from any device registered with Wireless. In addition to creating user groups and assigning objects to them, you can also remove objects from user groups.
Clicking the Access Control Content tab invokes the Groups page (Figure 5-7), which includes a table listing the current user groups. From this table, you can select a user group (using the Select button) and then edit it, delete it, or manage the objects assigned to it.
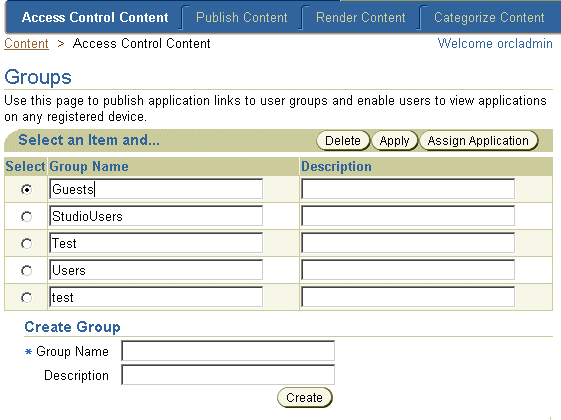
Table 5-9 describes the fields and functions of the Groups screen.
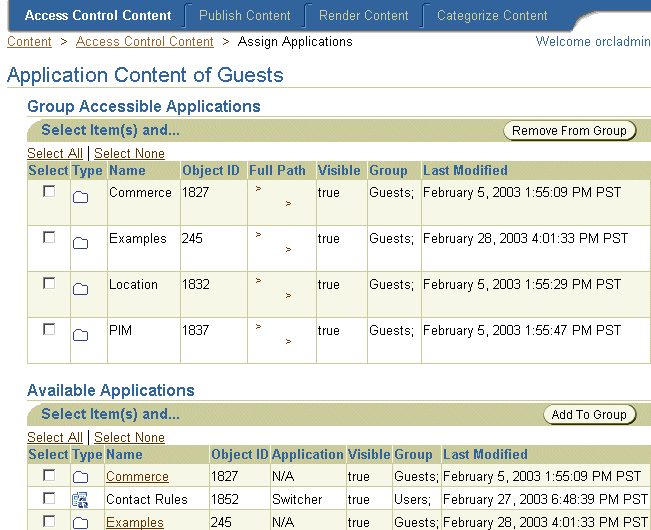
To manage the contents of a user group, select the group and then click Assign Applications. The Application Content page for the selected groups appears (Figure 5-8, displaying the objects currently associated with the groups as well as the objects which can be assigned to the group. From this page, you can assign selected application links, bookmarks, or alerts (notifications) to a user group, or remove them from a user group by clicking either the Add to Group or Remove from Group buttons. Clicking Finish saves the changes made to the contents of a user group.
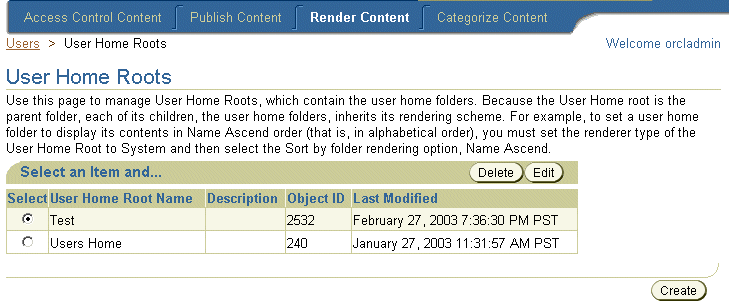
The Render Content tab enables you to group user home folders by user community or by provider. Users are assigned to these user home root folders in the User Manager. When a user is assigned to a user home root folder, that user's home folder becomes the child of the user home root folder by being placed within it. In addition, user home folders inherit the folder rendering style, or display properties, of their user home root folder. For more information on assigning a user home folder, see Section 4.5.
Selecting the Render Content tab displays User Home Roots screen (Figure 5-9), which includes a table listing the current root folders by name, description, object ID in the database, and by the date that the folder was last modified. From this table, you can both edit and delete selected user home root folders.
Clicking the Create button enables you to add a new user home root folder. Creating a user home root folder is a two-step process.
After you click Create, the General screen appears. This screen includes the following parameters:
Clicking Continue on the General screen invokes the second (and final) screen used to create a user home root folder, the Rendering screen. This screen contains the display options specific to the renderer type (System, Inherited, or Customized) that you selected when setting the basic parameters for the user home root folder. Because user home folders are the children of the user home root folders, each user home folder inherits the rendering style of its parent, the user home root folder.
If you select a System renderer type, then you select from among the following sorting options in the Rendering screen.These options include the ascending and descending sorting style for folders by:
By default, folders appear by sequence number and then by name. Click Finish to complete the user home root folder.
If you select the Custom renderer, then the Rendering screen displays the root-level folders and applications. Using the Select button, you choose the appropriate folder or application with the appropriate rendering style and then click Finish to complete the user home root folder.
If you selected the Inherited renderer option, then click Finish in the Rendering screen. The inherited rendering for a user home root folder is the system default rendering.
You can edit both the general parameters and the rendering options for a selected user home root folder. To do this, select a folder from the table in the User Home Roots page and then click Edit. The editing screen appears and defaults to the general parameters set for the selected user home root folder. If you wish to edit the rendering options, select Rendering from the menu. Click Apply to save your changes. Clicking Cancel sets them back to their previous values.
You can delete a user home root folder by first selecting from the table in the User Home Roots page and then by clicking Delete.
|
Note: You cannot delete a User Home Root folder if it contains any user home folders; you must delete all user home folders from a User Home Root folder before you can delete it. |
To support PremiumSMS and ReverseCharge, the Content Manager enables you to create application link categories, which are sets of similar applications. For example, in PremiumSMS, each set of applications having the same premium level can be put into an application link category.
Each access point (for example, an Async address) can be optionally associated with one or more application link categories. Only the associated access points can gain access to applications assigned to a category.
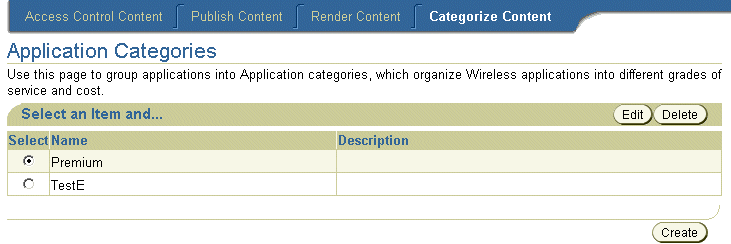
Clicking the Categorize Content tab invokes the Application Categories screen (Figure 5-10), which includes a table listing the current application link categories. From this table, you select an application link category for editing or for deletion. Clicking the Create button invokes the Create Application Category page, which you use to create an application category and assign access points to the category. After you create a category, you then associate application links with that category.
In the Create Application Category screen, enter a name for the application link category. For example, enter Premium. This is a required field. You can optionally enter a description. You then associate an access point with the category, thereby making all of the applications associated with this category accessible through the selected access point. (The access points are created using the System Manager. For more information, see Section 5.6.2.1). If needed, click Add to select additional access points.
After you create an application category, you add Async applications to the application category. To do this, select an application from the browsing screen of the Publish Content tab and then click Categorize. In the following screen, use the Move arrows (> and >>) to move an application from the All Application Categories pane to the Associated Application Categories pane. To remove an application link from an application link category, use the Remove arrows (< and <<) to move the selected application link category from the Associated Application Category pane to the All Application Categories pane.
Access points, which display in the Content Manager, are created using the System Manager as part of the configuration of the Async Listener. A user having System Administrator privileges sets the values for an access points, which includes a name, delivery type, or site address or number. For the latter value, the address should be the Large Account provided by the Premium SMS operator. For more information on configuring the Async Listener, see Section 3.6.2.3.
For an access point to display in the Content Manager (and in turn, be selected for an application category), the System Administrator cannot select the option, Allowed to Access All Applications. If this flag is set, then this access point cannot be associated with a specific application category, because users sending requests to this access point can access all applications, not just those grouped into any one application category.
Optionally, you can edit the pre-seeded _MESSAGE_ROUTE_ preset definition so that each portal can customize the message headers which are sent to the SMS driver as the billing information for the result message. For example, you can change the description of ROUTE_COST_LEVEL from cost level to tariff class, or add or delete meta fields.
By default, the values of the two fields, ROUTE_CHANNEL and ROUTE_REV_CHANNEL, are set to the From and ReplyTo fields, respectively, of the result message. Because of this, a custom-built driver is not needed to pass information to the Premium SMS operator. To change these mappings, a System Administrator modifies the following attributes in the system.properties file:
You can add SMS routing information when creating (or editing) Premium SMS-enabled application links. For example, you can assign the value of the Large Account, to which the reply message should be charged, to the Channel field. For more information, see Section 5.3.4.
Using the Alerts browsing screen, you can search for, create, edit, move, delete, and share alerts (notifications), applications that notify users of important information or events. In addition you can add topics, which group alerts.
Using the topics and alerts browsing screen, you can search for a topic or an alert using a search field in conjunction with drop-down lists of search options, which enable you to either narrow or broaden your searches. The search results appear as a list on the Root Topics and Services screen (Figure 5-11).
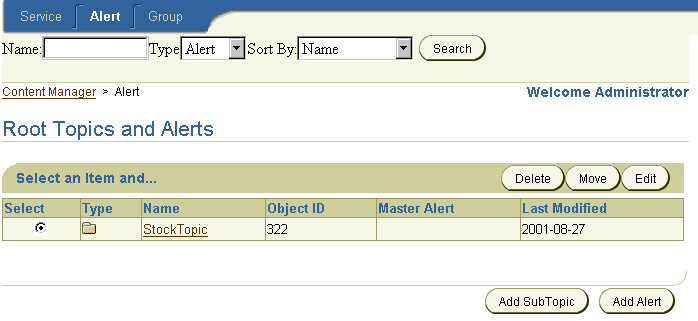
Table 5-11 describes the elements in the topics and alerts browsing screen.
To find a topic or an alert:
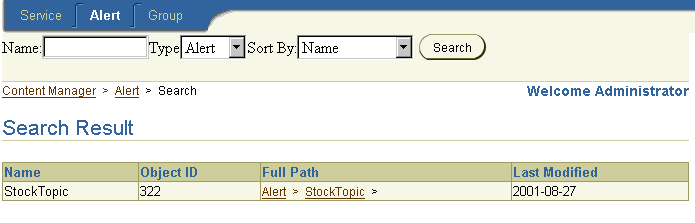
Table 5-12 describes the elements of the Search Result screen.
To create an alert, you first click the Add Alert button. The General screen of the Create Alert wizard appears.
n the General screen, you define the name and optionally add a description for the alert. Table 5-13 describes the fields in this screen.
| Field | Description |
|---|---|
|
Alert Name |
The name of the alert. |
|
Description |
A description of the alert. |
In the Master Alert screen of the Alert Creation Wizard, you select a master alert on which to base your alert. This master alert serves as the template for the alert that you customize and publish to users.
The Input Parameters screen displays the input parameters for the master alert selected in Step 2. If needed, define the parameters in this screen.
Table 5-14 describes the master alert input parameters:
You use the Trigger Condition screen to enable the end user to set the conditions that invoke an alert on the Wireless Customization. For example, if you create an alert notifying users of a stock price, you can set the alert conditions that allow an end user to request an alert when the stock has risen above, or fallen below, a certain price. Table 5-15 describes the parameters of the Trigger Condition screen.
Use the editing screen to change or update the parameter values for a selected alert. To access the editing screen, select an alert in the browsing screen and then click the Edit button. From the menu on the editing screen, you can select the values that you want to edit, such as those for the general parameters, the input parameters, and the trigger conditions.
You can delete a topic or an alert by selecting a topic or an alert from the browsing screen and then by clicking Delete.
The Content Manager enables you to move alerts and topics, allowing you to organize the wireless portal in a business context. To move alerts, select an alert from the browsing screen. In the Move Alerts screen, drill down to a destination topic for the alert. Click Move Here. The Alert-Topic browse screen reappears, showing the new destination topic as the current context topic. The alert displays in the table. Clicking the destination topic reveals the alert in its new location. Clicking Cancel while you are in the Move Alerts screen terminates the operation and returns you to the Topic-Alert browsing screen.
You can further organize your alerts by creating Topics.
To create a topic, click Add Subtopic in the browsing screen. The New Subtopic screen appears, where you enter a topic name. If you want the topic to be visible (and accessible) to an end user, select Visible. Click Add to complete the topic.
You can edit a topic's name and visibility by selecting it from the browsing screen and then by clicking Edit.
The Group tab enables you to assign alerts and topics to user groups, making them available to several users. To make an alert or topic available to a group, you select the group to which you want to assign the objects and then click Assign Alerts. From the Assign Alerts screen, select the objects that you want to assign to the group and then click AddToGroup.
To remove an alert or topic from a user group, select the object that you want to remove and then click RemoveFromGroup.
|
|
 Copyright © 2003 Oracle Corporation. All Rights Reserved. |
|