10g (9.0.4)
Part Number B10188-01
Home |
Solution Area |
Contents |
Index |
| Oracle Application Server Wireless Administrator's Guide 10g (9.0.4) Part Number B10188-01 |
|
This chapter includes the following sections:
The User Manager is a Web-based tool used to perform such user-support tasks as creating a new user, resetting the PIN and password for a user, assigning a special role to a user, or investigating any problems that a user may encounter when using the mobile applications. In the latter case, the User Manager enables you to view a user log, view and test user applications, and user devices.
The User Manager provides help desk functions for both developers and end users (Wireless customers). In addition, the User Manager supports third-party content developers using Mobile Studio.
|
Note: Users granted the Super User or User Manager role access the User Manager tool. For more information, see Table 4-1. |
Wireless users are assigned according to a user's responsibilities. These roles, which are described in Table 4-1, encompass all of the Wireless resources, from server management and configuration, application development and publishing, help desk functions to subscription management.
Wireless also allows anonymous users, the users who do not register with Wireless but want to use the applications as a guest. You can create an anonymous user account for each group. All unregistered users share the guest account to invoke applications owned by the group. A guest user cannot personalize applications.
You must assign roles to users from the User Manager rather than with other general-purpose user management tools, such as DAS (Oracle Delegated Administration Services). Users created using DAS or other OID (Oracle Internet Directory) tools are provisioned in Wireless only when they accesses the Wireless and Voice portal, the mobile portal, or any of the PC-based tools for the first time. These provisioned users do not have the assigned roles needed to access the Wireless tools. For example, a user must have the Application Developer role to access the Service Manager. If a user with no assigned roles tries to log into a Wireless tool in the integrated mode, then Wireless displays the following Single Sign-On (SSO) error:
No privilege to access this tool. Logout and login as another user with the required role.
The user can successfully log into the Wireless Tools (or other components) only after you assign that user a role. See Section 4.5 for information on creating a user and assigning user roles.
Before using the User Manager, you must first access the login page for the Wireless Tools using the following URL:
http://hostname:port/webtool/login.uix
For example, you access the login page by entering following URL into your browser:
http://hostname:7777/webtool/login.uix
Enter your user name and then enter your password. If you are an administrator, enter orcladmin as your user name. (The password is set during installation, but can be changed with the User Manager.)
After you have successfully logged into the User Manager, the tool defaults to the User tab, displaying the User Overview screen.
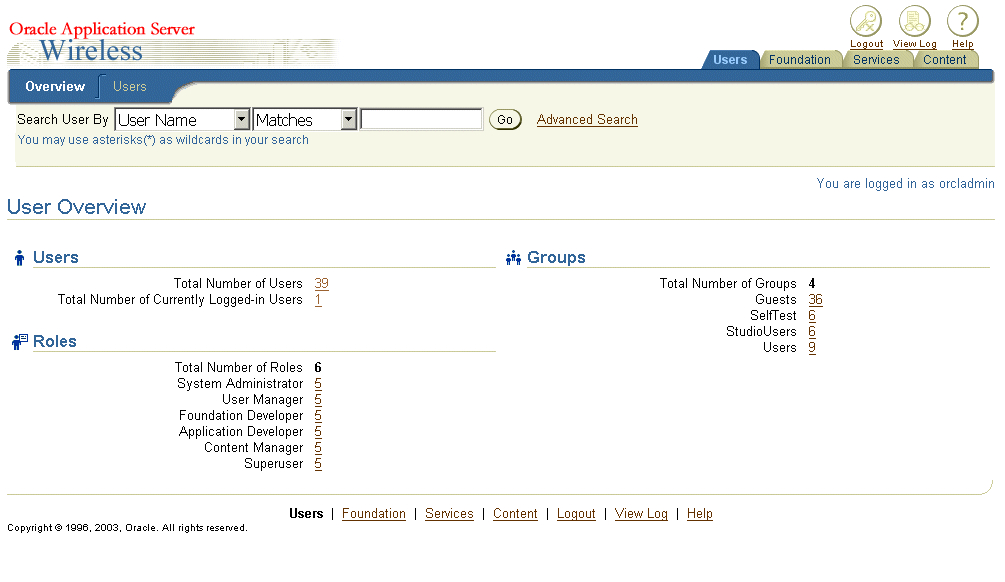
The Overview subtab provides you with an overall view of Wireless users by displaying the following:
The User Manager displays the number of users as a link, which has a built-in query. Clicking this link invokes the Users Search Results page subtab, which displays a table listing all of the users matching the selected link. For example, clicking 2 next to Application Developers in Figure 4-1 invokes the Users Search Results page illustrated in Figure 4-2, which displays the two Wireless users who are assigned the Application Developer role.
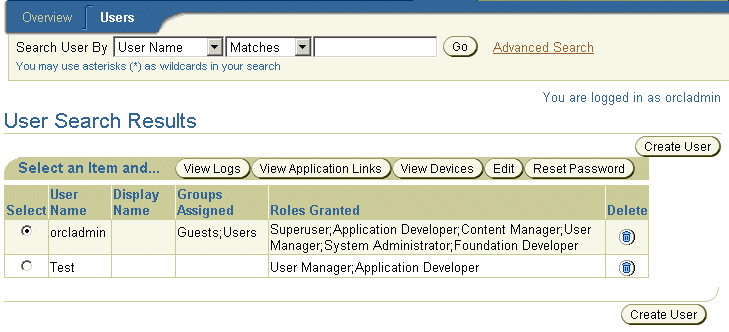
Both the Overview and Users subtabs contain a Quick Search area, in which you construct the criteria for finding current Wireless users by specifying the user's name, display name, phone number, or email address. You can further enhance your search by using the options accessed through the Advanced Search link, which enable you to find a user by user group, user role and user type.
Elements Search User Result Screen
| Label | Definition |
|---|---|
|
User Name |
The name of the user. |
|
Display Name |
The display name of the user. |
|
Groups Assigned |
The group to which the user has been assigned. |
|
Roles Granted |
The role (or roles) granted to the user. For information on user roles, see Section 4.5. |
To find users using Quick Search, you first select the type of search by selecting from the following options in the drop-down list:
Enter the search string in the Search By field. For example, enter the user's display name in this field. From the drop-down list, select the match type (matches, starts with, ends with, or contains) and then click the Go button. The list of users corresponding to the search criteria appears.
If you want to specify more search options, such as finding a user belonging to a specific group, or with a specific role, click Advanced Search to further define your search.
To find users in Advanced Search, you first select the type of search:
Enter the search string in the Search By field. For example, enter the user display name in this field. Use the drop-down lists to select the group to which the user belongs, the role granted to the user, and the user type. There are three types of Wireless users: anonymous users who are guest users, virtual users, and registered users. When an unregistered user accesses a Wireless site, Wireless detects the user and creates a virtual user account for that user.
Click the Search button. The list of users corresponding to the search criteria appears in the Users subtab.
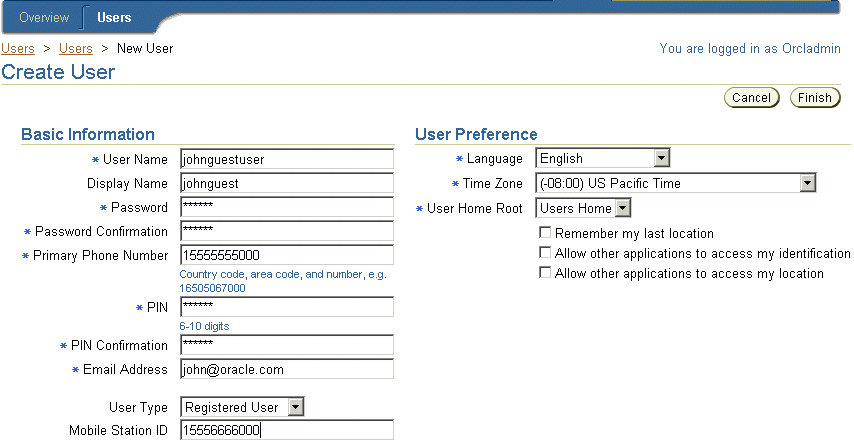
The Create User screen contains a set of parameters that administrators set to create and configure new users.
Table 4-3 describes the parameters in the Create User screen.
| Parameter | Value |
|---|---|
|
User Name |
The name of the user. This is a required field. Note: the name is case-sensitive. |
|
Display Name |
The display name of the user. |
|
New Password |
The user's password. Note: the password is case-sensitive. This field is required when creating new user. |
|
Password Confirmation |
The user's password entered again. This field is required when creating new user. |
|
Primary Phone Number |
The primary phone number of the user. This is a required field. When you enter the value for this parameter, Wireless creates a device for this user with this phone number. This number also serves as the user's account number, which the user enters for login rather than entering a user name on a device.When you edit a user profile, the Account Number field in the editing screen corresponds to the Primary Phone Number field in the Create User screen. Changing the value for the Account Number, however, only changes the account number, not the value for the primary phone number. |
|
PIN |
The user's personal identification number (PIN) requested when the user logs in using the primary phone number (that is, the. account number). This field is required when creating new user. |
|
PIN Confirmation |
The confirmation for the user's personal identification number. This field is required when creating new user. |
|
Email Address |
The user's email address. This is a required field and it appears only in the Create User screen. A user device with this email address is created for the user. |
|
Mobile Station ID |
The user's mobile phone number, or the MSISDN (mobile subscriber ISDN) for GSM (Global System for Mobile communication) services. Wireless uses this ID to track the position of the user. |
|
External Repository ID |
A mapping of a user from the Wireless schema to a unique ID of that user in another user database. |
|
Virtual User Device ID |
An ID generated for unregistered users who access a Wireless site. When an unregistered user accesses a Wireless site, Wireless detects the user and creates a virtual user account for that user. Wireless traces this user by phone number or by another identification number sent from the user's device. This number is the Virtual Device ID number. You cannot create a virtual user; Wireless creates virtual users dynamically. This parameter does not apply to registered users or to anonymous users. |
|
User Type |
Select Registered for registered Wireless users. Select Anonymous when creating an anonymous user, an entity that Wireless automatically assigns to an unknown user. An unknown user is a user whose device does not send any identifiable numbers through the HTTP header when accessing a Wireless site. Creating an anonymous user enables unknown users to access public applications and explore the site before registering. |
|
Gender |
The user's gender (select either male or female). |
|
Date of Birth |
The user's date of birth. You can select this from the calendar or enter it in the field using the mm/dd/yyyy format. |
|
Enabled |
Selecting this check box enables users to log in. Leaving this check box clear prevents a user from logging in. By default, this option is enabled. |
|
Language |
A drop-down list of display languages. This is a required field. See Section 4.5.1.1. |
|
Time Zone |
A drop-down of time zones for the user's locale. Note: Wireless generates and delivers notifications to the time zone selected by the user rather than by the time zone of the Wireless server itself. This is a required field. |
|
User Home Root |
A drop-down list of root folders, which can represent user communities or providers. The Content Manager creates these folders, which provision the home folders for users. This is a required field. |
|
Remember my last location |
This check box enables Wireless to ascertain the user's current location using the signal from the user's mobile device, and to cache the user's current location. Wireless sends the user content specific to the current location. Caching the location can improve server performance. |
|
Allow other applications to access my identification. |
This check box enables the user identity to be disclosed to a third-party application. |
|
Allow other applications to access my location. |
This check box enables the user's location be reported to a third-party application. |
|
Groups |
The groups to which you can assign the user. Using the arrow keys, you can select ( > or >>) or remove (< or <<) a user from a group. The Content Manager creates groups and assigns applications to them. For more information, see Section 5.4 in Chapter 5, "Managing Content". |
|
Roles |
The roles to which you can assign a user. Using the arrow keys, you can select ( > or >>) or remove (< or <<) a user from a role. If you do not select a role, then the user has end-user privileges and cannot access any Wireless tool. A User Manager user can only create other User Manager users or end users. |
|
Note: Users assigned the User Manager role only (that is, a user without the Super User privileges) can only assign the User Manager role. |
To create a new user, you first click Create User in the Users screen. The create screen appears (Figure 4-3), with its fields populated by such default information as the user's status as enabled and the default language and time zone (which are based on the corresponding configuration for the Wireless Site). Enter the values as needed. The user name, password, primary phone number, PIN, email address are required, as is the user's language, time zone and User Home Root.
Click Finish to complete the creation of the user. The new user appears in the user list in the Browse User screen, along with the message User with the name of *** has been created. Figure 4-4 illustrates the Browse User screen displaying this message.
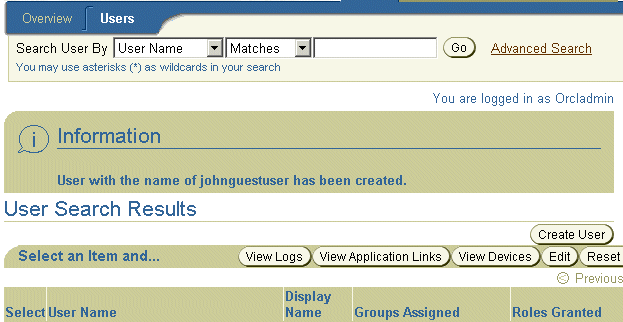
Click Finish to complete the user. The new user appears in the user list in the Browse User screen, along with the message, User with the name of *** has been created.
From the Users screen, select the user from the Users screen and then click Edit. The Edit screen appears, displaying the current user profile information for the selected user. When you edit a user profile, the Account Number field in the editing screen corresponds to the Primary Phone Number field in the Create User screen. For example, Figure 4-5 depicts a partial view of the Editing screen in which the value for the Account Number field, 1555555000 is the same as the value entered for the user's Primary Phone Number in Figure 4-4. Changing the value for the Account Number, however, only changes the account number, not the value for the primary phone number. You cannot edit the email address for a user. To edit the values for the Primary Phone Number and for the email address, you must edit the user's devices.
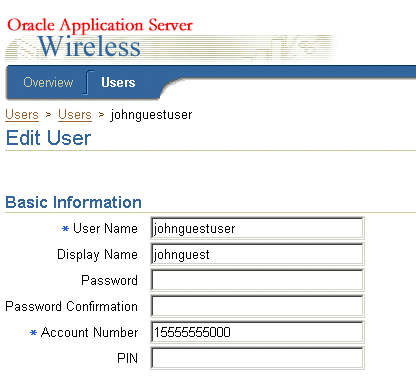
Edit the values as needed. See Section 4.5 for information on the parameters of a user's profile. The password and PIN are not required when editing user profiles, but you can edit these values if needed.
Click Finish. The Users browse screen appears, displaying any changes pertinent to the labels in the Users screen (for example, the user name).
Users can view the Wireless Tools in 11 languages and the Wireless Customization in 29 languages. (The languages available for Wireless Customization include the 11 languages available to the Wireless Tools in addition to 18 more.)
Some languages may not display properly if you use Netscape 4.7 or a lower version. In some cases, characters may display as boxes. To fix this problem, configure the Netscape preferences as follows:
From the Netscape tool bar, select Edit.
The User Manager enables you to reset the user password and PIN.
From the Browse User screen, select a user and then click the Reset Password button. The Reset Password screen then appears, where you to enter the new password, the password confirmation, the new PIN, and the PIN confirmation. To reset the PIN only, do not enter a value Password field (leave it blank). Likewise, you can leave the PIN field blank if you need only to reset the password.
In the default installation of Oracle Application Server, a Wireless application entity does not have the User Administrator privilege to change a user password, so saving the changed password fails with a general error message. You can identify the error by checking the Wireless log file.
You can assign the User Administrator (UserSecurityAdmins) privilege by running the assignUserSecurityAdminsPrivilege.sh script, located at $ORACLE_HOME/wireless/bin. To assign this privilege, run the following command:
assignUserSecurityAdminsPrivilege.sh cn=orcladmin, welcome1
For more information, refer to the OracleAS Security Guide. This privilege checking applies only to password and not to PIN.
To delete a user, select a user from the Browse User screen and then click the delete user icon. After confirmation, Wireless deletes the user from the list.
The View Application Links button enables you to view the applications, bookmarks, folders, and notifications accessible by a single user, as well as use the simulator to test applications. The applications that a user can access include all those assigned to the groups that the user belongs to, as well as applications created in the selected user's home folder using Mobile Studio, or published through the Service Manager using the Quick Publish function.
Selecting a user and then clicking the View Application Links button displays the following:
For detailed information on the Edit, Delete, Move and Debug buttons, refer to Section 5.3. These functions are identical to those in the Content Manager, except that the User Manager only enables you to modify the attributes of applications which belong to the selected user's home folder; you cannot modify the applications assigned to the selected user's group.
The User Manager enables you to manage a user's devices by clicking the View Devices button from the Browse User screen.
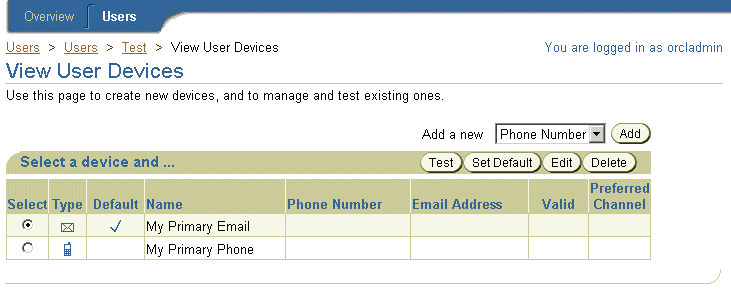
Clicking View Devices enables you to see all the devices belonging to a selected user (as illustrated in Figure 4-6). The User Manager provides the same functionality as the Wireless Customization Portal by enabling you to add, edit, delete, or validate a device, as well as set a default device.
The Test button enables you to test a selected device by sending a test message to the user. If a user cannot receive subscribed notifications, then this function indicates that there are problems with sending messages.
For more information on using the Wireless Customization Portal for general device management and display attributes, refer to Oracle Application Server Wireless Developer's Guide.
The User Manager enables you to view activity logs that display the accessed Async applications, notifications, applications, and the downloaded media contents (that is, J2ME applications) for a selected user. The activity logs display the most recent activity for user, or the user's activity within a specific time frame. In addition, these activity logs tell you if Wireless dispatched applications successfully.
To view the user logs, select a user and then click the View Logs button. The summary page of activity log appears (Figure 4-7), displaying the last five logged records of the Async applications requested, notifications sent, applications accessed, and media contents downloaded.
To view the detailed activity based on a specified time frame, click the Full List button of the specific log type.
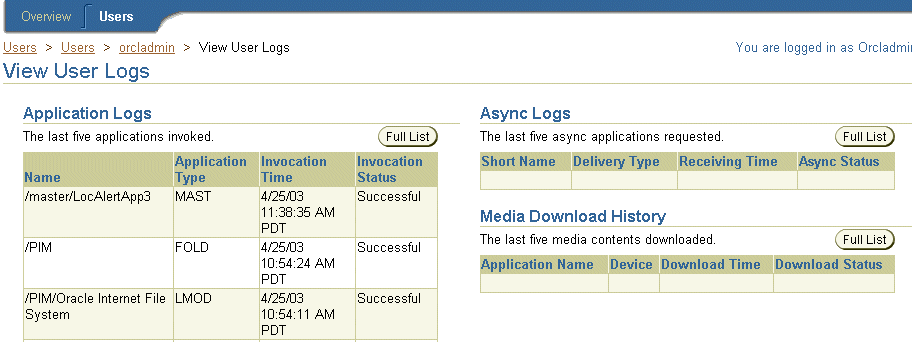
Table 4-5 describes the Async application statistics for a selected user.
Table 4-6 describes the notification statistics for a selected user.
Table 4-7 describes the application statistics for a selected user.
Table 4-8 describes the media download statistics for a selected user.
You can view the activity log for a specific period using the From Date and To Date fields. You can set the starting and ending dates either by entering them in the fields in the mm/dd/yyyy format, or by picking them from the calendars. Click Go after you have completed entering the date range.
|
Note: The default From date is midnight of the previous day. Both the From and To dates assume midnight of the selected day. |
You can print an activity log by clicking Printable Page. This printed page contains text only and has no headers or footers. Use the browser's Back button to navigate from the printed page.
|
|
 Copyright © 2003 Oracle Corporation. All Rights Reserved. |
|