10g (9.0.4)
Part Number B10948-01
Home |
Solution Area |
Contents |
Index |
| Oracle Application Server Wireless Developer's Guide 10g (9.0.4) Part Number B10948-01 |
|
This document explains Transcoding. Each section of this document presents a different topic. These sections include:
The majority of applications available on web render content in format specific to certain types of devices. Web scraping allows applications developed for a particular markup language to be reformatted for use with other devices. Web scraping includes Web Clipping for repurposing PC browser applications and the WML Translator for reusing WML applications.
This section describes the Web Clipping application feature available with OracleAS Wireless. It also describes the roles of the OracleAS Wireless Administrator and user for creating, customizing, and viewing Web Clipping applications on a wireless device. Information about some administrative tasks, such as how to configure proxy settings and security, is also included.
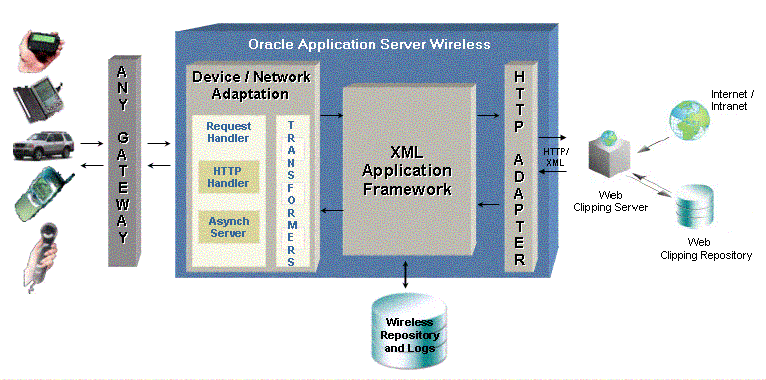
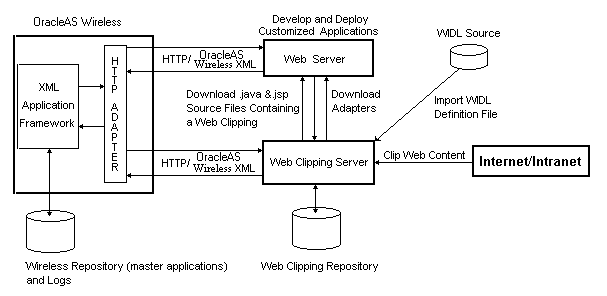
The Web Clipping server architecture relative to OracleAS Wireless is shown in Figure 13-1, "Web Clipping Server Architecture Relative to OracleAS Wireless Core".
The Web Clipping server enables OracleAS Wireless Administrators to clip and scrape Web content and create Web Clipping applications that are stored persistently in the Web Clipping server repository. When a request is initiated by a user using a mobile wireless device to view a particular Web Clipping application, that application is retrieved by the HTTP Adapter and delivered to OracleAS Wireless Core for processing and delivery to the mobile device, as shown in Figure 13-2, "Web Clipping Application".
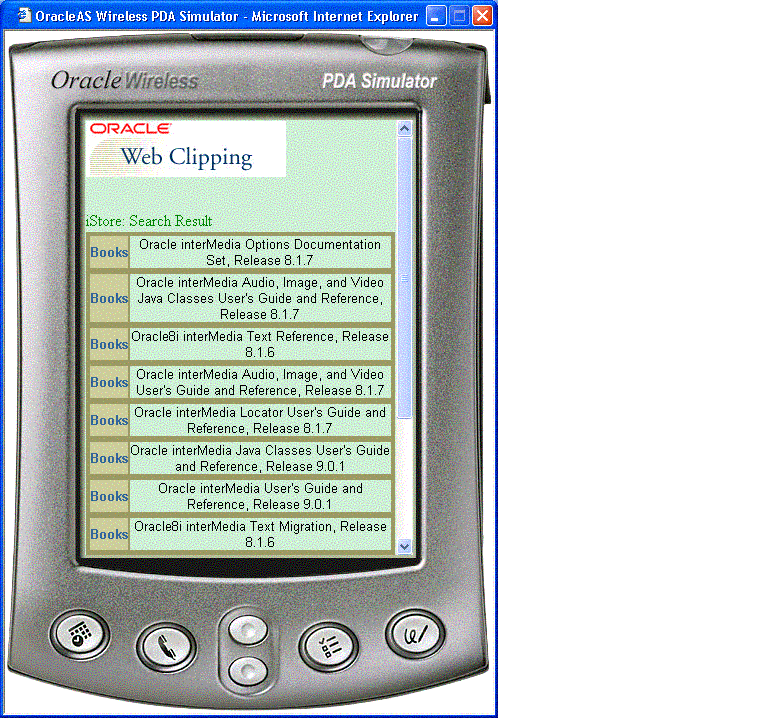
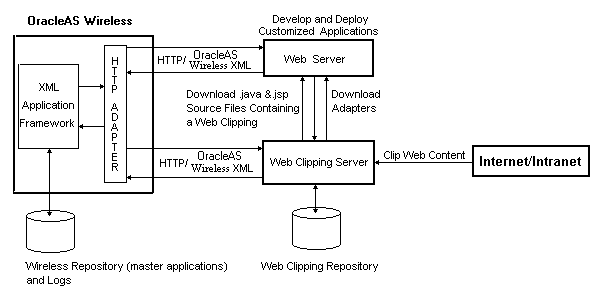
Figure 13-3, "Detailed Web Clipping Server Architecture" shows a more detailed look at the Web Clipping server. Web clipping content can be clipped and scraped from Internet or Intranet Web sites scattered throughout a large organization. Using OracleAS Wireless, you can create and store in the wireless repository applications containing Web clippings. In addition, you can create customized applications that uses Web clippings to their best advantage by first identifying the development environment that best fits your needs. Depending upon the development environment you select, you must download and deploy the required archive files into that development environment. Next, clip the desired content. Then, download either the Java or JSP stub files to start developing.
The archive files available are for each of the following development environments are:
webclipping.rar.
wcbean.jar.
Applications can be customized and deployed in the J2EE or J2SE environments as standalone Java applications or part of other JSP applications, or these applications can be created into wireless applications and stored in the wireless repository, or this content can be clipped.
To create a Web Clipping application, the OracleAS Wireless Administrator simply uses a Web browser to navigate to the Web page containing the desired content, then selects the portion of the page to clip and scrape, sets some attributes and if the Web clipping uses form-based submission, exposes input parameters, saves the application, and tests the application.
Web Clipping applications support:
The following are known limitations of Web clipping:
The following page content cannot be clipped by Web clipping:
doc.write().
The Web Clipping server provides and renders clipped Web content as Web Clipping application content. The Web Clipping Studio allows OracleAS Wireless Administrators and wireless application users to do the following:
All Web Clipping application definitions are stored persistently in the Oracle Application Server infrastructure database. Any secure information, such as passwords, are stored in encrypted form, according to the Data Encryption Standard (DES), using Oracle encryption technology.
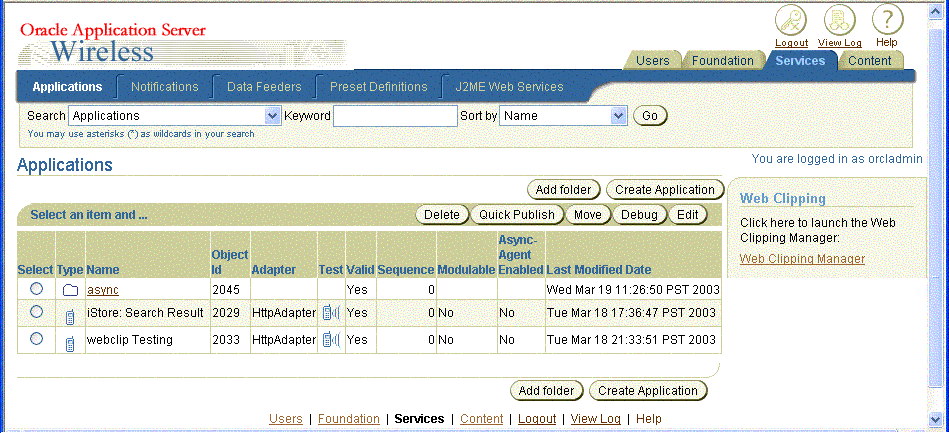
The Web Clipping server is automatically installed as part of OracleAS Wireless. OracleAS Wireless administrators can access the Web Clipping server in the repository under the Applications: Browse Folder: page in the Wireless Web Tool.
An OracleAS Wireless administrator may need to perform some configuration tasks (see Section 13.6, "Administrative Tasks for OracleAS Wireless Administrators") before getting started.
To create a Web Clipping, perform the following steps:
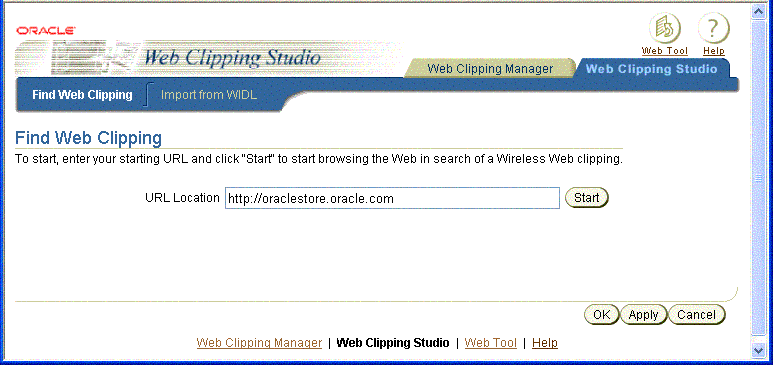
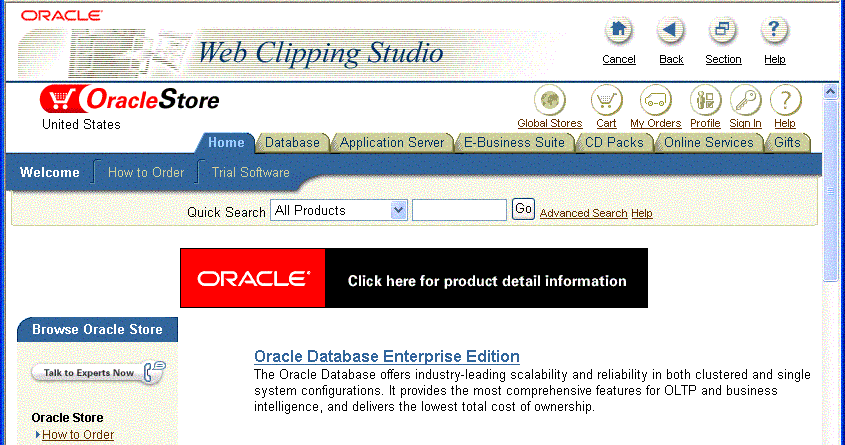
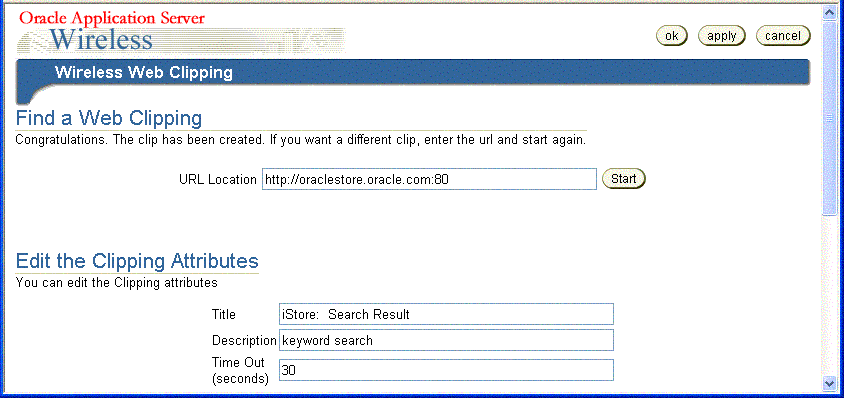
http://oraclestore.oracle.com, as shown in Figure 13-4, "Find a Web Clipping".
|
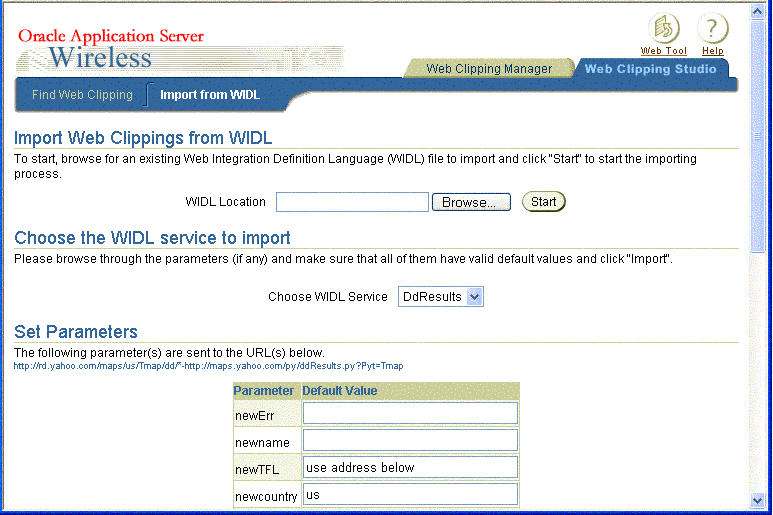
Note: To import a WIDL file and create a Web clipping, select the Import from WIDL tab. The Import from WIDL page appears. See Section 13.4, "Migrating from Existing Transcoding Technologies" for more information. |
The page that appears tells you to choose your store.
The Oracle Store Web page for the country of your choice appears inside the Web Clipping Studio, as shown in Figure 13-5, "Browse ORACLESTORE.ORACLE.COM in the Web Clipping Studio".
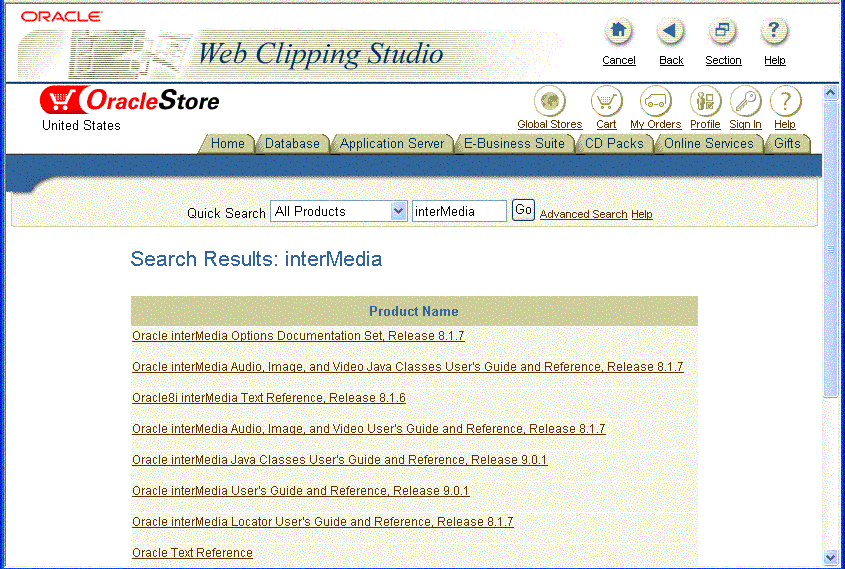
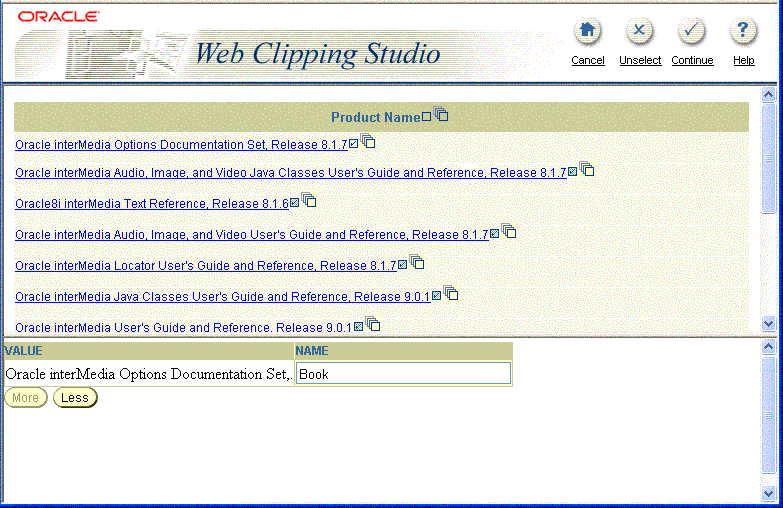
As you click hyperlinks in the Web page to browse to the desired content you want to clip, your navigation links are recorded. For example, using the starting-point URL oraclestore.oracle.com, then clicking United States to select the country, you could search for a product by name once you provide the name in the Quick Search box and click Go. For example, enter the feature name interMedia and click Go. All products containing that name appeared in the search results, as shown in Figure 13-6, "Browse to the Content to Be Clipped".
|
Note: Any browsing operations that do not contribute to the eventual Web clipping will be discarded. Thus, only the significant browsing operations are recorded for later playback during the test mode; any discarded links are not visited. See Figure 13-6, "Browse to the Content to Be Clipped" and note for this example there are just three URLs listed, the starting URL, one additional URL, and the URL containing the form. |
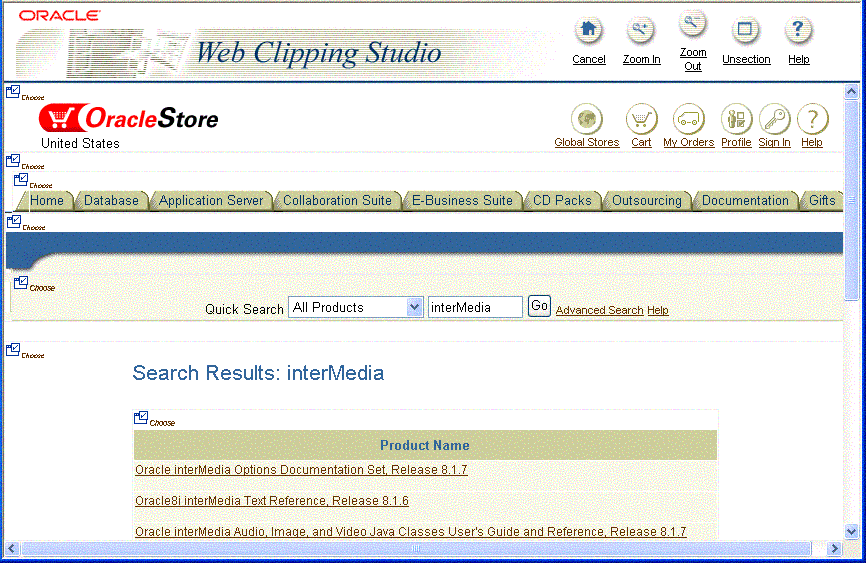
If you do not want to use the section you clipped in your Web Clipping application, click Unselect to return to the page containing the section. You can choose another section on the page, or click Unsection to navigate to another page.
Book.
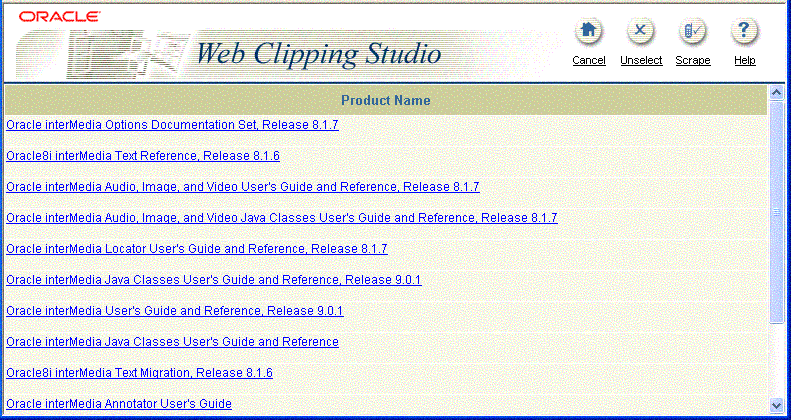
In tables with cells, a special stacked check box appears to allow selection of all text in the cell as output.
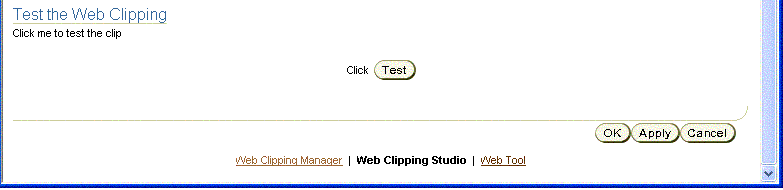
After selecting the output (first check box), you will have created a group that can be repeated as a whole as long as the first output you selected represents the first item in the collection of similar output. This means that you can only apply repeatability to a collection of similar output. Click More once to increase the repeat level to encompass the entire collection of similar output, as shown in Figure 13-9, "Scrape Mode". Click Continue to continue to the Web Clipping application attributes page.
A check box following anything indicates that you can select it as an output that can be scraped. One or more items of output may make up a collection of similar output. You can select output from the first row of similar output to be scraped. For each output you select, a row of values appears under the Value and Name table where you can name your output in the Name column. Give each output a meaningful name based, for example, on the column name from which it was scraped. Clicking More lets you quickly select the entire collection of similar output to be scraped. As you click More, check boxes of successive groups of selected output are checkmarked and designated to be scraped.This is a quick way of selecting successive groups of similar output to be scraped as output, rather than individually checking each one.
After you save your Web Clipping application and its attributes, you will be returned to the Applications Browse Folders: Master page.
keyword search.
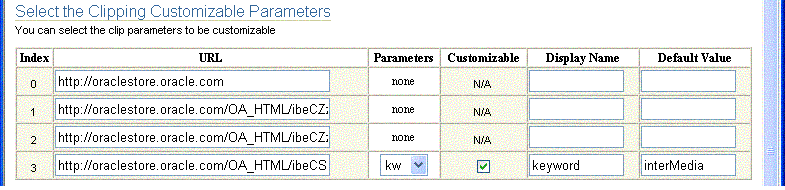
kw in the row whose Index value is 2, change its Display Name from kw to keyword to make this name more recognizable for wireless application users, then click the Customizable box to let wireless application users customize the parameter input value.
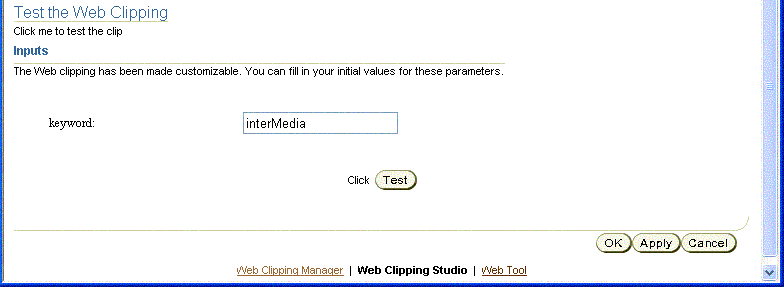
keyword and its input value interMedia appears. To test another input value, replace the initial value interMedia and enter a new initial value syndication, as shown in Figure 13-14, "Changing the Input Value". Click Test to test the new input value.


Click Add Web Clipping. The Find Web Clipping page appears in which you can enter a starting-point URL and begin browsing a Web site, and looking for content to clip.
Enter a search string in the Search field that matches any part of the name of the Web clipping you are looking for, then click Go to initiate the search. The list of Web clippings whose names match this search string is displayed.
Select the Web clipping you want to edit by clicking its radio button in the Select column and then click Edit. The Find a Web Clipping and Clipping Attributes page, as shown in Figure 13-10, "Select Web Clipping Application Options and Edit Clipping Attributes", appears where you can edit the Web clipping attributes.
Select the Web clipping you want to delete by clicking its radio button in the Select column and then click Delete. A confirmation message is displayed indicating the Web clipping is deleted.
To create a wireless application from a Web clipping, you use either of the following approaches:
At the Manage Web Clippings page as shown in Example 13-15, "Managing Web Clippings", you can create a default wireless application.
Select the Web clipping you want to turn into a default wireless application by clicking the radio button next to it, and then click Create Default Application. A default wireless application will be created to deliver a default rendering of the scraping just performed, in OracleAS Wireless XML.
After creating the default application, you are returned to the OracleAS Wireless Applications page, where you can create new Web Clipping applications.
Continuing with our example, the iStore: Search Result application is added to the list of applications, as shown in Figure 13-21, "The Develop Custom Applications Page".
Once you create a default application from a Web clipping, you can also:
Select the application to be edited by clicking its radio button, then click Edit in the Edit Clip in Web Clipping Studio section to edit the Web Clipping application attributes.
Select the application to be deleted by clicking its radio button in the Select column, and then click Delete. A confirmation message appears indicating that the selected Web Clipping application is deleted.
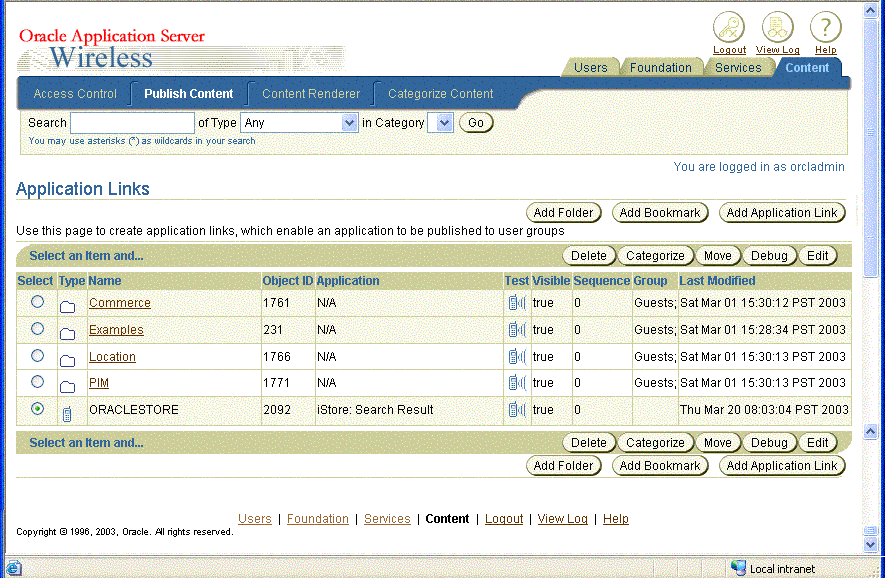
To create a new application link for a new wireless application, click the Content tab and click Add Application Link to add this new application to the Applications Links page. Follow the five steps provided by the wizard. At the Application step, select the application on which you want to base this application, then select your application, iStore: Search Result, then click Next. At the General step, enter the application name ORACLESTORE for the name of your new application, then click Next. At the Input Parameters step, accept the default settings for your new application by clicking Next. At the Async Application step, click Next. At the Additional step, in the Description field, enter the word Books, then click Finish. Your new application should appear in the Applications Links list of applications that will enable an application to be published to user groups and made accessible to mobile users of wireless devices, as shown in Figure 13-17, "Your New Application ORACLESTORE Is Published to the Content Manager".
You can test an application either from the Services tab or if you have published it, from the Content tab.
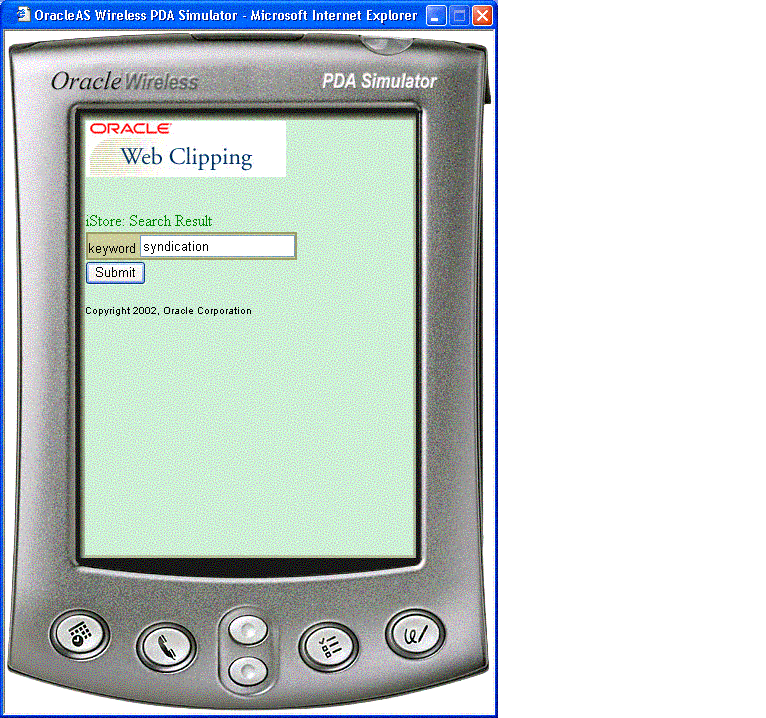
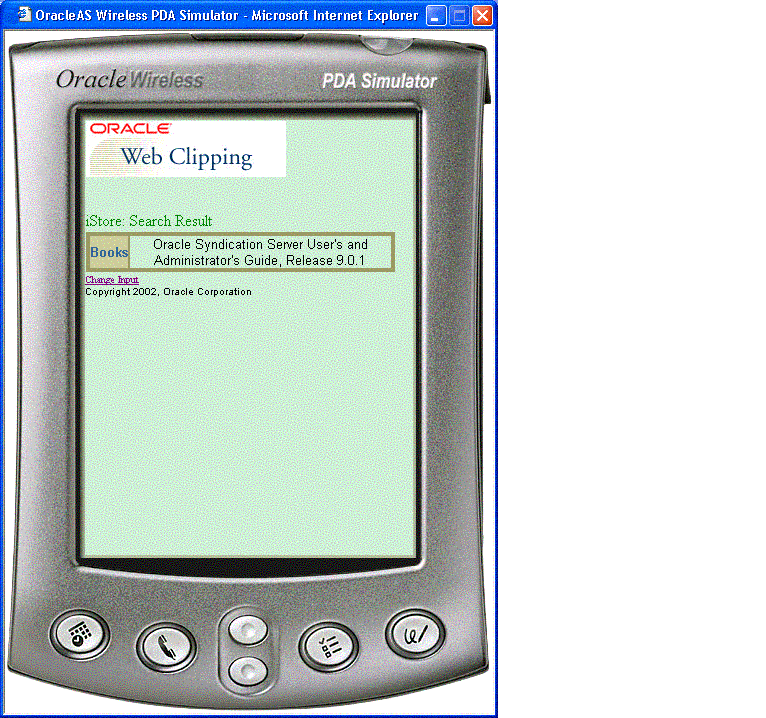
ORACLESTORE by clicking its Test icon in the Test column. An OracleAS Wireless PDA Simulator page appears in a new browser window, showing the contents of the Web Clipping application, as shown in Figure 13-2, "Web Clipping Application".
keyword, as shown in Figure 13-18, "Wireless PDA Simulator Showing an Initial Value interMedia". Delete the initial input value interMedia and enter the value syndication, as shown in Figure 13-19, "Wireless PDA Simulator Showing a New Value Syndication". Then click Submit.

At the Manage Web Clippings page as shown in Figure 13-15, "Managing Web Clippings", you can build a custom wireless application. Click the Custom Applications tab. A Downloads page appears, as shown in Figure 13-21, "The Develop Custom Applications Page", from which you can either:
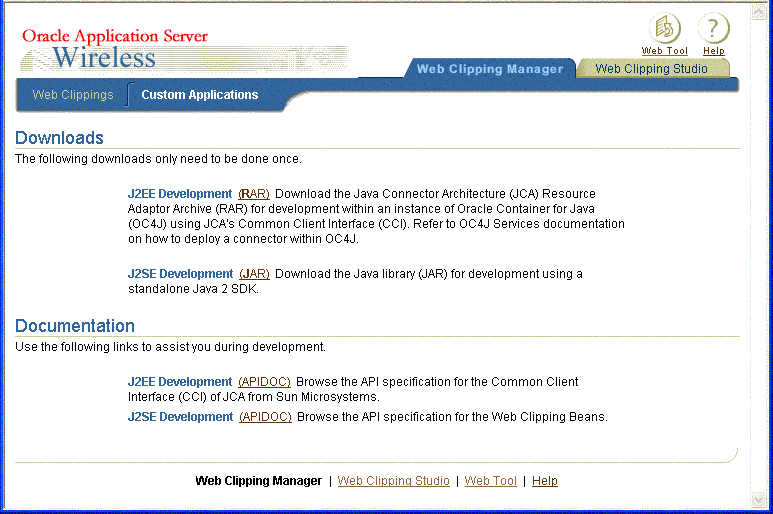
Click the RAR link under J2EE Development to download the JCA RAR file, webclipping.rar.
Follow the instructions in the "OC4J Services" section in the latest Oracle Application Server documentation to deploy an RAR file into your OC4J. Refer to the Oracle Application Server Documentation page to find the documentation for the correct version of OC4J.
You may need to restart OC4J for the library to take effect.
Return to the Web Clippings tab and find your desired Web clipping in the form of a Java Server Page (JSP) to start developing using the RAR file you have just deployed.
Click the JAR link under J2SE development to download the Java library file, wcbean.jar.
For a standalone Java 2 SDK environment, place the JAR file in the classpath during compilation and running of your code.
For J2EE (OC4J) development, place this JAR file where your Web application can access it, either in the root classpath of OC4J, in the application's own library path, or in the WEB-INF/lib directory of the Web Archive (WAR) file containing your Web application. You must restart your OC4J instance to be able to start using the Web Clipping Bean API.
The other files that are needed in order to compile and run the stub Java files are http_client.jar, Javax-ssl-1_2.jar, jssl-1_2.jar, and xmlparserv2.jar. Look for these files in your installation of Oracle Application Server OC4J.
Return to the Web Clippings tab and find your desired Web clipping in the form of a Java source file (.Java) to start developing using the JAR file you just deployed.
.Java file.
Click Download Java (see Figure 13-15, "Managing Web Clippings") to generate .Java file from the Web clipping. This.Java file can be compiled with other Java classes into an application, and deployed in J2SE as a standalone Java 2 SDK application.
.jsp file.
Click Download JSP (see Figure 13-15, "Managing Web Clippings") to generate a .jsp file from the Web clipping. This .jsp file can be deployed into J2EE OC4J so you can execute the Web clipping as a JSP.
.Java file or .jsp file.
.Java file
Starting with the .Java file that contains the sample code of how to use the Web Clipping Bean APIs, the Wireless developer can create his own HTTP application using any standard J2EE Container (such as OC4J), after having included the previously mentioned wcbean.jar file as well as its dependency libraries into the library path of the HTTP Server.
.jsp file
Similarly, with the .jsp file that contains the sample code of how to use the Java Connector Architecture APIs, the Wireless developer can create his own HTTP application using OC4J (this is a hard requirement as the RAR file is compliant to OC4J).
In order to be compliant with OracleAS Wireless, the HTTP application must render its output in either OracleAS Wireless XML, XHTML/MP, or XHTML/XForms. The Wireless developer will have full control over the Mobile UI of this HTTP application including the addition of mobile links or images. Note that the default JSP code renders the data as an HTML unordered list; the Wireless developer will need to change that rendering to one that is compliant with OracleAS Wireless.
After the creation of the HTTP application, the Wireless developer can use it to create a Wireless application using the HTTP Adaptor.
Previously in OracleAS Wireless, transcoding or Web content reuse was performed using Web Methods' Web Integration technologies. The recorded instructions on how and where to fetch external Web content was captured in a Web Integration Definition Language (WIDL) file. WIDL is a meta-language that implements a service-based architecture over the document-based resources of the World Wide Web. In this release, the responsibility of transcoding falls on Web Clippings. Without having the developers or users recreate the same set of instructions on Web Clippings terms, there is a migration path for them that allows for importing WIDL files into Web Clippings so that they may reuse what they have captured previously. This is shown in the augmented Web Clipping Server architecture (see Figure 13-22, "Web Clipping Server Architecture Showing Importing a WIDL Definition File"), with the added WIDL Source as an alternate means of creating a Web Clipping.
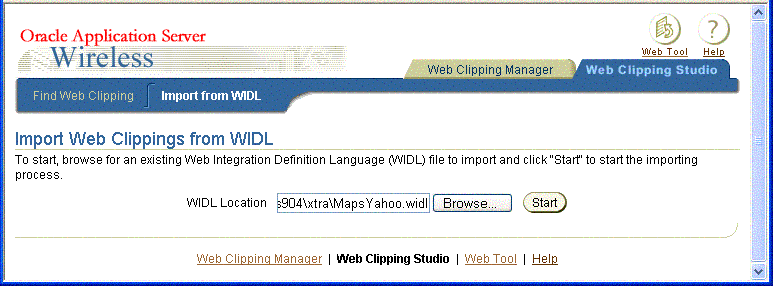
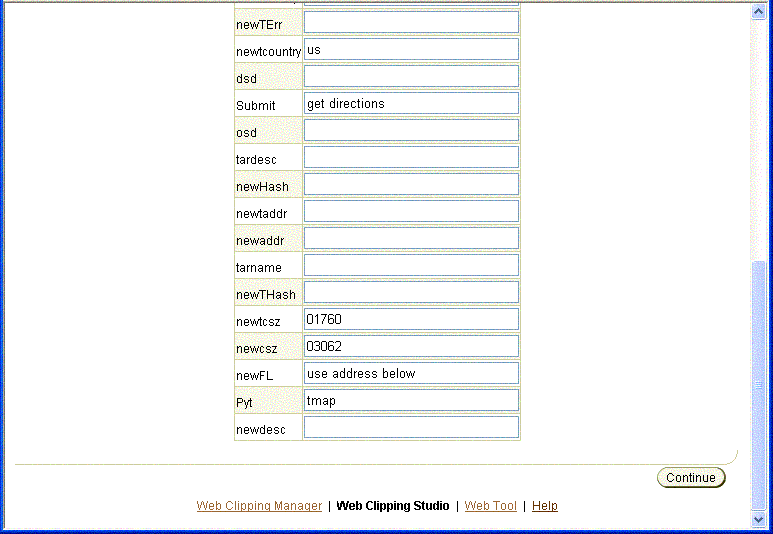
To import a WIDL definition file, do the following:
At the Manage Web Clippings page, you can then either create a default application (see Section 13.3.1, "Creating a Default Application") and then create an application link to enable an application to be published to user groups and made accessible to mobile users of wireless devices, or build a custom application and generate either a .Java file or a .jsp file from the Web clipping (see Section 13.3.2, "Building a Custom Application").
Wireless users can click Change Input on the test page to customize values for any input parameters of a form if the OracleAS Wireless Administrator parameterized these input parameters and made them customizable. (See the help topic Editing Web Clipping Application Attributes and Customizing Parameters in Help for more information.)
The administrative tasks that must be performed by the OracleAS Wireless Administrator include:
A trusted server certificate file, ca-bundle.txt, generated from Oracle Wallet Manager, is shipped with the Web Clipping server feature. This file, located in <ORACLE_HOME>/portal/conf on UNIX or in <ORACLE_HOME>\portal\conf on Windows, contains an initial list of trusted server certificates that might be used for navigating to some secure servers using HTTPS. However, this is not a complete list of all possible server certificates that exist on the Web. Therefore, this file must be configured or extended to recognize any additional trusted server certificates for any new trusted sites that are visited. See Section 13.7.1, "Deploying and Configuring WML Translator" for more information about how to configure or extend this trusted certificate file.
Web Clippings allows rendering events to be logged so that an administrator can query the event log and generate useful reports like those used for billing. See Section 13.7.2, "Using the WML Translator" for more information about how to enable the logging of rendering events and how to make use of a set of PL/SQL procedures to operate on the logged events to generate useful reports.
When an OracleAS Wireless Administrator navigates to a secure site, the Web site giving secure information typically returns a certificate identifying itself to the administrator. If the OracleAS Wireless Administrator accepts the certificate, the certificate is placed into the list of trusted certificates of the browser so that a secure channel can be opened between the browser and that server. Like a Web browser, the Web Clipping server behaves as an HTTP client to external Web sites. In order for the Web Clipping server to keep track of trusted sites, it makes use of a file that stores the certificates of those sites, namely the ca-bundle.crt file.
The shipped ca-bundle.txt file is an exported version of the trusted server certificate file from Oracle Wallet Manager. The default trusted server certificate in Oracle Wallet Manager does not cover all possible server certificates that exist on the Web. For this reason, when an OracleAS Wireless Administrator navigates to a secure server using HTTPS, the administrator may get an "SSL Hand-shake failed" exception in the Web Clipping Studio. To solve this problem, the ca-bundle.crt file needs to be augmented with new trusted sites that are visited. As an OracleAS Wireless administrator, you must do the following to extend the shipped ca-bundle.crt file:
ca-bundle.crt file with that file.
For more information about Oracle Wallet Manager, see Chapter 17 Using Oracle Wallet Manager in Oracle Advanced Security Administrator's Guide in the Oracle9i Release 2 (9.0.2) documentation section on the Oracle Technology Network (OTN) (http://otn.oracle.com).
Web Clippings allows rendering events to be logged so that an administrator can query the event log and generate useful reports, such as those used for billing purposes. To enable event logging, the administrator must manually modify a context-param within the web.xml file located at <ORACLE_HOME>/j2ee/OC4J_Wireless/applications/webclipping/webclipping-web/WEB-INF/web.xml. The context-param to look for has its param-name equal to oracle.webclipping.LogBusiness and has a default param-value of false. To enable the logging of rendering events, the administrator must change that value to true. After setting this parameter, restart the OC4J_Wireless instance to refresh this change. Refer to the OC4J guide for how to use DCM to do that.
Once the logging is enabled, the Administrator can make use of a set of PL/SQL procedures in the infrastructure database to operate on the logged events. The administrator needs to first connect to the infrastructure database as a SYSDBA, then execute the following line to change his user to WCRSYS:
ALTER SESSION SET CURRENT_SCHEMA=WCRSYS;
As user WCRSYS, the Administrator can make use of the following PL/SQL procedures and functions to operate on the events logged. As a preface, the record type that you will be using in most of these procedures and functions is WWWCP_API_REGISTRY.REC_RENDER_EVENT:
/**
* This describes a record type used to return a single clipping rendering
* event.
*
* This structure is used by the lookup APIs to encapsulate the
* information that is retrieved from the wwwcp_render_log$ table.
* It is used to describe the cursor that will be returned as an OUT
* parameter of lookup_render_events.
*
* @field clip_id           The clip id that allows the fetching of the
*                          other facets of the clipping definition to
*                          populate the events table.
* @field clip_description  Textual description of the clip rendered.
* @field clip_title        Title of the clip that was rendered.
* @field clip_timeout      Timeout in milliseconds that allows the clipping
*                          that was rendered to be timed out. This could be
*                          an indication of the quality of service.
* @field effective_url     The url where the clip resides. This is usually
*                          the last url declared in the clipping definition
*                          clipping definition, where the clip would reside.
* @field render_status     A number that indicates either success or
*                          failure of the rendering call.
* @field render_type       Tells what type of rendering is in question,
*                          whether it be for Portal Show Mode, for
*                          Wireless default SimpleResult show mode, or
*                          for the Wireless connector show mode.
* @field render_start      Starting time of the rendering.
* @field render_end        Ending time of the rendering.
* @field fuzzy_used        Indicates whether fuzzy match was kicked in.
* @field db_lookup         The time it takes in milliseconds to look up
*                          the clipping definition from the database.
* @field http_latency      The time it takes to reach the first byte to
*                          read from the http remote site.
* @field render_user       The user (together with a possible realm) for
*                          which the rendering was done.
* @field error_cause       The cause of the error if the status indicated
*                          a failure of the rendering.
* @field event_description This field provides more information about
*                          the logged event.
* @field clip_input        The input provided to render this clipping. It
*                          is usually provided in the form of an HTTP URL
*                          query string like abc=def.
* @field clip_output       The possible output (only if it's small) of
*                          rendering, if it gives any more hints on the
*                          billing process.
*/
type rec_render_event is record (
    clip_id           integer,
    clip_description  varchar2(1024),
    clip_title        varchar2(512),
    clip_timeout      integer,
    effective_url     varchar2(2048),
    render_status     integer,
    render_type       integer,
    render_start      date,
    render_end        date,
    fuzzy_used        integer,
    db_lookup         integer,
    http_latency      integer,
    render_user       varchar2(512),
    error_cause       varchar2(256),
    event_description varchar2(256),
    clip_input        varchar2(128),
    clip_output       varchar2(256));
The Cursor type that is used with this record type is WWWCP_API_REGISTRY.RENDER_EVENT_CURSOR. The following procedures within the WWWCP_API_REGISTRY have been defined to allow lookups on the render event log.
/**
 * This API looks up rows of render events from the wwwcp_render_log$
 * table, filtered by a specific clip id.
 *
 * The full rendering event information structure is returned as iterable
 * by the cursor returned.
 *
 * @param p_clip_id          The clip id as a filtering mechanism of the
 *                           events that were logged for this particular
 *                           clip.
 * @param p_cv_render_events The list of render events that are associated
 *                           with this clip.
 */
 procedure lookup_render_events(
     p_clip_id          in  integer,
     p_cv_render_events out render_event_cursor
 );

/**
 * This API looks up rows of render events from the wwwcp_render_log$
 * table, filtered by a specific effective url.
 *
 * This is useful for business queries that center on not the clip id but by
 * the actual location of where the clips are found. For example, if Yahoo's
 * partner, namely someone using Web Clippings, can do a search of all the
 * events that went to http://my.yahoo.com, it can find out how to charge
 * each user for what they have rendered.
 *
 * The full rendering event information structure is returned as iterable
 * by the cursor returned.
 *
 * @param p_effective_url    The effective url, starting with which points
 *                           to the web page containing the clip.
 * @param p_cv_render_events The list of render events that are associated
 *                           with this clip.
 */
 procedure lookup_render_events(
     p_effective_url    in  varchar2,
     p_cv_render_events out render_event_cursor
 );

/**
 * This API looks up rows of render events from the wwwcp_render_log$
 * table, filtered by the domain.
 *
 * This is useful for business queries that center on not the clip id but by
 * the domain of where the clips are found. For example, if Yahoo can do a
 * search of all the events that went to *.yahoo.com, it can find out how to
 * charge each user for what they have rendered.
 *
 * The full rendering event information structure is returned as iterable
 * by the cursor returned.
 *
 * @param p_effective_domain The domain of the effective url, starting with
 *                          which points to the web page containing the
 *                          clip. This domain is provided in the format
 *                          "oracle.com" or "yahoo.com".
 * @param p_cv_render_events The list of render events that are associated
 *                          with this clip.
 */
 procedure lookup_render_events(
     p_effective_domain in  varchar2,
     p_cv_render_events out render_event_cursor
 );

 /**
 * This API looks up rows of render events from the wwwcp_render_log$
 * table, filtered by the user that requested the render.
 *
 * This is useful for business queries that center on not the clip id but by
 * the user to visualize how much a user has rendered, regardless of where
 * the clipping is from, so it can charge for a flat fee based on for
 * example, the number of render events for a particular user.
 *
 * The full rendering event information structure is returned as iterable
 * by the cursor returned.
 *
 * @param p_render_user      The user on behalf of whom the render request
 *                           is made.
 * @param p_cv_render_events The list of render events that are associated
 *                           with this clip.
 */
 procedure lookup_render_events(
     p_render_user      in  varchar2,
     p_cv_render_events out render_event_cursor
);
It is also the responsibility of the Administrator to make sure that the logged events do not exceed the allotted database table space. Therefore the following procedures have been defined to allow removal of entries from the render event log.
/**
 * This API removes all render events from the wwwcp_render_log$ table.
 *
 * This is useful as a cleansing measure that an organization can do between
 * the different phases of rolling out their Web Clipping usage initiative.
 * It can be used to reset the stage before going into development testing
 * phase, or when the rollout is going live and the company wishes to begin
 * charging its subscribers for their usages, or another possible cleansing
 * may occur at for example, every month end or year end when the data
 * recorded is no longer useful.
 */
 procedure remove_all_render_events;

/**
 * This API removes all render events from the wwwcp_render_log$ table for
 * a given rendering user.
 *
 * This is useful as a cleansing measure that an organization can do for
 * example, labeling the development user to be some constant user id and
 * then removing all rendering events when it goes live.
 *
 * @param p_render_user The user on behalf of whom the render request is
 *                      made.
 */
 procedure remove_render_events(p_render_user in varchar2);

/**
 * This API removes all render events from the wwwcp_render_log$ table for
 * a given starting or stopping time before or after the query time.
 *
 * This is useful as a cleansing measure that an organization can do for
 * example, all rendering events that started or stopped before a certain
 * date are deemed development efforts and therefore should be disregarded.
 *
 * @param p_query_time   The date/time with which to query.
 * @param p_query_before Whether the query is for before or after. A value
 *                       of 1 signifies that the query is for comparing
 *                       times before the p_query_time while a 0 value.
 *                       implies comparing times after the p_query_time.
 * @param p_query_start  Whether or not the query is for start time.
 *                       A value of 1 means true while 0 means false.
 */
 procedure remove_render_events(
     p_query_time   in date,
     p_query_before in number,
     p_query_start  in number
 );
The OracleAS Wireless WML Translator reformats applications developed in WML for all wireless web-enabled devices. At runtime, content developed in WML is converted to OracleAS Wireless XML, which is then transformed into the appropriate device specific markup language.
Generally, source documents in WML 1.x (up to WML 1.3) are supported. Each source document is processed in the following order:
Table 13-1 shows a rough comparison between source elements in WML and translated elements in OracleAS Wireless XML.
The WML Translator does not support pass-through mode. Even if the end user's device supports WML, WML translator will still translate source WML into OracleAS Wireless XML format.
URLs are generally rewritten to point back to the Wireless and Voice Portal. However, URLs to images are not rewritten. Image adaptation is utilized in this release. For example, the following WML element
<img src="/images/yahooicon.wbmp" alt="Yahoo!"/>
is translated into
<SimpleImage src="http://wap.yahoo.com/images/yahooicon.wbmp" vspace="0"
hspace="0" valign="bottom" alt="Yahoo!" addImageExtension="auto"/>
This image is adapted and rendered based on end user's device model.
There are certain constraints in current release of WML Translator:
The WML Translator is deployed as an OracleAS Wireless application. It can be accessed via Commerce->Translator by end users like the previous version. However, the following three service input parameters are no longer supported:
ORACLE_SERVICES_COMMERCE_TRANSLATOR_DEFAULT_CONNECTION
ORACLE_SERVICES_COMMERCE_TRANSLATOR_HELPER_WML
ORACLE_SERVICES_COMMERCE_TRANSLATOR_XSL_WML_FILENAME
The following service input parameter is still supported:
ORACLE_SERVICES_COMMERCE_TRANSLATOR_SHOW_GOHOME
The following service input parameter is added to enhance navigation support:
ORACLE_SERVICES_TRANSCODER_NAVIGATION
If ORACLE_SERVICES_TRANSCODER_NAVIGATION has valid value, ORACLE_SERVICES_COMMERCE_TRANSLATOR_SHOW_GOHOME is ignored.
ORACLE_SERVICES_TRANSCODER_NAVIGATION should point to an XML file that can be accessed via either a URL or a file on server's local file system. The XML contains the navigation specification. The following is sample navigation XML:
<?xml version="1.0" encoding="UTF-8"?>
<Navigation>
<NavigationItems>
<Item target="%value home.url%"
label="Home"
showAs="Link"
preferredLocation="Header" />
<Item target="%value service.parent.url%"
label_prefix="Back"
showAs="Link" />
<Item target="http://www.oraclemobile.com"
label="OracleMobile"
showAs="Button"
preferredLocation="Footer" />
</NavigationItems>
</Navigation>
Each navigation item has the attributes described in Table 13-2.
Here is the schema for navigation XML:
<?xml version="1.0" encoding="UTF-8"?>
<xs:schema xmlns:xs="http://www.w3.org/2001/XMLSchema"
elementFormDefault="qualified" attributeFormDefault="unqualified">
<xs:element name="Navigation">
<xs:complexType>
<xs:all>
<xs:element ref="NavigationItems" minOccurs="0"/>
</xs:all>
</xs:complexType>
</xs:element>
<xs:element name="NavigationItems">
<xs:complexType>
<xs:sequence>
<xs:element ref="Item" minOccurs="0" maxOccurs="unbounded"/>
</xs:sequence>
</xs:complexType>
</xs:element>
<xs:element name="Item">
<xs:complexType>
<xs:attribute name="target" type="xs:string" use="required"/>
<xs:attribute name="label" type="xs:string" use="optional"/>
<xs:attribute name="label_prefix" type="xs:string" use="optional"/>
<xs:attribute name="label_suffix" type="xs:string" use="optional"/>
<xs:attribute name="showAs" type="xs:string" use="optional"/>
<xs:attribute name="preferredLocation" type="xs:string" use="optional"/>
</xs:complexType>
</xs:element>
</xs:schema>
The WML Translator is deployed as an OracleAS Wireless Application at URL omp://oracle/services/commerce/translator. The application can be invoked by passing WML source URL in request parameter XLTORSITE. For example, to invoke www.oraclemobile.com, you can use the following URL in your OracleAS Wireless XML
omp://oracle/services/commerce/translator?XLTORSITE=http%3A%2F%2Fwww.oraclemobil
e.com
|
|
 Copyright © 2003 Oracle Corporation. All Rights Reserved. |
|