10g (9.0.4)
Part Number B10271-01
Home |
Contents |
Index |
| Oracle Discoverer Administrator Tutorial 10g (9.0.4) Part Number B10271-01 |
|
It will probably take you about 20 minutes to complete this lesson.
In this lesson you will customize items in the business area.
As the Discoverer manager, your concern is not only what Discoverer Plus, Discoverer Desktop and Discoverer Viewer display to end users, but that data is presented in a way that makes the information more readable, and therefore easier to analyze. In this lesson you will learn how to hide items from end users, make changes to the axis structure, create lists of values and alternative sorts for them. You will also learn how to create derived items and aggregated calculations that are useful for queries and reports.
This lesson consists of the following exercises:
In this exercise you will hide items in the business area so that end users do not see them.
End users might not need to see all the items in a business area (e.g. primary and foreign keys). Also, sensitive information such as pay scale, time in service, and some items used in calculations might be inappropriate to display to end users. The items listed in the following table are essential to the business area as they are used in join conditions, but they are of no interest to the business user.
Hiding items does not delete them, they remain in the business area, but are not visible to the end user. However, deleted items are removed from the business area.
In general it is a good idea to hide all items that end users do not need to query. This reduces the length of the list of items presented to the end user, making it easier to find what they are looking for.
In the New Video Stores business area, typical items in a folder that would be hidden are shown in the following table:
| Folder | Item |
|---|---|
|
Product Information |
Product Key |
|
Time Information |
Time Key |
|
Store Information |
Store Key |
|
Sales Details |
Time Key |
|
Sales Details |
Product Key |
|
Sales Details |
Store Key |
To hide the key items from end users:
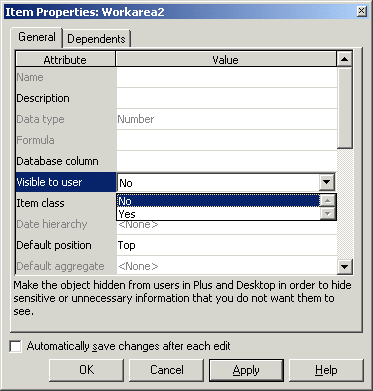
The Item Properties dialog displays the properties that each of the selected items have in common.
Note: Discoverer now displays items that are hidden from the user in grayed text.
In this exercise you hid items in the business area so that end users do not see them.
In this exercise you will set the default axis position of an item and learn how you can rearrange the display axes in Discoverer Plus.
A crosstab worksheet in Discoverer Plus can display data along three axes named top, side, and page (for more information, see the figure below). In Discoverer Administrator, you can specify the default axis for each item. Specifying a default axis does not prevent the end user from switching an item from one axis to another during data analysis.
To set the default position of an item to the side axis and rearrange the display axes:
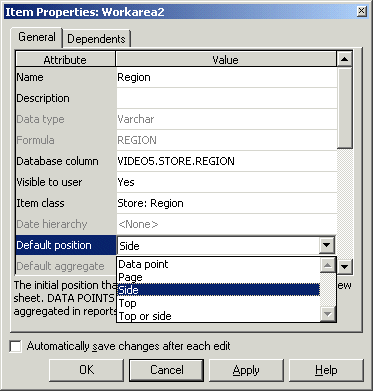
In Discoverer Plus, the end user can rearrange the axes to override the settings you create in Discoverer Administrator. The figure below shows the Workbook Wizard, Step 3, where the end user can rearrange the axes.
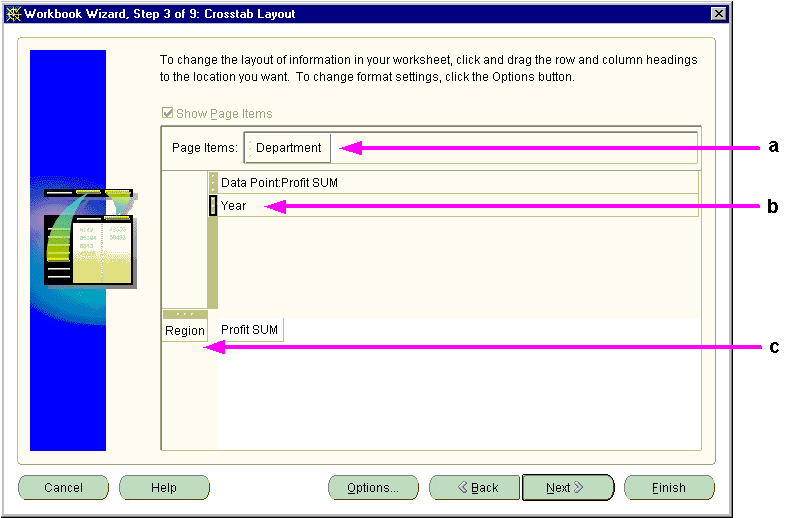
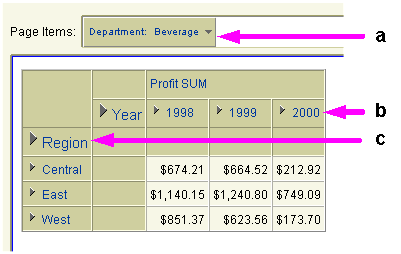
The above figures show how Discoverer Plus displays axes items in a Worksheet after they have been rearranged in the Worksheet Wizard.
Key to the above figures:
In this exercise you set the default axis position of an item and learned how to rearrange the display axes in Discoverer Plus.
In this exercise you will create a list of values that displays each department name in the New Video Stores business area.
You create lists of values by using an item class. Most of the item classes used in the tutorial were generated automatically when you loaded the EUL in "Lesson 2: Connecting to Discoverer Administrator, using the Load Wizard and the Workarea". However, you can create new item classes that contain lists of the unique data values represented by an item.
To create a list of values:
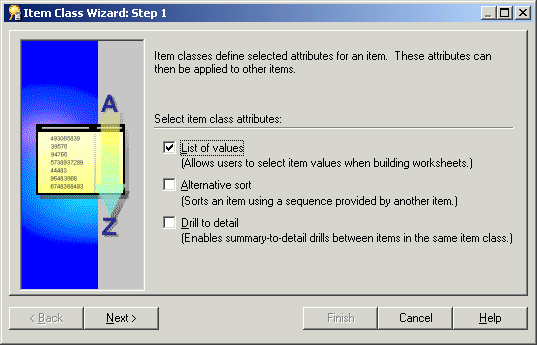
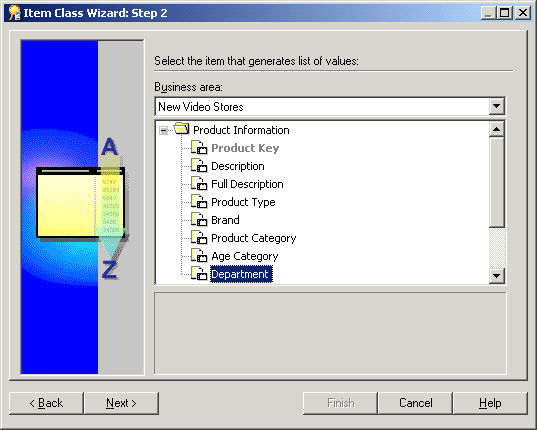
This is the source that Discoverer uses to create a list of values for the new item class.
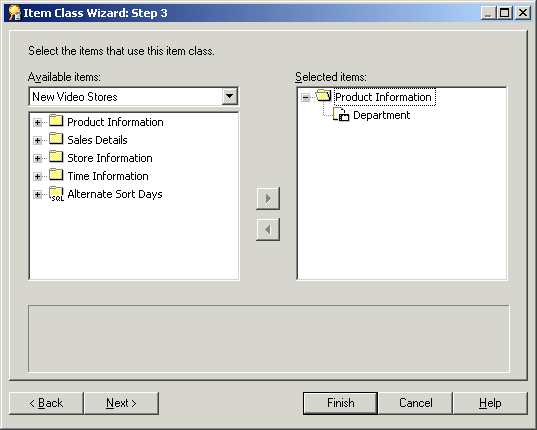
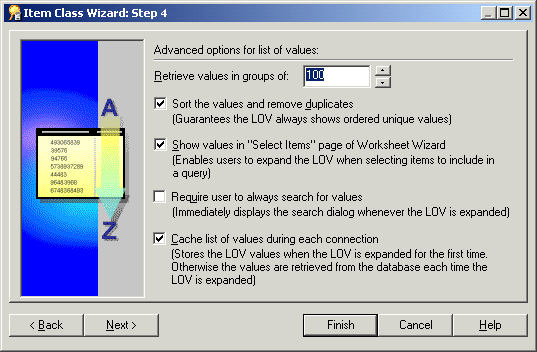
Departments in the Item class name field.
Video Store Sales and Rentals in the Item class description field.
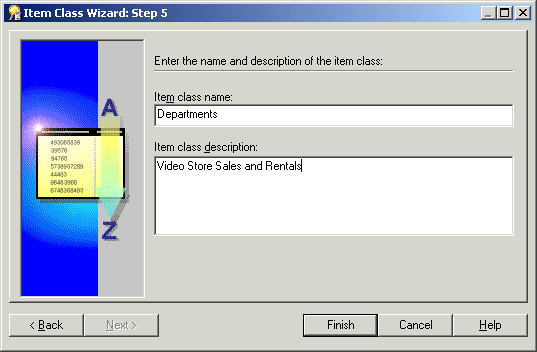
In this exercise you created a list of values that displays each department name in the New Video Stores business area.
In this exercise you will view the list of values (LOV) item class that you created in the previous exercise.
To view the list of values item class created in the previous exercise:
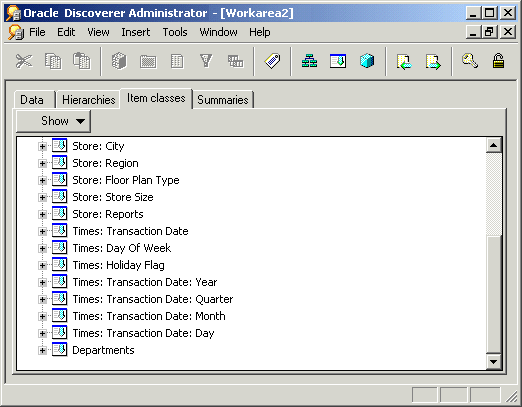
Note: To build a list of values, Discoverer Administrator reads every row of the relevant table from the database. If the table has a large number of rows, it can take a long time to build the list of values. Discoverer Administrator warns you of this and asks you if you want to continue.
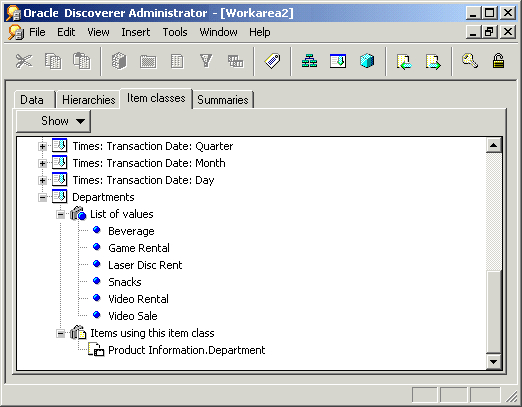
In this exercise you viewed the list of values (LOV) item class that you created in the previous exercise.
The Discoverer Plus user sees the list of values created in Discoverer Administrator, and can use this list of values to apply a condition.
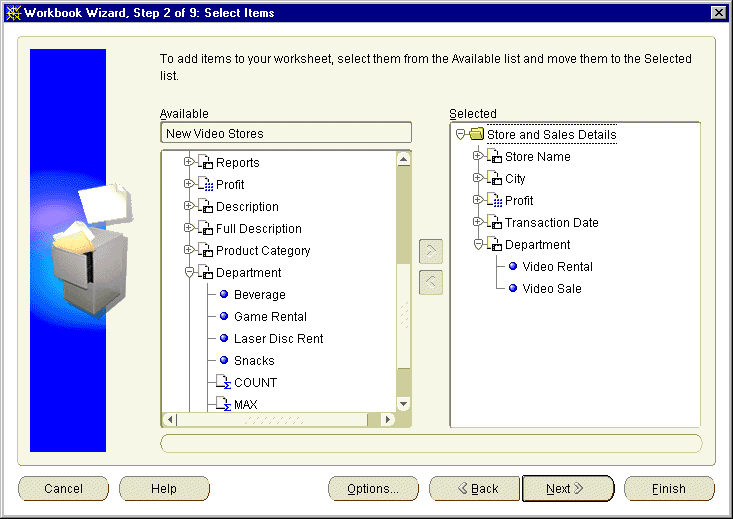
When you create a worksheet, the end user creates a condition by selecting the specific item values from the list of values in the Available list and moving them to the Selected list as shown above.
In this exercise you will create an alternative sort that enables end users to sort list of value items in a non-standard fashion.
A standard sort might be alphabetical, numerical or chronological, whereas a non-standard sort is arbitrary such as North=1, South=2, East=3, and West=4, or the days of the week beginning with Monday. In Discoverer an alternative sort orders a list of values by using a sequence provided by another item (does not apply to ODBC databases).
In this exercise you will create an alternative sort for the Days of the Week item in the Time Information folder. To achieve this you will create a new item class that defines an alternative sort and you will apply it to the Days of the Week item. The alternative sort that you will use is called Alternate Sort Days, this is the custom folder you created previously (for more information, see "Lesson 5: Working with custom folders").
Note: When creating or editing an 'alternative sort' item class, a one-to-one relationship must exist between the column (item) used for the list of values and the column (item) used for the sort order. The two items must be in the same folder for the alternative sort order to work.
To create an alternative sort:
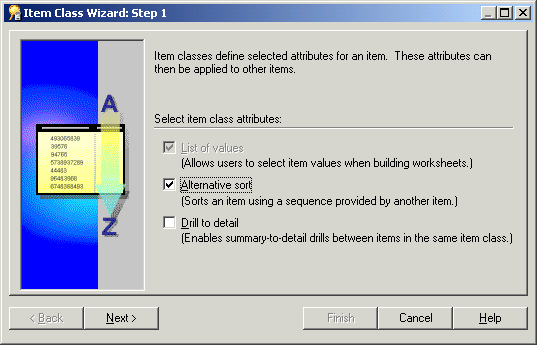
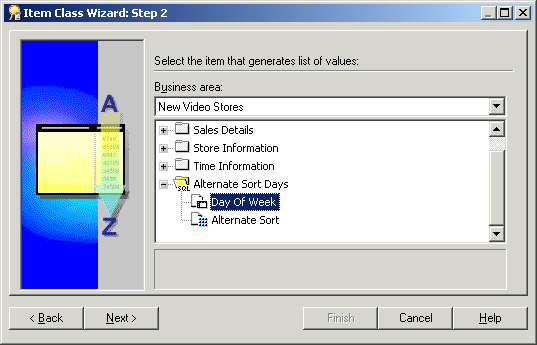
This is the item that will generate the list of values.
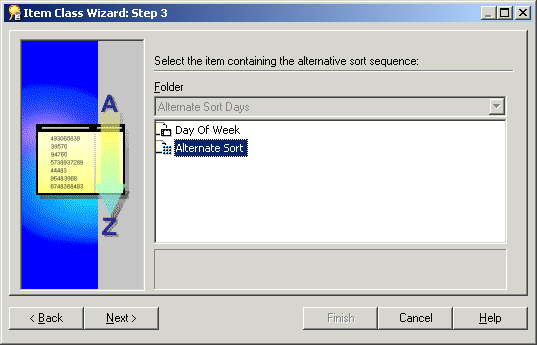
This is the item that contains the alternative sort sequence.
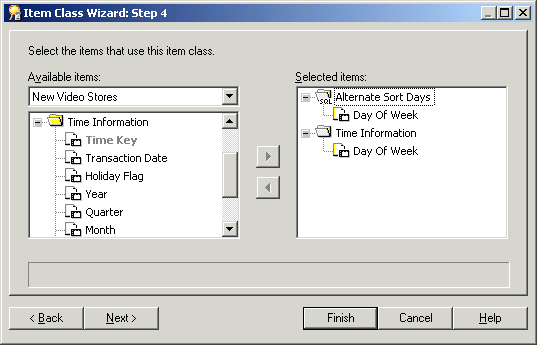
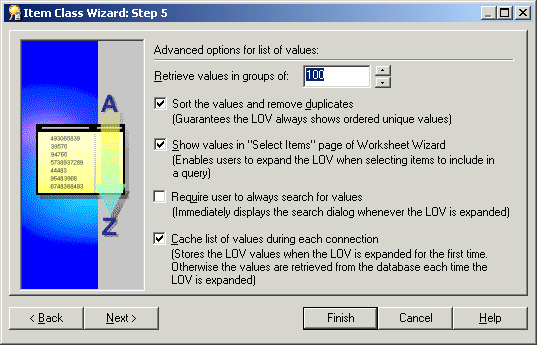
The Item Class Wizard: Step 4 dialog enables you to select one or more items that will use the alternative sort sequence. In this lesson you will choose an item from the Time Information folder.
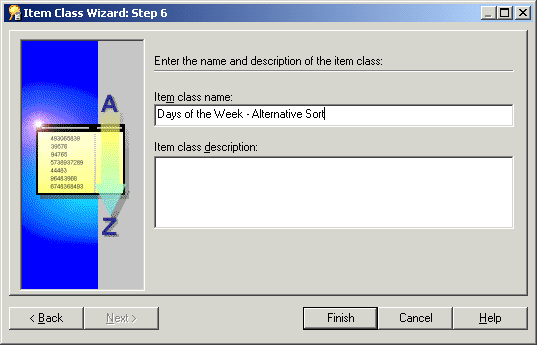
Days of the Week - Alternative Sort into the Item class name field.
In this exercise you created an alternative sort that enables end users to sort list of value items in a non-standard fashion.
In this exercise you will view the alternative sort you created in the previous exercise.
To display the newly created alternative sort in the Days of the Week item:
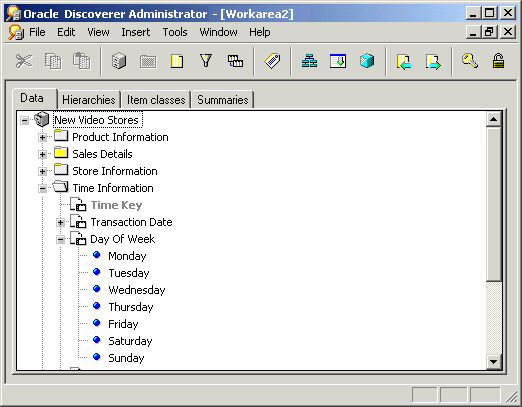
You can now see the days of the week can displayed in the sequence that is defined in the custom folder Alternate Sort Days.
Note: The reason you create a local list of values in the EUL is to improve performance in Discoverer Plus and Discoverer Viewer. Discoverer retrieves the values from the EUL and therefore does not need to read every row of the relevant table from the database. For more information, see Chapter 6, "Exercise 1: Creating a custom folder".
In this exercise you viewed the alternative sort you created in the previous exercise.
In this exercise you will create a new calculated item of profit as a percentage of sales.
Calculated items are often a critical element of a report. Typical business calculations include values such as:
You can improve the usefulness of a business area, by creating calculations that an end user is likely to require. Discoverer Administrator stores these calculations in the EUL for use in Discoverer Plus and Discoverer Viewer.
For more information about calculations, click Help.
How to create a new calculated item:
Note: You will create the new item in the Sales Details folder.
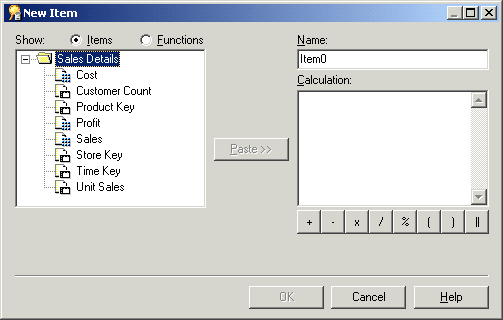
Percent Profit in the Name field.
SUM(Sales Details.Profit)/SUM(Sales Details.Sales)
Hint: You can type the calculation directly or you can use the following ways to minimize the amount of typing you need to do:
Note: Calculations must follow the Oracle calculation standard syntax. For a full description of the Oracle calculation syntax, see the Oracle9i SQL Language Reference Manual.
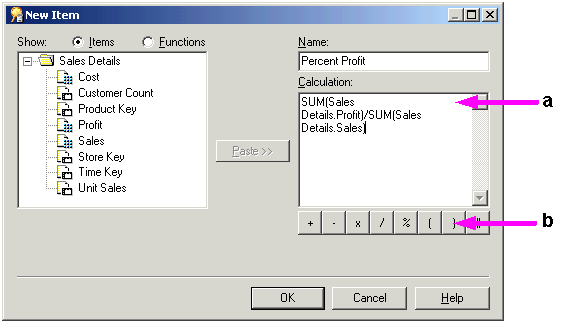
Key to the New Item dialog:
In this exercise you created a new calculated item of profit as a percentage of sales.
The Discoverer Plus user sees the calculated items created in Discoverer Administrato as shown in the following figures.
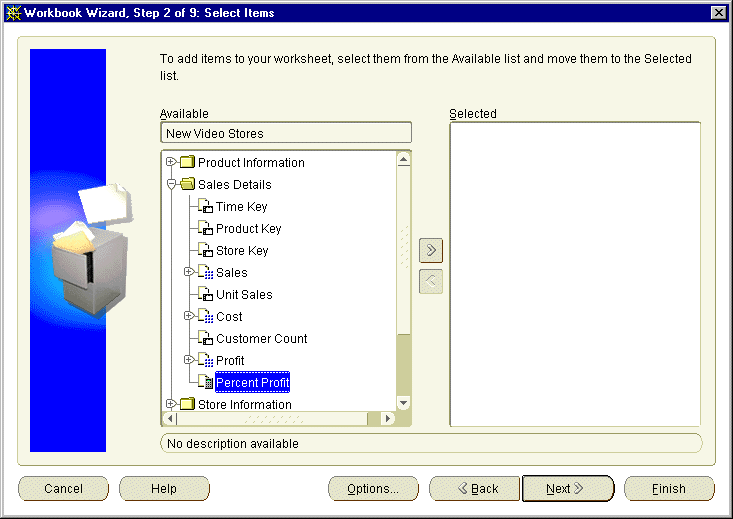
The above figure shows the calculated item Percent Profit, created in Discoverer Administrator, along with all the other items in the Sales Details folder.
The end user might use the Workbook Wizard to create a table style worksheet in Discoverer Plus using the New Video Stores business area by selecting the following items:
Discoverer will display the Percent Profit item (a calculated item, not a database column) with all the other items in the Sales Details folder.
When the end user runs the query, Discoverer displays Percent Profit in a Workbook.
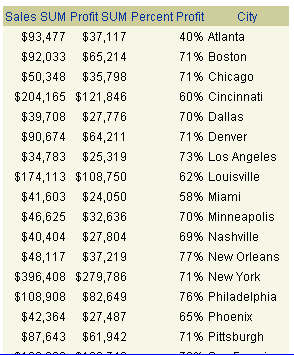
The above figure shows how including the Percent Profit calculated item in a Workbook causes Discoverer Plus to perform the calculation on each row and display the results in a column.
To control the display format of numbers for the Percent Profit item, the number format was set to the first option in the `Percent' category list in Discoverer Plus using the menu option Sheet | Format | Format Data | Number.
Look at the following examples of how to create some other kinds of calculated items:
For example: Sidney Sloan, 21 Great Jones Street Apt. 2B, New York City, New York 10012
For example: Business Analyst in Accounting Department, $50,000
Hint: NVL is a database function that can replace NULL with an alternative value, such as 0.
For example:
Calculation: SUM(Salary + NVL(Commission, 0))
Calculation: SUM(Commission)/SUM(Salary)
Calculation: SUM(unit_sales)/SUM(customer_count)
For more detailed information about creating calculations, click Help.
In this lesson you customized items in the business area and completed the following exercises:
In the next lesson you will create a complex folder that is made up of items from other folders in a business area.
|
|
 Copyright © 1996, 2003 Oracle Corporation. All Rights Reserved. |
|