|
Oracle® Business Intelligence Discoverer Plus User's Guide
10g Release 2 (10.1.2.0.0) Part No. B13915-01 |
|
 Previous |
 Next |
|
Oracle® Business Intelligence Discoverer Plus User's Guide
10g Release 2 (10.1.2.0.0) Part No. B13915-01 |
|
 Previous |
 Next |
You create single conditions when you want to filter worksheet data in a new way using a single condition statement. For example, to display data for the year 2001, you might create the condition 'Calendar year = 2001'.
To create a single condition:
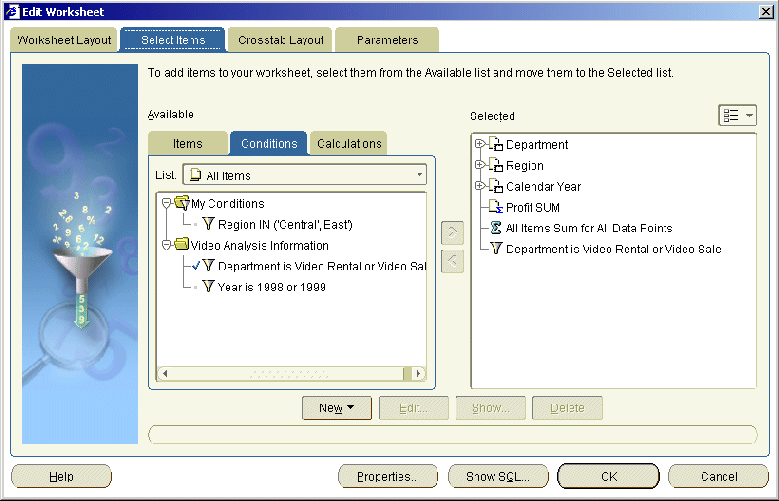
Choose Tools | Conditions to display the "Edit Worksheet dialog: Select Items tab: Conditions tab".

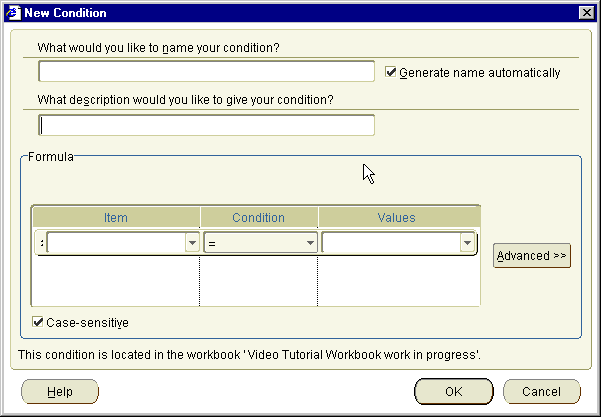
Click New and select New Condition from the drop down list to display the "New Condition dialog".

In the What would you like to name your condition field, specify a name for the condition.
Hint: If you want Discoverer to create a condition name for you from the conditions statements that you enter, select the Generate name automatically check box.
(Optional) Use the What description would you like to give your condition field to enter additional information about the condition.
For example, hints and tips about when to use the condition. This information is displayed to workbook users to help them select which conditions to use.
Use the Formula area to define the condition statements:
Use the Item drop down list to choose what item you want to filter the data on.
For example, you might choose Year to display data for a particular year.
Hint: The Item drop down list shows the items available in the worksheet that you can use in the condition. You can use items that are not currently displayed on the worksheet to filter the worksheet data.
Use the Condition drop down list to choose how to match data against the item.
For example, you might select '>' here to filter data where the value is greater than a certain number.
Use the Values field to define what data you want to match against.
For example, you might enter 2001 here to look only at data for the year 2001.
If a list of values is defined for the item, you can also select from items and values in the drop down list, which might contain items and values made available to you by the Discoverer manager. For more information, see "Using lists of values (LOVs)".
If you want to match upper and lower case text data exactly, select the Case sensitive check box.
Click OK to save the details and close the dialog.
The new condition appears in the Conditions dialog and is turned on.
Click OK to close the Conditions dialog and return to the worksheet.
Discoverer filters the worksheet to display only data that matches the condition. Data that does not match the condition is not displayed.
Notes
You can also create a new condition in the following ways:
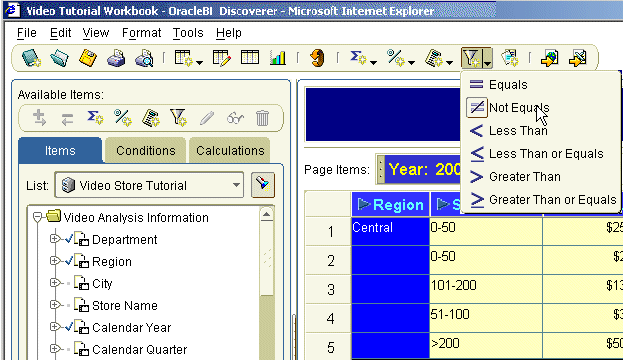
Select the worksheet item you want to filter, then select the New Condition option on the Standard toolbar and choose one of the condition operators available.

If the Available Items pane is displayed, the New Condition option on the Available Items toolbar (for more information, see "Available Items pane").
If the Available Items pane is displayed, right-click in the Conditions tab and select New Condition.
When entering values into the Values field, you can enter multiple values when the condition operator is one of the following types:
= (equals)
<> (not equals)
IN
NOT IN
For more information about what values you can enter in the Values field, see "Using lists of values (LOVs)".