Skip Headers

Oracle Reports Building Reports
10g (9.0.4)

Part Number B10602-01
Go To Documentation Library
Home
Go To Table Of Contents
Contents
Go To Index
Index

Go to previous page Go to next page

12
Building an Across Group Report

Figure 12-1 Across group report output

Text description of orbracross_fin.gif follows.

Text description of the illustration orbracross_fin.gif

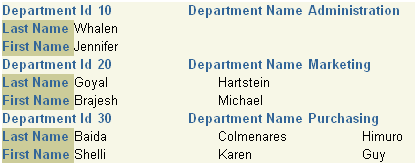
Reports Builder enables you to modify the look of your report in multiple ways. In this example, you will build an across group report that prints the values of a database column across the page instead of down.

Concepts

In across reports with breaks, the master (or break) group prints "top to bottom"; i.e., as it would in other master/detail reports. However, the values in the detail group print across the page, from left to right. When there are more values than will fit on a line, Oracle Reports wraps the line and prints the remaining values across the page on the next line.

For more information on break reports, refer to the Reports Builder online help (choose Index, then type "break report" in the box).

Data Relationships
Layout

Example Scenario

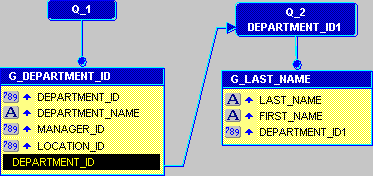
This example uses two queries that select all of the columns displayed. You'll link them to establish a master/detail relationship. Oracle Reports creates all other necessary data objects by default.

To see a sample across report with control breaks, open the examples folder called acrossbreak, then open the Oracle Reports example report named acrossbreak.rdf. For details on how to open it, see "Accessing the example reports" in the Preface.

Table 12-1 Features demonstrated in this example
Feature Location

Manually create a data model with two queries.

Section 12.2, "Create two queries"

Create the default layout using the Report Block Wizard.

Section 12.3, "Create the default layout"

Run your report to paper.

Section 12.4, "Run your report to paper"

12.1 Prerequisites for this example

To build the example in this chapter, you must have access to the sample schema provided with the Oracle9i database. If you don't know if you have access to this sample schema, contact your database administrator. You should have access to the "Human Resources" portion of the schema to complete this example.

12.2 Create two queries

When you create a report, you can either use the Report Wizard to assist you or create the report yourself. In this example, you will use the Data Model view to create your two queries, then use the tool palette to create a data link between the two queries to relate the data tables.

To create two queries:

  1. Launch Reports Builder (or, if already open, choose File > New > Report)

  2. In the Welcome or New Report dialog box, select Build a new report manually, then click OK.

  3. In the Data Model view that displays, click the SQL Query tool in the tool palette.

  4. In the SQL Query Statement box, type the following code:

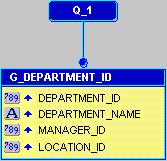
    SELECT ALL DEPARTMENTS.DEPARTMENT_ID, DEPARTMENTS.DEPARTMENT_NAME, 
    DEPARTMENTS.MANAGER_ID, DEPARTMENTS.LOCATION_ID
    FROM DEPARTMENTS 


Note:

You can enter this query in any of the following ways:

  • Copy and paste the code from the provided text file called acrossbreak_code.txt into the SQL Query Statement field.

  • Click Query Builder to build the query without entering any code manually.

  • Type the code in the SQL Query Statement field.


  1. Click OK.

    The data model for your new query displays:

Figure 12-2 Data Model for Query 1

Text description of orbracross_dm.gif follows.

Text description of the illustration orbracross_dm.gif

  1. Create another query, this time using the following code:

    SELECT ALL EMPLOYEES.LAST_NAME, EMPLOYEES.FIRST_NAME, EMPLOYEES.DEPARTMENT_
    ID
    FROM EMPLOYEES 
    ORDER BY EMPLOYEES.LAST_NAME


    Note:

    You can also copy and paste the code from the text file provided in the acrossbreak folder, called acrossbreak_code.txt.


  1. Click OK.

  2. In the Data Model view, click the Data Link tool in the tool palette.

  3. Click and drag your mouse from DEPARTMENT_ID column in Q_1, to DEPARTMENT_ID1 in Q_2 to create a data link between the two queries.

    Your data model should now look like this:

Figure 12-3 Data Model of the two linked queries

Text description of orbracross_dmlink.gif follows.

Text description of the illustration orbracross_dmlink.gif


Note:

You can right-click the data link, then choose Property Inspector from the pop-up menu to ensure that the data link was created properly.


12.3 Create the default layout

The steps in this section show you how to use the Report Block Wizard to create the layout and choose how your data will display in your report. Here, you will choose the style of report you want to create, and choose to display the data across the report (hence creating the across group report).

To create the default layout:

  1. In the Object Navigator, double-click the Paper Layout node to display the Paper Layout view.

  2. In the Paper Layout view, choose Insert > Report Block to display the Report Block Wizard.

  3. In the Report Block Wizard, on the Style page, select Group Above, then click Next.

  4. On the Groups page:

    • Click G_LAST_NAME in the Available Groups list, then click Across to specify the Print Direction and move this field to the Displayed Groups list.

    • Click G_DEPARTMENT_ID, then click Down.

    • Click Next.

  5. On the Fields page, click the right arrow (>) to move the following fields from the Available Fields list to the Displayed Fields list, then click Next:

    • DEPARTMENT_ID

    • DEPARTMENT_NAME

    • LAST_NAME

    • FIRST_NAME

  6. On the Labels page, click Next.

  7. On the Template page, make sure Beige is selected under Predefined Template, then click Finish to display your report output in the Paper Design view. It should look like this:

Figure 12-4 Paper Layout view for the across group report

Text description of orbracross_lay.gif follows.

Text description of the illustration orbracross_lay.gif

12.4 Run your report to paper

In this section, you will run your report to the Paper Design view so you can see how your report displays.

Figure 12-5 Paper Design View of the Across Group Report

Text description of orbracross_fin.gif follows.

Text description of the illustration orbracross_fin.gif

Save your report as acrossbreak_<your initials>.rdf.

12.5 Summary

Congratulations! You have successfully created a across group paper report. You now know how to:

For more information on any of the wizards, views, or properties used in this example, refer to the Reports Builder online help, which you can access in two ways:


Go to previous page Go to next page
Oracle
Copyright © 2002, 2003 Oracle Corporation.

All Rights Reserved.
Go To Documentation Library
Home
Go To Table Of Contents
Contents
Go To Index
Index