2
Adding Data to a Report
Estimated completion time: 15 minutes
Suppose you need to create a Web report that displays salary information about each employee in a department for your company's human resources managers. You already have an HTML page that match the company's logo and colors, and just want to add the necessary information.
This chapter shows you how to use the Data Wizard in Reports Builder to add data to an existing HTML page. At the end of the chapter, you will have created a data model to make data available for use in a Web report.
Figure 2-1 Adding Data to an HTML Page
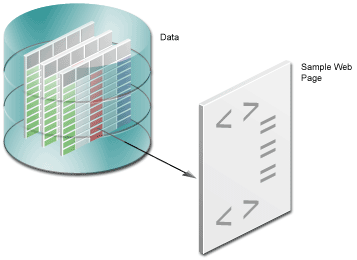
Text description of the illustration adddata_xg.gif
2.1 Open the Web page
The steps in this section show you how to open the Web page template we've provided, called emprev.htm. First, you will open the Web page in your Web browser so you can see what our template looks like.
Note:
If you do not have this file, refer to the "Prerequisites" section, in the Welcome chapter.
|
To open the sample HTML page in your Web browser:
- In your Web browser (e.g., Netscape or Internet Explorer), choose File > Open, then navigate to the sample file we've provided, called
emprev.htm.
To open an existing HTML page in Reports Builder:
- Launch Reports Builder.
Note:
If you are using UNIX, navigate to the directory where Reports Builder is installed, then execute runbuilder.sh.
|
- In the Welcome dialog box, click Open an existing report, then click OK.
- In the Open dialog box, navigate to the folder where the tutorial sample files are located, such as
d:\Reports_Tutorial.
- Find the file
emprev.htm, then click Open.
The Object Navigator now displays the emprev report.
Figure 2-2 Object Navigator displaying an existing HTML page
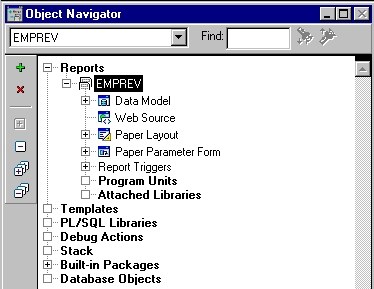
Text description of the illustration adddata_on.gif
2.2 Use the Data Wizard to add data to a sample Web page
When you build a report, you must first build a data model by selecting the data that you want to use in the report.
The steps in this section show you how to use the Data Wizard to build a data model for your Web report. The data model you create makes the data from the sample schema available for you to use in your report.
To add data to an existing HTML page:
- Open the Data Wizard to define a layout and add a data model.
- In the Object Navigator, double-click the Data Model node.
- In the Data Model view, right-click the canvas, then choose Data Wizard from the pop-up menu.
- If the Welcome page displays, click Next.
- On the Query name page, click Next to accept the default name.
- On the Data Source page, make sure SQL Query is selected, then click Next.
Note:
On the Data Source page, notice the other options (Oracle9i, XML, JDBC, etc.). On this page, you can choose any data source you wish to use in your report. For more information about using pluggable data source, see the Reports Builder online help or Getting Started with Oracle Reports.
|
- On the Data page, you can do either of the following:
- Open tutorial_sql.txt in a text editor, copy the query, and paste it into the SQL Statement box). Then, proceed to Step 16, OR:
- To learn how to use the Query Builder, follow steps 6 through 15.
- To use the Query Builder, click Query Builder.
Note:
If you are not connected to a database, the Connect dialog box displays. In the Connect dialog box, type the user name and password for your database. Please note that this tutorial uses the Human Resources schema. If you are using the default login, you can use the connection string: hr/hr@<databasename>.
If you do not know the connection information for the database that contains the sample schema we have provided, contact your administrator.
|
- In the Query Builder, double-click the EMPLOYEES table.
- Double-click the EMPLOYEES table again, then click Close.
Figure 2-3 Employees Tables displaying in the Query Builder
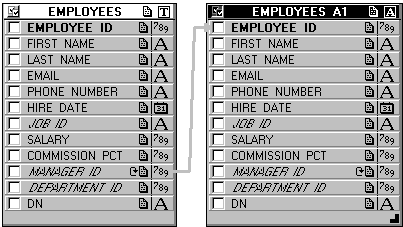
Text description of the illustration adddata_qb.gif
The EMPLOYEES table displays in the Query Builder as EMPLOYEES and EMPLOYEES A1. The link between the MANAGER ID in EMPLOYEES and the EMPLOYEE ID in EMPLOYEES A1 is automatically created because of the constraints that exist in the EMPLOYEES table.
Note:
You'll notice that some of the column names are bold, and some are italicized. Column names that are in bold are primary keys and column names that are in italics are foreign keys.
|
In the EMPLOYEES table, select the check boxes for the following fields (note that you must select the fields in the following order):
- EMPLOYEE_ID
- FIRST_NAME
- LAST_NAME
- HIRE_DATE
- JOB_ID
- SALARY
- DEPARTMENT_ID
In the EMPLOYEES A1 table, select the check boxes for the following fields:
- EMPLOYEE_ID
- FIRST_NAME
- LAST_NAME
Click OK.
The query generated for you by Query Builder now displays in the SQL Query Statement text box, and should look like the following:
SELECT ALL EMPLOYEES.EMPLOYEE_ID
  , EMPLOYEES.FIRST_NAME,EMPLOYEES.LAST_NAME
  , EMPLOYEES.HIRE_DATE
  , EMPLOYEES.SALARY
  , EMPLOYEES.DEPARTMENT_ID
  , EMPLOYEES_A1.EMPLOYEE_ID
  , EMPLOYEES_A1.JOB_ID
  , EMPLOYEES_A1.FIRST_NAME, EMPLOYEES_A1.LAST_NAME
FROM EMPLOYEES, EMPLOYEES EMPLOYEES_A1
WHERE (EMPLOYEES.MANAGER_ID = EMPLOYEES_A1.EMPLOYEE_ID)
To restrict the retrieved data to just the employees in Department 100, add an AND clause, so that your query looks like this (new code is in bold text):
SELECT ALL EMPLOYEES.EMPLOYEE_ID
  , EMPLOYEES.FIRST_NAME,EMPLOYEES.LAST_NAME
  , EMPLOYEES.HIRE_DATE
  , EMPLOYEES.SALARY
  , EMPLOYEES.DEPARTMENT_ID
  , EMPLOYEES_A1.EMPLOYEE_ID
  , EMPLOYEES_A1.JOB_ID
  , EMPLOYEES_A1.FIRST_NAME, EMPLOYEES_A1.LAST_NAME
FROM EMPLOYEES, EMPLOYEES EMPLOYEES_A1
WHERE (EMPLOYEES.MANAGER_ID = EMPLOYEES_A1.EMPLOYEE_ID)
AND EMPLOYEES.DEPARTMENT_ID=100
Let's make the report look more organized by displaying the employee names with their last names first.
Concatenate the EMPLOYEES.FIRST_NAME and EMPLOYEES.LAST_NAME fields into one alias called emp_name.
The line of the query should now look like this:
, EMPLOYEES.LAST_NAME ||', '|| EMPLOYEES.FIRST_NAME emp_name
- Concatenate the EMPLOYEES_A1.FIRST_NAME and EMPLOYEES_A1.LAST_NAME fields into one alias called
mgr_name.
The line of the query should now look like this:
, EMPLOYEES_A1.LAST_NAME ||', '|| EMPLOYEES_A1.FIRST_NAME mgr_name
- Verify that your query is correct. The entire query should now look like this:
SELECT ALL EMPLOYEES.EMPLOYEE_ID,
EMPLOYEES.LAST_NAME||','|| EMPLOYEES.FIRST_NAME emp_name,
EMPLOYEES.HIRE_DATE, EMPLOYEES.JOB_ID, EMPLOYEES.SALARY,
EMPLOYEES.DEPARTMENT_ID, EMPLOYEES_A1.EMPLOYEE_ID,
EMPLOYEES_A1.LAST_NAME||','|| EMPLOYEES_A1.FIRST_NAME mgr_name
FROM EMPLOYEES, EMPLOYEES EMPLOYEES_A1
WHERE (EMPLOYEES.MANAGER_ID = EMPLOYEES_A1.EMPLOYEE_ID)
AND EMPLOYEES.DEPARTMENT_ID = 100
Note:
If you're not sure whether your query is correct, open the file tutorial_sql.txt from the example files we provided to you
|
- Click Next.
- Now that we've selected the raw data, let's organize it into groups by department manager name.
On the Groups page, in the left column, click the MGR_NAME field, click the right arrow to move the field to the Group Fields list, then click Next.
- Now, let's calculate some of our data. The Totals page displays some of the commonly-used calculations.
On the Totals page, in the left column, click SALARY, then click Sum to display the sum of the Salary column in the Totals list.
- Click Finish.
Figure 2-4 Data Model view for the report
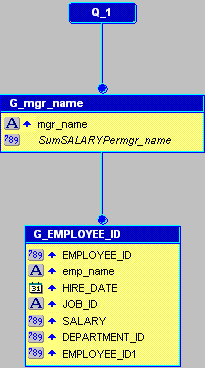
Text description of the illustration adddata_dm.gif
Note:
A Reports-level summary displays in the upper left-hand section of the Data Model view, but is not displayed in this image.
|
2.3 Save your report as a JSP file
In Reports Builder, you can save your report using several formats. Since we're creating a JSP-based Web report, we will save our report as a JSP (JavaServer Page).
To save your report as a JSP:
- With your report selected in the Object Navigator, choose File > Save As.
- In the Save dialog box, change the report name to
emprev_<your initials>, and change the type to Reports JSP (.jsp), then click Save.
Note:
Be sure to include your initials so you do not overwrite the files we've provided. This saves the report as a JavaServer Page (JSP). Since JSP is the primary technology Reports Builder uses to publish reports to the Web, saving your report as a JSP prepares your report for the later chapters in the tutorial.
|
- Choose File > Close.
2.4 Summary
Congratulations! You have now created a data model that will allow you to include a report on your Web page. You now know how to:
- Open an existing Web page (HTML file) in Reports Builder
- Use the Data Wizard to specify data for a report
- Use the Query Builder to select data
- Save your report as a JavaServer Page (JSP)
To review your work, continue to Chapter 3, "Reviewing the Source Code of the Web Report". Otherwise, skip to Chapter 4, "Creating a Report Block for the Web Report" to continue building your report.
For more information on using the Report Wizard, columns, groups, and fields, see the Reports Builder online help. You can also find more information about why JavaServer Pages are useful by visiting Getting Started with Oracle Reports on the Oracle Technology Network (http://otn.oracle.com/products/reports/).
