Skip Headers

Oracle Reports Tutorial
10g (9.0.4)

Part Number B10612-01
Go To Documentation Library
Home
Go To Table Of Contents
Contents
Go To Index
Index

Go to previous page Go to next page

4
Creating a Report Block for the Web Report

Estimated completion time: 15 minutes

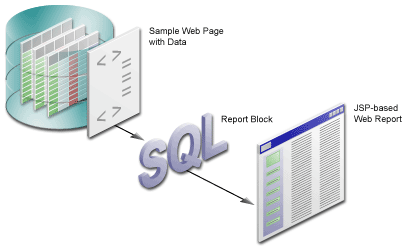
Now that you've created your data set, you want to format the data into your report to provide managers in your company with current information about their employees. To do so, you can create a report block and add it to your report. This report block will dynamically pull in the data using the query you specified in Chapter 1 every time you run the report, and format the data in your report.

The steps in this chapter will show you how to add a report block to your Web page.

Figure 4-1 Creating a Report Block for your JSP-based Web Report

Text description of repblk_xg.gif follows.

Text description of the illustration repblk_xg.gif

4.1 Add a report block to your Web page

If you completed Chapter 3, "Reviewing the Source Code of the Web Report", you should already have the source open in Reports Builder, and you can skip Step 1. The steps in this section show you how to use the Report Wizard to format the data you specified in Chapter 1, and dynamically pull in the data into your report.

To add a report block:

  1. Make sure your report (emprev_<your initials>.jsp) is open in Reports Builder.


    Note:

    If you did not create emprev_<your initials> in Chapter 1, simply open the Web page we've provided, named emprev.jsp.


  2. In the Object Navigator, double-click the Web Source node under emprev_<your initials>.

  3. In the Web Source view, choose Edit > Find and Replace to find and delete the following text (note that this text is in two different places that state "Replace"):

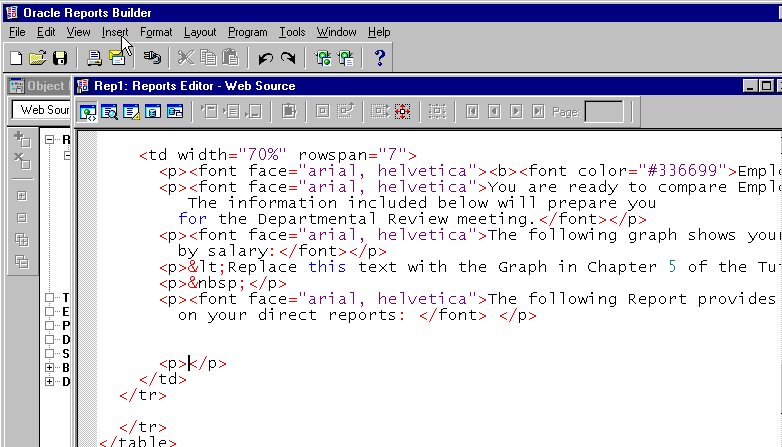
    Replace this text with the Report block in Chapter 4 of the tutorial.
    
  4. Make sure your cursor is in the location where you deleted the text, and choose Insert > Report Block to display the Report Wizard.

Figure 4-2 Inserting the Report Block into your Web Source

Text description of repblk_add.gif follows.

Text description of the illustration repblk_add.gif

  1. On the first page of the wizard, title your report "My Team's Salaries" and select the Group Above radio button, then click Next.

  2. Let's format the data so that the employee names list in a downward column.

    On the Groups page, click G_EMPLOYEE_ID, then click Down to move the group to the Displayed Groups list.


    Note:

    If you did not select the fields in the correct order in Section 2.2, "Use the Data Wizard to add data to a sample Web page", you may not see this group. If this is the case, copy the SQL text from tutorial_sql.txt into the Query Statement box.


  3. Click Next.

  4. On the Fields page, click the double arrows (>>) to move all Available Fields to the Displayed Fields list.

  5. In the Displayed Fields list, click EMPLOYEE_ID1, then click the left arrow (<) to move the field back to the Available Fields list, then click Next.

  6. On the Labels page, click Next.

  7. Make sure the Predefined Templates radio button is selected on the Templates page.

  8. Make sure the Beige template is selected, then click Finish.

    The Report Wizard has now generated the HTML with custom JSP tags to display your formatted data on the Web page.

  9. Choose File > Save As.

  10. In the Save dialog box, change the name to empreva_<your initials>.jsp and click Save.

  11. Click the Run Web Layout icon in the toolbar to run and view your report in your Web browser. Your report should look something like this:


    Note:

    If Netscape 7.0 is your default browser, the browser may not display. You can work around this bug by making a copy of the Netscape 7.0 executable, naming it netscape.exe; with this name, the browser will display as expected.


Figure 4-3 JSP-based Web Report with Report Block

Text description of repblk_fin.gif follows.

Text description of the illustration repblk_fin.gif


Note:

You can also run the empreva.jsp file we've provided by opening the JSP in Reports Builder, and running it to the Web.


4.2 Summary

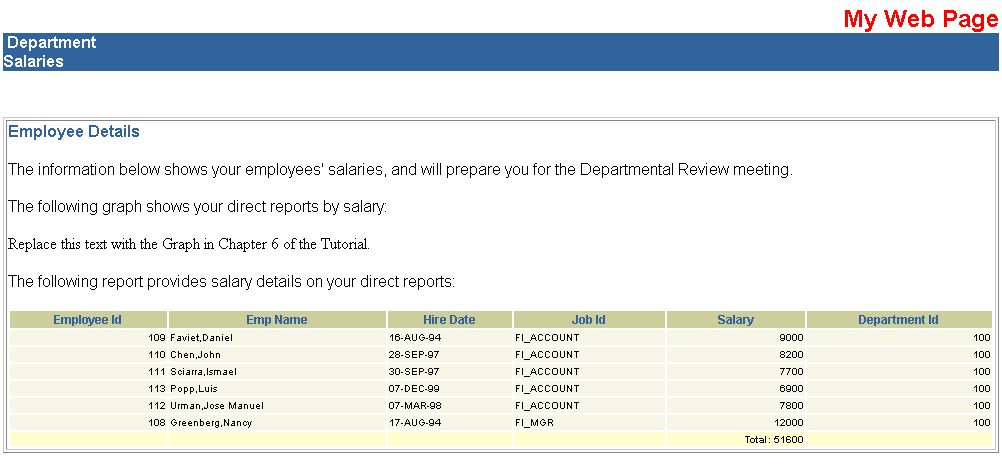
Congratulations! You have added a report block to a Web report. You now know how to:

To review your results, continue on to Chapter 5, "Reviewing the Source Code for the Report Block". Otherwise, skip to Chapter 6, "Creating a Graph for the Web Report" to add a graph to your report.


Go to previous page Go to next page
Oracle
Copyright © 2002, 2003 Oracle Corporation.

All Rights Reserved.
Go To Documentation Library
Home
Go To Table Of Contents
Contents
Go To Index
Index