| Oracle® SOA Suite Tutorial Release 3 (10.1.3.1.0) Part Number B28937-01 |
|
|
View PDF |
| Oracle® SOA Suite Tutorial Release 3 (10.1.3.1.0) Part Number B28937-01 |
|
|
View PDF |
This chapter describes how to create the SelectManufacturer project. It contains these sections:
Section 7.2, "Create a New BPEL Project for SelectManufacturer"
Section 7.4, "Define Variables for the SelectManufacturer Project"
Section 7.5, "Receive Order Data from the Client through a Receive Activity"
Section 7.7, "Return Values to the Client Using an Invoke Activity"
The SelectManufacturer project represents a supplier called Select Manufacturer. When a customer places an order, the order is sent to two suppliers, Select Manufacturer and Rapid Distributors, to get quote requests from both suppliers. The supplier that responds with the lower quote gets to fulfill the customer's order.
The SelectManufacturer project is an asynchronous BPEL process. This means that it contains a receive activity to initiate the BPEL process flow and an invoke activity to call back the client asynchronously with the results (that is, the quote) at the end of the flow.
Right-click the SOADEMO application in the Application Navigator and select New Project to display the New Gallery.
In the New Gallery, under Categories, expand General and select Projects. Under Items, select BPEL Process Project.
Figure 7-1 New Gallery for SelectManufacturer Project
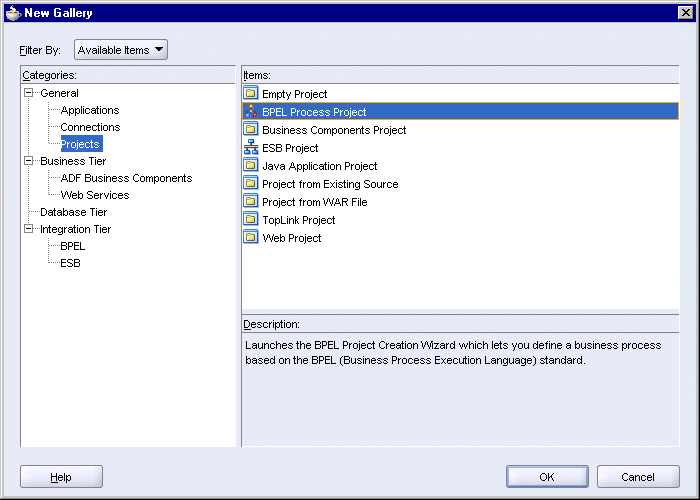
Click OK. This displays the BPEL Project Creation wizard.
On the Project Settings page of the BPEL Project Creation wizard:
Name: enter SelectManufacturer.
Namespace: enter http://www.globalcompany.com/ns/selectservice.
Use Default Project Settings: select this option.
Template: select Empty BPEL Process.
Figure 7-2 BPEL Project Creation Wizard - Project Settings Page
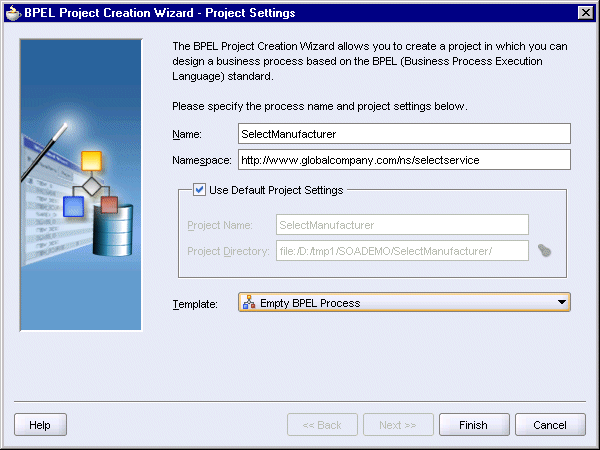
Click Finish.
Copy the SelectManufacturer\bpel\SelectManufacturer.wsdl file from the soademo_101310_prod.zip file to the SOADEMO\SelectManufacturer\bpel directory.
Select View > Component Palette to display the Component Palette. You need the Component Palette to drag and drop BPEL activities and services onto the SelectManufacturer BPEL flow you are about to create.
Select Services from the dropdown in the Component Palette.
Drag the Partner Link icon from the Component Palette and drop it on a Services swimlane. You can drop it on either the left side or the right side.
In the Partner Link dialog:
Name: enter SelectService.
WSDL: click the Service Explorer icon (the second one from the left) to display the Service Explorer dialog. In the Service Explorer dialog, expand Project WSDL Files and select SelectManufacturer.wsdl.
Figure 7-3 Service Explorer Dialog for SelectService
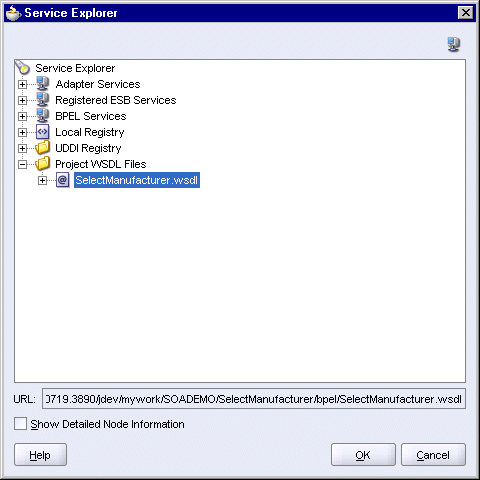
Click OK in the Service Explorer dialog.
Partner Link Type: select SelectService_PL (automatically filled in for you).
Partner Role: select SelectServiceRequester.
My Role: select SelectServiceProvider.
Figure 7-4 Create Partner Link Dialog for SelectService
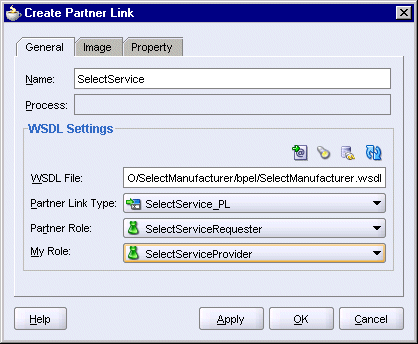
Click OK in the Create Partner Link dialog.
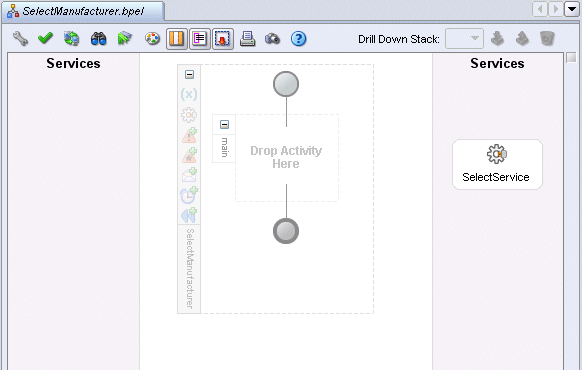
At this point, the SelectManufacturer.bpel page should look like this:
Figure 7-5 SelectManufacturer.bpel Page in JDeveloper
In this step, you create two variables called inputVariable and outputVariable for the SelectManufacturer project. Variables defined at the project level can be accessed by all activities in the project.
Double-click the SelectManufacturer scope to display the Process dialog. You can double-click the "SelectManufacturer" text that is displayed sideways.
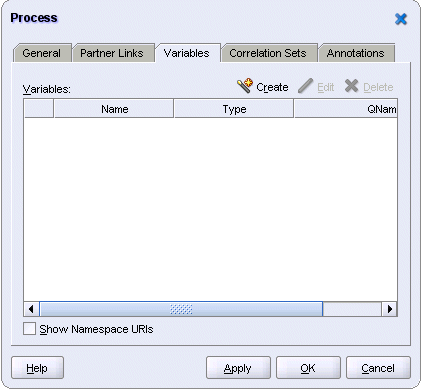
In the Process dialog, click the Variables tab.
Figure 7-6 Process Dialog, Variables Tab, for SelectManufacturer
Create a variable called inputVariable.
Click Create to display the Create Variable dialog.
In the Create Variable dialog, set these values:
Name: enter inputVariable.
Type: select Message Type, and click the flashlight icon. This displays the Type Chooser dialog.
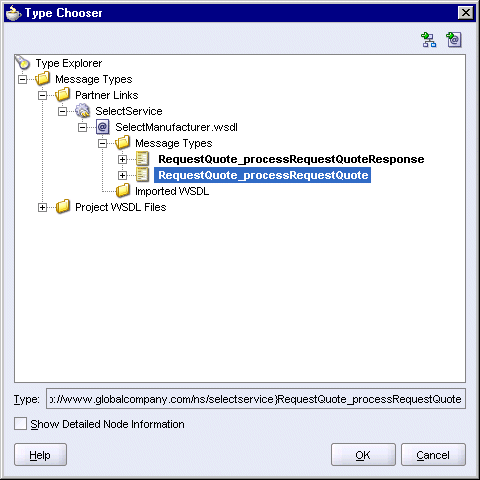
In the Type Chooser, select Type Explorer > Message Types > Partner Links > SelectService > SelectManufacture.wsdl > Message Types > RequestQuote_processRequestQuote.
Figure 7-7 Type Chooser for inputVariable
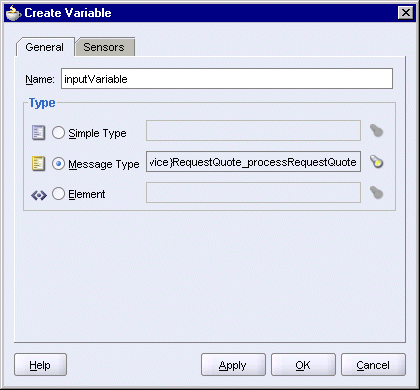
Click OK in the Type Chooser. The Create Variable dialog now looks like this:
Figure 7-8 Create Variable Dialog for inputVariable
Click OK in the Create Variable dialog. This returns you to the Process dialog. You should see the inputVariable in the dialog.
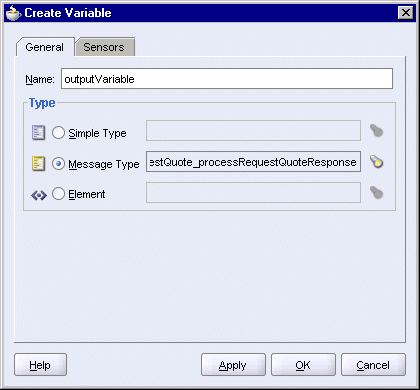
Create a second variable called outputVariable.
Click Create to display the Create Variable dialog.
In the Create Variable dialog, set these values:
Name: enter outputVariable.
Type: select Message Type, and click the flashlight icon. This displays the Type Chooser dialog.
In the Type Chooser, select Type Explorer > Message Types > Partner Links > SelectService > SelectManufacture.wsdl > Message Types > RequestQuote_processRequestQuoteResponse.
Figure 7-9 Type Chooser for outputVariable

Click OK in the Type Chooser. The Create Variable dialog now looks like this:
Figure 7-10 Create Variable Dialog for outputVariable
Click OK in the Create Variable dialog.
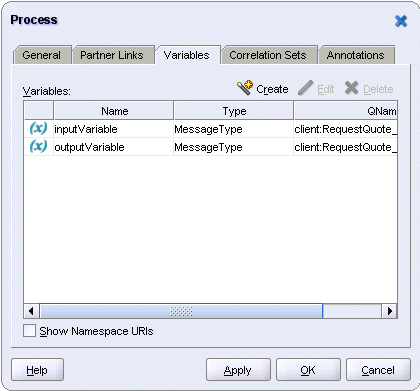
In the Process dialog, you should see the two variables:
Figure 7-11 Process Dialog Showing inputVariable and outputVariable
Click OK in the Process dialog.
Select File > Save to save your work.
Create a receive activity as the starting point for this BPEL process. The receive activity receives requests from clients (in this case, the client is the SOAOrderBooking project, which is another BPEL process), and the requests can contain parameters.
Select Process Activities from the dropdown in the Component Palette.
Drag the Receive activity icon from the Component Palette and drop it in the "Drop Activity Here" box on the page.
Drag an arrow from the newly created receive activity and drop it on the SelectService partner link. As you drag, you should see a line connecting the receive activity with partner link. When you release, JDeveloper displays the Receive dialog.
In the Receive dialog:
Name: enter Receive_1.
Partner Link: should be set to SelectService. This should be filled in automatically for you.
Operation: should be set to processRequestQuote. This should be filled in automatically for you.
Variable: click the Browse Variables icon (the icon on the right) to display the Variable Chooser dialog. Select inputVariable.
Click OK in the Variable Chooser.
Create Instance: select this option.
The Receive dialog now looks like this:
Click OK in the Receive dialog.
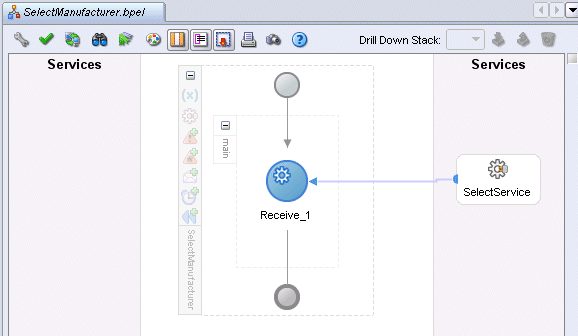
The SelectManufacturer.bpel page now contains a link from the SelectService partner link to the receive activity.
Figure 7-14 SelectManufacturer.bpel Showing Link from SelectService Partner Link to the Receive Activity
Select File > Save to save your work.
In this assign activity, you set the values that are returned by Select Manufacturer when it is asked for a quote. To simplify things in this SOA Order Booking application, the SelectManufacturer BPEL process returns two values:
its name ("SelectDistributors")
the quote for the order. Select Manufacturer simply returns 120 multiplied by the number of items in the order to get the quote.
These values are set in the outputVariable variable, which will be returned to the client.
Select Process Activities from the dropdown in the Component Palette.
Drag the Assign activity icon from the Component Palette and drop it after the Receive_1 activity.
Double-click the new Assign instance to display the Assign dialog.
Click the Copy Operation tab in the Assign dialog.
In the Copy Operation tab, create the first copy operation. This copy operation sets the quote value to return.
Select Copy Operation from the Create dropdown. This displays the Create Copy Operation dialog.
In the Create Copy Operation dialog:
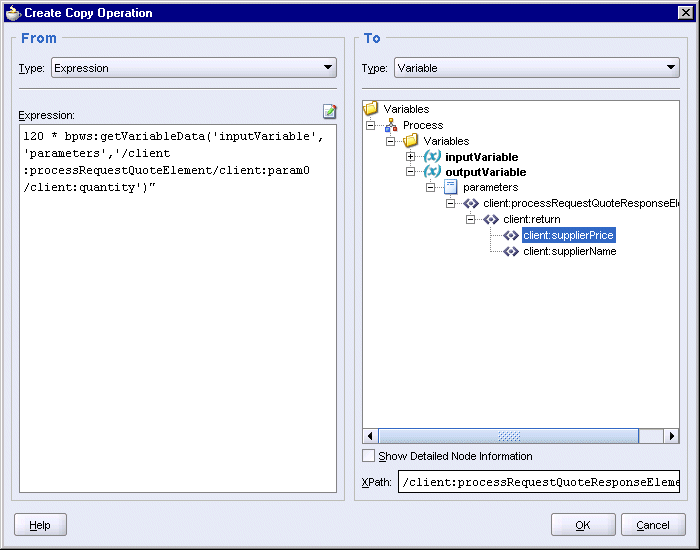
On the From side, select Expression from the Type dropdown. Enter the following into the Expression box:
120 * bpws:getVariableData('inputVariable','parameters',
'/client:processRequestQuoteElement/client:param0/client:quantity')
This formula multiplies the number of items in the order by 120 to get the quote price.
On the To side, select Variable from the Type dropdown. Select Variables > Process > Variables > outputVariable > parameters > client:processRequestQuoteResponseElement > client:return > client:supplierPrice. Note that the prefix ("client") may be different on your machine.
The Create Copy Variable dialog should look like this:
Figure 7-15 Create Copy Variable Dialog for Returning the Supplier Price
Click OK in the Create Copy Operation dialog.
Create the second copy operation. This copy operation sets the name to return.
Select Copy Operation from the Create dropdown. This displays the Create Copy Operation dialog.
In the Create Copy Operation dialog:
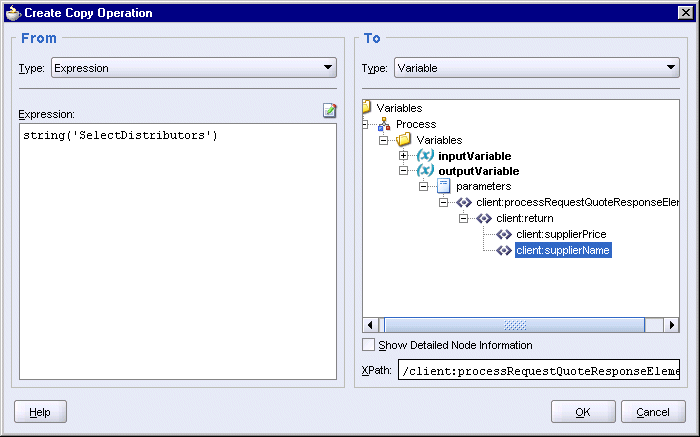
On the From side, select Expression from the Type dropdown. Enter the following into the Expression box:
string('SelectDistributors')
On the To side, select Variable from the Type dropdown. Select Variables > Process > Variables > outputVariable > parameters > client:processRequestQuoteResponseElement > client:return > client:supplierName.
The Create Copy Variable dialog should look like this:
Figure 7-16 Create Copy Variable Dialog for Returning the Supplier Name
Click OK in the Create Copy Operation dialog.
The Assign dialog should look like this:
Click OK in the Assign dialog.
Select File > Save to save your work.
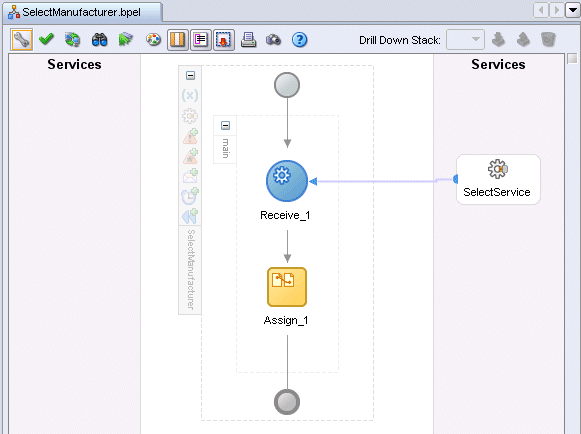
The SelectManufacturer.bpel page should now look like this:
Figure 7-18 SelectManufacturer.bpel Page Showing the Assign Activity
The Invoke activity returns the values in the outputVariable to the client.
Select Process Activities from the dropdown in the Component Palette.
Drag the Invoke activity icon from the Component Palette and drop it after the Assign_1 activity.
Drag an arrow from the newly created invoke activity and drop it on the SelectService partner link. This displays the Invoke dialog.
In the Invoke dialog:
Name: enter Invoke_1.
Partner Link: should be set to SelectService.
Operation: select processRequestQuoteResponse. This is set for you automatically.
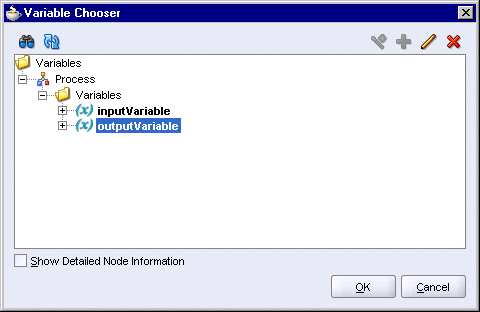
Input Variable: click the Browser Variables icon (the one on the right) to display the Variable Chooser. In the Variable Chooser, select Variables > Process > Variables > outputVariable.
Figure 7-19 Variable Chooser for the Input Variable
Click OK in the Variable Chooser.
The Invoke dialog should now look like this:
Click OK in the Invoke dialog.
Select File > Save to save your work.
The SelectManufacturer.bpel page now looks like this:
Figure 7-21 SelectManufacturer.bpel Page with Invoke Activity

Double-click build.properties, located under SelectManufacturer > Resources in the Application Navigator. This file defines values that are used by build.xml when you deploy the BPEL project.
Uncomment (by removing the # character) these lines in the build.properties file:
platform=ias_10g
domain=default
rev=1.0
admin.user=oc4jadmin
admin.password=welcome99
http.hostname=myAppServerMachine.mydomain.com
http.port=8888
j2ee.hostname=myAppServerMachine.mydomain.com
rmi.port=23793
opmn.requestport=6005
oc4jinstancename=home
Edit the values as necessary. The values in bold italics are the typical values you need to modify.
To determine the value for rmi.port, run:
ORACLE_HOME\opmn\bin\opmnctl status -l
ORACLE_HOME specifies the Oracle home for Oracle Application Server.
To determine the value for opmn.requestport, see step 6.
Select File > Save to save your changes to build.properties.
Right-click build.xml (located under SelectManufacturer > Resources) and select Run Ant.
In the Run Ant dialog, click the Properties tab.
In the Property Files section, click Add. In the Add Ant Property File dialog, select the build.properties file in the SelectManufacturer directory and click Open.
The Run Ant dialog should look like this:
Figure 7-22 Run Ant Dialog, Properties Tab, With build.properties File Loaded

Click OK. JDeveloper runs Ant to compile and deploy the project. If you get errors, see the next section, Section 7.8.1, "Deploying Using Ant from the Developer Prompt".
If you get errors, check that the values you entered in the build.properties file are correct.
If the values are correct, but you still get errors, you can run ant from the Developer Prompt to deploy the project:
On the machine running Oracle Application Server, select Start > Programs > Oracle - instanceName > Oracle BPEL Process Manager > Developer Prompt. This displays a shell window configured for Oracle BPEL Process Manager.
Note that you must run ant from the Developer Prompt shell window to deploy the SelectManufacturer project. Running ant from a regular operating system shell for deploying the project is not supported.
In the Developer Prompt window, change directory to the SOADEMO\SelectManufacturer directory, where SOADEMO refers to the directory where you created the SOA Order Booking application.
> cd SOADEMO
> cd SelectManufacturer
If you are running JDeveloper and Oracle Application Server on separate machines, you can copy the SelectManufacturer directory from the JDeveloper machine to the Oracle Application Server machine. You can place it anywhere on the Oracle Application Server machine. In the Developer Prompt, you can just navigate to that directory.
Run ant.
> ant
After deployment, SelectManufacturer appears in the Oracle BPEL Control. Enter the following URL in a browser to bring up the Oracle BPEL Control:
http://hostname:port/BPELConsole
Log in as the oc4jadmin user.
SelectManufacturer appears in the Dashboard tab of the Oracle BPEL Control:
Figure 7-23 Oracle BPEL Control Showing SelectManufacturer
