| Oracle® Web Services Manager Quick Start Guide 10g (10.1.3.1.0) Part Number B32126-01 |
|
|
View PDF |
| Oracle® Web Services Manager Quick Start Guide 10g (10.1.3.1.0) Part Number B32126-01 |
|
|
View PDF |
In this tutorial, you will perform the following tasks:
Log in to Web Services Manager Control
Register a gateway.
Register a Web service to the gateway.
Add policies to the gateway that will authenticate users.
Create the file used to authenticate users.
View the WSDL for the Web service.
Test whether the policy step is authenticating users.
Add an authorization policy that verifies users' access.
Edit the sample authorization file.
Test whether the policy step is authorizing users.
Make a backup copy of the Oracle Web Services Manager Database before you begin this tutorial. The database file (orawsm.odb) is located in the following directory:
$ORACLE_HOME/10.1.3.1/owsm/Mobile/Sdk/OLDB40
The instructions in this tutorial assume that you are starting with a new installation of Oracle Web Services Manager. If you run into an error or you want to start the tutorial again, copy the backup copy of the database file into the directory shown above.
Open a Web browser, and enter the following URL:
http://fully_qualified_host_name:http_port
|
Note: If you are logging in to a standalone version of Oracle Web Services Manager, skip to step 3 now. |
The Welcome to Oracle SOA Suite (10.1.3.1.0) page appears (Figure 2-1).
Figure 2-1 Welcome to Oracle SOA Suite (10.1.3.1.0) Page
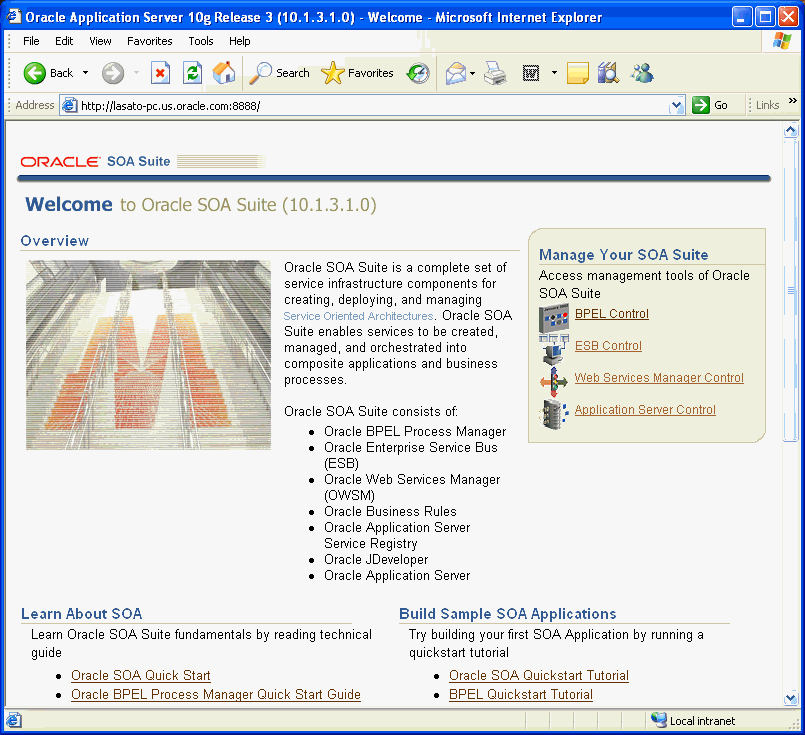
In the Manage Your SOA Suite box, click the Web Services Manager Control link.
In the Log In page, log in as oc4jadmin and use the password you supplied during the installation. Click Login. (Figure 2-2)
|
Note: If you are logging in to a standalone version of Oracle WSM, the log in page looks slightly different. Log in as the Oracle Web Services Manager Administrator. By default the user name is admin and the password is oracle. |
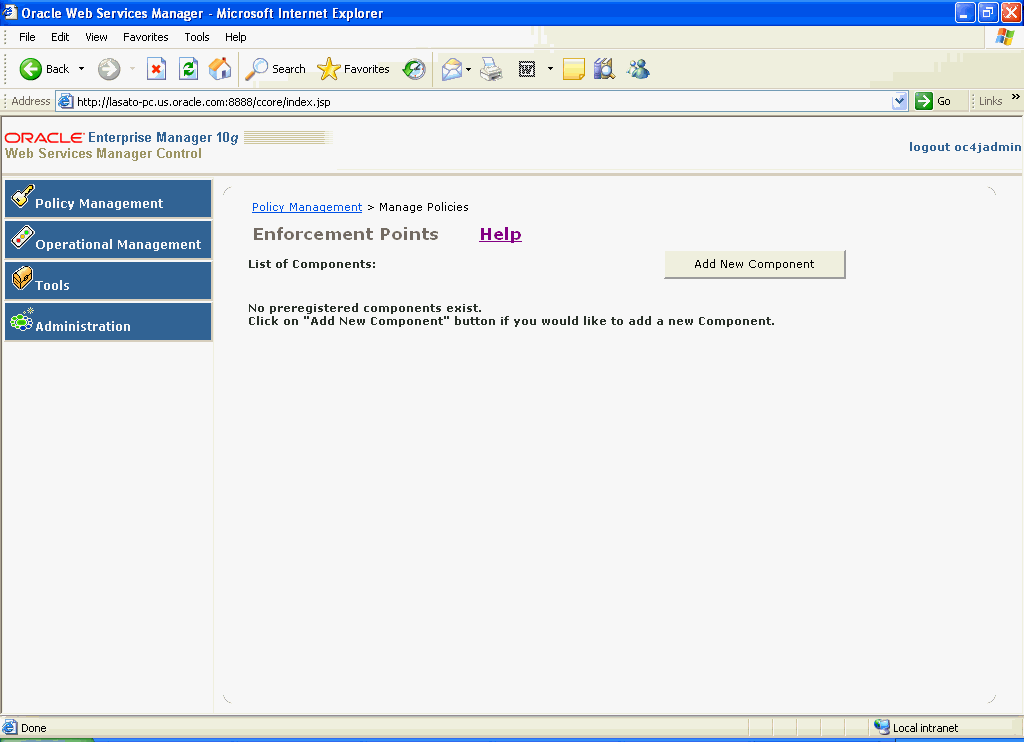
The next page you see is the Web Services Manager Control page (Figure 2-3).
Figure 2-3 Web Services Manager Control Page
In Oracle Web Services Manager, you can create gateway components, server agent components, and client agent components to protect your Web services. In this quick start tutorial, you will be creating and registering an Oracle WSM Gateway.
Click Add New Component (Figure 2-4).
|
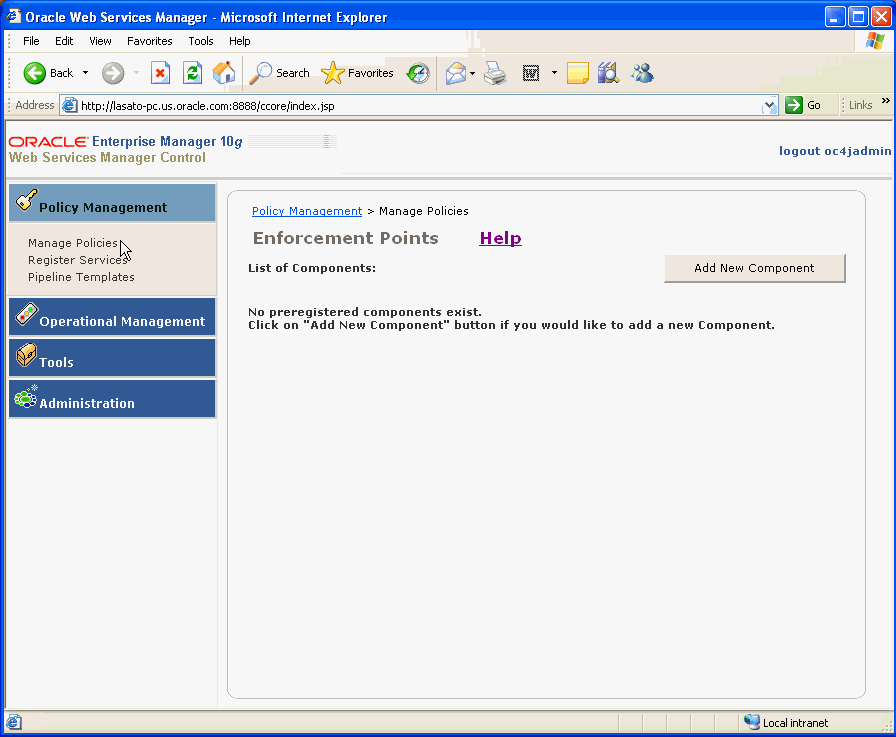
Note: If you do not see the Add New Component button, click Policy Management, then click Manage Policies from the navigation pane on the left side to return to the correct page (Figure 2-5). |
Figure 2-5 Navigating to the Manage Policies Page
In the Add New Component page, enter the following:
Component Name – Enter: MyGateway
Component Type – Accept the default value: Gateway
Container Type – Accept the default value: Oracle Web Services Manager
Component URL – Enter the following: http://fully_qualified_host_name:http_port/gateway
where fully_qualified_host_name is the URL for Oracle Web Services Manager, and http_port is the port on which Oracle Web Services Manager is hosted.
|
Tip: Check the URL in your browser that you use to access the Web Services Manager Control. Replace "ccore" with "gateway." For example, change the URL:http://marcc-pc.us.oracle.com:8888/ccore to the following URL: http://marcc-pc.us.oracle.com:8888/gateway Enter this URL in the Component URL field. |
Component Groups – Accept the default values for the component groups.
See Figure 2-6 for an example of the Add New Component page.
Click Register.
The following message confirms that you have successfully registered the gateway (Figure 2-7).
Figure 2-7 Message Confirming Successful Component Registration

Click Ok.
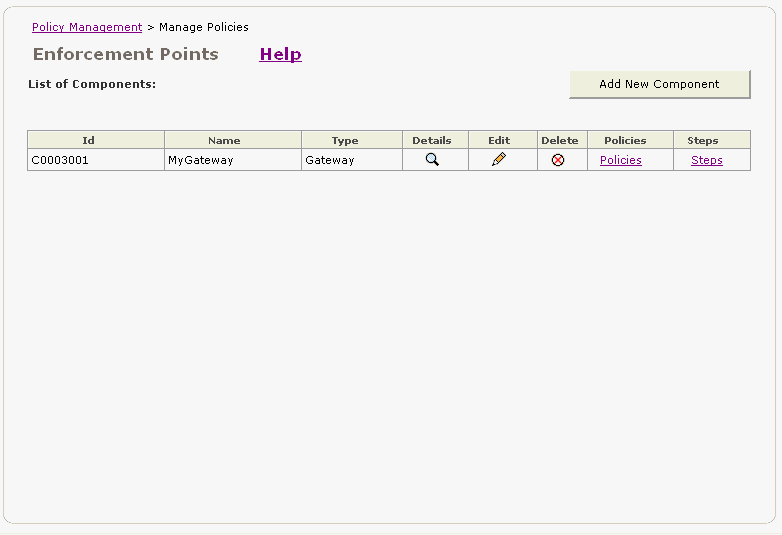
The gateway now appears in the List of Components (Figure 2-8).
Figure 2-8 Gateway Component in the List of Components Page
In this tutorial, you will register the Time Service Web service to the gateway that you just created. (There is more information about Time Service at the end of this procedure.) By doing so, you are associating the gateway with the Web service that it will protect.
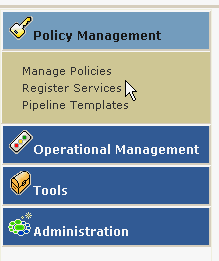
From the navigation pane of Web Services Manager Control, click Policy Management, then click Register Services (Figure 2-9).
Figure 2-9 Web Service Manager Control Navigation Pane
In the List of Gateways page (Figure 2-10), you see the gateway you just created. The Gateway Name is the name you assigned the gateway when you registered it, and the Gateway Id is the component Id that Oracle Web Services Manager assigned to the gateway.
Figure 2-10 MyGateway in the List of Gateways Page
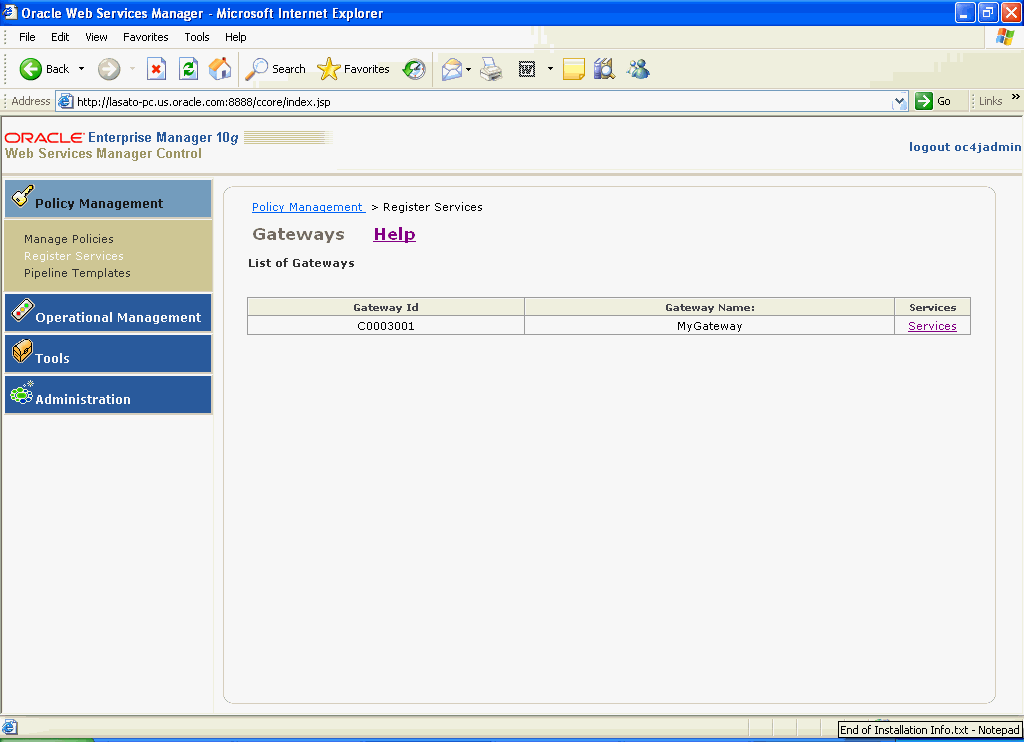
Click the Services link.
Click Add New Service.
Note, in the List of Services page, there are currently no services registered to this gateway (Figure 2-11).
Figure 2-11 List of Services Page for MyGateway
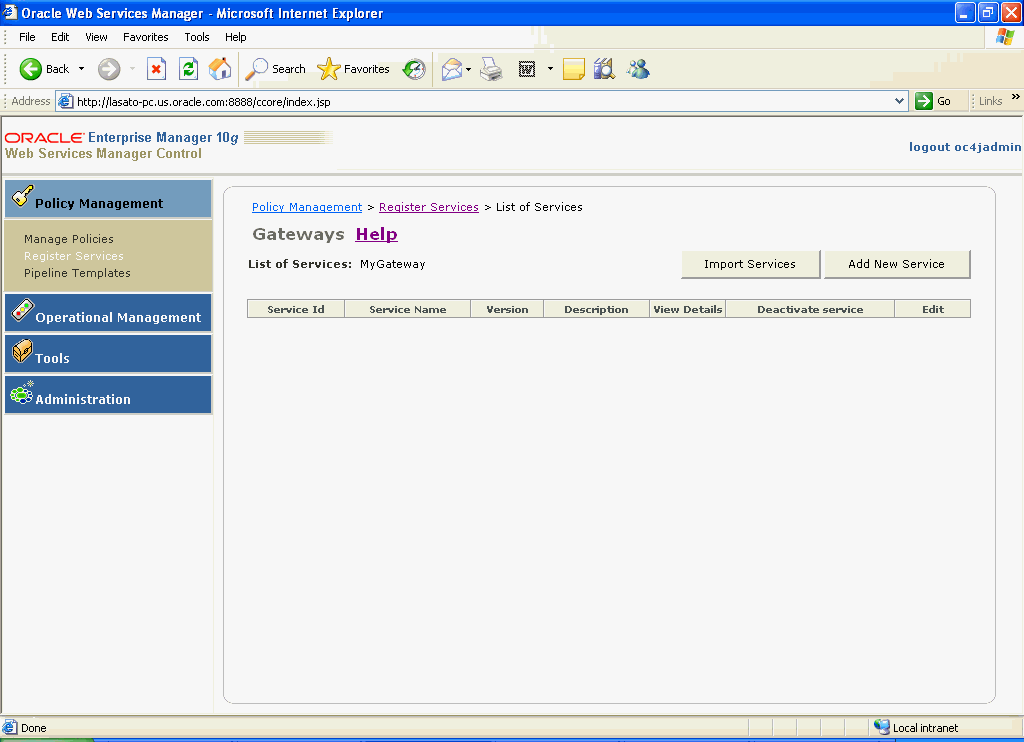
Click Add New Service.
In the Add New Service page, enter the following service details:
Service Name – TimeService
Note: There is no space between Time and Service. This will be explained later.
Service Version – 1.0
Service Description – Gives the time of day.
WSDL URL – http://fully_qualified_host_name:http_port/ccore/TimeService.wsdl
where fully_qualified_host_name is the URL for Oracle Web Services Manager, and http_port is the port on which Oracle Web Services Manager is hosted.
|
Note: It is important that the URL and the port you assign here match the URL and port you specified when you registered your gateway. |
Service Protocol – Accept the default, HTTP(S).
Service Groups – Accept the defaults.
Figure 2-12 is an example of the Add New Service page with the service details entered.
Click Next.
The Configure Messenger Step for New Service page is displayed. On the previous page you accepted the default service protocol, HTTP(S). This page (Figure 2-13) displays the parameters for configuring the HTTP(S) protocol.
Figure 2-13 Configure HTTP Messenger Step for New Service Page
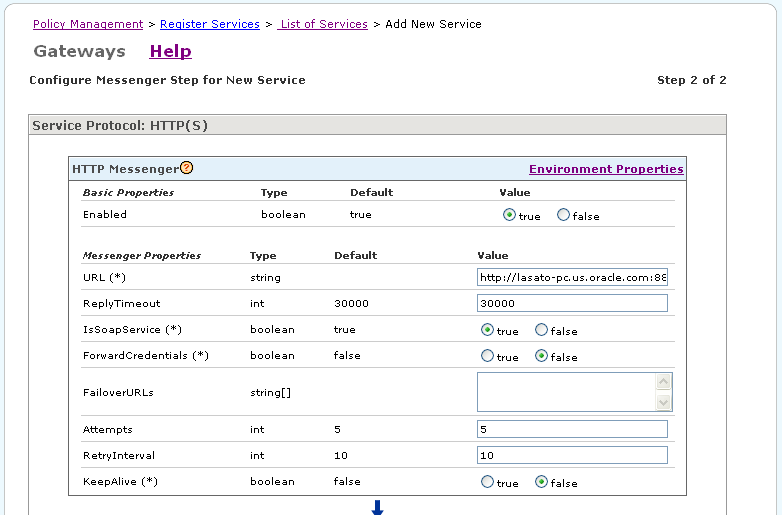
In the Configure Messenger Step for New Service page, verify that the URL matches the URL you provided on the previous page. Accept the default values for the remaining fields, and click Finish.
The following message appears (Figure 2-14).
Figure 2-14 Message Confirming Successful Service Registration

Click Ok.
Now, the new service appears in the List of Services (Figure 2-15). The Service Name, Version, and Description are what you entered when you registered the service. The Service Id is the Id that Oracle Web Services Manager assigned to the service.
Figure 2-15 List of Services Page with TimeService Added
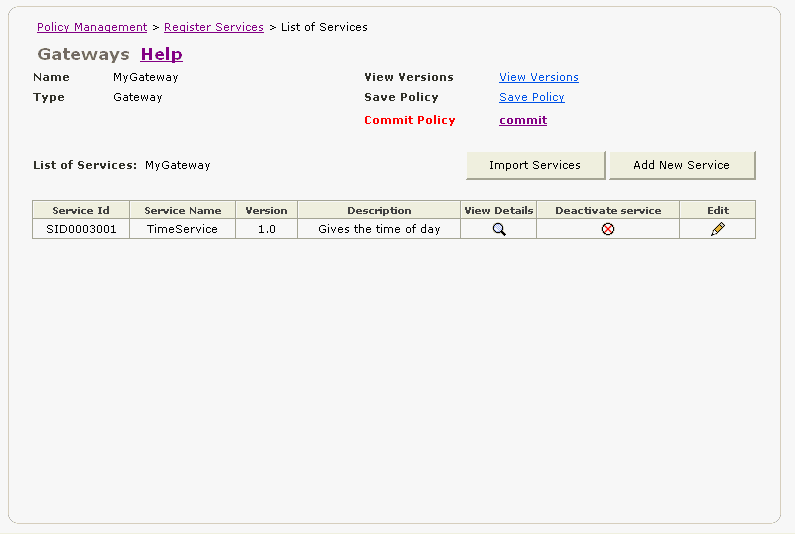
Note the Commit Policy field appears in red. This is to alert you to the fact that you need to click the commit link to commit the change to the Oracle WSM Database. Click commit.
The following confirmation appears (Figure 2-16). Click Ok.
Figure 2-16 Message Confirming Policies Successfully Updated

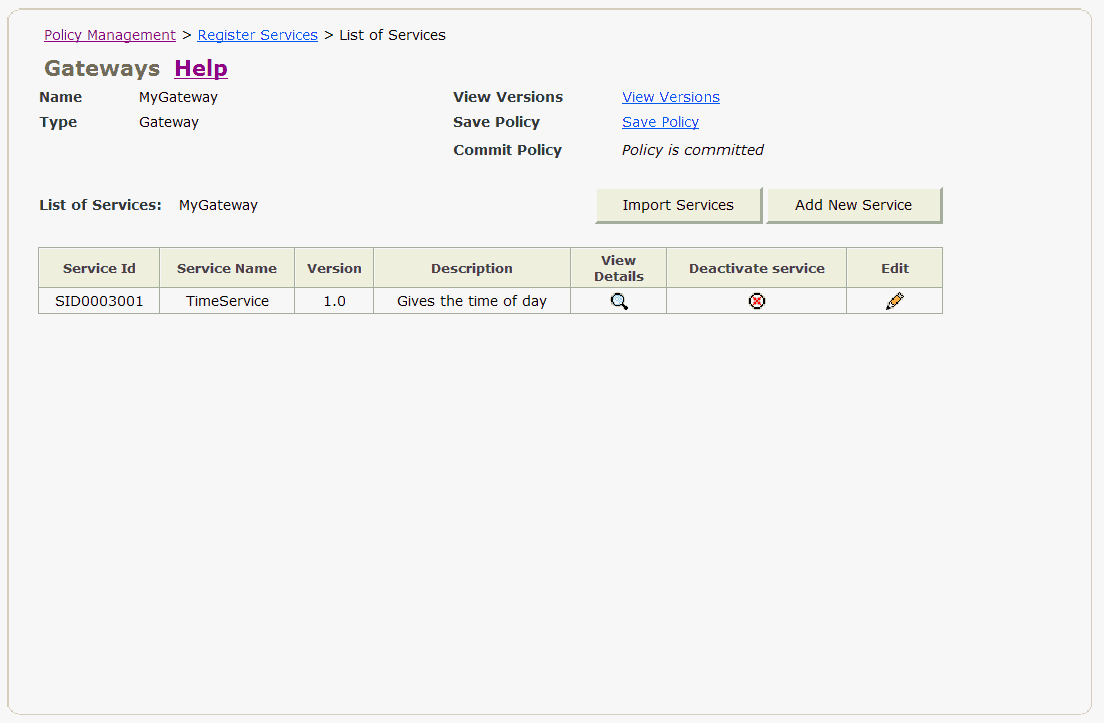
You return to the List of Services page (Figure 2-17). Note, this time, in the Commit Policy field, it says: Policy is committed.
Figure 2-17 List of Services Page Showing the Policy is Committed
About the Time Service Web Service
Oracle WSM ships with a Time Service Web service that returns the current time. Time Service is not an actual Web service in the sense that it is not deployed to the Oracle Application Server. (Time Service is a simple JSP.) Therefore, Time Service can only be used with a gateway and not with an agent. The Time Service WSDL file is located at the following location:
ORACLE_HOME/j2ee/home/applications/ccore/ccore/TimeService.wsdl
You can access the Time Service WSDL file in your browser directly, without going through the gateway using the following URL:
http://fully_qualified_host_name:http_port/ccore/TimeService.wsdl
Now that you have associated a Web service with your gateway, you will add policies that will be used by the gateway to protect the service. Generally, the Web service client submits a request by sending an XML message that includes user credentials. Because we are using a gateway rather than an agent in this tutorial, the request is made directly to the gateway. In other words, the gateway virtualizes the protected Web service.
In this tutorial, you will be using two policy steps to secure this service. The first policy step, Extract Credentials, will isolate the user name and password credentials from the request. The second step, File Authenticate, will authenticate the user using a file that contains valid users and their passwords.
Later in this tutorial, you will add a third policy step, File Authorize, that will authorize the user by checking a file to see if the user belongs to a role that is granted access to the service.
To add the Extract Credentials policy step
This policy step extracts user credentials from the Web service request.
From the navigation pane of the Web Services Manager Control, click Policy Management, then click Manage Policies.
In the List of Components, click the Policies link for your gateway (Figure 2-18).
Figure 2-18 Gateway Component in the List of Components Page

The policies for the MyGateway component are displayed (Figure 2-19). By default, Oracle WSM creates a policy with same name as the name of the service, in this example, TimeService. Note that the version number is included in parentheses.
Figure 2-19 Policies for the MyGateway Gateway
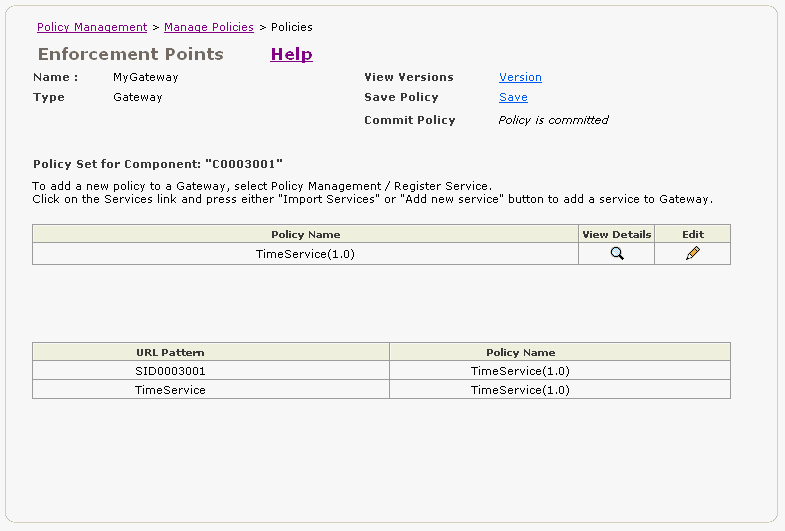
Click the Edit icon.
You see the Policy Definition page for the TimeService(1.0) policy (Figure 2-20). There are four pipelines or parts to the policy definition:
Foot 1 PreRequest Pipeline – The policy steps in this pipeline are executed before the Web service request is processed.
Request Pipeline – The policy steps in this pipeline are executed on the Web service request.
Response Pipeline – The policy steps in this pipeline are executed on the response from the Web service
Footref 1PostResponse Pipeline – The policy steps in this pipeline are executed after the response from the Web service is sent to the client requestor
|
Note: The screen shot of the page is truncated. You can scroll down the page to see all four pipelines. |
For this tutorial, we will be adding policies to the Request pipeline. Note, by default, a Log policy step has been added to the Request and Response pipelines.
Figure 2-20 Policy Definition Page for the TimeService (1.0) Policy
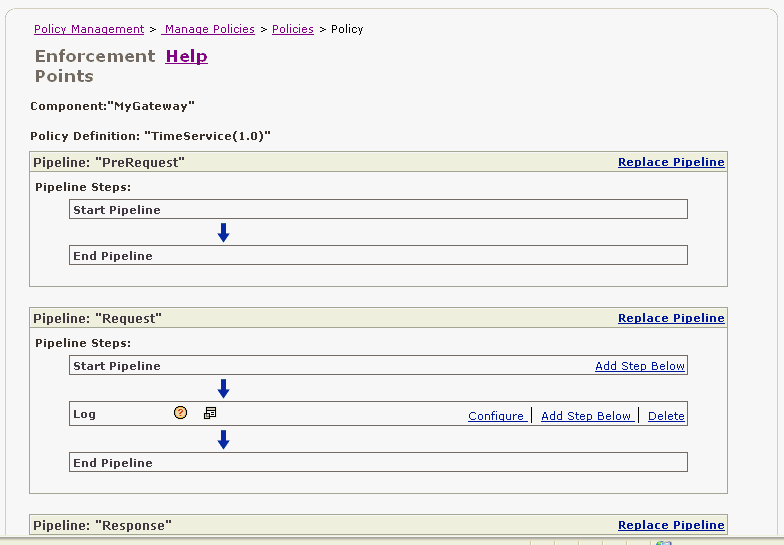
We are going to add a policy step below the Log step in the Request pipeline. In the row for the Log step, click the Add Step Below link (Figure 2-21).
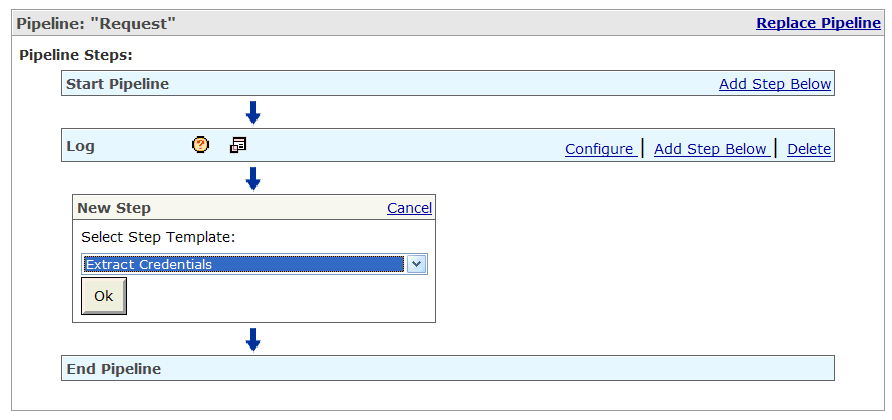
The page refreshes and the New Step box appears. From the Select Step Template list, click the arrow to display a list of policy steps, and select Extract Credentials from the list, and click Ok (Figure 2-22).
Figure 2-22 Selecting the Extract Credentials Policy Step
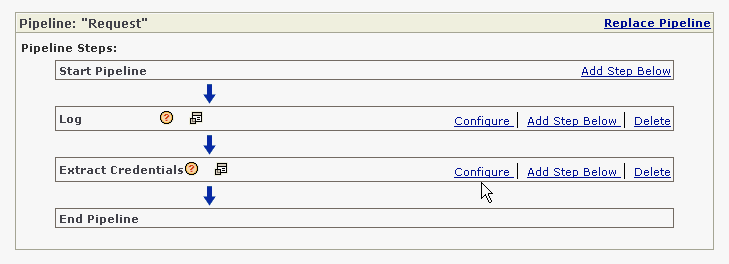
The Extract Credentials policy step has been added below the Log step. Now, we are going to configure the Extract Credentials step. In the Extract Credentials row, click the Configure link (Figure 2-23).
Figure 2-23 Clicking Configure for the Extract Credentials Policy Step
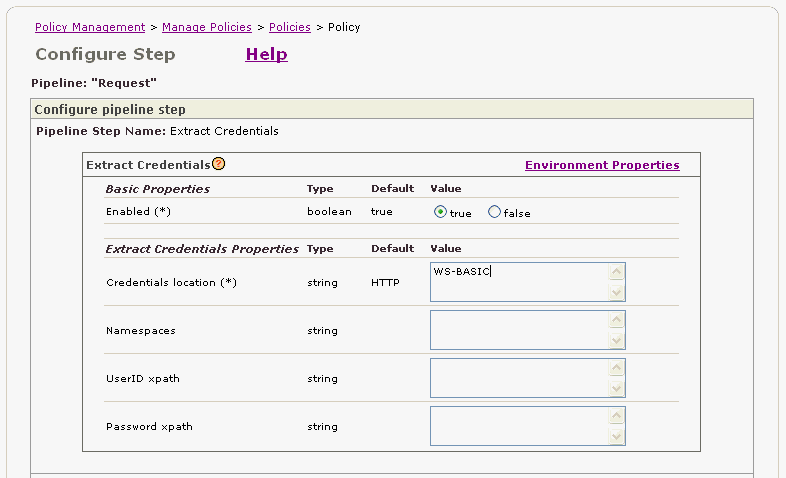
The properties for the Extract Credentials policy step are displayed.
In this tutorial, we will simulate extracting the user's credentials from the standard Username Token as specified in the WS-I Basic Security Profile, and authenticate the user against a file of valid users.
In the Configure pipeline step page, change the default value for the Credentials location to WS-BASIC as shown in Figure 2-24.
Figure 2-24 Extract Credentials Policy Step Properties
Scroll down to the bottom of the page, and click Ok.
You return to the Policy Definition page.
To add the File Authenticate policy step
The extracted credentials need to be validated against a reference. In this tutorial, the reference is a file of valid user names and passwords. Other references that can be used with Oracle Web Services Manager include LDAP directories, Oracle Access Manager, or eTrust SiteMinder from CA.
In the Extract Credentials row, click the Add Step Below link.
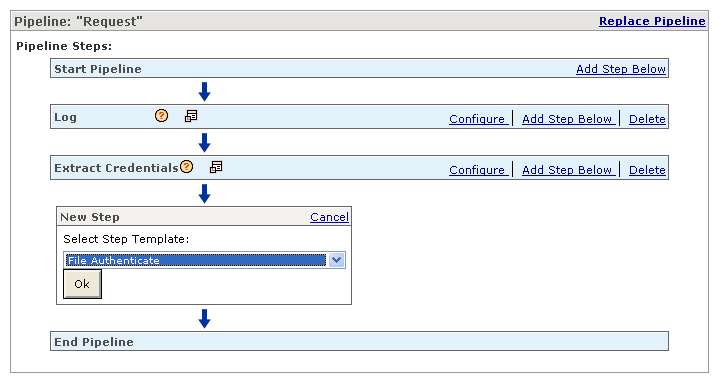
From the Select Step Template list, select File Authenticate, and click Ok (Figure 2-25).
Figure 2-25 Selecting the File Authenticate Policy Step
In the File Authenticate row, click Configure.
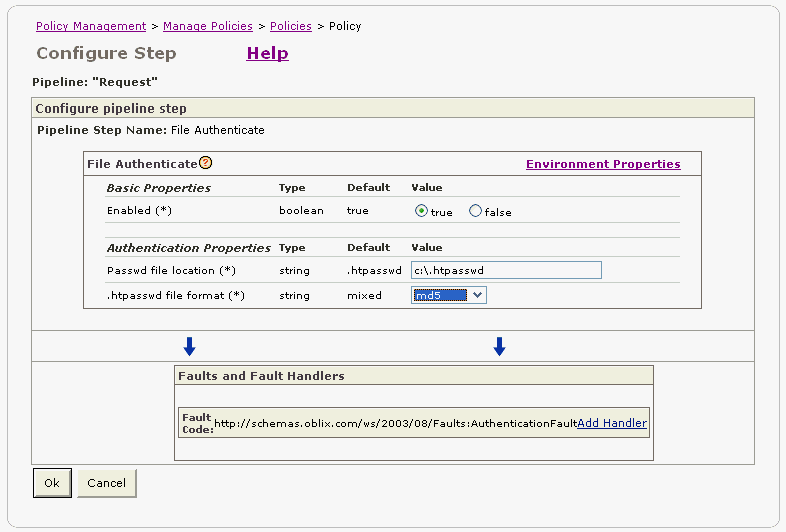
The properties for the File Authenticate policy step are displayed. In the Passwd file location box, you will specify the full path location and name of the file used to authenticate users (Figure 2-26). In our example, we are specifying the following location:
C:\.htpasswd
In a later step, you will be creating a file called .htpasswd at the root directory.
In the .htpasswd file format field, you specify the format in which passwords are encrypted. Select md5 from the list (Figure 2-26). MD5 is the message digest algorithm that you will use to encrypt the password later in this tutorial.
Figure 2-26 File Authenticate Policy Step Properties
Click Ok.
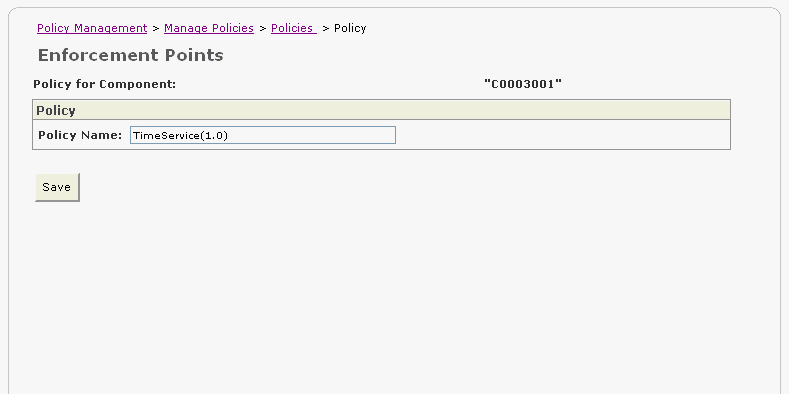
Click Next, then click Save (Figure 2-27).
Figure 2-27 Policy for the MyGateway Component
The Commit Policy field appears in red, alerting you that you must commit your changes (Figure 2-31). Click the Commit link.
Figure 2-28 Policy Set for MyGateway Gateway with TimeService Policy Added
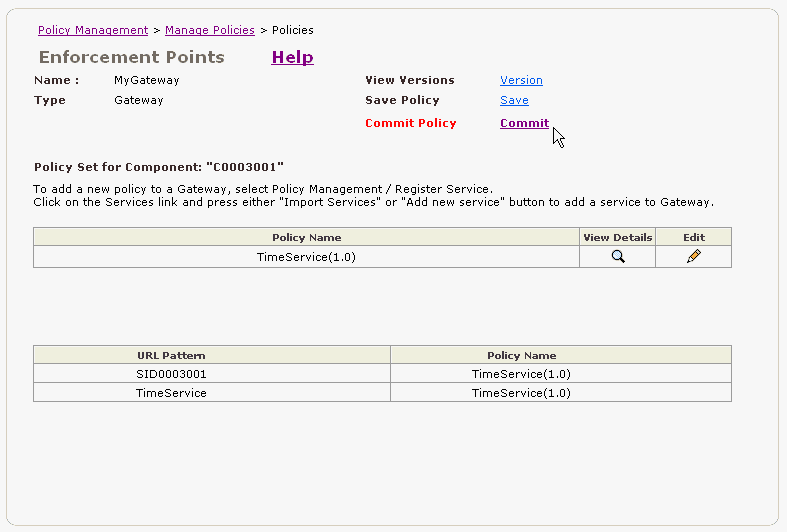
The page refreshes and in the Commit Policy field, the message indicates the policy has been committed.
You will be creating a file with your user name and password. This file, which was specified in the File Authenticate step, will be used to authenticate you when you attempt to access the Web service. You will use an Oracle WSM tool to encode the password in the file.
Create a text file and add a user name and password in the following format:
user_name:password
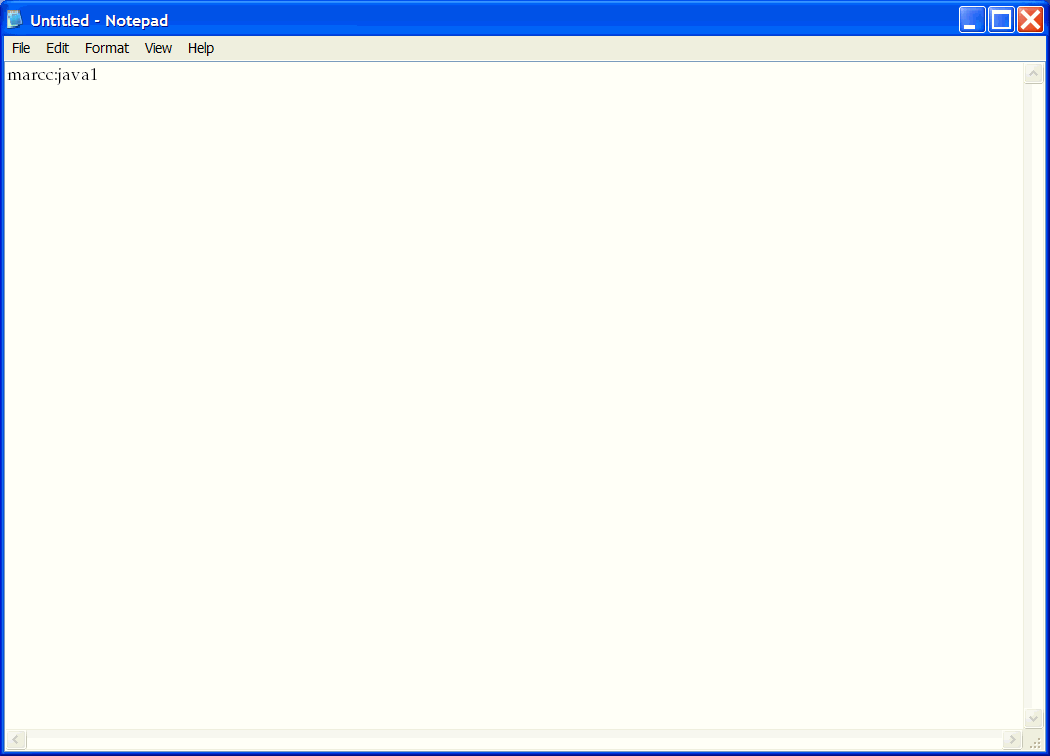
Figure 2-29 is an example of a text file (.htpasswd) with the user name marcc and the password java1. Enter this user name and password combination, or add your own user name and password.
Figure 2-29 .htpassword File with User Name and Password
Save the file with the name .htpassword in the root directory. We are saving the file at the root, but you can save the file anywhere.
You will be using an Oracle WSM utility to create a digest or hash of the password. A digest is the result of applying a one-way mathematical function to an input stream in order to compress it. Message-Digest Algorithm 5 (MD5) is one mathematical function commonly used to store passwords.
Open a command window and execute the following command:
On Linux:
ORACLE_HOME/owsm/bin/wsmadmin.sh md5encode user_name password .htpasswd
On Windows:
ORACLE_HOME\owsm\bin\wsmadmin md5encode user_name password .htpasswd
For example:
ORACLE_HOME\owsm\bin\wsmadmin md5encode marcc java1 .htpasswd
|
Note: Use the user name and password you entered in Step 1 of this procedure.Be sure to leave a space between the user name (marcc in our example) and the password (java1). |
Open the .htpasswd file in a text editor. You will see that the password you entered has been replaced by an encrypted version of the password similar to what you see in Figure 2-30.
Figure 2-30 .htpasswd File with Encrypted Password
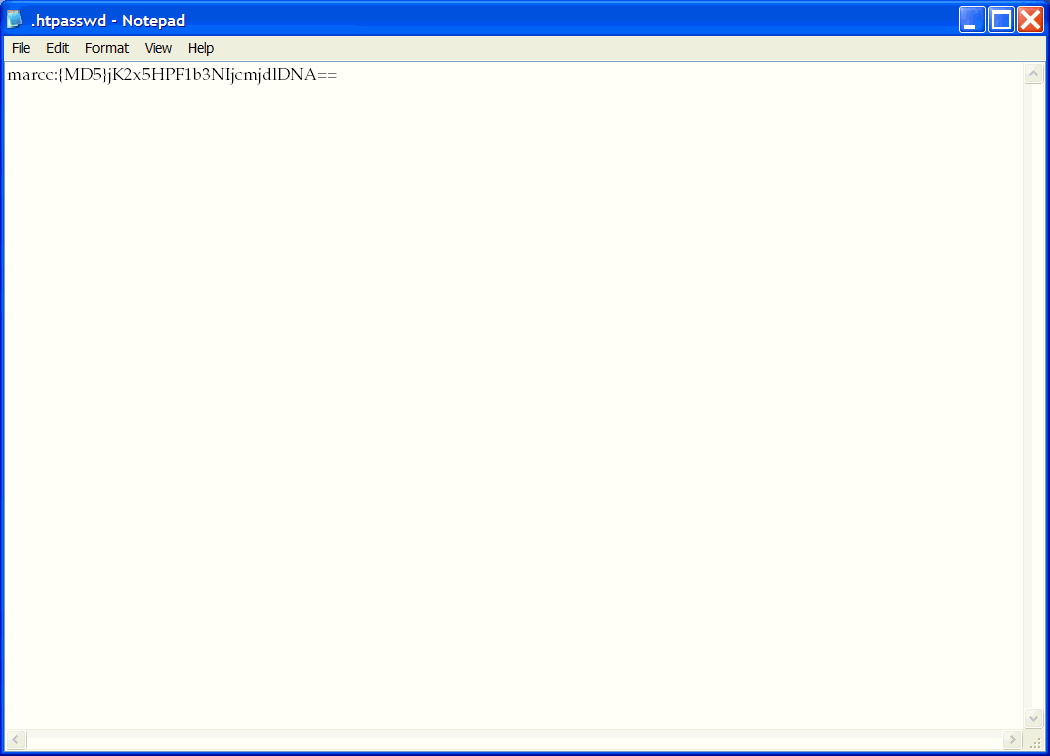
When the File Authenticate policy step is executed, it uses the .htpasswd file and checks to see if the credentials that are passed matches one of the entries in the file.
In order to test your WSDL and see if you can access the Web Service, you need to make a request to the Oracle WSM Gateway to which the WSDL is registered. You need to get the URL to which you make your request.
From the navigation pane of Web Services Manager Control, click Policy Management, then click Register Services.
For your gateway, MyGateway, click the Services link.
In the List of Services, click the Edit link for the TimeService service (Figure 2-31).
Figure 2-31 Editing the TimeService Service
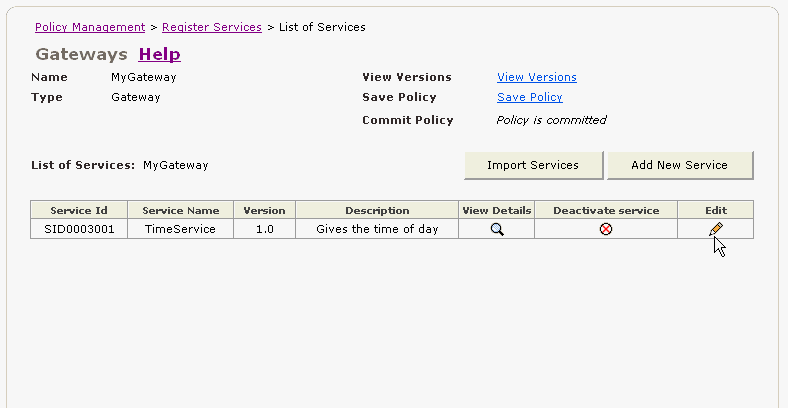
In the Edit Service page, copy the URL in the Service WSDL URL field (Figure 2-32).
You will use this URL in the next task.
Protecting Your Web Services
The Oracle Web Services Manager Gateway is designed to virtualize Web services. Therefore, you could access the Web services directly and circumvent the security provided by the gateway. To correct this potential security breach, Oracle recommends that customers use an Oracle Web Services Manager Agent to ensure that the Web service can only be accessed through the agent. This is sometimes referred to as "last-mile security."
You will simulate a Web service request to test that the Time Service is correctly secured. You will make the request using the user name and password you added to the authentication file.
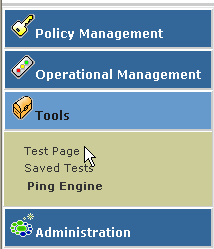
From the navigation pane of the Web Services Manager Control, click Tools, then click Test Page (Figure 2-33).
Figure 2-33 Web Services Manager Navigation Pane
Paste the URL you copied into the Enter wsdl url text box as shown in (Figure 2-34).
Click Submit Query. The Test Page refreshes and displays a number of parameters (Figure 2-35). Note that the endpoint URL is pointing to the gateway.
Figure 2-35 Test Web Service Page for the Example WSDL

You will simulate a request from a Web service client by providing credentials. Click the plus sign (+) next to the WS-Security parameter.The User Name and Password parameters are exposed (Figure 2-36).
Select the check box Include in Header to include the credentials in the WS-Security header (Figure 2-36).
Figure 2-36 Test Web Service Page with WS-Security Parameters Filled In
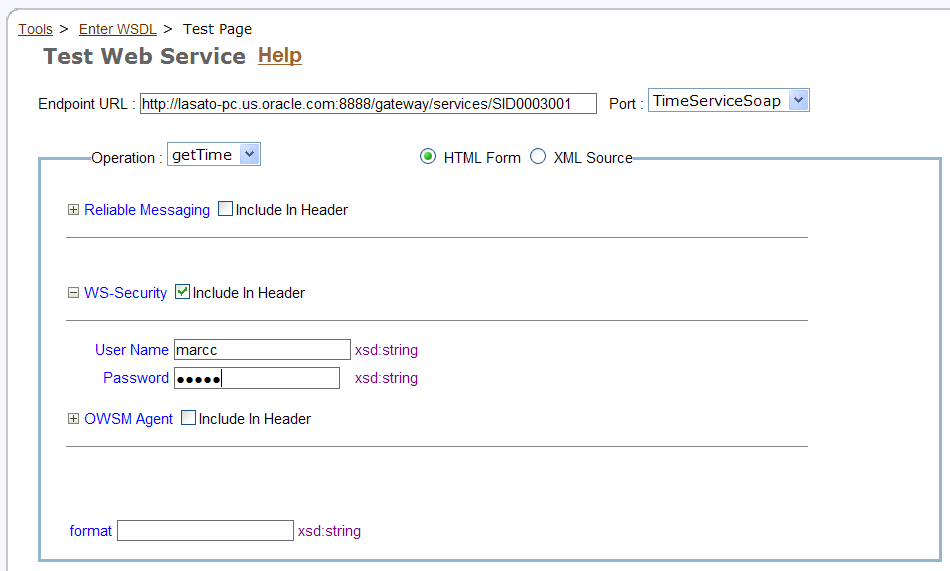
Enter the user name and password you supplied for the .htpasswd file in the User Name and Password fields. Figure 2-36 shows the user marcc and the password for this user obscured.
Click Invoke.
The Test Result displays the current time. By default, the results are displayed in raw HTML. Click the Formatted XML link to see the results in an easier-to-read format (Figure 2-37).
Now, you will make a request for the Time Service Web service, but this time, you will use an invalid user name and password, to verify that the File Authentication policy step is working.
On the Test Result page, click the Test same WSDL again link.
Click the plus sign (+) next to WS-Security to display the WS-Security parameters.
This time, enter a user name that is not a valid user, for example, bugs bunny, and enter any password.
Again, select the check box Include in Header.
Click Invoke.
This time, the Test Result shows that a Client Authentication Fault occurred, and the current time is not returned (Figure 2-38).
Figure 2-38 Test Result Page Showing a Client Authentication Fault
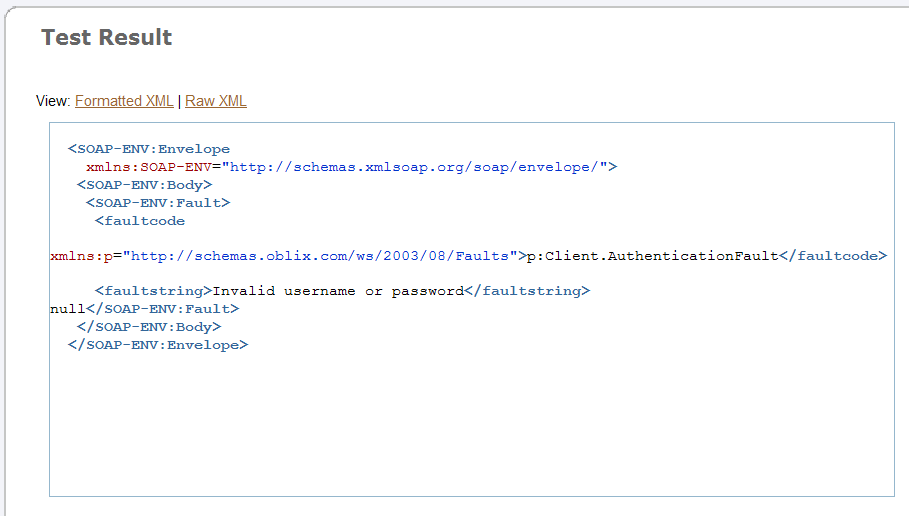
By first providing valid credentials, then providing invalid credentials, you have tested that authentication is working. Authentication verifies your identity based on the credentials you provide. This is, however, only the first step. The second step is to verify whether an authenticated user is authorized to access a resource (in this tutorial, the Time Service Web service) based on attributes assigned to the user's identity.
First we need to edit the Request pipeline for the gateway and add an authorization policy step.
To add the File Authorize policy step
From the navigation pane of the Web Services Manager Control, click Policy Management, then click Manage Policies.
In the List of Components, click the Policies link for your gateway.
Click the Edit icon.
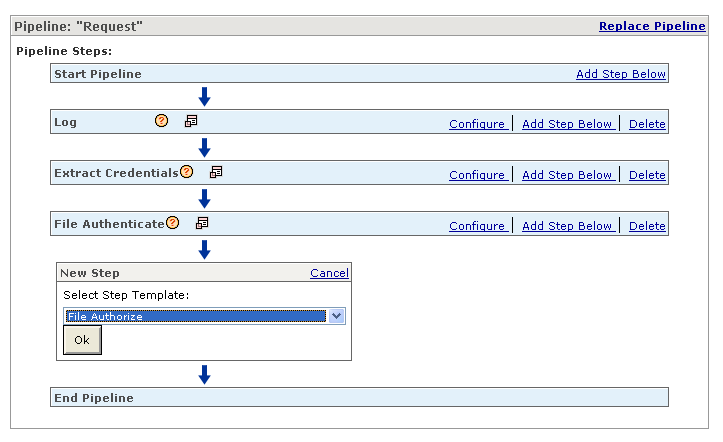
In the File Authenticate row, click Add Step Below.
From the Select Step Template list, select File Authorize, and click Ok (Figure 2-39).
Figure 2-39 Selecting the File Authorize Policy Step
In the File Authorize row, click Configure.
The properties for the File Authorize policy are displayed (Figure 2-40).
Figure 2-40 File Authorize Policy Step Properties
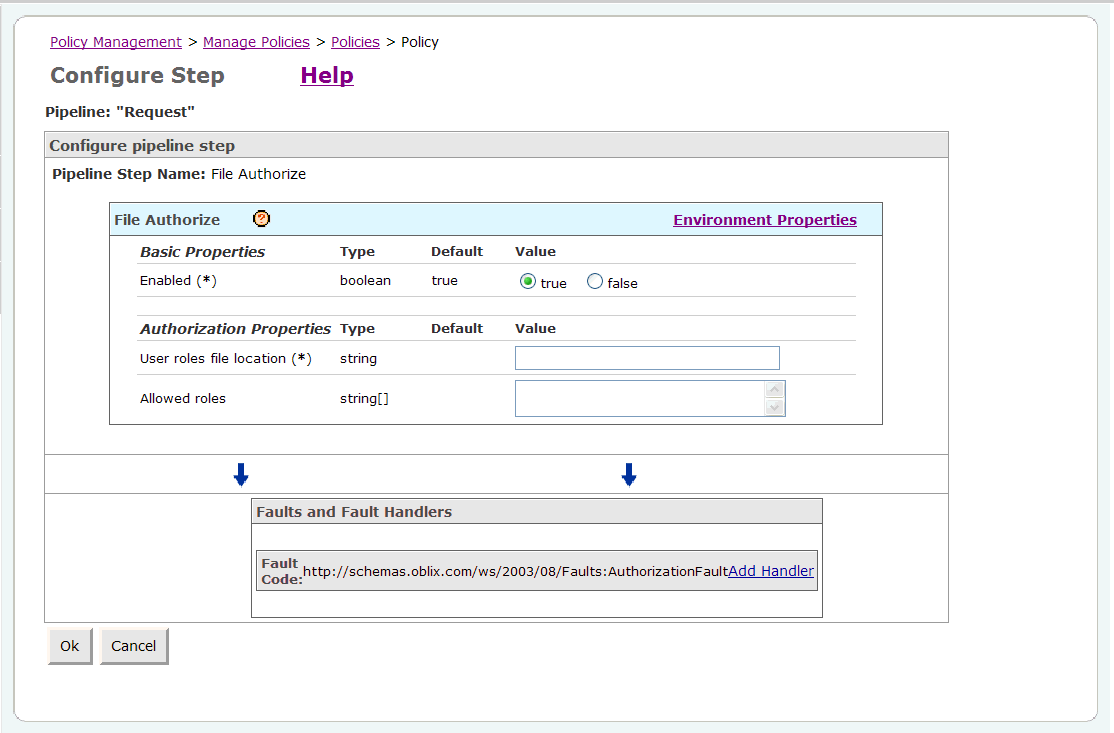
Specify the file that will be used to authorize users in the User roles file location field (Figure 2-40).
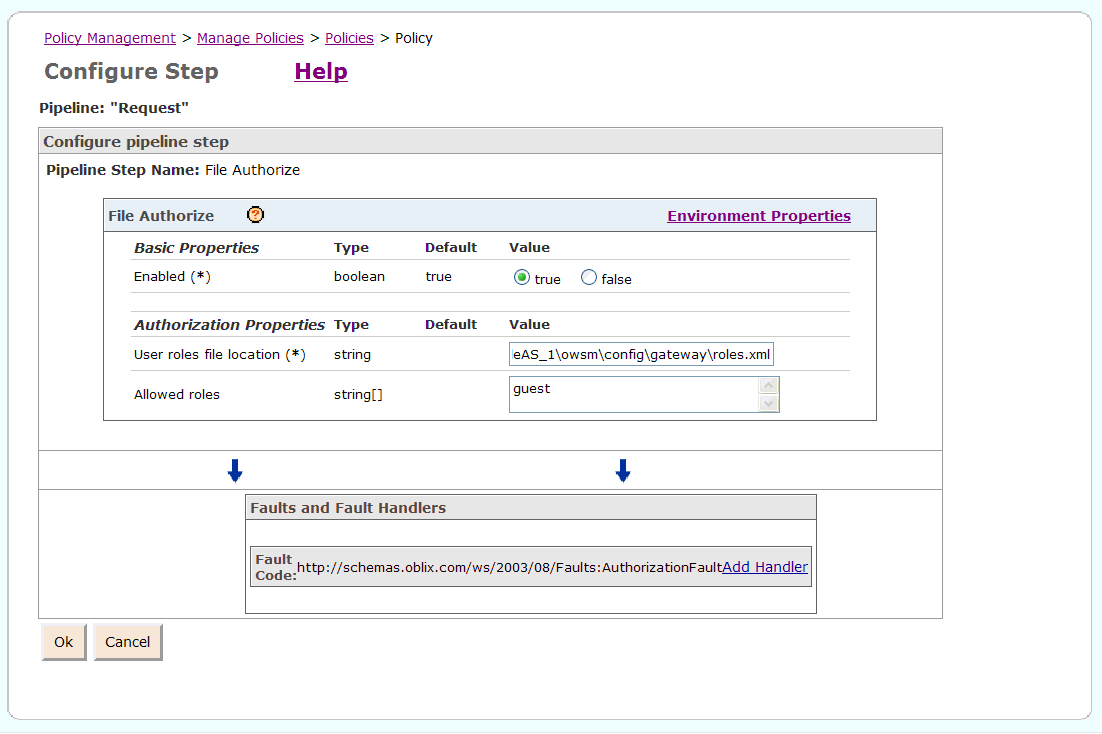
Enter: ORACLE_HOME/owsm/config/gateway/roles.xml
where ORACLE_HOME is the directory where Oracle Web Services Manager is installed.
Specify which roles are permitted access to the Web service in the Allowed roles field. Enter guest, and click Ok (Figure 2-41).
Figure 2-41 Configuring the File Authorize Policy Step
Click Next, then click Save.
The Commit Policy field appears in red, alerting you that you must commit your changes. Click the Commit link.
Once the user name and password have been authenticated, then Oracle Web Services Manager checks to see if the user is authorized to access the Web service. In our tutorial, this is done by checking a file to see if the user is assigned to an authorized role.
A sample authorization file can be found in the following location:
ORACLE_HOME/owsm/config/gateway/roles.xml
where ORACLE_HOME is the directory where Oracle Web Services Manager is installed. You will be adding your user name and the guest role to this file.
Open the file in a text editor.
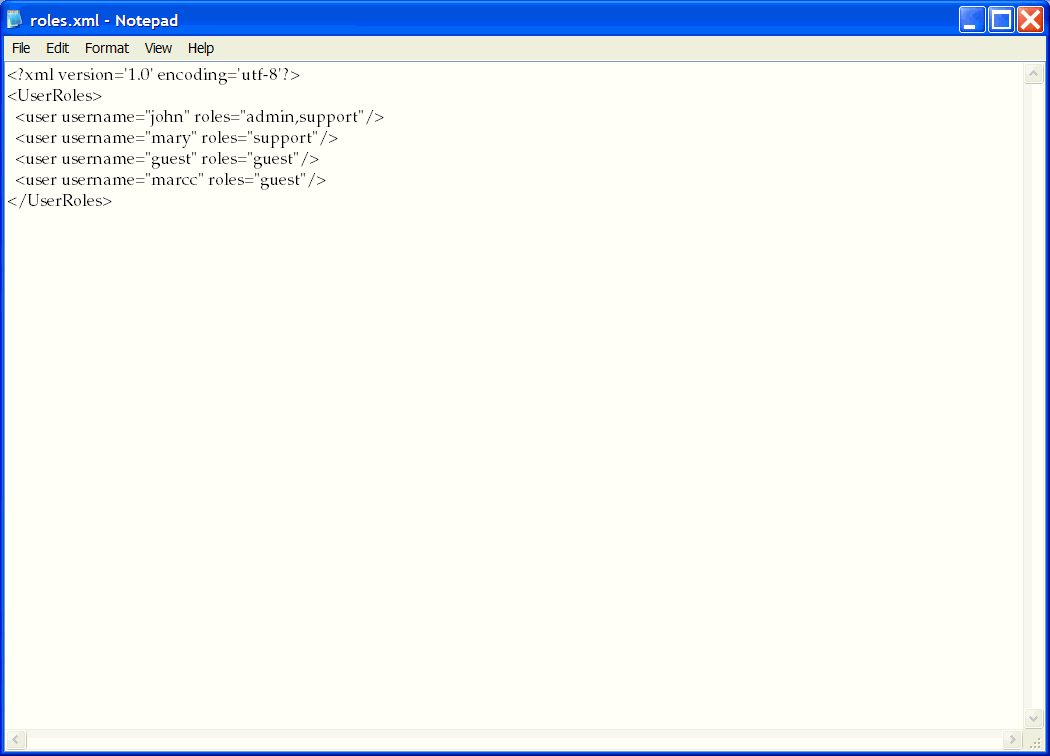
Add your user name and the role, guest. Figure 2-42 shows the user marcc assigned to the role guest.
Figure 2-42 Roles File with User Name and Role Added
Save the file.
If the user name and password are successfully authenticated with the File Authenticate step, then the File Authorize step is executed. Oracle WSM checks the roles.xml file to see if the user has been assigned a role that is authorized to access the Time Service Web service. In this example, users assigned the role of guest may access the service.
This time, you will be sending valid credentials which will be validated against the file. Then, the user will be checked against a file to see if he is assigned to a role that is authorized to access the Web service.
From the navigation pane of the Web Services Manager Control, click Tools, then click Test Page.
Paste the URL you copied into the Enter wsdl url text box.
Click Submit Query.
Click the plus sign (+) next to the WS-Security parameter.
Select the check box Include in Header.
Enter the user name and password you supplied for the .htpasswd file, and click Invoke.
The Test Result displays the current time.
Now you will test the File Authorization policy step by editing the file authorization file and assigning a role that is not authorized access the Web service to your user.
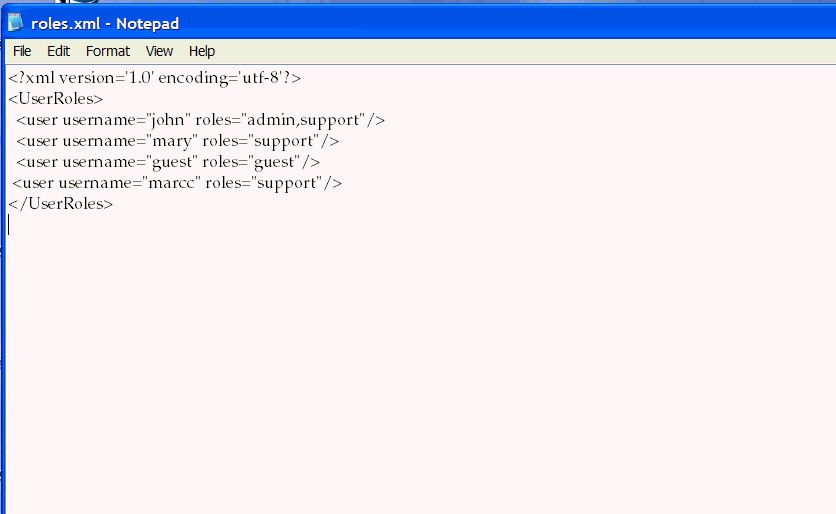
Edit the ORACLE_HOME/owsm/config/gateway/roles.xml file. Change the role for your user to something other than guest, and save the file. In our example, the user marcc is now assigned to the role support (Figure 2-43).
Figure 2-43 roles.xml File with User Assigned to Unauthorized Role
From the Test Page, click the Test same WSDL again link.
Click the plus sign (+) next to WS-Security to display the WS-Security parameters.
Enter a valid user name and password, and click Invoke.
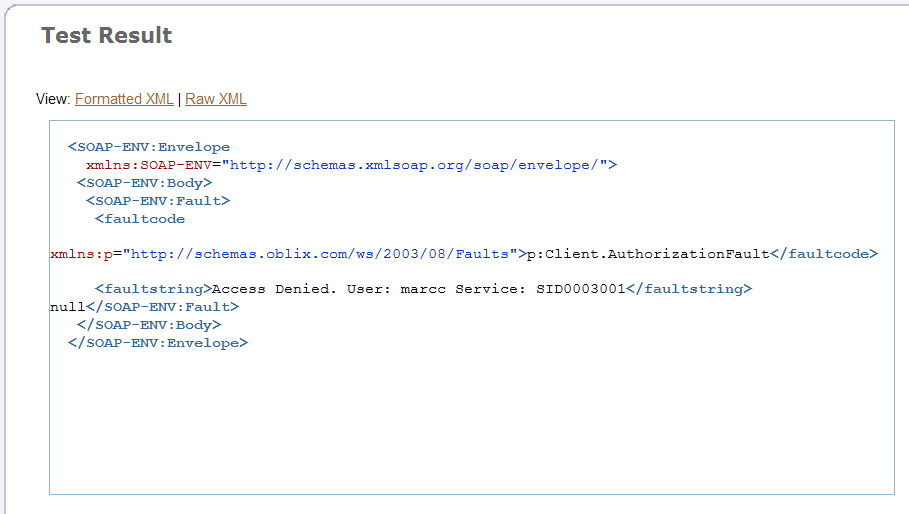
This time, the Test Result page displays a Client Authorization fault, and shows that the user in this example, marcc, was denied access to the service whose ID is SID0003001 (Figure 2-44).
Figure 2-44 Test Result Page Showing a Client Authorization Fault
In this tutorial, you learned about the security features of Oracle Web Services Manager. You created an Oracle WSM Gateway, registered a Web service to the gateway, created policies to protect the Web service, and tested those policies.
Now we will look at the monitoring features of Oracle WSM.
Footnote Legend
Footnote 1: The PreRequest and PostRequest Pipelines will not be supported in future releases of Oracle Web Services Manager.