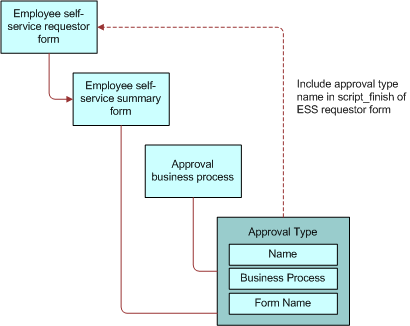
Siebel HelpDesk Guide > Setting Up Employee Self-Service >

Linking Self-Service Forms to the Inbox


To route an employee self-service form to the Inbox, the form and the inbox must be linked. Figure 8 shows the business process used when linking the form and the Inbox.

Figure 8. Linking Employee Self-Service Form to Inbox

As an administrator, you can create an approval type to link a form to the inbox. After the approval type is configured, you can reference the approval type name within the employee self-service requestor form. For information about creating an approval type, see Siebel Applications Administration Guide.

NOTE:  The following procedure is required only for new Employee Self-Service forms, not for preconfigured forms. For more information on creating an Employee Self-Service form, see Designing Employee Self-Service Requestor Forms.

This task is a step in Process of Setting Up Employee Self-Service.

To link employee self-service forms to the Inbox

  1. Navigate to the Site Map > Administration - SmartScript > Scripts view.
  2. In the Scripts list, select the Employee Self-Service form (SmartScript) you want to link to the Inbox.
  3. Click the Programs view tab, and in the Programs list, add a new record and complete the fields.
    1. In Name field, select Script_Finish from the drop-down list.
    2. In the Program Language field, select eScript from the drop-down list, and then click Save.
  4. In the eScript form, enter the following script:

    function Script_Finish ()

    {

    var szScriptSessionId;

    var szRequester;

    var svc;

    var indata;

    var outdata;

    // Cancel saving everything to the database

    Cancel ();

    indata =TheApplication ().NewPropertySet ();

    outdata = TheApplication ().NewPropertySet ();

    // Get the login name of the user

    szRequester = TheApplication ().LoginName ();

    // Get SmartScript Save Session table Id.

    szScriptSessionId = GetSessionId ();

    // ItemObjectId, ItemType, ItemSubmittedBy, and ItemDescription are the

    // required input arguments for the "Universal Inbox.Initialize"

    indata.SetProperty ("ItemObjectId", szScriptSessionId);

    // Item Type is the Approvals Inbox type defined in the

    // Approvals Inbox Administration screen

    indata.SetProperty ("ItemType", "PAFChange");

    // Short Description of the inbox item

    indata.SetProperty ("ItemDescription", szScriptSessionId);

    indata.SetProperty ("ItemSubmittedBy", szRequester);

    // ItemQueueDuration, ItemPriority, and ItemComments are the

    // optional input arguments for the "Universal Inbox.Initialize"

    indata.SetProperty ("ItemQueueDuration", "129600");

    indata.SetProperty ("ItemPriority", "High");

    indata.SetProperty ("ItemComments", "Comments from Employee Self-Service");

    svc = TheApplication ().GetService ("Universal Inbox");

    svc.InvokeMethod("Initialize", indata, outdata);

    }

  5. In the Script field, change the indata.SetProperty ("ItemType", "") parameters as needed.

    The second parameter of the function should equal the name of the appropriate Inbox type. For example:

    // Approvals Inbox Administration screen

    indata.SetProperty ("ItemType", "PAFChange");

    NOTE:  For more information on Inbox types, see Siebel Applications Administration Guide.

  6. Click Check Syntax to locate syntax issues.
  7. Save the program record.
Siebel HelpDesk Guide Copyright © 2010, Oracle and/or its affiliates. All rights reserved. Legal Notices.