| Bookshelf Home | Contents | Index | Search | PDF | |
Siebel eEvents Management Guide for Financial Services > Registering for an Event >
Registering an Attendee
There are two ways a potential attendee can be registered to attend an event:
- Self-Registration. The potential attendee can use a standard Web browser to visit the Siebel eEvents Web site and register for an event listed there.
- Registration by an administrator. A member of your own company can use administrative screens to register the potential attendee for an event.
Although self-registration through the eEvents Web site home page is recommended over registration by an administrator, there may be times when it is convenient for an employee of the presenting organization to register an attendee for an event or a session, rather than requiring the attendee to self-register. This is particularly useful for events that allow registration at the door—employees with access to administration screens can register walk-in attendees upon their arrival.
Self-registration is preferred because it uses LDAP security systems and authenticates a user's username and password. Registration from administrative screens may require site-specific steps to create matching user accounts for both your Siebel application and the security system.
NOTE: Not all event attendees must be customers or clients of your company. If you wish to track the attendance of event staff, speakers, personnel from partner organizations, and so on, you may do so by registering them as attendees.
Registration Workflow
Siebel eEvents Manager for Finance uses workflow rules to eliminate redundant data entry during the registration process. For example, when an event manager registers a contact for a subevent, the workflow automatically (and simultaneously):
- Registers the attendee for the event
- If the contact's company is not registered, registers the account for the subevent (with a status of Restricted Invite)
- If the contact's company is not registered, registers the account for the event (with a status of Restricted Invite)
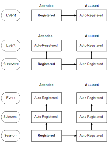
The following diagram illustrates the workflow triggered during event, subevent, and session registration.
Note that the parent event and subevent registration records do not remain synchronized throughout the event management process. If you register an attendee in error, the workflow process still creates a corresponding registration record for the:
- Attendee for the subevent
- Attendee for the event
- Account for the subevent
- Account for the event
If you recognize this error and manually delete the individual from the Attendees list, no further workflow is engaged.
If you want to eliminate all history for the erroneous registration, you also need to manually delete the individual from the Attendees list for the parent event. You will also want to check to see whether any other employees from the account have been registered. If not, you will want to delete the registration records that were created for the account when you erroneously registered the account employee. The account attendee records are created at both the subevent and event levels.
Maintaining up-to-date account attendee records is important because:
- These records supply the data for account attendee reporting, indicating how many accounts attended the event.
- These records determine whether the employees of a given company will be able to see the event listed in the Upcoming Events list in the eEvent home page.
NOTE: Registered contacts continue to see the event in the My Events list.
Registering an Attendee for a Subevent or Session
The following procedure describes how you can register an attendee for a subevent or session directly from the administrative screens. If an attendee registers for a subevent prior to the attendee's account being registered for the subevent, the account is automatically registered for the subevent and for the event. The event registration status is set to Restricted Invite.
Attendees that are not in the system as contacts are automatically added to the contacts table after the following procedure is completed.
To register an attendee for a subevent or session
- From the application-level menu, choose View > Site Map > Events > All Events.
- Click the Sub-Events or Sessions screen tab.
- In the Sub-Events or Sessions list, select the subevent or session for which you want to register an attendee.
- Click the Attendee Registration view tab.
- In the Attendee Registration list, click New button to create a new attendee record.
NOTE: You must select an attendee in the Last Name field before you save the record. If you try to save the record without completing the Last Name field, the system will undo the record and all information is lost.
If the event does not have a registration fee, and if there is space available, the value of the Registration Status should be Confirmed.
If the registration status is automatically set to Waitlisted, then all seats are taken for the subevent or session. If you want, you can continue registering additional attendees, but they are placed on the waiting list.
If there is a fee for attending the subevent or session, and if there are seats available, the registration status is Pending until the fee payment is submitted in Step 6.
After an account or contact is registered, it disappears from the Registration tab. The record is transferred to the Attendees or Account Attendees tab, as appropriate. There is no data loss.
- If this is a fee-based event, to step through the shopping cart and complete the purchase transaction with a credit card, click Finish. (The Finish button is available only if there is a fee.)
The following table describes some fields in the Registration list.
Session Registration and Activity Records
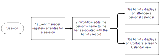
As part of session management, the workflow performs the following tasks:
- When a session is first created, the workflow creates an Activity record to track that session, and sets the Activity Type = Session.
- When an event manager registers a person for the session, the workflow adds the person's name to the list associated with the Activity record.
These workflow activities are generated so that all internal employees who are registered for a session can see that session displayed on their personal calendar within the Siebel application (shown in the Calendar screen). In addition, for all external contacts who are registered for a session, an Activity of Type = Session shows on the contact-centric calendar, which is found in the Contacts screen, Calendar view.
Figure 5 illustrates the workflow triggered during session registration.
Removing a Session Activity
If you register an attendee for a session in error, you need to remove the session activity from the attendee's personal calendar. This requires deleting the individual from the Attendee's list for the session, then removing the attendee's name from the Contacts field in the Activities form.
The following procedure describes how to remove a session activity from an attendee's personal calendar.
To remove a session activity from an attendee's personal calendar
- From the application-level menu, choose View > Site Map > Events > All Events.
- Click the Sessions screen tab, and select the session.
- Click the Attendees view tab, and then delete the individual from the Attendees list for the session.
- From the application-level menu, choose View > Site Map > Activities > All All Activities.
- Select the activity, and then remove the attendee's name from the Contacts field in the Activities form.
Troubleshooting Registration
If you are experiencing difficulty submitting credit card information using the Shopping Cart, make sure that Siebel eEvents Manager for Finance is properly configured for the database software in use. For more information, see Installing and Configuring eEvents Manager for Finance.
| Bookshelf Home | Contents | Index | Search | PDF | |
Siebel eEvents Management Guide for Financial Services Published: 18 April 2003 |