| Bookshelf Home | Contents | Index | Search | PDF | |
Siebel Reports Administration Guide > Reporting in the Siebel Web Clients > About Reporting in the Web Client >
Requesting Reports in the Siebel Web Clients
A user can choose View > Reports from the application-level menu and then select the desired report to be run in the Reports window. Users can also request reports by using the reports button. The next section explains how to activate the reports button feature.
Activating the Reports Button
The number of clicks used to request a report is reduced with the introduction of the reports button. The reports button is located on the Siebel application toolbar to the right of the customer dashboard button.
NOTE: The reports button is only available when the application is using the Reports Server to generate reports.
To activate the reports button
- Using your default text editor open your Siebel application configuration file (for example, siebel.cfg for Siebel Sales), add the following parameter to the [SWE] section:
EnableReportsFromToolbar = TRUE
To request a report using the reports button
- Click the reports button.
- Select the report to generate from the report listing in the drop-down menu.
This is the same listing that would appear in the Reports window (see Figure 3).
From the drop-down menu of the reports button, you can review your previously requested reports by selecting My Reports. For more information, see My Reports View.
Scheduling reports is also possible by selecting Schedule Reports from the drop-down menu after clicking the reports button. The Schedule Reports window that appears includes a drop-down listing from the Reports field that will allow you to select the report that you would like to schedule. For more information see, Figure 5.
NOTE: If you need to designate a language and locale that is different from the one your Siebel application is currently using, then you will need to request reports using View > Reports from the application-level menu.
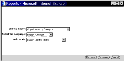
Figure 3 illustrates the report window started from the Opportunities views.
The fields of the Reports window are as follows:
- Select a Report. From the drop-down list, select the report you wish to run. In this example, the report selected is Opportunities by Category.
- Select the Language. From the drop-down list, select the language of the static text to be displayed in the report.
- Locale. From the drop-down list, select the locale setting to use for formatting and displaying the report data.
The language and locale of the report are generated independently of the locale in which the user is currently running Siebel eBusiness Applications.
If no strings are found for the language and locale, labels and properties are defaulted to the original ROD file values for that report.
Then the user may indicate if the report should be run in interactive (Run Now) or batch (Schedule) mode:
- Run Now mode: If the user has selected Run Now, there are no further dialogs. After Run Now is selected, the report will be displayed in the Web Client if it can be generated in 30 seconds or less, as defaulted in the Run Report Time Limit parameter. The default value of this parameter can be changed in View > User Preferences > Behavior. If the report generation takes longer than 30 seconds, the control is returned back to the Siebel Web Client and the message in Figure 4 will be displayed. However, the report generation will continue in the Reports Server irrespective of the Run Report Time Limit parameter value. In the Dedicated Web Client, the Run Now option is the Run option.
NOTE: The browser frame displaying the report in DHTML will automatically close if the user navigates to another view in the application. If the user requires the report to be displayed when navigating to other views, they should select the Download or Print option in the viewer to display the report in PDF format.
To change the Run Report Time Limit parameter at the client level
- From the application-level menu, select View > User Preferences.
- Select the Behavior tab.
- Enter a number in the Run Report Time Limit field to specify the number of seconds you are willing to wait to view the report.
The report will be generated in the Reports Server irrespective of the Run Report Time Limit parameter value.
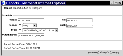
- Schedule mode: In the Web Client, this selection indicates that you wish to run a report in batch mode by scheduling the report for one-time or periodic generation. If Schedule is selected, the Schedule Report window appears, as shown below in Figure 5.
The Schedule Report window allows you to specify the time and date when the report is run, select the option to generate the report with a recurring frequency, and indicate if the report should be printed upon generation. You may also change the name of the report output file.
The fields of the Schedule Report dialog box are as follows:
- Run at. The time of day for report generation.
- On. For a one-time report, the date when the report is to be generated. For a periodic report, the first date the report is generated.
- Repeat check box. Specifies whether the report is one-time or periodic. Checked if periodic, unchecked if one-time.
- Until. Applies to periodic reports. This is the date after which the report is no longer run.
- Print check box. If this box is checked, the report is printed to the specified system printer upon its generation in the Reports Server.
- Printer name picklist. Allows the selection of a printer for report output on execution. The initially displayed printer name is the default printer specified in the user profile. The list of available printers is the set of printers administered for this purpose on the Reports Server.
- Output Name. Specifies the pathname in the Report Encyclopedia for the ROI file to be generated each time the report runs. This pathname is of the following form:
/folder/reportname_language_locale.roi
Where:
foldercan contain subfolders if necessary. The default value in the Report field is your default Report Encyclopedia folder, as specified in the Personal Profile view, followed by the samereport nameas the executable. You can specify a destination folder other than your own default folder, but it must be present on the Report Encyclopedia, and you must have access to it through a user list.
languagerepresents the three-letter code of the language of the static text to be displayed in the report (for example:ENUfor U.S. English).
localerepresents the three-letter code of the locale setting used for formatting and displaying the report data (for example:ENUfor U.S. English).See Global Deployment Guide for a list of three-letter International Standards Organization (ISO) language extensions.
- Report Server Date. Read-only field that indicates the equivalent Reports Server local date.
- Report Server Time. Read-only field that indicates the equivalent Reports Server local time.
After a report has been generated, the report output (ROI file) is available to the user for viewing and printing in the Completed Request Notifications, My Reports, or Explorer views. These views are described in Siebel Reports Server Views.
NOTE: Changing passwords on a regular basis affects scheduled reports. When the password is changed, logging on to the Application Object Manager during the report generation fails. As a result, the scheduled report is not generated. This occurs because the ssPassword value in the parameter file is not changed when you change your password. Therefore, all scheduled reports requested by you need to be rescheduled as well.
| Bookshelf Home | Contents | Index | Search | PDF | |
Siebel Reports Administration Guide Published: 18 July 2003 |