| Bookshelf Home | Contents | Index | Search | PDF | |
Siebel Tools Reference > Repositories > Object Comparison and Synchronization >
Viewing the Object Comparison Dialog Box
The Object Comparison dialog box displays the differences between the selected objects. First, you should select the two objects you would like to compare.
To view differences between two objects
- Select any two top-level objects of the same object type.
- Choose Tools > Compare Objects > Selected. (Selected-Repository, Selected-Archive, and Archive-Archive are the other options.) Compare Objects is also available by right-clicking as shown in the following example.
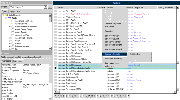
The Object Comparison dialog box appears. This dialog box shows the differences between two objects.
The following features are important in the Object Comparison dialog box:
Explorer Applets. The Explorer applets in the upper left and right sections of the dialog box are similar to what you see after clicking the Detail table of the Object Explorer. They are always in sync in order to show a line-by-line comparison.
Child objects that do not exist in either tree applet are represented with placeholders.
Expanding and collapsing folders are synchronized between the two tree applets. If you expand or collapse an object in one tree applet, its counterpart is automatically expanded or collapsed in the other applet.
Icons. Distinctive icons are used visually to identify child objects that either have no counterpart or have conflicting properties with their counterparts.
- Instances where the two objects do not have property differences are marked by a blue diamond icon. In the example AppletTitle and List for both objects have blue diamonds and are therefore the same.
- Instances where there are differences are marked by a red diamond icon. In the example, ButtonGetList and ButtonImport have differences. The highlighted control for the objects being compared is ButtonGetList. ButtonGetList for the Account - SAP Orders List applet has a Method Invoked value of SAPGetList. The value for the Account - SAP Orders List (MO) applet is SAPGetList (MO).
Properties. By default, only those properties that are different are shown. You need to check the Show All User Properties check box to view all the properties (Figure 244). The Show All Objects check box refers to objects on the Tree controls. By default all objects are shown (those with and without any property differences), and Show All Objects is checked. Show System Properties check box refers to some specific properties like Created, Created By, Updated, Updated By, and so on.
Copying and Deleting. The dialog box has features that allow you to copy and delete specific instances while comparing objects. For example, you can choose a specific Control from the ACD Transfer Call Applet and click Delete. Copying of objects to reconcile the differences between two objects is also accomplished by using the arrows.
NOTE: These operations can only be performed on objects that belong to locked projects.
Arrows. You can copy from one object to the other using the left and right arrows.
- The buttons marked with two plus or two minus signs are used to expand or contract the whole tree. The button marked with two minus signs contracts the whole tree.
- When you select an object instance, the right pointing arrow is enabled if you have the object on the right locked. The left pointing arrow is enabled if you have the object on the left locked.
- When you click the right-pointing arrow, the selected objects in the left tree applet are copied to the object in the right tree applet. If the objects do not exist in the right tree applet they will be created. If they do exist, the objects in the right tree applet will have their properties changed to reflect those in the left tree applet. When you click the left-pointing arrow, the same pattern will occur.
- When you copy an object from one tree applet to the other, the children of the object are copied as well.
NOTE: These arrows are disabled if the destination object does not have its project locked.
- You can delete an object by selecting it and clicking the Delete button under the selected tree applet.
- You can delete only one object at a time.
- The Delete button is only active when you lock the object and when you have selected a single object instance. If you want to delete specific instances of an object, a dialog box is displayed showing the changes and asking you, "Are you sure you want to perform the operation?" If you click No, no changes will be made. If you click Yes, the deletion is made.
- Read-only objects and child objects are greyed out and cannot be updated.
| Bookshelf Home | Contents | Index | Search | PDF | |
Siebel Tools Reference Published: 20 October 2003 |