| Bookshelf Home | Contents | Index | Search | PDF | |
Siebel Tools Reference > Siebel Tools Fundamentals >
Validating Object Definitions
As you modify or create objects, it is very important to validate their definitions also. Validating object definitions is generally a good practice. It should be one of the first things that a developer does if a configuration changes produces a run-time error.
NOTE: The validation process is time consuming. However, you can continue working in Siebel Tools while the validation is run.
Validation is based on a set of rules that help make sure that your configuration changes are logically consistent with existing object definitions and one another. Validating a parent object validates all child objects as well.
The rule that checks for invalid object references is the most important. An invalid object reference occurs when one object (an applet, for example) references another object (a business component) that has been inactivated or deleted.
- Select the object or objects you want to validate.
- Right-click and select Validate, or choose Tools >Validate Object.
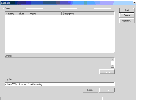
- In the Validate dialog box, click Start.
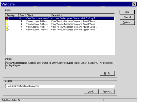
Violations of the rules currently being enforced appear in the Errors list, as shown in the following figure.
User Interface Elements in the Validate Window
- Errors list table. Displays the results of the validation process. Each row in the list table identifies a rule violation for a specific object definition. You can double- click any of the errors to drill down to the specific object definition that contains the error. You can sort the rows by a particular list column by clicking the heading of that list column. You can also widen and narrow list columns by dragging the right or left border of the heading cell.
The Errors list table contains the following columns:
- Severity. An icon appears in this list column for each violation row. It indicates whether the violation is a warning (yellow icon with an exclamation mark) or an error (red icon with a minus sign). Errors cause the compiled application to generate run-time errors.
- Rule. An integer value appears in this list column, identifying the rule that has been violated. Rules are listed in order of rule number in the Validation Options window (shown in Step 2).
- Object. The name of the object definition that failed validation.
- Description. The description of the error or warning. It is normally cut off by the right boundary of the list column. To view the complete text, click a validation row, and it appears in the Details text box.
- Details text box. The full text of the error or warning message for the currently selected row in the Errors list table.
- Go To button. Select an error message row and click Go To to navigate to the corresponding object definition in the Object List Editor. Alternatively, you can double-click the error message.
- Log File text box. Path and filename of a log file containing the list of validation errors and warnings. To save a list of validation rows as a log file, click Save As, navigate to the right directory, and specify a filename. You can then reload the list of error and warning validations at a later time by using the Load button, rather than by repeating the validation process.
- Load button. Opens a previously saved log file and displays its list of validations in the Errors list table.
- Save As button. Saves the current list of validation rows as a log file.
You can change whether or not certain validation options are enforced.
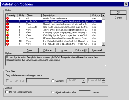
- In the Validate window (see Step 2), click Options.
- Change items in the Enforce column (shown in the following figure) from Yes to No, or vice versa, for rules you want to enforce or not enforce.
You do that by selecting a row and clicking the Enforce or Ignore button.
User Interface Elements in the Validation Options Window
- Rules list table. Lists all rules that can be enforced during validation.
Each row in the list table identifies a rule for a specific object type (or All). You can sort the rows by a particular list column by clicking the heading of that list column. You can also widen and narrow list columns by dragging the right or left border of the heading cell.
The Rules list table contains the following list columns:
- Severity. An icon appears in this list column for each rule row. It indicates whether the rule generates a warning (yellow icon with an exclamation point) or an error (red icon with a minus sign).
- Rule. The integer value that identifies this rule.
- Object. Either the single object type that this rule applies to, or All.
- Description. The description of the rule. It is normally cut off by the right boundary of the list column. To view the complete text, click a rule row, and it appears in the Details text box.
- Enforce. A Yes or No value for each rule row. Yes validates all object definitions of the object type identified in the Object list column. Yes/No values in this list column are changed using the Enforce, Ignore, Enforce All, and Ignore All buttons.
- Save button. Saves the current set of rules and their state (enforced or ignored) to a text file you specify. Other settings are saved to the preferences file automatically when you press ENTER.
- Enforce button. Changes the Enforce list column value in the selected row from No to Yes.
- Ignore button. Changes the Enforce list column value in the selected row from Yes to No.
- Enforce All button. Changes all values in the Enforce list column to Yes.
- Ignore All button. Changes all values in the Enforce list column to No. This has the effect in the next validation of not validating any object definitions.
- Time filter check boxes. The repository Validator should be used only in conjunction with the Time Filter, to avoid validating objects that are not being used. Choose one of two time filters:
- Details text box. The full text of the rule description for the currently selected row in the Rules list table.
- Action check boxes. Choose refinements in Validator actions.
- Do not report warnings check box. When checked, reports errors only, not warnings. It also changes the Enforced setting of all warning rules to No.
- Abort validation after check box and text box. When the check box is checked and an integer value appears in the text box, the system stops validating after the specified number of errors is reached. By default, the validation process continues to run until it is completed or cancelled.
- OK button. Saves the validation option settings and closes the Validation Options dialog box.
- Cancel button. Discards the Validation Options settings and closes the Validation Options dialog box.
| Bookshelf Home | Contents | Index | Search | PDF | |
Siebel Tools Reference Published: 20 October 2003 |