| Oracle® Distributed Document Capture/Oracle® Document Capture Administrator's Guide Release 10gR3 E13871-01 |
|
 Previous |
 Next |
| Oracle® Distributed Document Capture/Oracle® Document Capture Administrator's Guide Release 10gR3 E13871-01 |
|
 Previous |
 Next |
Oracle Distributed Document Capture has a number of user interface screens, including:
Use the General screen to apply general settings to a selected scan profile.
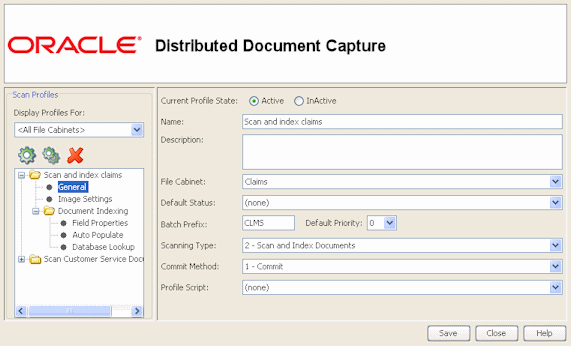
Display this screen by selecting a scan profile and clicking General in the Scan Profiles pane.
| Element | Description |
|---|---|
| Scan Profiles | Use this area to select, add, duplicate, or delete scan profiles, and to select options for display in the main pane.
Open the profile's folder and select its options. Note that Document Indexing options are not available for profiles with a Scanning Type of Scan Only. |
| Display Profiles For | Select a file cabinet to display its scan profiles only, or select <All File Cabinets> to display scan profiles for all file cabinets. |
 |
Click to add a scan profile. If a file cabinet is selected in the Display Profiles For field, the file cabinet is automatically assigned to the new profile. |
 |
Click to create a copy of the selected scan profile. After entering a profile name, the new profile is selected in the Scan Profiles pane. |
 |
Click to delete the selected scan profile. You will be prompted to confirm the deletion.
Deleting a profile makes it no longer available to client users, and users can no longer display, edit, or send batches they created using the profile. See the Current Profile State field to temporarily deactivate a profile before deleting it. |
| Current Profile State | Use this option to deactivate or activate a scan profile. When a scan profile is inactive, the word [Inactive] is displayed after the profile's name to users in the Scan Profile field in the client screen.
By default, scan profiles are Active. When a profile is set to Inactive, users can use the profile (security permitting) to view and edit existing batches, but they cannot use it to create new batches unless its state is changed back to Active. This option is useful when you want to phase out a profile. After you deactivate it, users can complete and send batches that use the profile. After all batches have been sent, delete the profile. |
| Name | This field is required.
Type a name for the scan profile. You can enter a name as long and descriptive as you want, and include spaces and special characters. Users select this name when choosing a scan profile in the client. |
| Description | Type instructions or a description for the user. This information appears in the Profile Description field in the client. For example, include special instructions regarding the type of documents being scanned, or explain how this profile creates documents. |
| File Cabinet | This field is required.
Select the file cabinet in which images will be assigned within Capture. This field lists all file cabinets available. (File cabinets and their fields are defined in Capture Administration.) In Capture, users are assigned to file cabinets. Therefore, users can only see profiles that are assigned to file cabinets accessible to them. Note: Once a scan profile has been created and used, you should not change its file cabinet until all batches have been sent and processed by the server. |
| Default Status | From the list of available statuses, select a default status for batches created using this profile. (Statuses for the selected file cabinet are defined in Capture Administration.) Users can choose another status in the client. For example, you might set a default batch status of None, and a user might change a batch's status to Rush before sending it. |
| Batch Prefix | This field is required.
Specify the prefix to be assigned to all batches created using the profile. The prefix can be up to eight characters long. For example, enter CLMS for Claims documents. |
| Default Priority | Select a default priority for batches created using this profile, by choosing a number from 0 to 10 (where 10 is highest priority). Users can change this priority in the client, by selecting or entering another number. For example, you might set a default priority of 5, and a user might upgrade a selected batch's priority from 5 to 10 before sending it. |
| Scanning Type | Use this option to specify whether client users index using the profile and how documents are created in batches. For more information, see "Scanning Types and Document Creation Options". If indexing is included, you must select index fields.
You specify if you want users to scan only (and not index the batches), scan and index documents one at a time, or scan and index batches (scan a batch of documents, then index them later). |
| Commit Method | Specify how you want indexed batches committed after users send them to the server.
|
| Profile Script | Use this option to assign a VBScript to the profile, which extends client functionality. This field allows you to select a script from those stored in the Scripts folder beneath the virtual directory.
For more information, see the Developer's Guide for Oracle Distributed Document Capture. |
| Save | Click to save changes to the selected scan profile. |
| Close | Click to save changes (if needed) and exit Profile Administration. |
Use the Image Settings screen to apply image settings to a selected scan profile.
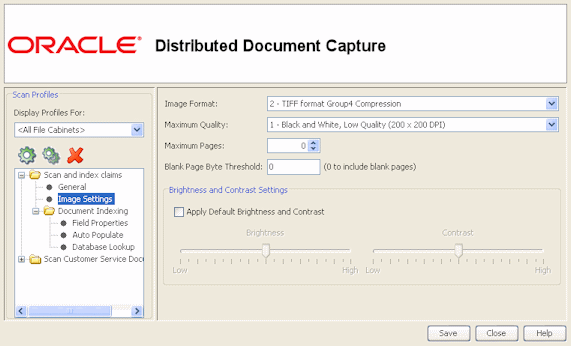
Display this screen by selecting a scan profile and clicking Image Settings in the Scan Profiles pane.
Use this screen to specify the index fields users will complete and how documents will be created.
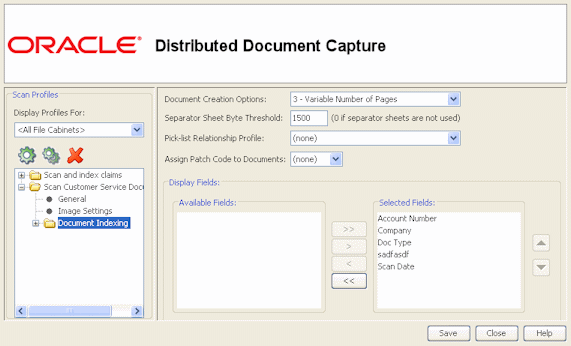
Display this screen by selecting a scan profile and clicking Document Indexing in the Scan Profiles pane. This screen is available when the selected scan profile has a scanning type of 2-Scan and Index Documents or 3-Scan and Index Batches, which both include indexing. (Scanning type is selected on the Profile Administration, General Screen.)
| Element | Description |
|---|---|
| Document Creation Options | This field is displayed only when the Scanning Type field on the General pane is set to 3-Scan and Index Batches.)
Use these options to specify how documents are created when users scan using the profile. For example, the program can create documents containing one page or two pages. You can also specify a variable number of pages, so that the program creates documents with all pages found between separator sheets. Lastly, you can have users decide how documents are created, by prompting them each time they scan using the profile. |
| Separator Sheet Byte Threshold | Use this option to set the scan profile to detect separator sheets. When Oracle Distributed Document Capture encounters an image whose file size is less than or equal to the threshold value you specify in this field, it creates a new document and deletes the separator sheet. The recommended value is 1500; at this setting, Oracle Distributed Document Capture can usually differentiate between a blank separator page and a page with a small amount of text. This value may need to be adjusted to a higher value, depending upon the Image Format and Maximum Quality settings. 1500 is suggested for low quality, black and white TIFF format Group4 compression images. However, you will need to conduct scan testing to determine the value required.
Note: In order for Oracle Distributed Document Capture to detect separator sheets, the Scanning Type field must be set to Scan and Index Batches and the Document Creation Options field must be set to either Variable Number of Pages or Prompt User. If other settings are selected in these fields, the Separator Sheet Byte Threshold field's setting has no effect. In addition, if Prompt User is selected in the Document Creation Options field, client users can override the separator sheet threshold you specify in this separator sheet field. The Blank Page Byte Threshold field also sets the threshold at which blank pages are detected; in that case, however, Oracle Distributed Document Capture deletes blank pages it detects, but does not treat them as separator sheets. Note that if both fields contain a value other than 0, the Separator Sheet Byte Threshold field overrides the Blank Page Byte Threshold field, which means that blank pages detected are used as separator sheets. However, if the Blank Page Byte Threshold value is higher than the Separator Sheet Byte Threshold value, pages whose bytes fall between the two values are deleted from the batch but are not used as separator sheets. |
| Pick-list Relationship Profile | Select a pick-list relationship profile to apply to the scan profile, if needed. For more information, see "About Pick-list Relationships". |
| Assign Patch Code to Documents | When creating a Scan and Index documents or Scan and Index batches-type profile, you can select a patch code type. If a patch code is specified, the server assigns the selected patch code value to the first batch page of the document. When users index a batch imported by the Oracle Distributed Document Capture Service in Oracle Document Capture's Index component, they can navigate between document separators (assuming the feature is enabled in the index profile). |
| Available Fields, Selected Fields | The Available Fields box lists index fields defined in the file cabinet for the profile. The Selected Fields box lists index fields that have been selected for the profile. In the client, these selected fields appear in the Index area of the Review/Index screen. |
Use this screen to specify how users will complete a selected index field. Select a field at the top and choose settings below it.
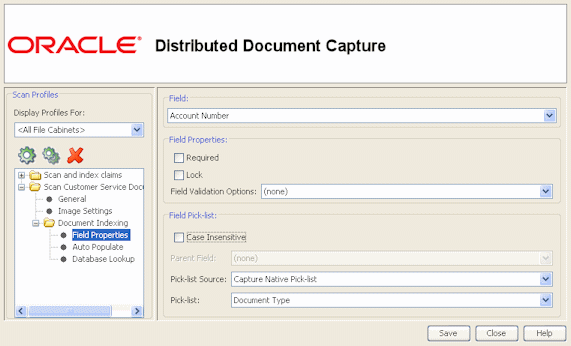
Display this screen by selecting a scan profile and clicking Field Properties from the Document Properties folder in the Scan Profiles pane. This screen is available when the selected scan profile has a scanning type of 2-Scan and Index Documents or 3-Scan and Index Batches, which both include indexing. (Scanning type is selected on the Profile Administration, General Screen.)
| Element | Description |
|---|---|
| Required | Requires the user to enter or select a value in the index field. (By default, index fields are not required.) An asterisk appears before the index field's name in the client when it's required.
In the client, users must index all documents within a batch before they can successfully send the batch to the server. To be indexed, at least one field must contain data, and all required fields must contain values. If any documents in a batch are NOT indexed, a message is displayed to users after the send process completes, informing them that the batches cannot be successfully sent until indexing is complete. |
| Lock | Select this field to make the index field locked. Locking a field prevents users from entering or changing its value. This setting is commonly used with a pick-list to ensure users select a pick-list item. |
| Field Validation Options | Use these options to affect how users enter or select values. You can choose None, Input Mask (see Table 13-1 and Table 13-2), or Input Format (see Table 13-3 and Table 13-4). You can define an input mask or a pick-list for a field, but not both. |
| Input Format | Enter an input format for the selected index field. This field is displayed only when Input Format is selected in the Field Validation Options field.
Use this option to ensure that data entered by users matches a certain format. When the user moves to another index field, the client changes the data if needed to match the specified input format. (This is different from an input mask, which forces the user to enter the data before he or she can leave the index field.) See Table 13-3, "Input Formats" and Table 13-4, "Custom Input Formats". |
| Input Mask | Enter an input mask for the selected index field. This field is displayed only when Input Mask is selected in the Field Validation Options field.
A mask is a filter that controls what users can enter into the index field. For example, a mask might allow users to type numbers but not letters into the field, or might limit the entry to four characters. If the user types a character that does not conform to the mask, the system beeps and the program doesn't accept it. For example, the mask can ensure that users enter Social Security numbers correctly. See Table 13-1, "Input Mask Characters" and Table 13-2, "Input Mask Examples". |
| Case Insensitive | Select this field to disregard case when users match pick-list items using the autocomplete feature.If this box is not checked, users must use the same case when typing the first few characters of a pick-list item. |
| Parent Field | Select a parent field for a Parent/Child pick-list. (This field is active only when you have selected a pick-list relationship profile in the Document Indexing options, as described in "Profile Administration, Document Indexing Screen".) |
| Pick-list Source | Select the source you want to use for the selected field.If using a Capture pick-list, choose Native Capture Pick-lists. If using a database pick-list, choose the database pick-list source. |
| Pick-list | Select the pick-list you want displayed for the selected index field. |
To set up a mask, choose Input Mask in the Field Validation Options field, then enter any of the available mask characters listed in Table 13-1, "Input Mask Characters" into the Input Mask field that displays. Any other characters you type are displayed exactly as typed.
Table 13-1 Input Mask Characters
| Mask Character | Description |
|---|---|
|
# |
Requires a number to be entered. |
|
. |
Decimal. The actual character used is whatever has been specified as the decimal placeholder in your Regional Settings (Windows Control Panel). This is treated as a literal. |
|
, |
Thousands separator. The actual character used is whatever has been specified as the thousands separator in your Regional Settings (Windows Control Panel). This is treated as a literal. |
|
: |
Time separator. The actual character used is whatever has been specified as the time separator in your Regional Settings (Windows Control Panel). This is treated as a literal. |
|
/ |
Date separator. The actual character used is whatever has been specified as the date separator in your Regional Settings (Windows Control Panel). This is treated as a literal. |
|
\ |
Treat the next character in the mask string as a literal. This allows you to use #, &, A, and ? as mask characters. This is treated as a literal. |
|
& |
Character placeholder. Valid values for this placeholder are ANSI characters 32-126 and 128-255. |
|
> |
Convert all following characters to uppercase. |
|
< |
Convert all following characters to lowercase. |
|
A |
Alphanumeric character placeholder where entry is required. |
|
a |
Alphanumeric character placeholder where entry is not required. |
|
9 |
Digit placeholder where entry is not required. |
|
C |
Character or space placeholder where entry is not required. This is the same as the & placeholder. |
|
? |
Letter placeholder. |
Table 13-2 lists examples of input masks.
Table 13-2 Input Mask Examples
| Input Mask | Description | Example Format |
|---|---|---|
|
###-##-#### |
Social Security Number |
123-45-6789 |
|
##-???-## |
Medium date |
17-July-08 |
|
##-##-## |
Short date |
07-17-08 |
|
##:## ?? |
Medium time |
03:15 PM |
To configure an input format, choose Input Format in the Field Validation Options field, then select or type an input format into the Input Format field that appears. Table 13-3, "Input Formats" lists available input formats.
Table 13-3 Input Formats
| Input Format | Description |
|---|---|
|
Custom |
Enter a custom format to be used. See Table 13-4. |
|
Currency |
Number with thousand separator, if appropriate, and two digits to the right of the decimal separator. Output is based on system locale settings. |
|
General Date |
A date and/or time. For real numbers, changes to a date and time; for example, 4/3/08 05:34 PM. If there is no fractional part, changes to only a date; for example, 4/3/03. If there is no integer part, changes to time only; for example, 05:34 PM. Date display is determined by the system locale settings. |
|
Short Date |
Date using the system's short date format. |
|
Medium Date |
Date using the medium date format appropriate for the language version of the host application. |
|
Long Date |
Date according to the system's long date format. |
|
Short Time |
Time using the 24-hour format; for example, 17:45. |
|
Medium Time |
Time in 12-hour format using hours and minutes and the AM/PM designator. |
|
Long Time |
Time using the system's long time format; includes hours, minutes, seconds. |
|
General Number |
Number with no thousand separator (for example, 7500). |
|
Fixed Number |
At least one digit to the left and two digits to the right of the decimal separator (for example, 7500.16). |
|
Standard Number |
Number with thousand separator, at least one digit to the left and two digits to the right of the decimal separator (for example, 7,500.16). |
|
Date formats |
Select from one of the following date formats: yyyy-mm-dd yyyy-mm-dd hh:mm yyyy-mm-dd hh:mm:ss yyyy-mm-dd hh:mm:ss AMPM mm-dd-yyyy mm-dd-yyyy hh:mm mm-dd-yyyy hh:mm:ss mm-dd-yyyy hh:mm:ss AMPM dd-mm-yyyy dd-mm-yyyy hh:mm dd-mm-yyyy hh:mm:ss dd-mm-yyyy hh:mm:ss AM mm/dd/yyyy mm/dd/yyyy hh:mm mm/dd/yyyy hh:mm:ss mm/dd/yyyy hh:mm:ss AMPM yyyy/mm/dd yyyy/mm/dd hh:mm yyyy/mm/dd hh:mm:ss yyyy/mm/dd hh:mm:ss AMPM |
In addition to predefined input forms, you can create custom character or numeric formats, as described in Table 13-4, "Custom Input Formats".
Table 13-4 Custom Input Formats
| Character | Description |
|---|---|
|
@ |
Character placeholder. Display a character or a space. If the string has a character in the position where the at symbol (@) appears in the format string, display it; otherwise, display a space in that position. Placeholders are filled from right to left unless there is an exclamation point character (!) in the format string. |
|
& |
Character placeholder. Display a character or nothing. If the string has a character in the position where the ampersand (&) appears, display it; otherwise, display nothing. Placeholders are filled from right to left unless there is an exclamation point character (!) in the format string. |
|
< |
Force lowercase. Display all characters in lowercase format. Example: A user entry of HELLO becomes hello |
|
> |
Force uppercase. Display all characters in uppercase format. Example: A user entry of This is it becomes THIS IS IT |
|
! |
Force left to right fill of placeholders. The default is to fill placeholders from right to left. |
|
(0) |
Digit placeholder. Display a digit or a zero. If the expression has a digit in the position where the 0 appears in the format string, display it; otherwise, display a zero in that position. If the number has fewer digits than there are zeros (on either side of the decimal) in the format expression, display leading or trailing zeros. If the number has more digits to the right of the decimal separator than there are zeros to the right of the decimal separator in the format expression, round the number to as many decimal places as there are zeros. If the number has more digits to the left of the decimal separator than there are zeros to the left of the decimal separator in the format expression, display the extra digits without modification. |
|
(#) |
Digit placeholder. Display a digit or nothing. If the expression has a digit in the position where the # appears in the format string, display it; otherwise, display nothing in that position. This symbol works like the 0 digit placeholder, except that leading and trailing zeros aren't displayed if the number has the same or fewer digits than there are # characters on either side of the decimal separator in the format expression. Example: With an input format of ##,##0.00, a user entry of 5459.4 becomes 5,459.40. |
|
(.) |
Decimal placeholder. In some locales, a comma is used as the decimal separator. The decimal placeholder determines how many digits are displayed to the left and right of the decimal separator. If the format expression contains only number signs to the left of this symbol, numbers smaller than 1 begin with a decimal separator. To display a leading zero displayed with fractional numbers, use 0 as the first digit placeholder to the left of the decimal separator. The actual character used as a decimal placeholder in the formatted output depends on the Number Format recognized by the system. |
|
(%) |
Percentage placeholder. The expression is multiplied by 100. The percent character (%) is inserted in the position where it appears in the format string. Example: With an input format of 0.00%, a user entry of 5 becomes 500.00% |
|
(,) |
Thousand separator. In some locales, a period is used as a thousand separator. The thousand separator separates thousands from hundreds within a number that has four or more places to the left of the decimal separator. Standard use of the thousand separator is specified if the format contains a thousand separator surrounded by digit placeholders (0 or #). Two adjacent thousand separators or a thousand separator immediately to the left of the decimal separator (whether or not a decimal is specified) means scale the number by dividing it by 1000, rounding as needed. For example, you can use the format string ##0,, to represent 100 million as 100. Numbers smaller than 1 million are displayed as 0. Two adjacent thousand separators in any position other than immediately to the left of the decimal separator are treated simply as specifying the use of a thousand separator. The actual character used as the thousand separator in the formatted output depends on the Number Format recognized by the system. |
|
(:) |
Time separator. In some locales, other characters may be used to represent the time separator. The time separator separates hours, minutes, and seconds when time values are formatted. The actual character used as the time separator in formatted output is determined by system settings. |
|
(/) |
Date separator. In some locales, other characters may be used to represent the date separator. The date separator separates the day, month, and year when date values are formatted. The actual character used as the date separator in formatted output is determined by system settings. |
|
(E- E+ e- e_) |
Scientific format. If the format expression contains at least one digit placeholder (0 or #) to the right of E-, E+, e-, or e+, the number is displayed in scientific format and E or e is inserted between the number and its exponent. The number of digit placeholders to the right determines the number of digits in the exponent. Use E- or e- to place a minus sign next to negative exponents. Use E+ or e+ to place a minus sign next to negative exponents and a plus sign next to positive exponents. |
|
(\) |
Examples of characters that can't be displayed as literal characters are the date-formatting and time-formatting characters (a, c, d, h, m, n, p, q, s, t, w, y, / and :), the numeric-formatting characters (#, 0, %, E, e, comma, and period), and the string-formatting characters (@, &, <, >, and !). Display the next character in the format string. To display a character that has special meaning as a literal character, precede it with a backslash (\). The backslash itself isn't displayed. Using a backslash is the same as enclosing the next character in double quotation marks. To display a backslash, use two backslashes (\\). |
|
- + $ () |
Display a literal character. To display a character other than one of those listed, precede it with a backslash (\) or enclose it in double quotation marks (" "). |
|
("ABC") |
Display the string inside the double quotation marks (" "). To include a string in format from within code, you must use Chr(34) to enclose the text (34 is the character code for a quotation mark (")). |
Use this screen to set the application to automatically fill (populate) selected index fields with certain values. For example, you might want to automatically populate a date field with the batch's scan date instead of having users type it in. Or, you might want to provide a default value for a field that the user could change if needed.
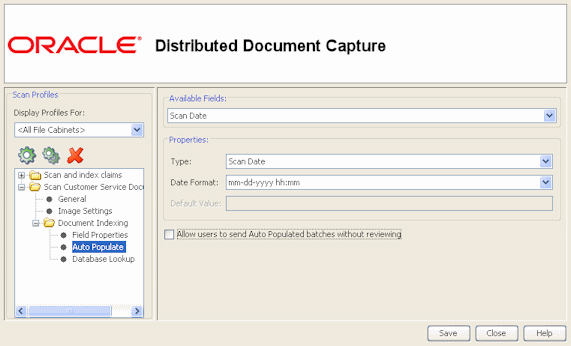
Display this screen by selecting a scan profile and clicking Auto Populate from the Document Properties folder in the Scan Profiles pane. This screen is available when the selected scan profile has a scanning type of 2-Scan and Index Documents or 3-Scan and Index Batches, which both include indexing. (Scanning type is selected on the Profile Administration, General Screen.
Fields do not have to be selected for display in the Document Indexing options in order to be auto populated.
Use this to apply a database lookup profile to a selected scan profile. For more information about database lookups, see "About Database Lookups".
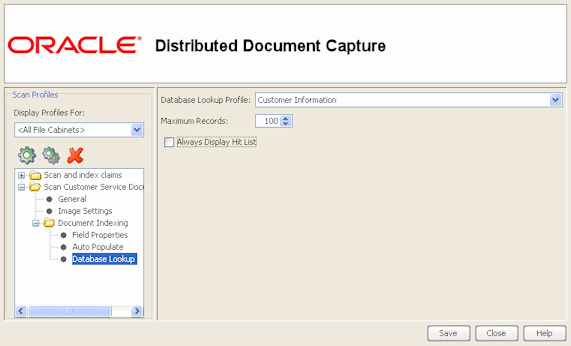
Display this screen by selecting a scan profile and clicking Database Lookup from the Document Properties folder in the Scan Profiles pane. This screen is available when the selected scan profile has a scanning type of 2-Scan and Index Documents or 3-Scan and Index Batches, which both include indexing. (Scanning type is selected on the Profile Administration, General Screen.)
Use the Server Configuration application to select or change server settings.
To activate this application from the Start menu, choose Oracle Distributed Document Capture, then choose Distributed Document Capture Server Configuration.
The Server Configuration application contains the following tabs and screens:
Use the Server Settings tab to select server folders and options.
|
Note: If you are configuring multiple virtual folders, copy the contents of the WebPages folder to each batch folder before setting the batch folders (see the Client Access Folders button). |
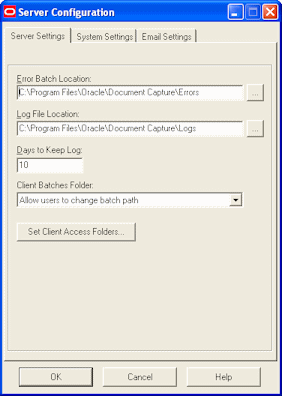
To display these options, choose Oracle Distributed Document Capture from the Start menu, then choose Distributed Document Capture Server Configuration.
| Element | Description |
|---|---|
| Error Batch Location | Specify the folder in which batches containing errors are placed. If an error is encountered in server processing, the entire .pak file is transferred into this folder for analysis. |
| Log File Location | Specify the folder to which the server writes log files. The server logs detailed records on all processing activities. Each day's log file is titled using the format PPSmmddyyyy.log. |
| Days to Keep Log | Specify the number of days to retain the log files the server automatically generates. For example, type 14 to retain log files for two weeks. A value of 0 indicates that the log files will not be deleted. |
| Client Batches Folders | Specify where user batches are temporarily stored before they are sent to the server and whether client users can view and change this location under their Settings options. You can choose:
|
| Set Client Access Folders | Click to set one or more folders for storing batches in the Client Access Folders Screen. |
Use this screen to specify the folder in which scan profiles are stored and in which batches are temporarily stored when users send them from the client.
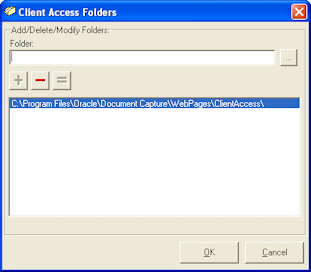
Display this screen by clicking the Set Client Access Folders button on the Server Configuration Screen, Server Settings Tab.
| Element | Description |
|---|---|
| Folder | Click the Browse button to select a folder for client access. You must configure at least one client access folder. Each folder must refer to the subfolder beneath WebPages and must be accessible by your Internet/Intranet users (i.e., within an IIS virtual directory). |
| +, -, = | Click + to add the folder to the Client Access Folders list. Click - to remove a selected folder. Click = to replace the selected folder. |
| Client Access Folders | Lists folders configured for client access. If configuring multiple Capture systems, you can configure more than one client access folder. |
Use the System Settings tab to select system settings.
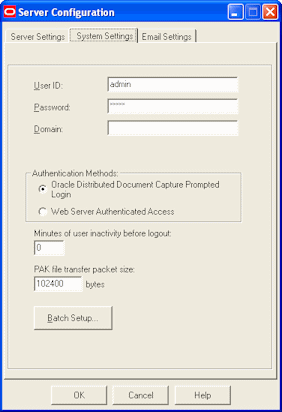
To display these options, choose Oracle Distributed Document Capture from the Start menu, then choose Distributed Document Capture Server Configuration. Click the System Settings tab.
Use this tab's options to specify who should receive an email if the server encounters an error while performing processing. The subject of the error email is Notification of Server Error; it identifies the batch being processed when the error occurred and describes the error.
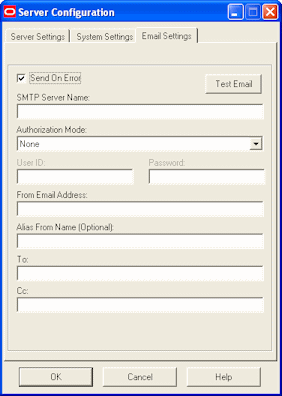
To display these options, choose Oracle Distributed Document Capture from the Start menu, then choose Distributed Document Capture Server Configuration. Click the Email Settings tab.
| Element | Description |
|---|---|
| Send On Error | Select this field if you want an email sent if an error is encountered. |
| SMTP Server Name | Specify the name or IP address of the server you are using to send emails. |
| Authorization Mode | Select a mode for which to authorize email sending. You can choose: None, AUTH LOGIN or CRAM-MD5 |
| User ID and Password | Enter a username and password for email authorization. If you selected None in the Authorization Mode field, you do not need to enter a user ID and password. |
| From Email Address | Enter the email address from which the error emails will be sent. |
| Alias From Name | Enter an alternate name from whom the emails will be sent. |
| To and Cc | Enter the email addresses of people to send the email to. Separate multiple email addresses in either field with a ; (semi-colon). |
| Test Email | Click this button to send a test email. The server verifies the SMTP settings you specified, and sends a test email to all users specified in the To and Cc fields. |