| Oracle® Enterprise Service Bus Developer's Guide 10g (10.1.3.3.0) Part Number E10295-01 |
|
|
View PDF |
| Oracle® Enterprise Service Bus Developer's Guide 10g (10.1.3.3.0) Part Number E10295-01 |
|
|
View PDF |
This chapter discusses various administration tasks for Oracle Enterprise Service Bus.
This chapter contains the following topics:
At different stages in setting up and running Oracle Enterprise Service Bus, administrative attention is required, as described in the following list:
Planning Resources for the ESB
This stage involves choosing the right amount of resources to provide the necessary capacity. This includes simple resources such as CPU, memory, and disk space; and also more complex resources including the type and size of the database to use for the metadata repository.
Installing the ESB software
This stages involves determining the system topology, deciding whether or not to create a cluster of Oracle Enterprise Service Bus Servers installed on different machines for high availability, choosing an active/active or active/passive model for failover, and choosing firewalls.
Designing the enterprise service bus
This stage involves testing and stress testing the enterprise service bus at design time
Functional testing
This stage involves testing to make sure the system supports the message flow as expected, coverage to ensure that the testers do not overlook any key elements, the number of different environments, and production once all testing is complete
Operational tuning
This stage involves tuning the Oracle Enterprise Service Bus to provide the best performance, generating and reading log files, and performing backups and restoring from a backup if necessary.
For information about administration tasks, see Oracle Application Server Administrator's Guide.
To estimate capacity, consider the needs of the business that will use the ESB system, including the following:
The number of message instances
The path through the ESB for each message
Throughput of ESB messages, including:
Peak throughput per hour
Sustained throughput per hour
Load of ESB messages, including:
Peak load start time and duration
Sustained load duration
Resource sizing
The number and sizes of documents, or payloads, passed between the ESB processes and the web services they use
The average response time for synchronous process during normal load
Average response time for synchronous process during peak load
Fault-tolerance – is High Availability required, or is cold failover acceptable?
In addition to business requirements, the needs of the ESB processes that will be used need to be considered and estimated. These needs include:
Payload size
Select the system resource capacity to accommodate the anticipated payloads plus reserve capacity. This is particularly an issue for Java-based application server components. For example, a 50 MB XML document in memory is large and therefore a challenge to process unless system resources are unusually generous. For efficiency, the best practice is to break up large payloads into smaller pieces.
Data transformations performed
End points and integration points
Number of Web services used and how often the ESB process invokes them
Type of Web service invocations, synchronous or asynchronous
Anticipated response times for both synchronous callbacks
To configure Oracle Enterprise Service Bus for high availability, you configure it as a cluster. An ESB cluster is a collection of instances with identical configuration and deployment. Clusters enforce homogeneity between member instances so that a group of ESB systems can appear and function as a single instance. With appropriate front-end load balancing, any instance in an ESB cluster can serve requests. This simplifies configuration and deployment across multiple instances and enables fault tolerance among clustered instances.
When you set up Oracle Enterprise Service Bus as a cluster, you first need to install the J2EE Server and Web Server option of the Application Server Advanced Installation on all the computers that belong to the cluster. Next, you need to install the Design Time (repository) OracleAS Middle Tier option of the ESB installation on one computer of the ESB cluster. Then install the Runtime OracleAS Middle Tier option of the ESB installation on the remaining computers of the ESB cluster. You can have multiple runtime installations, but only one design time (repository) installation. After the installations are completed, you need to configure the systems in the ESB cluster.
For an illustration of an ESB architecture showing a clustered environment, see Figure 9-1.
Figure 9-1 ESB Architecture - Clustered Environment
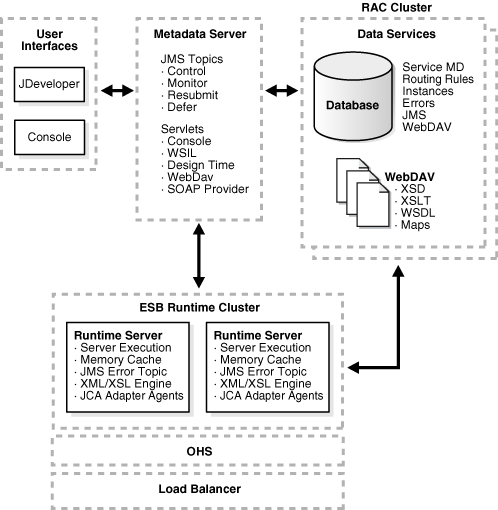
By configuring ESB systems into ESB clusters, you can take advantage of the high availability and load balancing features that OC4J instances configured with multiple processes provide. Configuring ESB systems in ESB clusters do not limit the flow of messages; messages can flow across ESB clusters.
When you install Oracle Enterprise Service Bus, an ESB cluster named ESB is created and configured for you. This default ESB cluster is provided so that you can use ESB tutorial documented in the Oracle Enterprise Service Bus Quick Start Guide without the prerequisite of configuring an ESB cluster manually. For production systems, you will want to create and configure additional ESB clusters, if you want to take advantage of the load-balancing and high-availability features enabled by OC4J clusters.
For information about high availability solutions for Oracle Enterprise Service Bus, see "High Availability for Oracle SOA Suite" in Oracle Application Server High Availability Guide. For information about high availability deployment scenarios for Oracle Enterprise Service Bus, see Oracle Application Server Enterprise Deployment Guide.
Security for Oracle Enterprise Service Bus is provided by Oracle Application Server. See the following resources information about setting up security:
For information about Secure Sockets Layer (SSL) and HTTPS protocol in Oracle Application Server, see "Enabling SSL in the Infrastructure" and "Enabling SSL in the Middle Tier" in Oracle Application Server Administrator's Guide.
For information about JDBC Client-Side security features, see Oracle Containers for J2EE Security Guide.
For information about Oracle Web Services Manager's authentication capabilities, see Oracle Web Services Manager Administrator's Guide.
You can set up notification channels in the event that an error occurs in the Oracle Enterprise Service Bus message processing. These notifications can be sent to the email ID, pager number, mobile number, or phone number of a system administrator or the person assigned to this task. You can set notification channels for each ESB system you have created.
Before notifications are sent, the channels must be configured using the XML files in the Oracle_Home\integration\esb\config\ directory.
Note:
If you have installed the SOA suite, or ESB and BPEL are both on the same middle tier, the configuration files are located in theOracle_Home\bpel\system\services\config directory.This sections contains the following topics:
To specify the notification channels:
Start the ESB Server and open the Oracle ESB Control.
See "Opening the Oracle ESB Control" for instructions.
In the Services navigation tree, select the ESB system for which you want to set channels under Notification Details.
The Definition tab appears similar to Figure 9-2.
Enter or update the values in the Email ID, Pager Number, Mobile Number, or Phone Number fields. Separate multiple entries with commas.
For example, enter sys_admin@mycompany.com,it_mgr@mycompany.com in the Email ID field.
If you are satisfied with your changes, click Apply; otherwise, click Reset to return the properties to the settings that were presented when you opened the page.
To send email for notifications, ensure that the mail server for the Oracle Enterprise Service Bus has been set up properly for each account in the Oracle_Home\integration\esb\config\ns-emails.xml file.
Each EmailAccount element sets the configuration of a specific e-mail account. The name attribute in the EmailAccount element is the name of the account.
A default e-mail account is specified in the e-mail configuration file. This account is used when there is no account specified to send an e-mail notification. This account is also used to send task-related notifications. A default e-mail account must always be specified in the configuration file.
The EmailAccount element contains the OutgoingServerSettings and IncomingServerSettings attributes. For actionable notifications in a workflow, both IncomingServerSettings and OutgoingServerSettings are required.
Table 9-1 describes the XML elements for the e-mail notification configuration stored in the ns_emails.xml file.
Table 9-1 XML Elements for the E-mail Notification Configuration File
| Name | Description |
|---|---|
EmailAccount/Name |
Name of the account. This can be any name, but must be unique within this server. |
EmailAccount/GeneralSettings/FromName |
Name of the |
EmailAccount/GeneralSettings/FromAddress |
E-mail address for the |
EmailAccount/OutgoingServerSettings/SMTPHost |
Name of the outgoing SMTP server |
EmailAccount/OutgoingServerSettings/SMTPPort |
Port of the outgoing SMTP server |
EmailAccount/IncomingServerSettings/Server |
Name of the incoming e-mail server |
EmailAccount/IncomingServerSettings/Port |
Port of the incoming e-mail server |
EmailAccount/IncomingServerSettings/UserName |
User ID of the e-mail address |
EmailAccount/IncomingServerSettings/Password |
User password |
EmailAccount/IncomingServerSettings/Password[encrypted |
Encrypted attribute of the password. It is |
EmailAccount/IncomingServerSettings/UseSSL |
Secure sockets layer (SSL) attribute. It is |
EmailAccount/IncomingServerSettings/Folder |
Name of the folder from which to read the incoming messages |
EmailAccount/IncomingServerSettings/PollingFrequency |
Polling interval for reading messages from the incoming messages folder |
The following is an example of an ns-emails.xml file:
Example 9-1 Sample ns-emails.xml File
<!-- ========================================================================================== -->
<!--  1) The default values in this file have to be changed for email to work.                  -->
<!--  2) In addition to setting the email account(s), you also need to change the attribute     -->
<!--    "NotificationMode" to either (the default value of this attribute is "NONE")            -->
<!--     * "EMAIL" - if you have only email set up, but not other channels                      -->
<!--     * "ALL" - if you have email and other channels like voice, SMS, fax, etc. set up.      -->
<!-- ========================================================================================== -->

<EmailAccounts xmlns="http://xmlns.oracle.com/ias/pcbpel/NotificationService"
               EmailMimeCharset=""
               NotificationMode="NONE">
   <EmailAccount>
      <Name>Default</Name>
      <GeneralSettings>
         <FromName>Oracle ESB</FromName>
         <FromAddress>accountId@yourdomain.com</FromAddress>
      </GeneralSettings>
      <OutgoingServerSettings>
         <SMTPHost>yourdomain.com</SMTPHost>
         <SMTPPort>25</SMTPPort>
      </OutgoingServerSettings>
      <IncomingServerSettings>
         <Server>yourdomain.com</Server>
         <Port>110</Port>
         <Protocol>pop3</Protocol>
         <UserName>accountId</UserName>
         <Password ns0:encrypted="false" xmlns:ns0="http://xmlns.oracle.com/ias/pcbpel/NotificationService">password</Password>
         <UseSSL>false</UseSSL>
         <Folder>Inbox</Folder>
         <PollingFrequency>1</PollingFrequency>
         <PostReadOperation>
            <MarkAsRead/>
         </PostReadOperation>
      </IncomingServerSettings>
   </EmailAccount>
   <!--EmailAccount>
      <Name>TaskServiceReceiving</Name>
      <GeneralSettings>
         <FromName>Oracle BPM</FromName>
         <FromAddress>accountId@yourdomain.com</FromAddress>
      </GeneralSettings>
      <OutgoingServerSettings>
         <SMTPHost>yourdomain.com</SMTPHost>
         <SMTPPort>25</SMTPPort>
      </OutgoingServerSettings>
      <IncomingServerSettings>
         <Server>yourdomain.com</Server>
         <Port>110</Port>
         <Protocol>pop3</Protocol>
         <UserName>accountId</UserName>
         <Password ns0:encrypted="false" xmlns:ns0="http://xmlns.oracle.com/ias/pcbpel/NotificationService">password</Password>
         <UseSSL>false</UseSSL>
         <Folder>Inbox</Folder>
         <PollingFrequency>1</PollingFrequency>
         <PostReadOperation>
            <MarkAsRead/>
         </PostReadOperation>
      </IncomingServerSettings>
   </EmailAccount-->
</EmailAccounts>
The wireless provider for voice is set up in the Oracle_Home\integration\esb\config\ns_iaswconfig.xml file.
Example 9-1 describes the XML elements for the voice notification configuration stored in ns_iaswconfig.xml on the Oracle_Home server.
Table 9-2 XML Elements for the Voice Notification Configuration File
| Name | Description |
|---|---|
/IASWConfiguration/SoapURL |
URL of the wireless service provider |
/IASWConfiguration/UserName |
Name of the user account with the wireless service provider |
/IASWConfiguration/Password |
User password |
/IASWConfiguration/Password[encrypted |
Encrypted attribute of the password. It is |
/IASWConfiguration/ProxyHost |
Name of the proxy server |
/IASWConfiguration/ProxyPort |
Port number of the proxy server |
Note:
The username and password are intentionally left blank at installation. If a username or password is not specified, the wireless server allows up to 50 notifications from a specific IP address. After 50 notifications, you must get a paid account from:http://messenger.oracle.com
You then specify the appropriate username and password in the configuration file, ns_iaswconfig.xml, or by using Oracle Enterprise Manager Application Server Control.
Example 9-2 is a an example of the ns_iaswconfig.xml file.
Example 9-2 Sample ns_iaswconfig.xml File
<?xml version = '1.0' encoding = 'UTF-8'?>
<!-- ========================================================================================== -->
<!-- 1) This XML file stores the details of the IAS Wireless Notification Service.              -->
<!-- 2) In addition to setting the email account(s) in ns_emails.xml and ns_iaswconfig.xml,     -->
<!--    you also need to change the attribute "NotificationMode" in ns_emails.xml to either     -->
<!--    EMAIL or ALL (the default value of this attribute is "NONE")                            -->
<!--     * "EMAIL" - if you have only email set up, but not other channels                      -->
<!--     * "ALL" - if you have email and other channels like voice, SMS, fax, etc. set up.      -->
<!-- =========================================================================================  -->

<IASWConfiguration xmlns="http://xmlns.oracle.com/ias/pcbpel/NotificationService">
  <!-- URL to the SOAP Service -->
  <SoapURL>http://messenger.oracle.com/xms/webservices</SoapURL>

  <!-- UserName - this username should exist in iAS Wireless schema -->
  <UserName></UserName>
  <Password ns0:encrypted="false" xmlns:ns0="http://xmlns.oracle.com/ias/pcbpel/NotificationService"></Password>

  <!-- Proxy information to connect to the hosted wireless service -->
  <ProxyHost>www-proxy.us.oracle.com</ProxyHost>
  <ProxyPort>80</ProxyPort>

  <!-- Specify any custom implementation for sending notification through Voice, Fax,  -->
  <!-- Pager, SMS or IM channels.                                                      -->
  <!--  All refers to an implementation for all of the above specified channels.       -->
  <!--  Email service can't have a custom implementation                               -->
  <CustomNotificationServices>
    <All/>
    <Email/>
    <Voice/>
    <Fax/>
    <Pager/>
    <SMS/>    <IM/>
  </CustomNotificationServices>
</IASWConfiguration>
To send paging notifications, make sure that paging for the Oracle Enterprise Service Bus has been set up properly for each account in the Oracle_Home\integration\esb\config\ns_iaswconfig.xml file.
To send mobile notifications, make sure that mobile notification for the Oracle Enterprise Service Bus has been set up properly for each account in the Oracle_Home\integration\esb\config\ns_iaswconfig.xml file.
To send phone notifications, make sure that the phone notification for the Oracle Enterprise Service Bus has been set up properly for each account in the Oracle_Home\integration\esb\config\ns_iaswconfig.xml file.
See "Configuring the Wireless Provider for Voice".
To add cover pages for a fax, you need to edit the Oracle_Home\integration\esb\config\ns_faxcoverpages.xml. Use the cover page name to specify the cover page in the fax message.
Example 9-3 Example of FAX Cover Page File
<FaxCoverPages xmlns="http://xmlns.oracle.com/ias/pcbpel/NotificationService">
  <FaxCoverPage>
     <Name>legal</Name>
     <MimeType>application/pdf</MimeType>
<FileLocation>C:\esb\runtime\config\faxcoverpages\003288.pdf</FileLocation>
  </FaxCoverPage>
</FaxCoverPages>
To test the services you are creating in Oracle JDeveloper, use the Test Web Service feature of Oracle Enterprise Manager.
To test using Oracle Enterprise Manager, perform the following steps:
Enter the URL for Oracle Enterprise Manager:
For example: http://localhost:8888/em
Enter the username and password to log in.
Click an application server in the list of All Application Servers.
For example, click the home application server.
In Application Server page, click the Web Services link.
The list of Web services displays.
Figure 9-3 Oracle Enterprise Manager Web Services
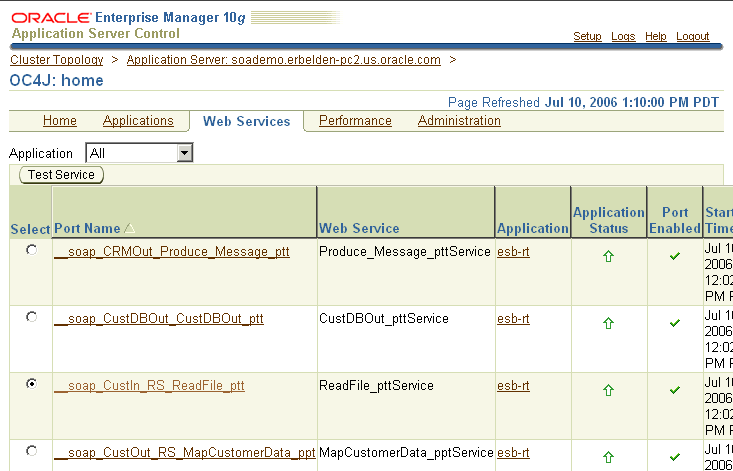
Select a Web service and click the Test Service button.
The Test Web Service page displays.
Figure 9-4 Oracle Enterprise Manager Test Web Service
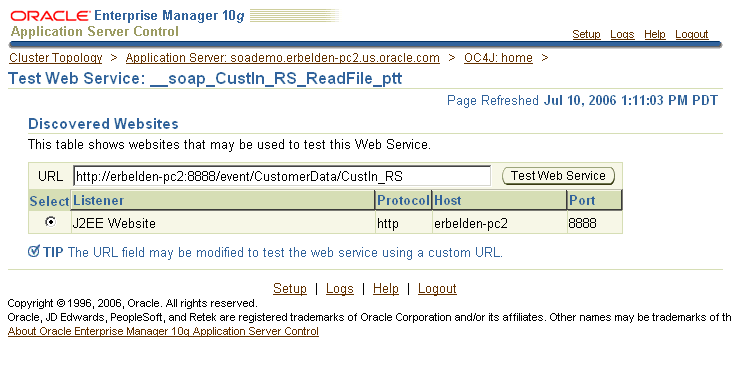
In the Test Web Service page, click the Test Web Service button.
The test page displays.
Enter data in the fields of the Test page to test the service.
For example, enter sample data for a customer order that would be processed by the CustIn_RS routing service.
Figure 9-5 Oracle Enterprise Manager Test Page
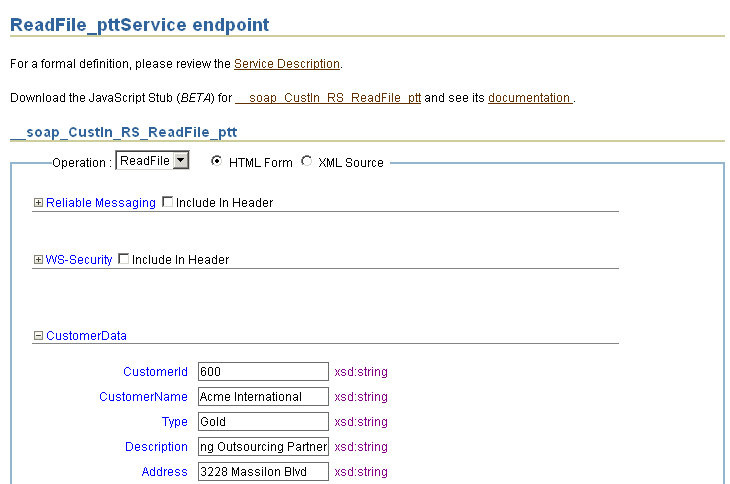
After providing sample data, click Invoke to display the Test Results page.
Check whether there are any errors in the page. You can close the test page after viewing the results.
View Instances in the Oracle ESB Control to check whether the message instance was successfully processed with the sample data. For an example of successful processing in the Instances in the Oracle ESB Control, see Figure 3-2.
If necessary, correct any errors and repeat the test process.
You can view logs for all the OC4J components running on an application server with Oracle Enterprise Manager Application Server Control. Oracle Application Server components generate log files containing messages that record all types of events, including startup and shutdown information, errors, warning messages, access information about HTTP requests, and additional information. You can set the level of information in a log file with the Logger Configuration page.
This sections contains the following topics:
See Also:
"Managing Log Files" in Oracle Application Server Administrator's Guide for more information about the log files of Oracle Application Server componentsYou can view log files using Oracle Enterprise Manager, as follows:
Go to the following URL:
http://host_name:port_number/em
Log in with username/password.
Click an application server to display the home page of the server.
Click Logs in the upper right corner to display the Log Files page.
Expand Components > OC4J > name-of-application server
The page appears similar to Figure 9-6.
Figure 9-6 Oracle Application Server Control – OC4J Log Files
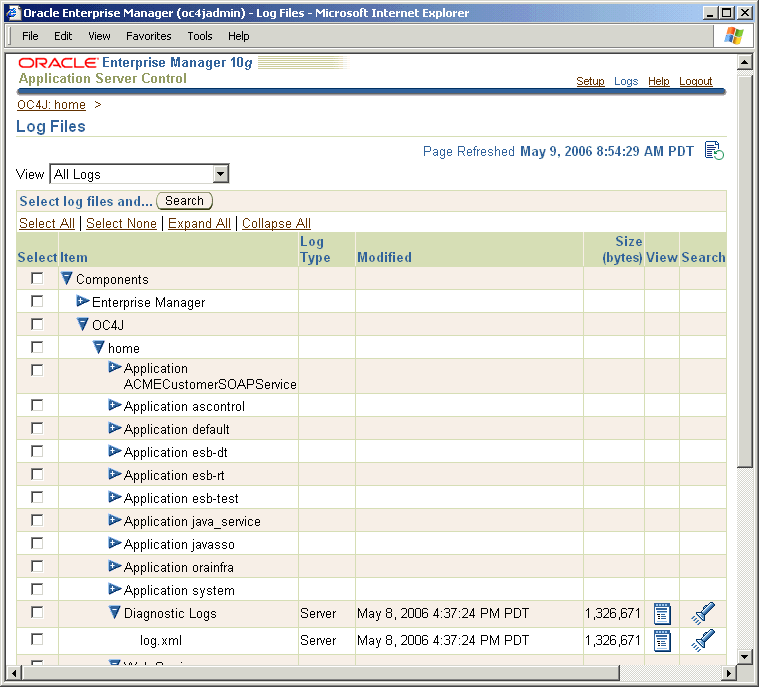
Expand the items in the Select list until you locate a specific log file, then click View.
For example, expand the Application esb-dt, Application esb-rt, and Diagnostic Logs items. Click the icon in the View column to display the log file text.
The diagnostic file is located in the log.xml file and can be viewed with a text editor.
You can configure log file settings for individual logger classes to display more information in the log files.
To configure the log file settings:
Go to the following URL:
http://host_name:port_number/em
Log in with username/password.
Click an application server to display the home page of the server.
Click the Administration tab.
Under Administration Tasks > Properties, click Go to Task next to Logger Configuration.
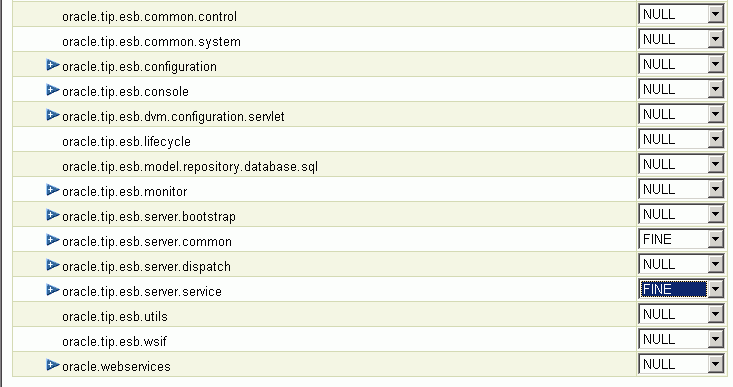
Expand Root Logger > oracle to display the logger classes and the Log Level settings.
You can locate specific logger classes by name with the search option. In the Search by Logger Name field, enter a string and then click Go.
For example, enter esb in the Search by Logger Name field.
In the Log Level list, select a level option for the logger classes you want to configure.
For example, set oracle.tip.esb.server.common and oracle.tip.esb.server.service to FINE, as shown in Figure 9-6.
Figure 9-7 Oracle Application Server Control – Logger Configuration
Click Apply.
You can move the ESB instance to a different database if you want to change the Oracle Home of the ESB Server.
To move the ESB instance, follow these steps:
If the new Oracle Home does not have an ESB schema, create a new database schema by executing the createuser.sql and createschema.sql scripts that are located in the Oracle_Home/integration/esb/sql/oracle/ directory.
For example:
SQL>@Oracle_Home\integration\esb\sql\oracle\createuser.sql
SQL>@Oracle_Home\integration\esb\sql\oracle\createschema.sql
If the new Oracle Home contains already contains an ESB schema:
You can back up the ESB metadata with the ESB export utility. See "Using the ESB Import and Export Utilities".
You can remove the existing schema with the drop_esb_tables.sql script that is located in the Oracle_Home/integration/esb/sql/oracle/ directory.
Configure the ESB JDBC connection pooling to point to the new Oracle Home in the Oracle_Home/j2ee/home/config/data-sources.xml file. You need to update the connection-factory details in the data-sources.xml file:
<connection-pool name="ESBPool">
  <connection-factory factory-class="driver_class_name_for_db"
     url="url_to_database" user="db_user_name" password="db_user_password"/>
</connection-pool>
Export the ESB parameters from the old Oracle Home by running the ant utility as follows:
ant export-params -Dparamfile=file_path_specfication\esb.properties>
                  -DDB_URL=jdbc_url_to_old_database
                  -DDB_USER=db_user_name
                  -DDB_PASSWORD=db_user_password
You do not need to provide the DDB_URL, DDB_USER, and DDB_PASSWORD parameters if you are using a standalone Oracle Lite database.
Export the metadata from the old Oracle Home with the ESB export utility.
For example:
> Oracle_home/integration/esb/bin/export c:\temp\metadata.zip
Import the ESB parameters from the old Oracle Home to the new Oracle Home by running the ant utility as follows:
ant import-params -Dparamfile=file_path_specfication\esb.properties>
                  -DDB_URL=jdbc_url_to_new_database
                  -DDB_USER=db_user_name
                  -DDB_PASSWORD=db_user_password
You do not need to provide the DDB_URL, DDB_USER, and DDB_PASSWORD parameters if you are using a standalone Oracle Lite database.
Restart the ESB Server with the opnmctl utility as follows:
> Oracle_Home\opmn\bin\opmnctl stopall
> Oracle_Home\opmn\bin\opmnctl startall
Import the metadata from the old Oracle Home to the new Oracle Home with the ESB import utility.
For example:
> Oracle_home/integration/esb/bin/import c:\temp\metadata.zip
You can use the Oracle Enterprise Service Bus import and export utilities to export ESB metadata to and from an ESB Server on different Oracle instances.
To export metadata from anESB Server:
Start the ESB Server if it is not currently running. See "Starting, Stopping, and Accessing Oracle Enterprise Service Bus Components".
Open a operating system command window.
Change the directory to the Oracle_home/integration/esb/bin directory.
For example, cd c:\product\10.1.3.1\integration\esb\bin
Enter the following command:
export file-spec
   -system system_name
   -serviceGroup service_group_name
   -service  service_name
   -flow
file-spec is the full file specification for the file in which you want to export the metadata
-system is the name of the system to be exported. All service groups/services belonging to the specified system are exported recursively.
-serviceGroup is the name of the service group to be exported. All service groups/services belonging to the specified service group are exported recursively.
-service is the name of the service to be exported
-flow indicates that the entire flow of the service specified using -service option is to be exported. All the down stream services along with this service are exported. If inbound adapter service is specified using -service option, then all services involving in the flow are exported. If a routing service is specified, the routing service and all the down stream services involving in the flow are exported.
The options -system, -serviceGroup, and -service can be used multiple times for different entities. If no option is specified, the entire metadata is exported.
Examples:
export c:\temp\metadata.zip
export c:\esb\metadata.zip -system T-Vox -system T-Vox1 -serviceGroup T-Vox2.Stores -service T-Vox3.Stores.SFOProductLanuch -flow
To import metadata to an ESB Server:
Start the ESB Server if it is not currently running. See "Starting, Stopping, and Accessing Oracle Enterprise Service Bus Components".
Open a operating system command window.
Change the directory to the Oracle_home/integration/esb/bin directory.
For example, cd c:\product\10.1.3.1\integration\esb\bin
Enter the following command:
import file-spec
   -system system_name
   -serviceGroup service_group_name
   -service  service_name
   -flow
file-spec is the full file specification for the file that contains the metadata that you want to import
-system is the name of the system to be imported. All service groups/services belonging to the specified system are imported recursively.
-serviceGroup is the name of the service group to be imported. All service groups/services belonging to the specified service group are exported recursively.
-service is the name of the service to be imported
-flow indicates that the entire flow of the service specified using -service option is to be imported. All the down stream services along with this service are imported. If inbound adapter service is specified using -service option, then all services involving in the flow are imported. If a routing service is specified, the routing service and all the down stream services involving in the flow are imported.
The options -system, -serviceGroup, and -service can be used multiple times for different entities. If no option is specified, the entire metadata is imported.
Examples:
import c:\temp\metadata.zip
import c:\esb\metadata.zip -system T-Vox -system T-Vox1 -serviceGroup T-Vox2.Stores -service T-Vox3.Stores.SFOProductLanuch -flow
To use Oracle Enterprise Service Bus with Oracle InterConnect, you need to install and configure the ICAdapter for use with ESB.
To install and configure the InterConnect Adapter, perform the following steps. For a SOA basic (instead of advanced) installation, replace oc4j_soa with home in the java commands.
Deploy ICAdapter with the following:
java -jar admin_client.jar
  deployer:oc4j:opmn://hostname:opmn_request_port/oc4j_soa oc4jadmin welcome1
    -deploy -file oracle_home\integration\esb\lib\icadapter.rar
    -deploymentName IcAdapter
Deploy ICwsilplugin with the following:
java -jar admin_client.jar
  deployer:oc4j:opmn://hostname:opmn_request_port/oc4j_soa oc4jadmin welcome1
    -deploy -file oracle_home\integration\esb\lib\icwsilplugin.ear
    -deploymentName icwsilplugin -parent default
Bind ICWsilPlugin with the following:
java -jar admin_client.jar
  deployer:oc4j:opmn://hostname:opmn_request_port/oc4j_soa oc4jadmin welcome1
    -bindWebApp -appName icwsilplugin -webModuleName icwsilplugin
    -webSiteName default-web-site -contextRoot /ic
Update the oc4j-ra.xml file in the Oracle_home\j2ee\home\application-deployments\defaults\ICAdapter directory. The following is an example of the oc4j-ra.xml file.
<?xml version="1.0"?>
<oc4j-connector-factories ...... schema-minor-version="0" >
 <connector-factory location="eis/ICAdapter"
                    connector-name="Interconnect Adapter">
   <config-property name="applicationName" value="BPELPM"/>
   <config-property name="driverClassName"
                    value="oracle.jdbc.driver.OracleDriver"/>
   <config-property name="connectionString"
                    value="jdbc:oracle:thin:@bpel-db-as:1521:ORCL"/>
   <config-property name="userName" value="ichub"/>
   <config-property name="password" value="Manager1"/>
   <config-property name="repoName" value="InterConnectRepository"/>
   <connection-pooling use="none"></connection-pooling>
   <security-config use="none"></security-config>
 </connector-factory>
</oc4j-connector-factories>
Add the oai.jar path to the server.xml file in the Oracle_home\j2ee\home\config directory. The following is an example of the server.xml file.
<shared-library name="bpel" version="1.0" library-compatible="true">
  <code-source path="c:/oracle/mid/integration/interconnect/lib/oai.jar"/>
  <code-source path="../../../integration/esb/lib/orabpel-common.jar"/>
  <code-source path="../../../integration/esb/lib/orabpel-thirdparty.jar"/>
  <code-source path="../../../integration/esb/lib/orabpel.jar"/>
  <code-source path="../../../integration/esb/lib/orabpel-boot.jar"/>
  <code-source path="../../../integration/esb/lib/bpm-infra.jar"/>
  <code-source path="../../../integration/esb/lib/olite40.jar"/>
  <code-source path="../../../integration/esb/lib/wdk.jar"/>
  <import-shared-library name="apache-commons"/>
  <import-shared-library name="oracle.xml"/>
  <import-shared-library name="oracle.jdbc"/>
  <import-shared-library name="oracle.jwsdl"/>
  <import-shared-library name="oracle.dms"/>
  <import-shared-library name="soap"/>
  <import-shared-library name="oracle.ws.client"/>
</shared-library>
Restart the ESB Server.
Register the InterConnect events and procedures under the ESB application in InterConnect to ESB as ESB services with the following:
oracle_home\integration\esb\bin\regadapters.bat
On a Linux system, run the regadapters.sh script.