| Oracle® VM Manager User's Guide Release 2.1 Part Number E10901-04 |
|
|
View PDF |
| Oracle® VM Manager User's Guide Release 2.1 Part Number E10901-04 |
|
|
View PDF |
This Chapter describes how to start using Oracle VM Manager. It includes the following sections:
After you install Oracle VM Manager, go to one of the following Web sites to log into Oracle VM Manager:
For local access: http[s]://127.0.0.1:port/OVS
For remote access: http[s]://hostname:port/OVS
Where, hostname refers to the host name or IP address of the Oracle VM Manager host. For example, to connect to Oracle VM Manager using the standard port of 8888 on a host named example.com, use:
http://example.com:8888/OVS
To connect to Oracle VM Manager using the Secure Sockets Layer (SSL) port of 4443 on a host named example.com, use:
https://example.com:4443/OVS
You can obtain an account using one of the following ways:
If you have configured the default administration account admin when you installed Oracle VM Manager, you can use this account to log in to Oracle VM Manager directly. By default, this account is granted the administrator role.
Contact the administrator of Oracle VM Manager to create an account with any role you need, including administrator, manager, and user.
If you only want to use the basic functions as a common user, such as creating and using virtual machines, or importing resources, you can register a new account by yourself. After registering the account, you need to ask the administrator to assign some server pools and groups to your account. By default, the account you register is granted the user role.
For more information about the roles, see Roles in Oracle VM Manager.
To register a new account with Oracle VM Manager:
On the Oracle VM Manager Login page, click Register.
The User Information screen is displayed. Enter your personal account information.
Username
Enter a descriptive user name you use for login.
Password
Enter the password for the account.
Retype Password
First Name
Last Name
Click Next.
Confirm your account details.
An account is created, and a confirmation message is displayed on the Oracle VM Manager Login screen.
Before using any features, you need to ask the administrator to assign some server pools and groups to your account. For more information on editing users, see Editing a User.
Now you can use the new account to log in to Oracle VM Manager.
To open the Login page of Oracle VM Manager, enter either of the following addresses in a Web browser:
For local access: http[s]://127.0.0.1:port/OVS
For remote access: http[s]://hostname:port/OVS
Where, hostname refers to the host name or IP address of the Oracle VM Manager host. For example, to connect to Oracle VM Manager using the standard port of 8888 on a host named example.com, use:
http://example.com:8888/OVS
To connect to Oracle VM Manager using the Secure Sockets Layer (SSL) port of 4443 on a host named example.com, use:
https://example.com:4443/OVS
On the Oracle VM Manager Login page, enter your user name and password to log in. Now you can create virtual machines, import resources, and so on.
After logging in, the available tabs vary, depending on the role of your account, as shown in Table 2-1, "Available Tabs for Each Role". If you want to change the role of your account, contact the administrator. Only administrators can change the roles of accounts.
Table 2-1 Available Tabs for Each Role
| Role | Available Tabs |
|---|---|
|
User |
|
|
Manager |
|
|
Administrator |
|
To change your account information, such as e-mail address and password, click Profile on the upper-right part of any page.
If you forget your password, click Forgot Password on the Login page and submit your account name. A new password will be sent to your registered e-mail address.
After installation, you can log in to Oracle VM Manager, and follow the Wizard to create a server pool containing a physical server which will act as the Server Pool Master, the Virtual Machine Server, and the Utility Server.
To create a server pool by following the Wizard:
On the Welcome page, click Next.
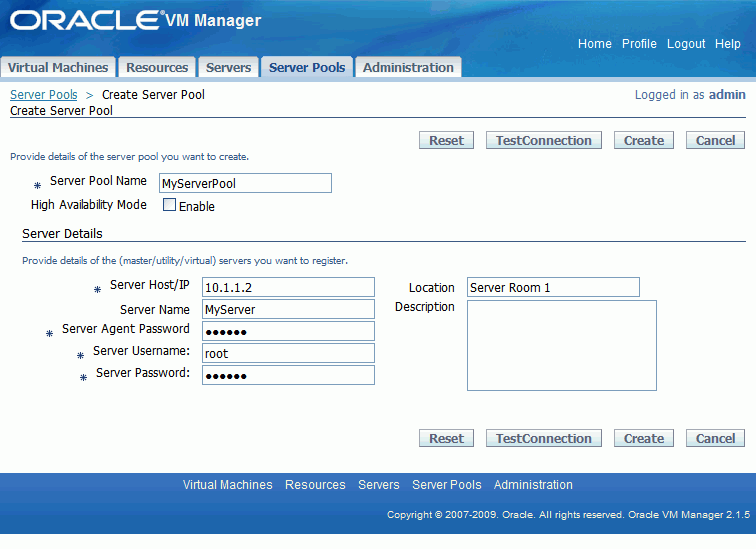
On the Server Information page, enter the server pool information:
Enter the name of the server pool in the Server Pool Name field.
Select whether to enable HA with the High Availability Mode check box. To use HA, you must enable HA in the server pool, and on each virtual machine. For information about HA, see Enabling High Availability (HA). For more information on how to set up HA prerequisites, see the Oracle VM Server User's Guide.
Enter the following information about the Oracle VM Server in the Server Details box:
Server Host/IP
Enter the host name, or IP address of the Oracle VM Server, for example:
192.168.2.20
or
hostname.example.com
Server Name
Enter a name for the Oracle VM Server. This must be unique.
Server Agent Password
Enter the password to access Oracle VM Agent installed on the Oracle VM Server.
Server Username
Enter the username to log in to the Oracle VM Server.
Server Password
Enter the password to log in to the Oracle VM Server.
Location
The location of the Oracle VM Server. For example, Server Room 1.
Description
A description of the Oracle VM Server.
To test the connection to the Oracle VM Server click Test Connection. If the information is incorrect, or the Oracle VM Server is not available, you cannot add it to the server pool.
Figure 2-3 Adding Servers to a Server Pool

Click Create to create the server pool.
Now you have created a server pool, you can continue to add more Virtual Machine Servers and Utility Servers, or add more users to the server pool. For more information on creating server pools and adding servers, see Creating a Server Pool and Adding a Server.
Once the server pool is created, you can start importing resources, or creating virtual machines. See Chapter 5, "Managing Resources" and Chapter 6, "Managing Virtual Machines".