3 Using the Connector

After you deploy the connector, you must configure it to meet your requirements. This chapter discusses the following connector configuration procedures:

Note:

These sections provide both conceptual and procedural information about configuring the connector. It is recommended that you read the conceptual information before you perform the procedures.

3.1 Summary of Steps to Use the Connector

Note:

It is assumed that you have performed all the procedures described in the preceding chapter. In Oracle Identity Manager release 11.1.x or later, a scheduled job is an instance of a scheduled task.

See Scheduled Tasks in Oracle Fusion Middleware Administering Oracle Identity Manager for more information about scheduled tasks and scheduled jobs.

The following is a summary of the steps to use the connector:

  1. Configure and run the scheduled task to synchronize the Lookup.SAP.HRMS.EmployeeType lookup definition. See Configuring the Scheduled Job for Lookup Field Synchronization for information.
  2. Test full reconciliation as follows:

    See Performing Full Reconciliation for instructions.

    • Generate flat files for a few users.
    • Configure and run the SAP HRMS User Recon scheduled job.
    • Check if reconciliation events are created for user records in the flat file.
  3. Perform first-time (full) reconciliation. See Performing Full Reconciliation for insructions.
  4. Change from full reconciliation to incremental reconciliation. See Performing Incremental Reconciliation for instructions.

Note:

As mentioned earlier in this guide, you can switch from incremental reconciliation to full reconciliation and back to incremental reconciliation at any time. It is recommended that you perform full reconciliation at periodic intervals (for example, a few months) to fully ensure that OIM Users exist for all target system users.

3.2 Configuring the Scheduled Job for Lookup Field Synchronization

The Lookup.SAP.HRMS.EmployeeType lookup definition is used to hold mappings between combinations of Employee Group and Employee Subgroup values from the target system and employee types defined in Oracle Identity Manager.
The SAP HRMS EmployeeType Lookup Recon scheduled Job is used to fetch the Employee Group and Employee Subgroup values from the target system and populate them in the Code Key column of the Lookup.SAP.HRMS.EmployeeType lookup definition.To configure and run the SAP HRMS EmployeeType Lookup Recon scheduled task:

  1. Depending on the Oracle Identity Manager release you are using, perform one of the following steps:
    For Oracle Identity Manager release 11.1.1.x:
    • Log in to the Administrative and User Console.
    • On the Welcome to Oracle Identity Manager Self Service page, click Advanced in the upper-right corner of the page.
    For Oracle Identity Manager release 11.1.2.x or later, search for and open the scheduled job as follows:
    • On the Welcome to Oracle Identity Manager Advanced Administration page, in the System Management region, click Search Scheduled Jobs.
    • On the left pane, in the Search field, enter the name of the scheduled job as the search criterion. Alternatively, you can click Advanced Search and specify the search criterion.
    • In the search results table on the left pane, click the scheduled job in the Job Name column.
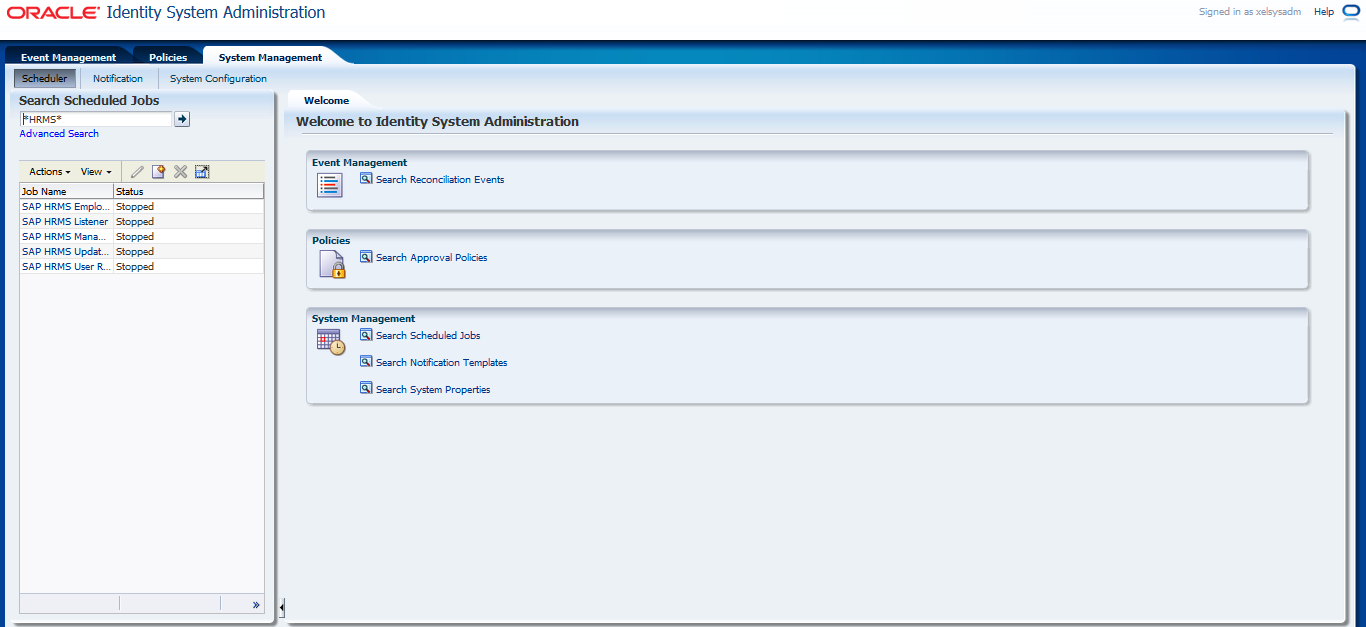
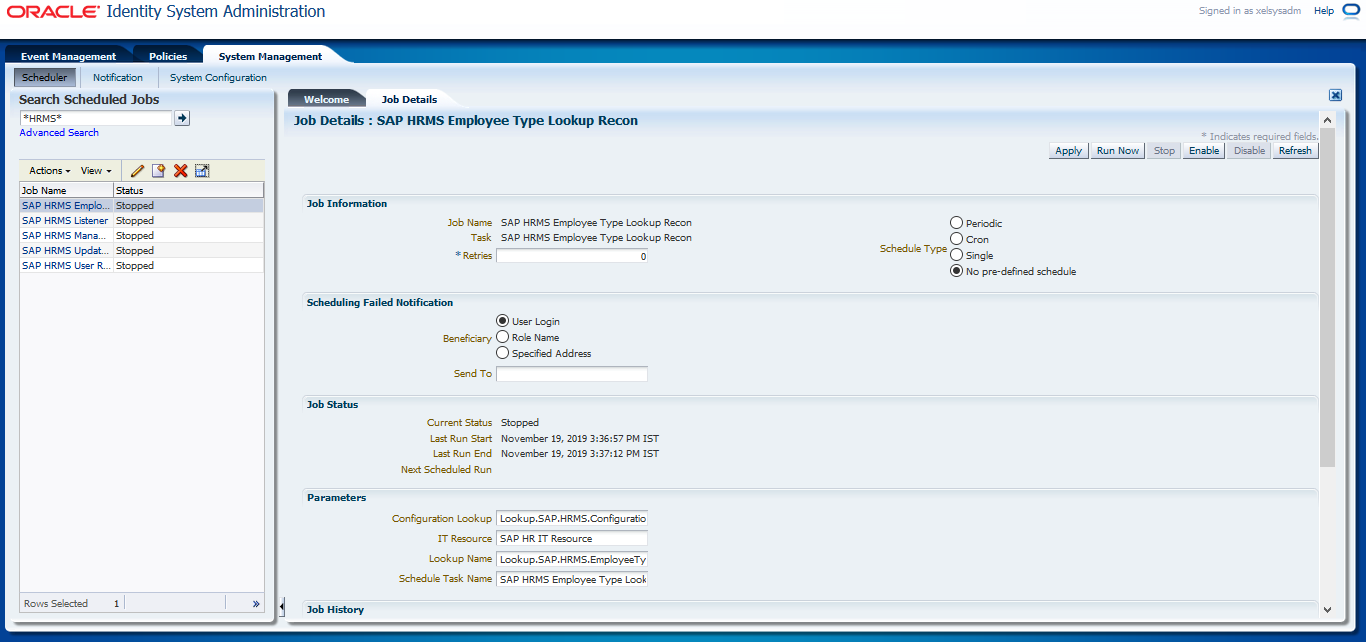
    This screenshot displays the System Administration page.
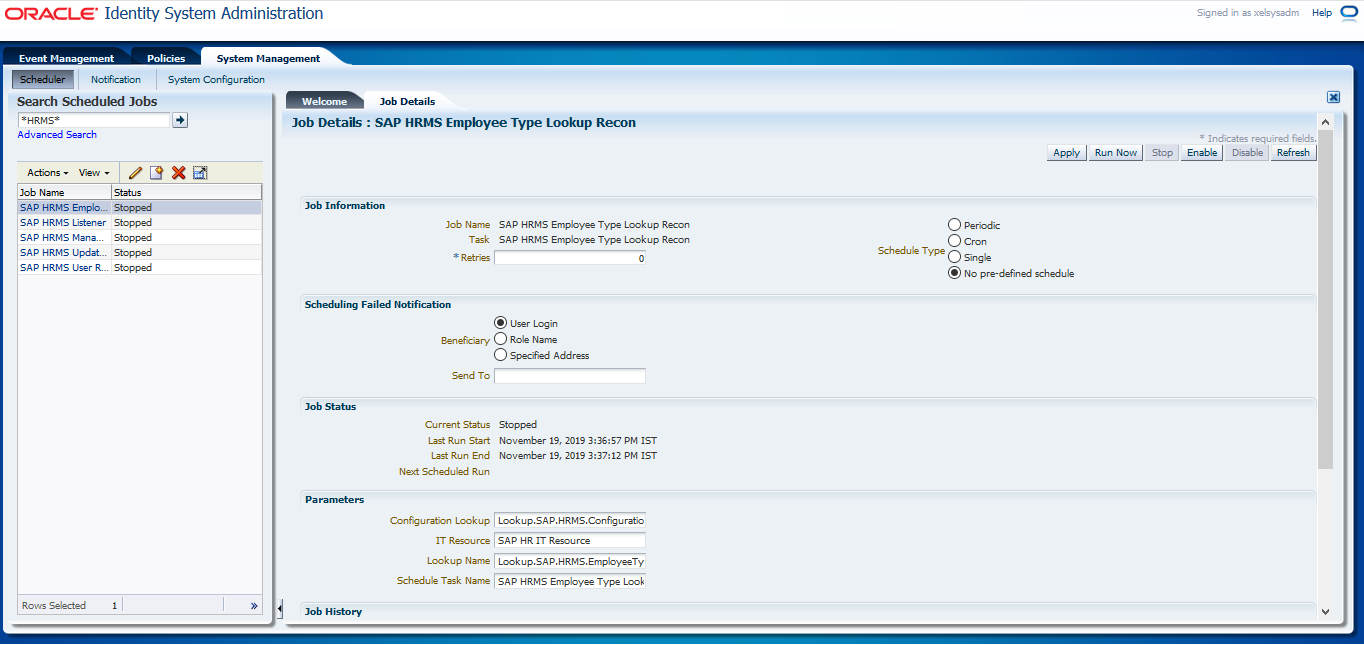
  2. On the Job Details tab, you can modify the parameters of the scheduled jobs.
    • Retries: Enter an integer value in this field. This number represents the number of times the scheduler tries to start the job before assigning the Stopped status to the job.
    • Schedule Type: Depending on the frequency at which you want the job to run, select the appropriate schedule type.

      Note:

      See Creating Jobs of Oracle Fusion Middleware Administering Oracle Identity Manager for more information about schedule types.

      In addition to modifying the job details, you can enable or disable a job.

    This screenshot displays the parameters of the scheduled jobs
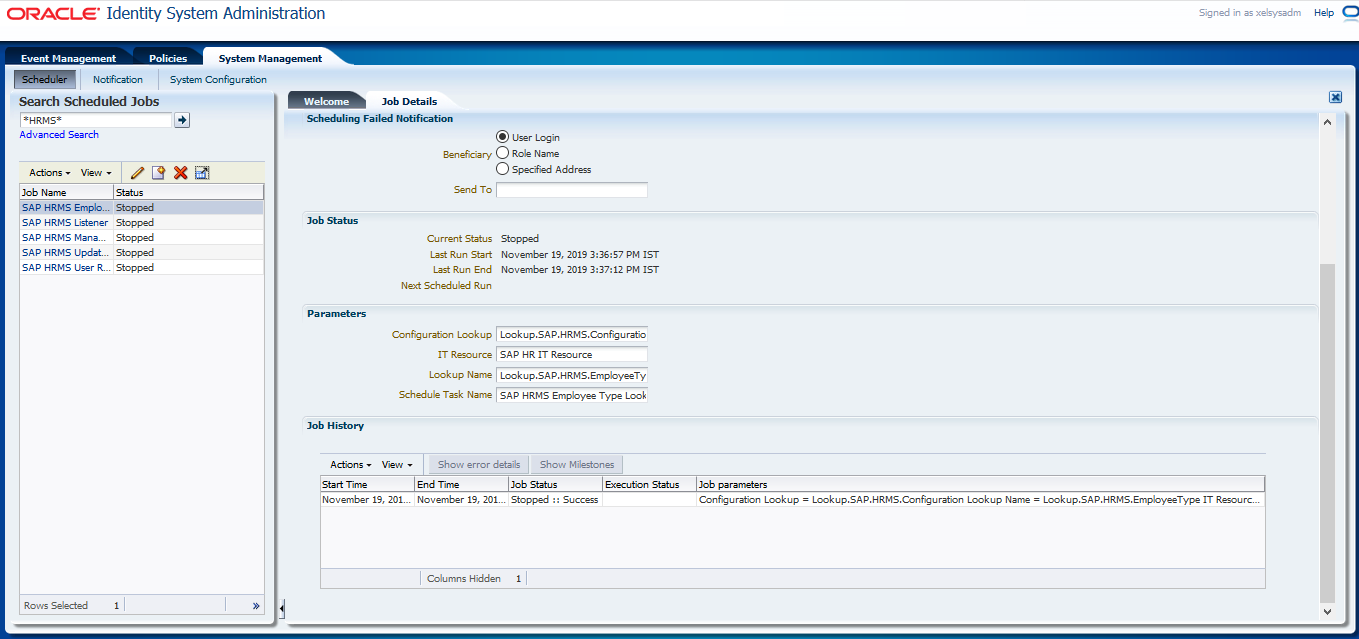
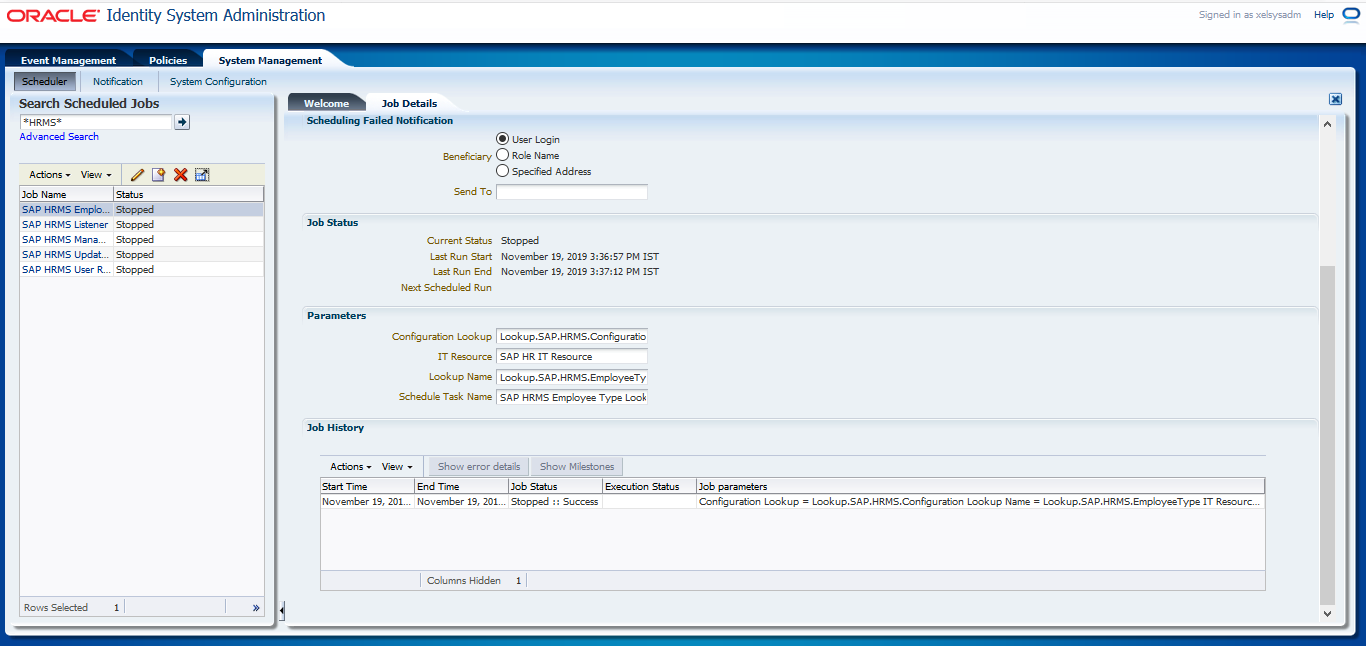
  3. On the Job Details tab, in the Parameters region, specify values for the attributes of the scheduled task.
    This screenshot displays the Parameters region
  4. Click Apply to save the changes.

    Table 3-1 lists the attributes of this scheduled task.

    Table 3-1 Attributes of the SAP HRMS EmployeeType Lookup Recon Scheduled Task

    Attribute Description
    Configuration lookup This attribute holds the name of the lookup definition that contains configuration details.

    Value: Lookup.SAP.HRMS.Configuration

    Note: For this scheduled task, you must not change the value of this attribute. However, if you create a copy of the lookup definition, then you must enter the unique name of that lookup definition as the value of the Configuration lookup attribute. See Setting Up the Lookup.SAP.HRMS.Configuration Lookup Definition in Oracle Identity Manager for information about this lookup definition.

    IT Resource Enter the name of the IT resource that you create by performing the procedure described in the Configuring the IT Resource.
    Lookup Name

    Value: Lookup.SAP.HRMS.EmployeeType

    Note: For this scheduled task, you must not change the value of this attribute. However, if you create a copy of the lookup definition, then you must enter the unique name of that lookup definition as the value of the Lookup Name attribute.

    Schedule Task Name This attribute holds the name of the scheduled task.

    Value: SAP HRMS EmployeeType Lookup Recon

    Note: For this scheduled task, you must not change the value of this attribute. However, if you create a copy of the scheduled task, then you must enter the unique name of that scheduled task as the value of the Schedule Task Name attribute in that scheduled task.

3.3 Guidelines on Performing Reconciliation

On a Microsoft Windows platform, if you encounter the org.quartz.SchedulerException exception during a reconciliation run, then download and install the Microsoft Visual C++ 2005 SP1 Redistributable Package from the Microsoft Web site.

3.4 Performing Full Reconciliation

Full reconciliation involves reconciling all existing user records from the target system into Oracle Identity Manager. After you deploy the connector, you must first perform full reconciliation.
The following section discusses the procedures involved in full reconciliation:

3.4.1 Generating IDocs

You must generate IDocs for all existing employees in the target system.

To generate IDocs for full reconciliation:
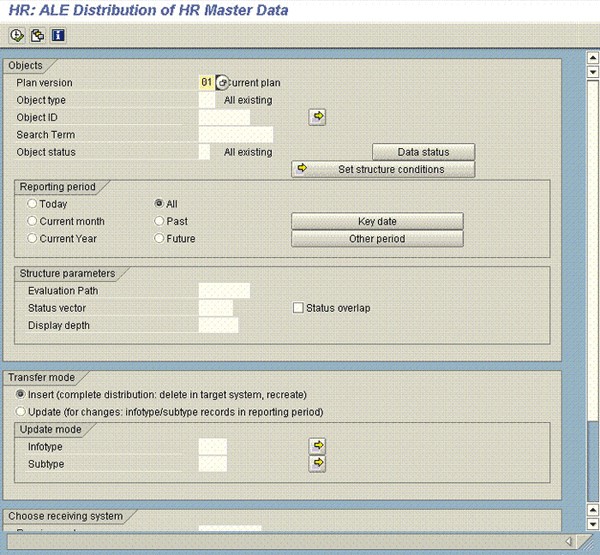
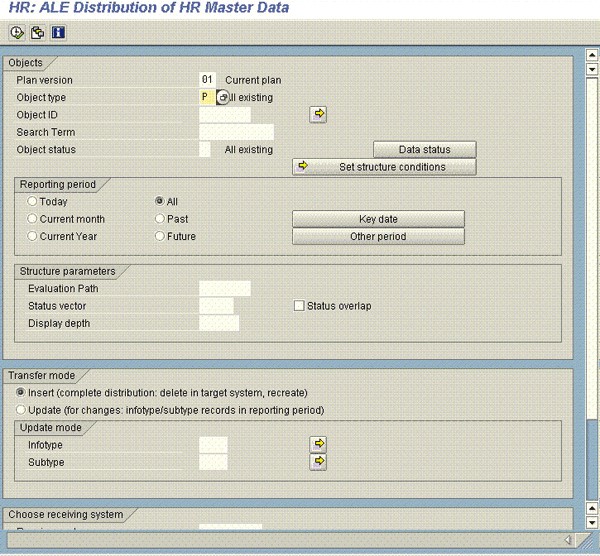
  1. Run transaction PFAL.
    This screenshot displays the transaction PFAL.
  2. In the Objects region, select P as the object type. The value P indicates that you want IDocs to be created for person records.
  3. Use the Object ID field to specify the persons for whom you want to generate IDocs. The Personnel Number attribute is of the numeric data type. If required, you can use the Object ID field to specify the range of personnel numbers of persons for whom you want to generate IDocs.

    Note:

    To specify that you want IDocs to be generated for all persons at the same time, do not enter a value in the object ID field.
  4. In the Reporting period region, the All option is selected by default. With this option, IDocs are created for all infotypes, regardless of the end date of the infotypes. If you want IDocs to be created only for current- or future-dated infotypes, then click Key date and enter the date relative to which infotypes must be considered for reconciliation. IDocs are created only for infotypes that are current- or future-dated on the date that you enter. For example, if you enter 02-Dec-2009, then IDocs are created only for infotypes having an end date that equals or is greater than 02-Dec-2009.
  5. In the Number of objects per process field, enter the number of IDocs that must be recorded in one flat file. This field takes a maximum value of 200. If you do not specify a value, then a system default is used, which may be less than or equal to 200.
    This screenshot displays the Number of objects per process field.
  6. Click Execute.
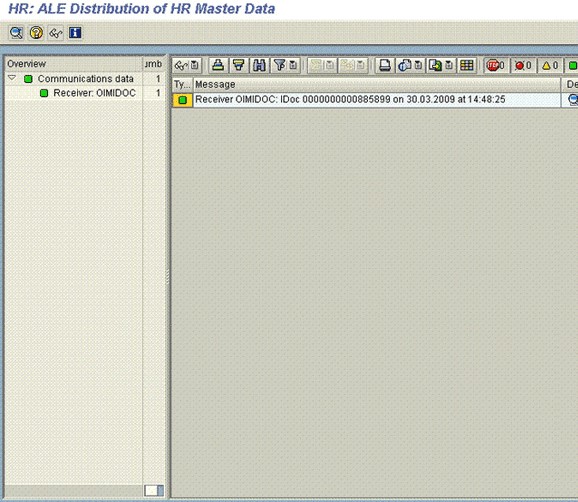
  7. Verify that the status is Passed to Port OK.
    This screenshot displays the status "Passed to Port OK."

    At this stage, flat files containing the IDocs are in the directory location that you specify in the file port definition.

  8. Copy the flat files to a directory on the Oracle Identity Manager host computer.

    Note:

    In an Oracle Identity Manager cluster, copy the flat files to each node of the cluster.

3.4.2 Importing IDocs Into Oracle Identity Manager

3.4.2.1 Limited Reconciliation

By default, all target system records that are added or modified after the last reconciliation run are reconciled during the current incremental reconciliation run. For full reconciliation, all target system records are fetched into Oracle Identity Manager.

You configure segment filtering to specify the attributes whose values you want to fetch into Oracle Identity Manager. Similarly, you can configure limited reconciliation to specify the subset of target system records that must be fetched into Oracle Identity Manager.

You configure limited reconciliation by specifying a query condition as the value of the Custom Query attribute of the SAP HRMS User Recon and SAP HRMS Listener scheduled tasks.

You must use the following format to specify a value for the Custom Query attribute:

RESOURCE_OBJECT_ATTRIBUTE_NAME=VALUE

For example, suppose you specify the following as the value of the Custom Query attribute:

Last Name=Doe

With this query condition, only records for users whose last name is Doe are considered for reconciliation.

Note:

IDocs for the records to which the query condition is applied have already been fetched to Oracle Identity Manager. The query condition only limits records that are sent to the Reconciliation Manager.

You can add multiple query conditions by using the ampersand (&) as the AND operator and the vertical bar (|) as the OR operator. For example, the following query condition is used to limit reconciliation to records of those users whose first name is John and last name is Doe:

First Name=John & Last Name=Doe

To configure limited reconciliation:

  1. Ensure that the OIM User attribute that you want to use in the query exists in the Lookup.SAP.HRMS.AttributeMapping lookup definition. This lookup definition maps OIM User form fields with target system attributes.

    See Lookup.SAP.HRMS.AttributeMapping for a listing of the default contents of this lookup definition. If there is no entry in this lookup definition for the attribute that you want to use, then create an entry. See Adding Attribute Mapping for more information.

  2. Ensure that the OIM User attribute that you want to use in the query exists in the Lookup.SAP.HRMS.CustomQueryMapping lookup definition. This lookup definition maps resource object fields with OIM User form fields. It is used during application of the query condition that you create.

    If there is no entry in this lookup definition for the attribute that you want to use, then create an entry.

  3. Create the query condition. Apply the following guidelines when you create the query condition:
    • Use only the equal sign (=), ampersand (&), and vertical bar (|) in the query condition. Do not include any other special characters in the query condition. Any other character that is included is treated as part of the value that you specify.
    • Add a space before and after ampersand and vertical bars used in the query condition. For example:

      First Name=John & Last Name=Doe

      This is to ensure to help the system distinguish between ampersands and vertical bars used in the query and the same characters included as part of attribute values specified in the query condition.

    • You must not include unnecessary blank spaces between operators and values in the query condition.

      A query condition with spaces separating values and operators would yield different results as compared to a query condition that does not contain spaces between values and operators. For example, the output of the following query conditions would be different:

      First Name=John & Last Name=Doe

      First Name= John & Last Name= Doe

      In the second query condition, the reconciliation engine would look for first name and last name values that contain a space at the start.

    • Ensure that attribute names that you use in the query condition are in the same case (uppercase and lowercase) as the case of values in the Lookup.SAP.HRMS.AttributeMapping and Lookup.SAP.HRMS.CustomQueryMapping lookup definitions. For example, the following query condition would fail:

      fiRst Name = John

  4. While configuring the SAP HRMS User Recon scheduled task, specify the query condition as the value of the Custom Query attribute. The procedure is described later in this chapter.

3.4.2.2 Configuring the Scheduled Task for User Data Reconciliation

The SAP HRMS User Recon scheduled task is used to transfer IDocs data from the file to the parser. The parser then converts this data into reconciliation events.

Table 3-2 describes the attributes of this scheduled task. See Configuring Scheduled Tasks for instructions on running the scheduled task.

Note:

In an Oracle Identity Manager cluster, the file is automatically deleted only from one node after the reconciliation run. You must manually delete the file from the other nodes.

The scheduled task connects to the target system during a full reconciliation run. You must ensure that connectivity to the target system is maintained during the reconciliation run.

Table 3-2 Attributes of the SAP HRMS User Recon Scheduled Task

Attribute Description
Attribute Mapping Lookup Lookup.SAP.HRMS.AttributeMapping
Configuration lookup This attribute holds the name of the lookup definition that stores configuration details.

Value: Lookup.SAP.HRMS.Configuration

Note: For a particular target system installation, you must not change the value of this attribute. If you create and use a copy of the configuration lookup definition for a different installation of the target system, then you must enter then name of that lookup definition as the value of this attribute.

Custom Query If you want to implement limited reconciliation, then enter the query condition that you create by following the instructions given in Limited Reconciliation.
Custom Query Lookup This attribute holds the name of the lookup definition that maps resource object fields with OIM User form fields. This lookup definition is used during application of the custom query. See Limited Reconciliation for more information.

Default Value: Lookup.SAP.HRMS.CustomQueryMapping

Employee Type Query Use this attribute to specify the combination of employee group and subgroup for which you want fetch users for reconciliation.
You can use the following target system attributes to specify a value for the Employee Type Query attribute:
  • PERSG: This is the Employee Group attribute on the target system. In the Lookup.SAP.HRMS.Configuration lookup definition, this attribute is represented as follows:

    E2P0001001;PERSG;146;146

  • PERSK: This is the Employee Subgroup attribute on the target system. In the Lookup.SAP.HRMS.Configuration lookup definition, this attribute is represented as follows:

    E2P0001001;PERSK;147;148

The following is a sample value for the Employee Type Query attribute:

Group=1 & SubGroup=DU

When this employee type query is applied during reconciliation, only user records belonging to employee group 1 and subgroup DU are fetched for reconciliation.

Note: The guidelines for creating the employee type query are the same as those described inLimited Reconciliation

File Archival Enter yes if you want flat files used during full reconciliation to be archived. Enter no if you want the flat files to be deleted after data inside the files is reconciled.
File Archival Folder Enter the full path and name of the directory in which you want flat files used during full reconciliation to be archived.

You must enter a value for the File Archival Folder attribute only if you specify yes as the value for the File Archival attribute.

IDoc Folder Path Enter the path of the directory on the Oracle Identity Manager host computer into which you copy the file containing IDocs data.

Sample value: /usr/idocs_data

IT resource Enter the name of the IT resource that you create by performing the procedure described in Configuring the IT Resource section.

Default value: SAP HRMS IT Resource

Resource Object This attribute holds the name of the resource object.

Default value: SAP HRMS Resource Object

Schedule Task Name This attribute holds the name of the scheduled task.

Value: SAP HRMS User Recon

Note: For this scheduled task, you must not change the value of this attribute. However, if you create a copy of this scheduled task, then you must enter the unique name of that new reconciliation scheduled task as the value of the Schedule Task Name attribute in the copy of this scheduled task.

3.4.2.3 Running the SAP HRMS Update Manager Scheduled Task

Manager ID values might not be reconciled for some users at the end of a full reconciliation run. The following scenario illustrates this condition:

During a reconciliation run, suppose Mark's record was brought to Oracle Identity Manager before the record of Mark's manager. When this happens, the Manager ID attribute in Mark's record will remain empty.

In addition, when the manager of an organization is replaced by another manager, the change in Manager ID values is not automatically propagated to OIM User records of users who belong to that organization.

If you come across either of these issues, then you must configure and run the SAP HRMS Update Manager scheduled task.

Before you run this scheduled task, you must specify a value for the "Update users with empty manager id only" attribute:

  • Enter yes if you want the scheduled task to populate Manager ID values in OIM User records that do not have this value. Existing Manager ID values in other OIM User records are not modified.
  • Enter no if you want the scheduled task to fetch and populate Manager ID values for all OIM User records, regardless of whether the Manager ID attribute in these records currently contains a value.

Note:

You must ensure that the Lookup.SAP.HRMS.OrgHierarchy and Lookup.SAP.HRMS.OrgManager lookup definitions are updated before you run this scheduled task.

When it is run, this scheduled task performs the process described in Reconciliation of the Manager ID Attribute.

3.5 Performing Incremental Reconciliation

Performing incremental reconciliation involves the following tasks:

3.5.1 Specifying the Mode of Reconciliation in the Partner Profile

To change from full reconciliation to incremental reconciliation or from incremental reconciliation to full reconciliation:

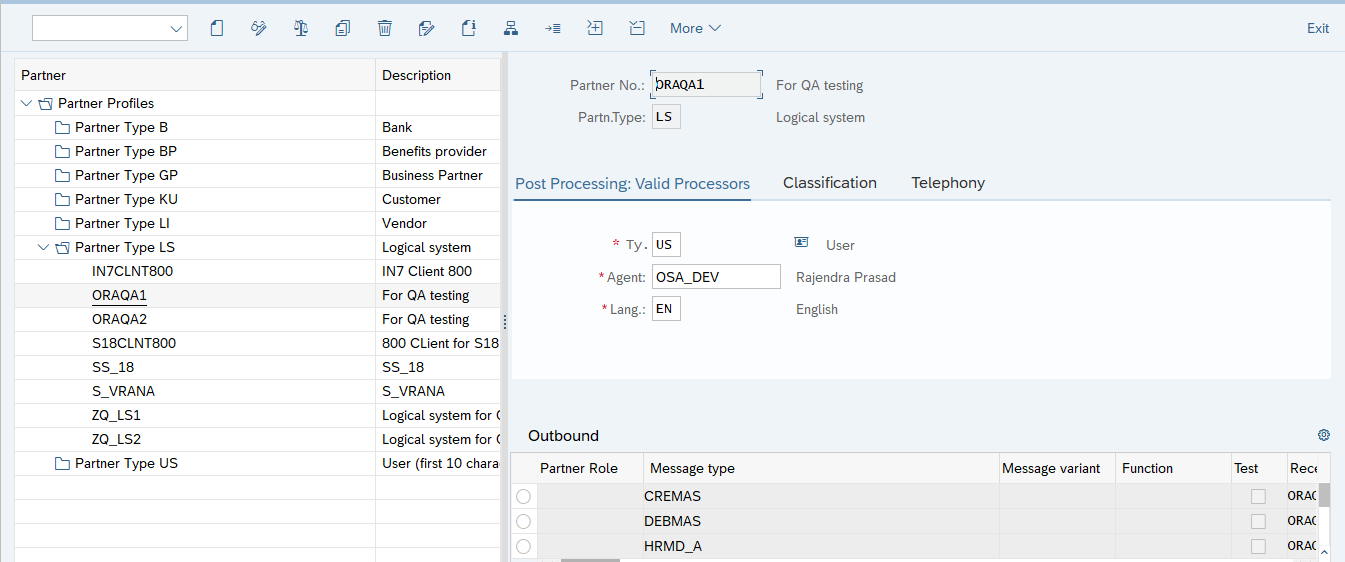
  1. Run transaction WE20.
  2. Expand Partner Profiles, select Partner Type LS, and then double-click the partner profile that you created by performing the procedure described in Defining the Partner Profile.
    • In the Outbound Parameters table, double-click HRMD_A in the Message Type column.

      This screenshot displays the Outbound Parameters table

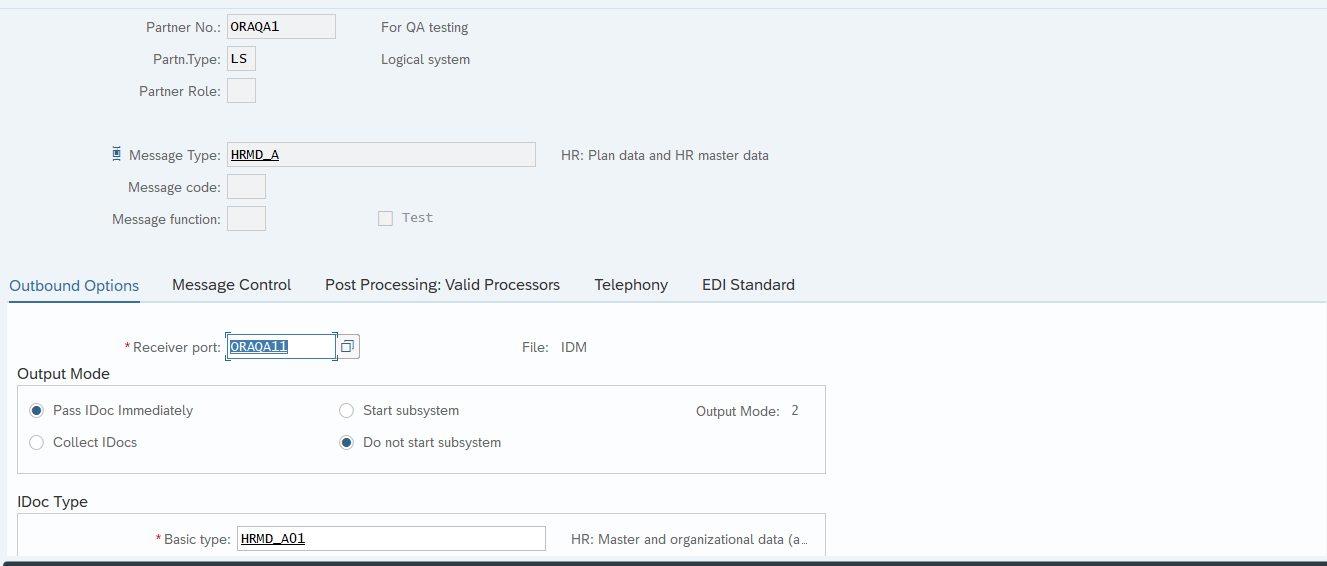
    • On the Outbound Options tab:
      • In the Receiver port:

        * For incremental reconciliation, select the tRFC port that you define by performing the procedure described in Creating the tRFC Port.

        * For full reconciliation, select the file port that you define by performing the procedure described in Creating the File Port

        .
      • In the Output Mode region, select one of the following options:

        * For incremental reconciliation, select either the Transfer IDocs immediately or the Collect IDocs option.

        * For full reconciliation, select the Collect IDocs option.

    This screenshot displays the Collect IDocs option
  3. Click the Save icon.

3.5.2 Scheduling Jobs on the Target System for Incremental Reconciliation

While configuring the partner profile for incremental reconciliation, you can specify that you want IDocs to be created out of change docs at two-hour intervals. Alternatively, you can select the Collect IDocs option that lets you schedule a job to create IDocs out of change docs at specified time intervals.

Regardless of the option you select in the partner profile, you must schedule a job to generate IDocs:

  1. Run transaction SE38.
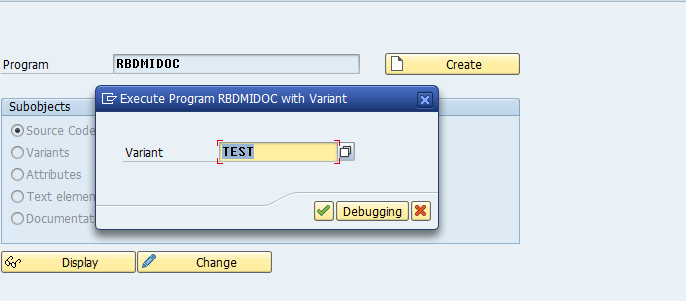
  2. Select the RBDMIDOC program, select the Variants option, and then click the Variants icon on the toolbar.
    This screenshot displays the RBDMIDOC program
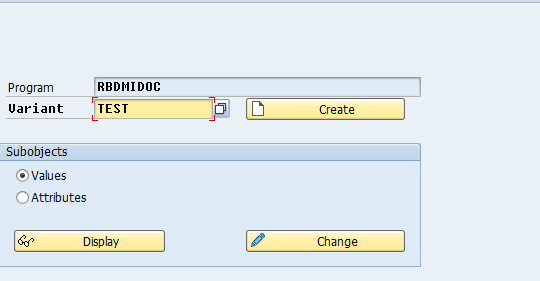
  3. Select a variant, and then click Create.
    This screenshot displays the Create option.
  4. In the Message type field, enter HRMD_A, and then click Attributes.
  5. Select the Only for background processing check box.
    This screenshot displays the Only for background processing check box.
  6. Click the Save icon.
  7. Run transaction SM36.
  8. Specify values for the following fields:
    • Job name: Enter a name for the job.
    • Job class: Specify a priority for the job.

    Job class is the priority in which jobs are processed. Class A is the highest priority

  9. Click the Start condition button on the toolbar.
  10. In the Start Time dialog box, click Date/Time, and enter the required details.
  11. Click the Step button on the toolbar.
  12. In the Create Step 1 dialog box, enter RBDMIDOC as the program name and then enter the name of the variant that you specified in Step 3 of this procedure.
  13. Click the Save icon.
    Whether or not you must schedule a job to publish IDocs depends on the option that you select for IDocs transfer while creating the partner profile:
    • If you select the Transfer IDocs immediately option, then IDocs are transferred to the tRFC port as soon as they are created by the job built around the RBDMIDOC program.
    • If you select the Collect IDocs option in the partner profile, then schedule a job to publish IDocs by perform the procedure given in this section. While performing Steps 2 and 12 of the procedure, specify RSEOUT00 as the program name instead of the RBDMIDOC program.

3.5.3 Configuring the Listener on Oracle Identity Manager

The SAP HRMS Listener scheduled task is used to transfer IDocs data from the Java object to the parser. Depending on the Oracle Identity Manager version that you are using, the following actions are performed:

Oracle Identity Manager release 11.1.x or later:

The parser converts IDocs data into reconciliation events. These reconciliation events have the Events Received status only and are not forwarded to the reconciliation manager for linking until the SAP HRMS Listener scheduled task is completed. Therefore, to link these reconciliation events to an OIM User while the SAP HRMS Listener scheduled task is running, you must run the Non Scheduled Batch Recon scheduled task.

Configuring the Listener on Oracle Identity Manager describes the attributes of this scheduled task.

Table 3-3 Attributes of the SAP HRMS Listener Scheduled Task

Attribute Description
Attribute Mapping Lookup Lookup.SAP.HRMS.AttributeMapping
Configuration lookup This attribute holds the name of the lookup definition that stores configuration details.

Value: Lookup.SAP.HRMS.Configuration

Note: For a particular target system installation, you must not change the value of this attribute. If you create and use a copy of the configuration lookup definition for a different installation of the target system, then you must enter then name of that lookup definition as the value of this attribute.

Custom Query If you want to implement limited reconciliation, then enter the query condition that you create by following the instructions given in Limited Reconciliation.
Custom Query Lookup This attribute holds the name of the lookup definition that maps resource object fields with OIM User form fields. This lookup definition is used during application of the custom query. See Limited Reconciliation for more information.

Default Value: Lookup.SAP.HRMS.CustomQueryMapping

Employee Type Query Use this attribute to specify the combination of employee group and subgroup for which you want fetch users for reconciliation.
You can use the following target system attributes to specify a value for the Employee Type Query attribute:
  • PERSG: This is the Employee Group attribute on the target system. In the Lookup.SAP.HRMS.Configuration lookup definition, this attribute is represented as follows:

    E2P0001001;PERSG;146;146

  • PERSK: This is the Employee Subgroup attribute on the target system. In the Lookup.SAP.HRMS.Configuration lookup definition, this attribute is represented as follows:

    E2P0001001;PERSK;147;148

The following is a sample value for the Employee Type Query attribute:

Group=1 & SubGroup=DU

When this employee type query is applied during reconciliation, only user records belonging to employee group 1 and subgroup DU are fetched for reconciliation.

Note: The guidelines for creating the employee type query are the same as those described inLimited Reconciliation

IT resource Enter the name of the IT resource that you create by performing the procedure described in Configuring the IT Resource section.

Default value: SAP HRMS IT Resource

Resource Object This attribute holds the name of the resource object.

Default value: SAP HRMS Resource Object

Schedule Task Name This attribute holds the name of the scheduled task.

Value: SAP HRMS Listener

Note: For this scheduled task, you must not change the value of this attribute. However, if you create a copy of this scheduled task, then you must enter the unique name of that new reconciliation scheduled task as the value of the Schedule Task Name attribute in the copy of this scheduled task.

3.5.4 Configuring Incremental Reconciliation of Manager ID Attribute Values

Manager ID values are reconciled when you run the SAP HRMS Update Manager scheduled task. Configure this scheduled task to run at periodic intervals and fetch manager ID values for OIM Users created through reconciliation.

While configuring this scheduled task, enter no as the value of the "Update users with empty manager id only" attribute. With this value, the scheduled task fetches and populates Manager ID values for all OIM User records, regardless of whether the Manager ID attribute in these records already contains a value.

You set the value of this attribute to yes while performing the procedure described in Running the SAP HRMS Update Manager Scheduled Task .

3.6 Resending IDocs That Are Not Received by the Listener

As mentioned earlier in this guide, IDocs are generated and sent to Oracle Identity Manager regardless of whether or not the listener is running.

Reconciliation events are not created for the IDocs that are sent to Oracle Identity Manager while the listener is unavailable. To ensure that all IDocs generated on the target system reach Oracle Identity Manager, perform the following procedures:

3.6.1 Configuring the Target System to Resend IDocs

To configure the target system for resending IDocs:

  1. Run transaction SM59.
  2. Select RFC Destinations, and then select TCP/IP Connections.
  3. Double-click the tRFC port that you defined earlier.
  4. Select the Destination and tRFC options.
  5. Specify values for the following variables:
    • Connection attempts up to task: Enter the number of attempts to be made to retry sending the iDoc.
    • Time between 2 tries (mins).

3.6.2 Manually Sending IDocs

After an IDoc is sent to the tRFC port, its status is set to "03 Data transfer to port OK," regardless of whether or not the listener was available when the IDoc was sent.

  1. Ensure that the listener is available.
    To check the listener program:
    • Run transaction SMGW.
    • From the GOTO menu, select Logged on Clients.

      Oracle Identity Manager should be displayed in the list of logged on clients.

    • To confirm that the listener program is running on the Oracle Identity Manager side, verify that EFP_LIST is displayed in the TP Name column.
  2. Run transaction BD75.

    This transaction changes the status of all IDocs received by the listener to "12 Sent OK." After this transaction is run, the IDocs that are still at status "03 Data transfer to port OK" are the ones that were not received by the listener.

  3. To resend IDocs that are at status "03 Data transfer to port OK," use one of the following approaches:
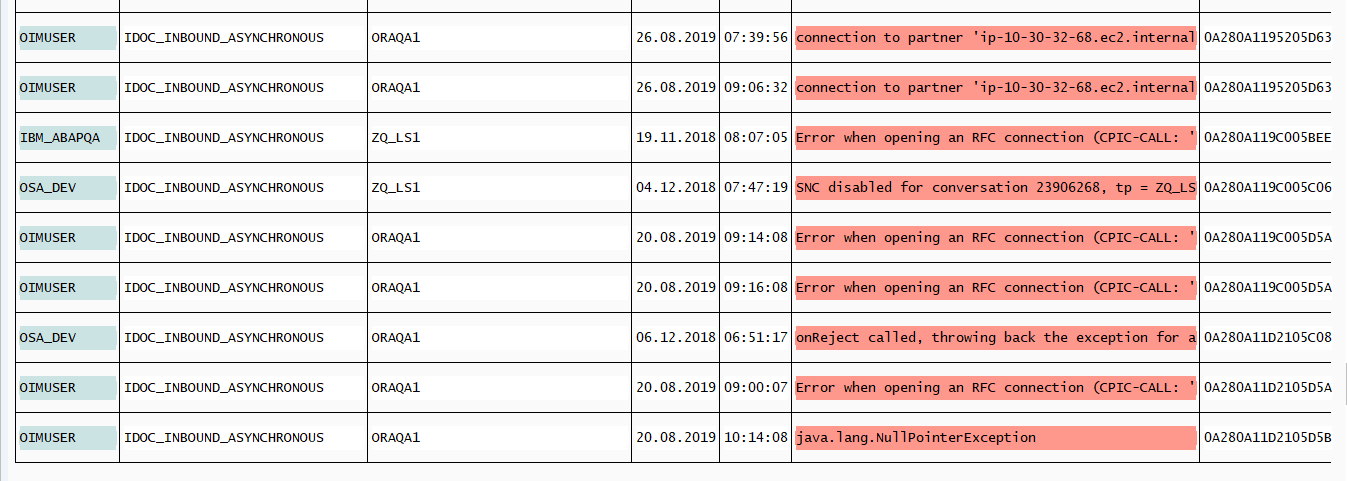
    • Run transaction SM58 for IDocs sent within the given date range. Status text is highlighted in red font for all IDocs that do not reach the listener. To resend each of these IDocs, click the IDoc and press F6.

      This screenshot displays manually sending IDocs

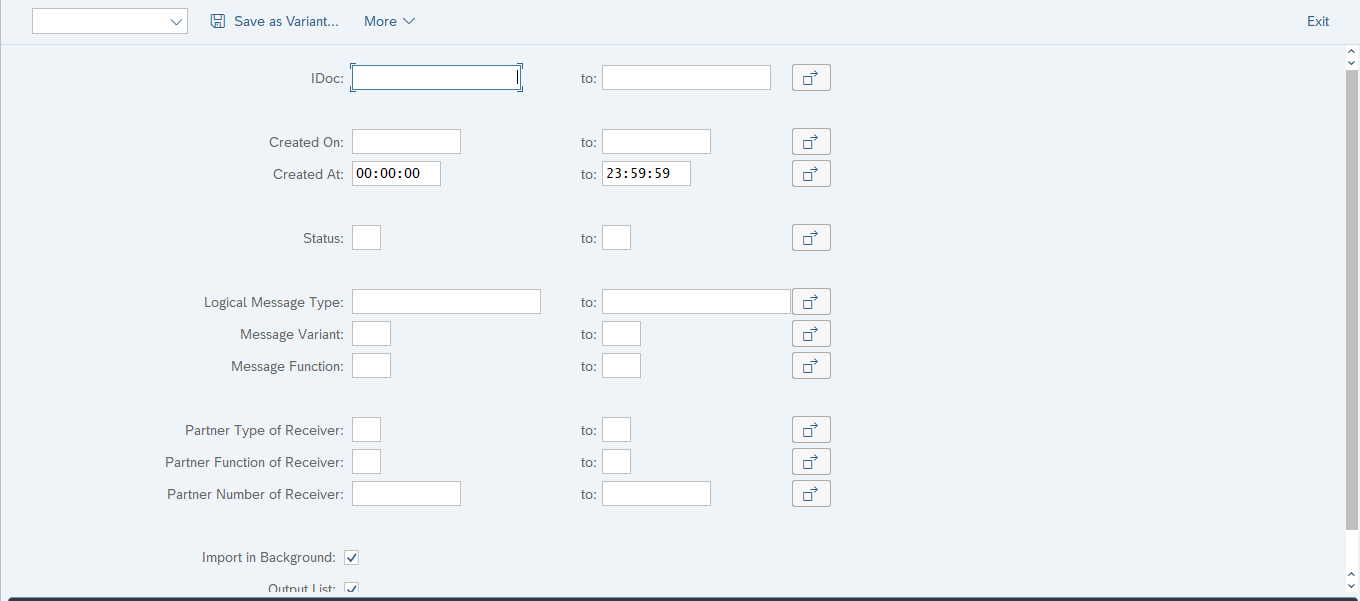
    • Specify a value for the date range parameter of the RBDAGAIN ABAP program, and then run the program.
    This screenshot displays manually sending IDocs

3.7 Configuring Scheduled Tasks

This section describes the procedure to configure scheduled tasks. You can apply this procedure to configure the scheduled tasks for lookup field synchronization and reconciliation.

lists the scheduled tasks that you must configure.

Table 3-4 Scheduled Tasks for Lookup Field Synchronization and Reconciliation

Scheduled Task Description
SAP HRMS EmployeeType Lookup Recon This scheduled task is used to fetch values of the Employee Group and Employee Subgroup attributes from the target system and populate them in the Code Key column of the Lookup.SAP.HRMS.EmployeeType lookup definition. See Lookup.SAP.HRMS.EmployeeType for more information.
SAP HRMS User Recon This scheduled task is used during full reconciliation. It parses the contents of the flat files containing IDocs and then creates reconciliation events for each record.
SAP HRMS Listener This scheduled task is used during incremental reconciliation. It parses the contents of the IDocs received at the tRFC port and then creates reconciliation events for each record.
SAP HRMS Update Manager See Running the SAP HRMS Update Manager Scheduled Task for information about this scheduled task.

To configure a scheduled task:

  1. Depending on the Oracle Identity Manager release you are using, perform one of the following steps:
    • For Oracle Identity Manager release 11.1.1:
      1. Log in to the Administrative and User Console.
      2. On the Welcome to Oracle Identity Manager Self Service page, click Advanced in the upper-right corner of the page.
    • For Oracle Identity Manager release 11.1.2 or later:
      1. Log in to Oracle Identity System Administration.
      2. Create and activate a sandbox. For detailed instructions on creating and activating a sandbox, see Managing Sandboxes in Oracle Fusion Middleware Developing and Customizing Applications for Oracle Identity Manager.
      3. In the left pane, under System Management, click Scheduler.
  2. If you are using Oracle Identity Manager release 11.1.1, then perform the following steps:
    1. On the Welcome to Oracle Identity Manager Self Service page, click Advanced.
    2. Click the System Management tab, and then click Scheduler.
    3. On the left pane, click Advanced Search.
    This screenshot displays the System Management tab.
  3. On the page that is displayed, enter the name of the scheduled task as the search criteria and then click Search.

    The list of scheduled tasks that match your search criteria is displayed in the search results table.

    This screenshot displays the list of scheduled tasks
  4. If you are using Oracle Identity Manager release 11.1.x, select the link for the scheduled task from the list of scheduled tasks displayed in the search results table.
  5. Modify the details of the scheduled task. To do so:

    If you are using Oracle Identity Manager release 11.1.x, then on the Job Details tab, you can modify the following parameters:

    • Retries: Enter an integer value in this field. This number represents the number of times the scheduler tries to start the job before assigning the Stopped status to the job.
    • Schedule Type: Depending on the frequency at which you want the job to run, select the appropriate schedule type.

    Note:

    See Creating Jobs in Oracle Fusion Middleware Administering Oracle Identity Manager for detailed information about schedule types.
  6. Specify values for the attributes of the scheduled task. To do so:

    If you are using Oracle Identity Manager release 11.1.x, then on the Job Details tab, under the Parameters section, specify values for the attributes of the scheduled task.

    This screenshot displays the Job Details tab

    Note:

    Attribute values are predefined in the connector XML file that is imported during the installation of the connector. Specify values only for the attributes that you want to change.
  7. After specifying the attributes, perform one of the following steps:

    If you are using Oracle Identity Manager release 11.1.x, then click Apply to save the changes.

    Note:

    The Stop Execution option is not available in the Administrative and User Console. If you want to stop a task, then click Stop Execution on the Task Scheduler form of the Design Console.

3.8 Uninstalling the Connector

If you want to uninstall the connector for any reason, see Uninstalling Connectors in Oracle Fusion Middleware Administering Oracle Identity Manager.