| Oracle® Retail Fiscal Management User Guide Release 14.2 F29358-01 |
|

 Previous |
 Next |
Purchase Order (PO) is the regular buying process of a retailer. The retailer issues a PO when buying the merchandise from a supplier. When the merchandise is received, this merchandise is matched against the related PO in order to verify that the receiving merchandise has the items that the retailer has bought to the supplier.
This chapter covers the following sections:
The business flow for PO receiving is as follows:
Retail Fiscal Management (ORFM) system can receive Nota Fiscal (NF) by:
Manual
EDI
Invoice Receiving Layer
When the shipment arrives at the warehouse or the store, create a schedule and enter the NFs received.
|
Note:
|
After NF entry, validate the NFs. In the validation process, the ORFM application checks for data integrity. Match the NF with the requisition documents in the Retail Merchandising System (RMS). This process is called as the Fiscal Receiving.
If the NF and the PO does not match, the NF is in discrepancy. You can identify the following discrepancies with the ORFM application:
Unit Cost Discrepancy for each item in the NF
Quantity Discrepancy for each item in the NF
Tax Discrepancy happens between system (tax details from Tax Engine) and NF.
After validation, send the schedule to the Warehouse Management System (RWMS) and/or Store Inventory Management System (SIM). After physical receiving, both the systems publish the receipt updates to ORFM. This completes the NF processing.
Send the transaction data in RMS and ORFM to a financial application. For fiscal reporting purposes, send the NF data in ORFM to the fiscal reporting system like SPED.
The Receiving/Issuing module of ORFM enables you to create the required NF. This module enables you to validate the NF, match the NF with the PO, resolve discrepancy, and approve the NF with correction documents.
To create the Nota Fiscal for PO Receiving, perform the following steps:
Navigate: From the RMS Start Menu, select Fiscal Management, then Login of Location. The Location Login window is displayed.
In the Location Login window, select the store or warehouse for receiving/issuing the fiscal document. Click the Location LOV to obtain the list of stores or warehouses. Select the location and click OK.
You are returned to the RMS main window. In Contents Of Fiscal Management, select Receiving/Issue.
In Contents Of Receiving/Issue, click Edit. The Receiving/Issue Schedule window is displayed.
Select the Mode from the list. For PO receiving, select Entry.
The other option available is Exit. This mode is for outbound flow.
The Filter section in the Receiving/Issue Schedule window displays the following:
Location Type – This field displays the information that flows from the Location Login window. The list contains Store or Warehouse.
Location – The sender/receiver location.
Schedule – Select the schedule number from the Schedule LOV or click Add to create a new schedule number.
Select the appropriate status from the list in the Status field. For PO Receiving, the status has to be Worksheet.
Schedules with physical receiving
For Entry type of Schedules where physical receiving is required such as PO receiving or TSF receiving:
Table 3-1 Status Of Schedule - Schedules with Physical Receiving
| Code | Schedule Status Description | Status Type | NF Status in Receiving ProcessDescription |
|---|---|---|---|
|
W |
Worksheet |
Inclusive |
Worksheet In Discrepancy Error |
|
P |
Pending for Receiving |
Exclusive |
Validated Calculated |
|
S |
Subm. for Recv. |
Exclusive |
Verifying NF-e Status |
|
R |
Received |
Inclusive |
Received Receipt-Verified Manifest Pending Post Sefaz Approve Error |
|
A |
Approved |
Exclusive |
Approved |
|
C |
Completed |
Exclusive |
Completed |
|
FP |
Financials Posted |
Exclusive |
Financials Posted |
|
I |
Inactive |
Exclusive |
Inactive |
Entry schedule status
Inactive can be: 'Reject Entire Receiving from WMS/SIM' or 'entry NF was rejected'.
Schedules with shipments
For Exit type of Schedules where shipment is done in order to generate NFs:
Table 3-2 Status Of Schedule - Schedules with Shipments
| Code | Schedule Status Code_Desc | Status Type | Code | NF Status in Shipment ProcessCode_Desc |
|---|---|---|---|---|
|
W |
Worksheet |
Inclusive |
W V NFE_P RA E F |
Worksheet Validated NFe Pending Request Approved Error Post Sefaz Approve Error |
|
A |
Approved |
Exclusive |
A |
Approved Calculated |
|
C |
Completed |
Exclusive |
C |
Completed |
|
FP |
Financials Posted |
Exclusive |
FP |
Financials Posted |
Status Type
Inclusive:
It is considered status type Inclusive the status that does NOT depend on equivalence of status for all fiscal documents associated to the schedule.
Example, schedule status W: This status will accept NFs in different statuses, including status that associated to the next step in the process.
| Schedule | Schedule Status | NF | NF Status |
|---|---|---|---|
| 90011 | W | 45001
45002 |
Worksheet
Validated |
In the above example, one NF is in status W that belongs to the range of status accounted for schedule status W, but one NF was already validated and V status belongs to range of schedule status P.
Exclusive:
It is considered status type exclusive the status that depends on ALL fiscal documents to be in the same status of the range in order to be changed.
Example, schedule status P (Pending for Receiving): This status will changed only if ALL NFs have status V (Validated) or CL (Calculated).
| Schedule | Schedule Status | NF | NF Status |
|---|---|---|---|
| 90011 | P | 45001
45002 |
Validated
Validated |
In the above example, all NFs are in status V that belongs to the range of status accounted for schedule status P, hence schedule status will exclusively be P in this scenario.
Enter the Start Date and the End Date in their respective fields.
The Action Required field reflects either at schedule or fiscal document level. At least one of the fiscal documents in the schedules to be with the referenced status is required to select yes.
Example of a Schedule with two NFs in different status:
| Schedule | Schedule Status | Action Required | NF | NF Status |
|---|---|---|---|---|
| 90011 | R | Y | 45001
45002 |
Received
Received Verified |
*RV status (Received Verified) would have no action required. However, R status (Received) needs action so Schedule Action Required Field will be Y.
Action required info mapping versus NF status and Schedule type:
| Action Required | Schedule Description | Schedule Receiving/Ship |
|---|---|---|
| Y | Worksheet | Receiving/Ship |
| Y | In Discrepancy | Receiving |
| Y | Validated | Receiving/Ship |
| Y | Calculated | Receiving |
| N | NFe Pending | Shipment |
| N | Request Approved | Shipment |
| Y | Error | Receiving/Ship |
| N | Verifying NF Status | Receiving |
| N | Submitted for Receiving | Receiving |
| Y | Received | Receiving |
| N | Receipt Verified | Receiving |
| N | Manifest Pending | Receiving |
| Y | Post Sefaz Error | Receiving/Ship |
| N | Approved | Receiving/Ship |
| N | Completed | Receiving/Ship |
| N | Financial Posted | Receiving/Ship |
| N | Inactive | Receiving/Ship |
| N | Canceled | Shipment |
| N | Nullified | Shipment |
| N | Denied | Shipment |
Click Fiscal in the Receiving/Issue Schedule window. The Fiscal Docs Find window is displayed. This screen displays all the NFs linked to that schedule.
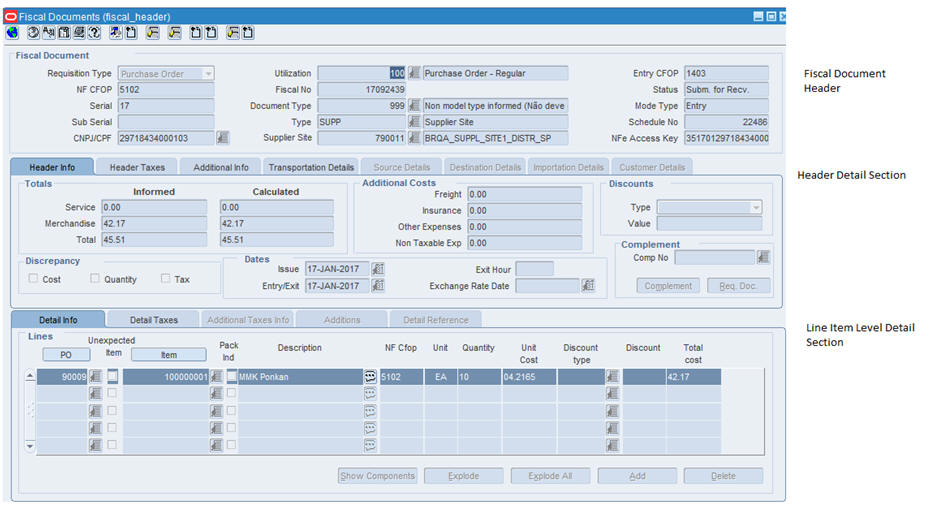
In the Fiscal Docs Find window, click Add. The Fiscal Documents window is displayed.
The Fiscal Documents window is divided into three sections – Fiscal Document Header, Header Detail, and Line Item Level Detail.
In the Fiscal Document Header section, enter the details as given in table Table 3-3
Table 3-3 Fields in the Fiscal Document Header Section
| Field | Description |
|---|---|
|
Requisition Type |
Select Purchase Order Requisition Type for the PO receiving transaction from the drop-down list. |
|
Utilization |
This field is enabled only when the Requisition Type is entered. Select the Utilization from the list that is specific to the PO operation. |
|
Entry CFOP |
This field is populated by the tax integration. The Entry CFOP is used for the fiscal bookkeeping and Public System of Digital Bookkeeping or SPED. This field is non-editable. |
|
NF CFOP |
Enter the value for NF CFOP. CFOP is the Operations and Service-Providing Fiscal Code. |
|
Fiscal No |
Enter the fiscal number. If the system option DI_NF_SERIAL_GENERATION_IND is Y for a DI NF, then this field and series number are not enabled. It is generated using the location sequencing functionality of ORFM. |
|
Status |
Contains the possible status of the NF. When you are entering the details in the system, the status of NF is Worksheet. The NF has to be in Worksheet status to edit or cancel it. The other statuses are as follows:
|
|
Serial |
Enter the serial number for the NF. |
|
Document Type |
Select the document type for the PO from the Document Type LOV. |
|
Mode Type |
This field is populated from the Receiving/Issue Schedule window. This field displays Entry for PO Receiving and Exit for outbound operations. |
|
Sub Serial |
Enter the sub-serial number of the NF. |
|
Type |
This is an external entity type from which NF is received. You can select any one of the Type from the Type LOV. The Type LOV includes Supplier Site, Store, Warehouse, Company, Customer, Bank, Agent, Freight forwarder, Importer, Broker, Factory, Consolidator, Applicant, Consignee, Manufacturer, Distributor, Wholesaler. Expense Vendor, Import Authority, Escheat –State, Escheat-Country, External Finisher, Discharge Port, Lading Port, Entry Port, Return Center, Bill to Location, LC to Location, Routing Location, Clearing Zone. |
|
Schedule No |
This field is populated from the Receiving/Issue Schedule window. It could be the number of the schedule receiving or the number of the schedule issuing. |
|
CNPJ/CPF |
CNPJ/CPF – Cadastro Nacional da Pessoa Jurídica (CNPJ) is the company code. Cadastro de Pessoa Física (CPF) is the personal code of the sender/receiver. This field is dimmed on the NF form. It takes the CNPJ/CPF number of the value in Type and Name fields in the form. For example, if Type = SUPP, Name/Supplier Site = 1000001010, the CNPJ number of the supplier site is displayed in the CNPJ/CPF field. |
|
Name |
Based on the Type, the user enters the values in this field. For example, if the Type is supplier, this field will have the supplier site value. |
|
NFe Access Key |
This field is not applicable for PO Receiving. Used to search NF-e. |
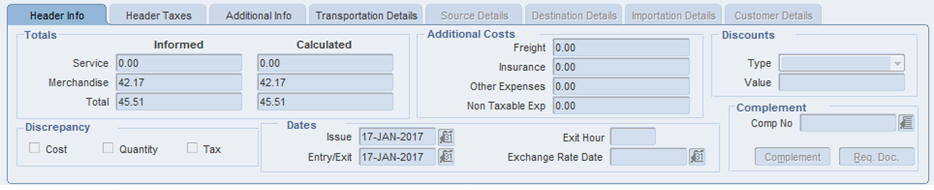
In the Header Details section, enter the following details – Header Info, Header Taxes, Additional Info, Transportation Details, Source Details, Destination Details, Importation Details, and Customer Details.
Figure 3-5 shows the Header Info Tab and the fields and description are provided in Table 3-4.
Table 3-4 Fields in the Header Info Tab
| Fields | Description |
|---|---|
|
Totals |
Informed and Calculated Service, Informed and Calculated Merchandise, Informed and Calculated Total. Enter the details in each field. The Calculated Costs is obtained from the system. |
|
Additional Costs |
Freight, Insurance, Other Expenses and Non-Taxable Expense. When processing complementary NF for Freight, only these fields are enabled. |
|
Discounts |
Select Percentage or Value from the Type list. Enter the value in the Value field. |
|
Discrepancy |
Three check boxes, for each type of discrepancy (Cost, Quantity and Tax) present. If the NF is in cost discrepancy, then the check box for Cost is selected. Likewise for Quantity and Tax. |
|
Dates |
Enter the Issue date, Entry/Exit date, Exit Hour of the NF, and Exchange Rate Date. Entry/Exit: It is updated to the date and time when the schedule is submitted to Warehouse Management System (RWMS)/Store Inventory Management System (SIM) for the physical receipt of merchandise. Exchange Rate Date: It is introduced to support the multi-currency functionality. For example, when you inform a PO NF for receiving, if the PO currency is different from NF currency, the exchange rate date keyed in will be considered for conversion into BRL on the NF. If left blank, the order approval will be considered. |
|
Complement |
Click Complement in the Header tab to link another NF (one that complements the main NF). In the ORFM application, the complement button is used for the following purposes:
|
|
Req. Doc. |
Click Req. Doc. to view all the all the POs for the given supplier. For more details, refer to Step 8. |
|
Note: The Exchange Rate Date is a nullable field. For example, when informing PO NF values, if this field is null then the PO approval date is considered for all exchange rate calculations. |
Figure 3-6 shows the Header Taxes Tab and the fields and description are provided in Table 3-5.
Table 3-5 Fields in the Header Taxes Tab
| Fields | Description |
|---|---|
|
Tax Code |
The tax code that are part of the Brazilian tax system are present in the list. Select the tax code from the list. |
|
Taxable Basis |
Enter the taxable basis value. |
|
Modified Taxable Basis |
This column displays the changed/modified taxable basis. This value flows from the external tax engine. In Brazil, some items are eligible to a tax rule that modifies the taxable basis. The tax rate for such items is applied on the modified taxable basis. |
|
Total Tax Value |
Enter the value. After entering the value for one tax code, click Add to enter additional details. In case, you want to delete any record, select the entry, and click Delete. |
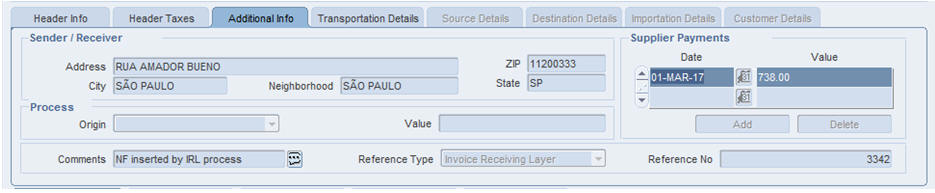
Figure 3-7 shows the Additional Info Tab and the fields and description are provided in Table 3-6.
Table 3-6 Fields and Description of Additional Info Tab
| Field | Description |
|---|---|
|
Sender/Receiver |
In this block, the following fields of the sender/receiver are auto populated:
These fields are taken from the Supplier/Supplier Site Address, City, and so on for a PO. |
|
Supplier Payments |
In this block, enter the following details for the supplier payments:
Click Add to add additional details. Click Delete in case you want to delete a record. |
|
Process |
In this block, select the Origin from the list. The Process list includes the following values:
In the Value field, enter the value. These fields meet SPED requirements. |
|
Comments |
You can capture comments or general information regarding the purpose behind the creation of the NF document. |
|
Reference Type |
This field serves as a descriptor for data (that is the number/code) captured in the Reference Number field. The Reference Type list includes PO, Transfer, Bill of Lading (BOL), Shipment, Allocation, Advance Shipping Notice (ASN), Sale, Return, RTV, Invoice Receiving Layer. |
|
Reference No. |
This field supports entry of text or alphanumeric/numeric codes of transactions that the NF document might wish to associate/reference. |
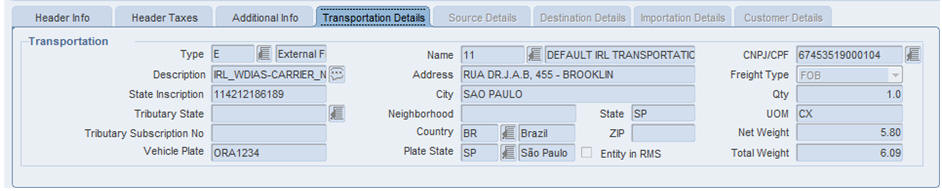
Figure 3-8 shows the Transportation Details Tab and the fields and description are provided in Table 3-7.
Table 3-7 Fields and Description of Transportation Details Tab
| Field | Description |
|---|---|
|
Type |
You can select any one of the Type from the list. The Type list includes Bank, Agent, Freight Forwarder, Importer, Broker, Factory, Consolidator, Applicant, Consignee, Manufacturer, Expense Vendor, Import Authority, Escheat-State, Escheat-Country, Other, and External Finisher. Other Type is populated if the NF is a Free Form NF. |
|
Description |
This field is auto populated with the description of the Type selected. |
|
State Inscription |
This field is auto populated based on the name or CNPJ/CPF selected if Entity in RMS is selected. Else, the field is a free form entry. |
|
Tributary State |
This field is auto populated based on the name or CNPJ/CPF selected if Entity in RMS is selected. Else, the field is a free form entry. |
|
Tributary Subscription No |
This field is auto populated based on the name or CNPJ/CPF selected if Entity in RMS is selected. Else, the field is a free form entry. |
|
Vehicle Plate |
This field is for SPED requirement. |
|
Name |
This field is auto populated based on the name or CNPJ/CPF selected if Entity in RMS is selected. Else, the field is a free form entry. |
|
Address |
This field is auto populated based on the name or CNPJ/CPF selected if Entity in RMS is selected. Else, the field is a free form entry. |
|
City |
This field is auto populated based on the name or CNPJ/CPF selected if Entity in RMS is selected. Else, the field is a free form entry. |
|
Neighborhood |
This field is auto populated based on the name or CNPJ/CPF selected if Entity in RMS is selected. Else, the field is a free form entry. |
|
Country |
This field is auto populated based on the name or CNPJ/CPF selected if Entity in RMS is selected. Else, the field is a free form entry. |
|
Plate State |
You can specify the field if the Entity in RMS check box is not selected. Else the field is dimmed. |
|
CNPJ/CPF |
Enter the CNPJ/CPF number. This field is free form entry if Entity in RMS is not selected. |
|
Freight Type |
You can either choose Cost Inclusive of Freight (CIF) and Free on Board (FOB) from the freight type list. |
|
Qty |
Enter the quantity of items. |
|
UOM |
Enter the unit of measure. |
|
Net Weight |
Enter the net weight. |
|
Total Weight |
Enter the total weight. |
|
Entity in RMS |
You have an option to deselect the Entity in RMS check box, for an NF having requisition type Free Form NF. For a Direct NF, the Entity in RMS check box is selected and dimmed. |
The following fields are enabled only for StandAlone NFs:
Description
State Inscription
Tributary State
Tributary Subscription No
Neighborhood
Country
Entity in RMS
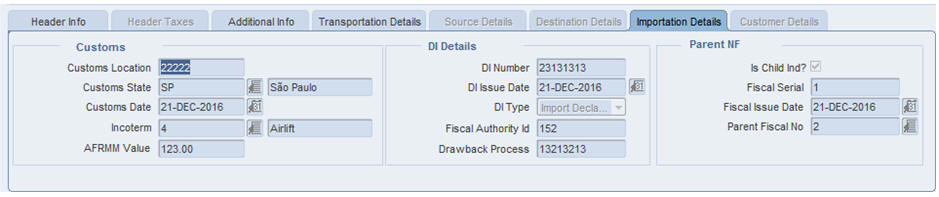
Figure 3-9 shows the Importation Details Tab.
The Importation Details tab is divided into three blocks – Customs, DI Details, and Parent NF.
Table 3-8 Fields and Description of Importation Details Tab
| Field | Description |
|---|---|
|
Customs |
In this block, enter the following fields:
|
|
DI Details |
In this block, enter the DI Number, DI Issue Date, DI Type, Fiscal Authority ID, and Drawback Process. You can either choose Import Declaration or Simplified Import Declaration from the DI Type list. |
|
Parent NF |
In this block, the following fields are enabled if you select Is Child Ind? check box:
|
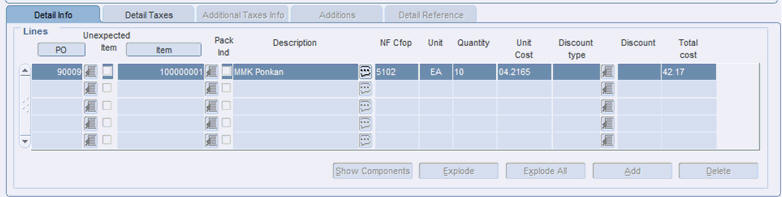
In the Line Item Level Details section, the detailed information of the purchase order (PO) and the items are displayed.
You can populate the Detail Info section of PO in the following three ways:
Default
Custom
UOM
|
Note: UOM view is available and editable only when NF is in Worksheet status. |
Click PO in the Detail Info tab of the Item Level Details section. Select the PO details from the list or enter the PO details.
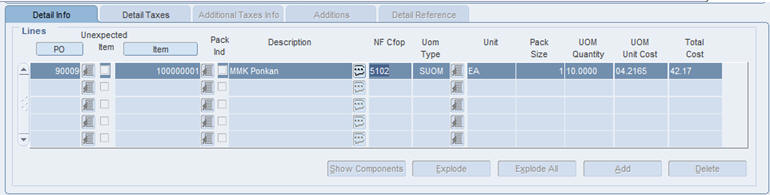
Figure 3-10 shows the Detail Info Tab and the fields and description are provided in Table 3-9.
Table 3-9 Fields and Description of the Detail Info Tab
| Field | Description |
|---|---|
|
PO |
It is a requisition number. |
|
Unexpected Item |
Check this field if the item does not belong to any PO. |
|
Item |
Enter the item or items that are part of the purchase order. |
|
Pack Ind |
This indicator is highlighted if the item is a pack. |
|
Unit |
The number of units of the item. |
|
Quantity |
Enter the quantity of the item. |
|
Unit Cost |
The unit cost of the item. |
|
Discount Type |
Enter the discount type applicable. |
|
Discount |
Enter the discount applicable. |
|
Total Cost |
Enter the total cost applicable. |
|
Note: You can also view the Unit of Measurement (UOM) type by selecting UOM from the View menu. |
Figure 3-11 shows the Detail Info UOM View and the fields and description are provided in Table 3-10.
Table 3-10 Fields and Description of the Detail Info Tab UOM View
| Field | Description |
|---|---|
|
PO |
Enter the Purchase Order (PO) number. |
|
Unexpected Item |
Check this field if the item does not belong to any PO. |
|
Item |
Enter the item or items that are part of the purchase order. |
|
Pack Ind |
Enter the packet item indicator that are part of the purchase order. |
|
Description |
Enter the description of the item. |
|
NF CFOP |
This field displays the CFOP code from Tax Engine. |
|
UOM Type |
UOM type provides an option to associate an appropriate NF based UOM to an item. Select the UOM type from the following list:
|
|
Unit |
The unit cost of the item. Unit displays the corresponding SUOM if user selects UOM type as SUOM, Case, or Pallet. |
|
Pack Size |
Enter the pack size applicable. You are not allowed to update the pack size during NF entry. |
|
UOM Quantity |
Enter the UOM quantity applicable. |
|
UOM Unit Cost |
Enter the UOM unit cost applicable. |
|
Total Cost |
Enter the total cost applicable. |
|
Note: You cannot modify the Item or PO details in the default view that are modified in the UOM view. |
|
Note: You can search for an Item using the Vendor Product Number (VPN). See Searching using Vendor Product Number in the Fiscal Docs Find window for more information on searching for an Item using the VPN. |
Click the Req. Doc. button in the Header Details section. The Match Document window opens.
An example of the Match Document window is given below.
In the Match Document window, all the open POs of that particular supplier are displayed.
To include the PO details in the NF, do the following:
In the Additional Filter section of the Match Documents window, you can select POs from different supplier sites of the same supplier.
Click Add in the Additional Filter section of the Match Documents window to view the POs from different supplier sites of that particular supplier in the multi-record block.
Select one or more requisition documents from the list.
Click Add to NF. The item level information from those POs is defaulted on the NF. This saves significant data entry efforts.
Select the check box for the Unexpected Item to indicate any unexpected item in the NF. When this check box is selected, the PO column is disabled and the value for the PO number is set to null.
Enter the item quantity and cost. The cost and the quantity of the unexpected item is not matched with the PO.
Click Item. Enter the items associated with the PO. If the PO contains pack items the Pack Ind check box is selected.
|
Note: The Show Components, Explode, and Explode All button is enabled for pack items. |
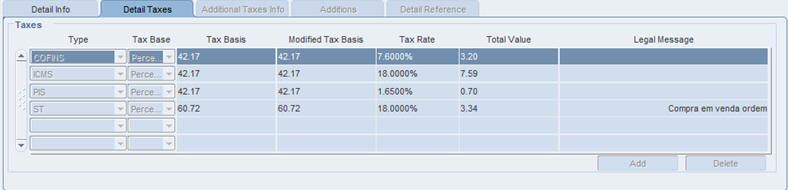
In the Detail Taxes tab, enter the tax details for the item.
Table 3-11 Fields and Description of the Detail Taxes Tab
| Fields | Description |
|---|---|
|
Type |
Indicates the type of tax such as ICMS, COFINS, and so on. |
|
Tax Base |
Indicates whether the tax is value-based or percentage-based. |
|
Tax Basis |
The basis for calculating the taxes. |
|
Modified Tax Basis |
Displays the modified or changed taxable basis. The external tax engine provides this basis, and this value is used for tax calculation. In Brazil, some items are eligible for a tax rule that modifies the taxable basis, mostly lower taxable basis. For such items, the tax rate is applied on the modified taxable basis. Tax Engine calculates the modified base and then calculates the tax values accordingly. |
|
Tax Rate |
The tax rate applied. |
|
Total Value |
The informed total value for the tax. |
|
Legal Message |
The legal message associated with the tax code at the line level. |
|
Note: If you enter detail level taxes, you have to enter the detail level taxes for each item which are on the Item Detail grid.The Totals on the Detail Taxes tab has to match the Header tax information within the tolerance level. |
See Figure 3-13 for an example of the Detail Taxes tab.
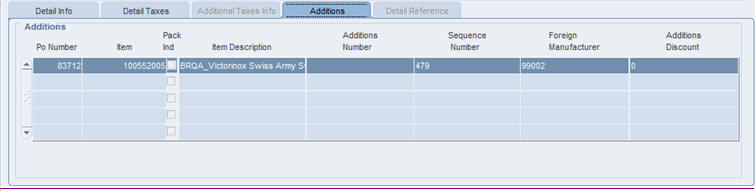
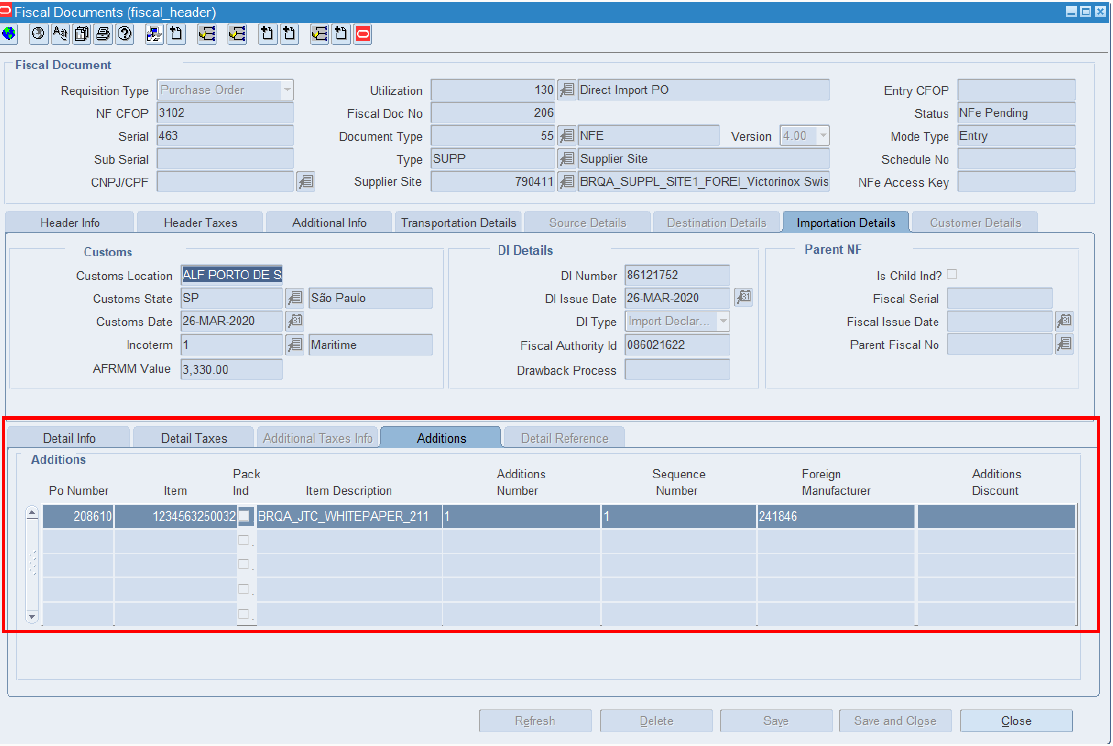
In the Additions tab, enter the additional details for the item.
Table 3-12 Fields and Description of the Additions Tab
| Fields | Description |
|---|---|
|
Po Number |
Enter the purchase order number. |
|
item |
Enter the item or items that are part of the purchase order. |
|
Pack Ind |
This indicator is highlighted if the item is a pack. |
|
Item Description |
Enter the description of the item. |
|
Additions Number |
This field indicates the additions number. |
|
Sequence Number |
This field indicates the sequence number. |
|
Foreign Manufacturer |
This field indicates the foreign manufacturer code. |
|
Additions Discount |
This field indicates the additions discounts. |
|
Note: Additions tab is enabled for Direct Import NF. |
Figure 3-14 shows the Additions Tab and the fields and description are provided in Table 3-12.
After you have entered the relevant details, from the Options menu, select Validate. If there is no discrepancy, the status of NF changes to Validated.
The different menu items of the Options menu in the Fiscal Documents window are given below.
Table 3-13 Options Menu Items and Description
| Menu Item | Description |
|---|---|
|
Worksheet |
To edit the Nota Fiscal, change the status of NF to worksheet. |
|
Validate |
Use this option to validate the NF after entry. Validation process has the following steps involved:
For more information, see Discrepancy Identification and Resolution Process. |
|
Verify Received Qty |
Use this option to review any discrepancy between the expected quantity as per the NF and the actual received quantity. This option is enabled for Inbound NFs only. |
|
Cancel |
Use this option to cancel the NFs. ORFM allows cancellation for few types of NFs only, such as the NF for RMA. |
|
Approve |
Use this option to manually approve the NF. This is not applicable for inbound NFs. |
|
Print Correction Docs. |
This option is enabled only if the NF had undergone discrepancy or there is a damaged or excess/less receiving. This is enabled only after physical receiving. Use this option to list the correction documents for that NF and print them for sending it to the supplier or for internal reference. From the Options menu, select Print Correction Docs. The Print Fiscal Document window opens. This window displays the documents that are already printed and yet to be printed. |
|
Error Log |
Use this option to view the error log in order to take corrective actions, if needed. The error log can contain the following information:
|
|
Discrepancy Resolution |
Use this option to view all the discrepancies (resolved or unresolved) and resolve the unresolved discrepancies. From the Options menu, select Discrepancy Resolution to access the Discrepancy Resolution window. |
|
Note: The NFs in Submitted for Receiving status, and greater cannot be changed to Worksheet status for editing. |
Click OK. You are returned to the Fiscal Docs Find window.
Click OK in the Fiscal Docs Find window. You are returned to the Receiving/Issue Schedule window.
In the Receiving/Issue Schedule window, from the Options menu, select Sub. for Recv. The schedule is submitted for receiving.
The different menu items on the Options menu in the Receiving/Issue Schedule window are as given below.
Table 3-14 Options Menu Items and Description
| Menu Items | Description |
|---|---|
|
Worksheet |
Select this option to bring the schedule to worksheet status. A schedule can be edited only in this status. |
|
Validate |
Select this option to validate all the NFs on the schedule. |
|
Sub. for Recv |
This option is enabled only when the schedule is in Validated status. Select this option to change the schedule status to Submitted for Receiving. |
|
Print Rec. Report |
This option is enabled only after submission. Select this option to print a new report that shows the details of the schedule and the NF details. |
|
Print Document |
Select this option to print the documents. |
|
Approve |
This option is enabled only for outbound NFs. Use this option to manually approve NF. |
|
Error Log |
Select this option to see the Error Log associated with the schedule. For more information on Error log, see Viewing the Error Log. |
After the merchandise is received, ORFM uses the receipt updates, and the NF status is updated to Receipt Verified, if the received quantity is the same as the NF quantity. If there is a difference, the status changes to Received.
If the status is Received, from the Options menu in the Fiscal Documents windows, select Verify Received Qty. The Received Quantities window opens. Click Verify. The status changes to Receipt Verified, after reviewing the received quantity in this window.
After the receipt is verified, the NF status and schedule status changes to Approved. Upon approval, ORFM calculates the landed cost. The landed cost is determined by subtracting the recoverable taxes from the non-recoverable taxes and non-merchandise costs. The recoverable taxes includes ICMS, Programa de Integração Social (PIS), and Contribuição para Financiamento da Seguridade Social (COFINS). These three taxes are part of the unit cost. After removing the recoverable tax, add the nonrecoverable taxes like Imposto sobre Produtos Industrializados (IPI), and the non-merchandise cost (such as freight insurance). ORFM then publishes the receipts with the updated landed cost to RMS.
To view the error log, do the following:
Navigate: In the Receiving/Issue Schedule window, from the Options menu, select Error Log. The Error Log window opens.
|
Note: To view the error log at the NF level, in the Fiscal Documents window, from the Options menu, select Error Log. |
In the filter section of the Error Log, you can enter any or all of the details as given in the following table:
Table 3-15 Error Log Window Fields and Description
| Field | Description |
|---|---|
|
Filter section |
|
|
Schedule No |
Enter the schedule number here. |
|
Document No |
Enter the number of the fiscal document. |
|
Document Type |
The document type list includes Purchase Order, Sell, Return Merchandise Authorization, Transfer, Return to Vendor, Stock Out, EDI Doc. Select the document type. |
|
Error Type |
This list contains two values: Warning and Error. |
|
Error Date |
Enter the date. |
|
Error Status |
The error status can be Open or Closed. |
Click the filter button after entering the values. The multi-record block displays the records that meet the filter criteria along with the Error Message.
Select the error and click Fiscal Doc to see the Fiscal Documents window.
Click Close to exit the window.
The Receiving/Issuing module of ORFM enables you to link/delink an existing NF to a schedule.
|
Note: You can Link and Delink the NF on schedules of "Submitted for Receiving" status. |
To link the Nota Fiscal to a schedule, perform the following steps:
Navigate: From the RMS Start Menu, select Fiscal Management. In the Contents Of Fiscal Management, select Receiving/Issue. In the Contents Of Receiving/Issue, click Edit. The Receiving/Issue Schedule window opens.
Click Fiscal in the Receiving/Issue Schedule window. The Fiscal Docs Find window opens. This window displays all the NFs linked to that schedule.
Click Link to link another NF to the schedule. The Fiscal Docs Find window opens.
Enter the query criteria in the Fiscal Docs Find window and execute the query. All NFs meeting the query criteria are displayed in the Fiscal Docs Find window.
|
Note: You can search for an item using fiscal number, or the VPN. See Searching using Vendor Product Number in the Fiscal Docs Find window for more information on searching for an Item using the VPN. |
In the Fiscal Docs Find window, check the NF to be linked to the schedule, and click OK. The Fiscal Docs Find window displays the list of NFs linked to the schedule.
|
Note: Click OK + Repeat to add another NF to the schedule. |
Click Close to exit the window.
To delink the Nota Fiscal and the schedule, perform the following steps:
Navigate: From the RMS Start Menu, select Fiscal Management. In the Contents Of Fiscal Management, select Receiving/Issue. In the Contents Of Receiving/Issue, click Edit. The Receiving/Issue Schedule window opens.
Click Fiscal in the Receiving/Issue Schedule window. The Fiscal Docs Find window opens. This window displays all the NFs linked to that schedule.
Select the NF and click Delink to delink the NF from the schedule. The following message is displayed:
Click Yes to delink the NF.
Click Close to exit the window. You are returned to the Receiving/Issue Schedule window.
The NF processing for PO Receiving described in the section — NF Processing - PO Receiving works when there is no discrepancy. When there is a difference between the NF cost and PO Cost or NF quantity and PO Quantity, or NF tax and tax details from Tax Engine, the NF is said to be discrepant or in the In Discrepancy status.
|
Note: The discrepancy resolution and matching process does not address the identification of discount discrepancy and landed cost component discrepancy. The Nota Fiscal values for the landed cost component has to be apportioned to individual items. |
The two approaches that are supported in ORFM for the resolution of discrepancies are as follows:
Centralized Discrepancy Resolution – In the centralized discrepancy resolution process, the quantity discrepancies identified during the discrepancy identification has to be resolved before submitting the NF for receiving. The quantity discrepancy can be resolved at the receiving location or at the centralized location. However, the cost and tax discrepancy can be resolved at the central location after the physical receipt of the merchandise. The centralized location may refer to company headquarter or the regional office.
The status of NF or schedule in centralized receiving flow is as follows:
Table 3-16 Status of the NF for Centralized Discrepancy Resolution
| Quantity Discrepancy | Cost Discrepancy | Tax Discrepancy | Status |
|---|---|---|---|
|
Yes |
No |
No |
In Discrepancy |
|
Yes |
Yes |
No |
In Discrepancy |
|
Yes |
No |
Yes |
In Discrepancy |
|
No |
Yes |
Yes |
Validated |
|
No |
No |
Yes |
Validated |
|
Yes |
Yes |
Yes |
In Discrepancy |
The NF status will not change to Approved unless all the discrepancies are resolved.
In addition, the Discrepancy Resolution item on the Options menu in the Fiscal Documents window is enabled till all the discrepancies are resolved. The check box in the Discrepancy section of the Header Details section is selected for the unresolved discrepancy.
De-centralized Discrepancy Resolution – In the de-centralized discrepancy resolution approach, all the discrepancies are resolved at the location where the merchandise is to be received. The receiving location may be a warehouse or store.
In this approach, the NF status is set to In Discrepancy if any discrepancy exists after validation.
You cannot submit the NF for receiving until all the discrepancies are resolved, and hence physical receiving before discrepancy resolution is not possible. Only after all the discrepancies are resolved, will the NF status change to Validated, and you can submit the NF for receiving.
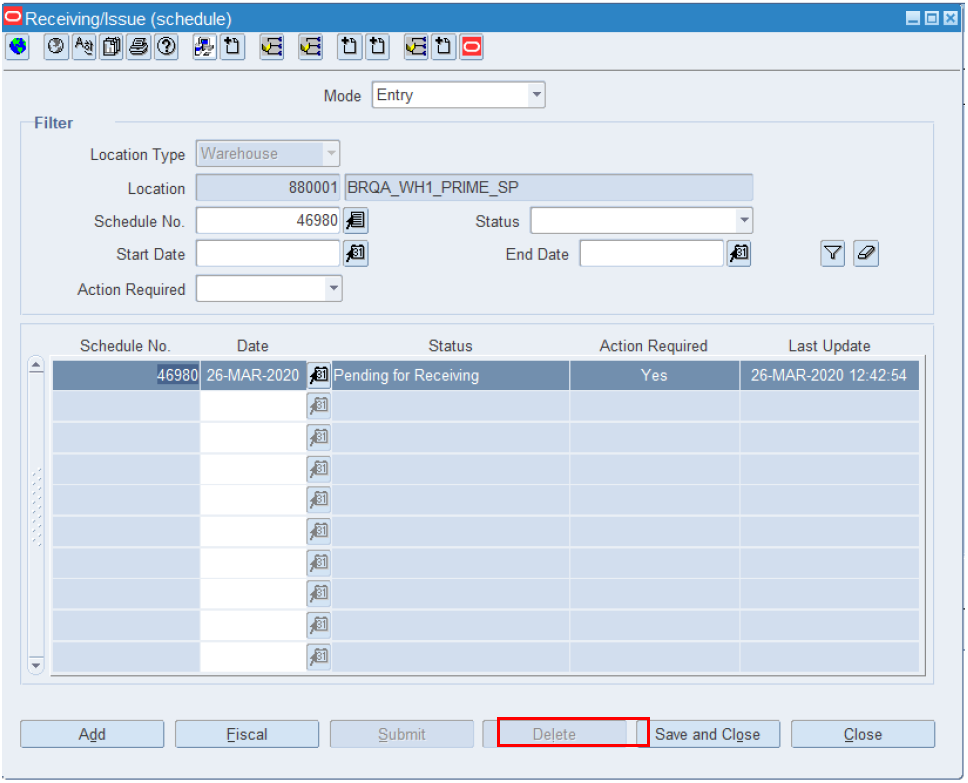
The Fiscal Docs Find displays the status of NF as In Discrepancy as shown below:
If there is quantity, cost or tax discrepancy, the Fiscal Documents window displays the status of NF as In Discrepancy.
In the Header area of the Fiscal Documents window, the check box is selected for the discrepancy that is present on the NF as shown in Figure 3-20.
In the centralized discrepancy resolution process, the quantity discrepancy is resolved at the receiving location or at the centralized location. The cost and tax discrepancies may not be resolved, but the nota fiscal will be in Validated status. The process to resolve quantity discrepancy is given below.
In order to resolve quantity discrepancy, do the following:
From the Options menu in the Fiscal Documents window, select Discrepancy Resolution. The Discrepancy Resolution window opens.
As highlighted in Figure 3-21, the check box for Qty is selected to indicate quantity discrepancy.
|
Note: It is not necessary for the all the discrepancies to exist together. |
Click Resolve Qty in the Discrepancy Resolution window to resolve only quantity discrepancy. The Discrepancy Resolution window displays the quantity details.
In the Discrepancy Resolution window, the list in the Resolution Action field has two options – System or Nota Fiscal. Select one of the options. Click Resolve Disc.
|
Note: Depending on the system options set, ORFM decides the action to be taken for discrepancy resolution.For example, in case the system option is set to System, the Nota Fiscal option is disabled. You have to select System to resolve the discrepancy. |
The message – "Selected Resolution Action will be applied to all the discrepant records. Are you sure you want to continue?" is displayed. Click Yes. You are returned to the Discrepancy Resolution window. Notice that the check box for quantity is not selected, and the Resolve Qty button is disabled as highlighted in Figure 3-23.
Click OK. You are returned to the Fiscal Documents window. The status of the Nota Fiscal is changed to Validated, if no other discrepancies exist.
In the Receiving/Issue Schedule window, from the Options menu, select Sub. for Recv.
The status of schedule changes from Validated to Subm. for Recv.
After the items are received, the status of the nota fiscal changes to Received.
Since there is a quantity discrepancy, you have to review the received quantities, before the nota fiscal can be approved. From the Options menu, select Verify Received Qty. The Received Quantities window opens.
In the Received Quantities window, click Verify.
In this window, review the quantity of merchandise received. After reviewing the quantity of merchandise received, the status of the NF changes to Approved if there are no pending discrepancies to be resolved.
A correction document is generated, depending on what you have selected while resolving the quantity.
Return NF and Merchandise without NF report can be generated at every NF level in the schedule. These reports are generated only if there is any return NF quantity or merchandise without NF quantity for any item on the NF.
The Return NF is sent to the supplier for the extra or damaged quantities. The cost and the tax details for the quantity of merchandise to be returned to the supplier are calculated.
To generate merchandise without NF, do the following:
In the Fiscal Documents window, from the Options menu, select Print Correction Docs. The Correction Documents List window opens.
The Correction Documents grid section lists all the correction document types that can be generated for the NF. The list may include the following, and depends on the corrective action taken:
Return NF - To return the stock to the supplier that was either received in excess or was damaged and hence rejected by Warehouse Management System (RWMS) or Store Inventory Management System (SIM), a Return NF is generated.
After excess or damaged receiving, if system generates Return NF report and auto generates Return NF in Exit mode with the reference number of main NF.
Merchandise without NF – If any item is received without mention on the NF, it is listed in the merchandise without NF report. This is an internal report that need not be sent to the supplier. Any such inventory is handled outside the system and it is not accounted as on-hand inventory.
Discrepancy Report – This document is generated when there are discrepancies. You can send the discrepancy report to correct the cost, quantity and tax discrepancies.
Complementary NF Request – This document is generated when the supplier has incorrectly charged lower taxes than system calculated taxes. Print this document and send it to the supplier requesting the complementary NF with corrected taxes.
To print the document, select the check box for merchandise without NF.
Click Print. The merchandise without NF is printed.
In the de-centralized discrepancy resolution approach, all the discrepancies are resolved at the location where the merchandise is to be received. The receiving location may be a warehouse or store.
The cost and tax discrepancy resolution processes are described below.
In order to resolve cost discrepancy, do the following:
From the Options menu in the Fiscal Documents window, select Discrepancy Resolution. The Discrepancy Resolution window is displayed.
As shown in Figure 3-26, if there is cost, and tax discrepancy, the check boxes for Cost, and Tax are selected.
Click Resolve Cost in the Discrepancy Resolution window to resolve the discrepancy in cost.
The Discrepancy Resolution window displays the cost details. In this window, the list in the Resolution Action field has two options – System or Nota Fiscal. Select one of the options. Click Resolve Disc.
|
Note: Depending on the system options set, ORFM decides the action to be taken for discrepancy resolution.For example, in case the system option is set to System, the Nota Fiscal option is disabled. The list for resolution is disabled and the default method of resolution then becomes 'System'. |
The message – "Selected Resolution Action will be applied to all the discrepant records. Are you sure you want to continue?" is displayed. Click Yes. You are returned to the Discrepancy Resolution window. Notice that the check box for Cost is not selected, and the Resolve Cost button is disabled as highlighted in Figure 3-28.
Click OK. You are returned to the Fiscal Documents window. The status of the NF changes to Validated.
Click Close. You are returned to the Receiving/Issue Schedule window. From the Options menu, select Sub. for Recv.
After the items are received, the status of the nota fiscal changes to Received, if there are any overages/damages and under-receiving. Else, the status of NF changes to Approved.
If the System Option is set to System, then a correction document is generated whenever a discrepancy occurs. The NF has to be in Approved status.
From the Options menu in the Fiscal Documents window, select Print Correction Docs. The Corrections Document List is displayed.
|
Note: The Print Correction Docs option is enabled only for approved NFs. |
Select the check box for Discrepancy Report.
Click Print. The correction document for the cost discrepancy is printed.
In order to resolve tax discrepancy, do the following:
From the Options menu, select Discrepancy Resolution. The Discrepancy Resolution window is displayed.
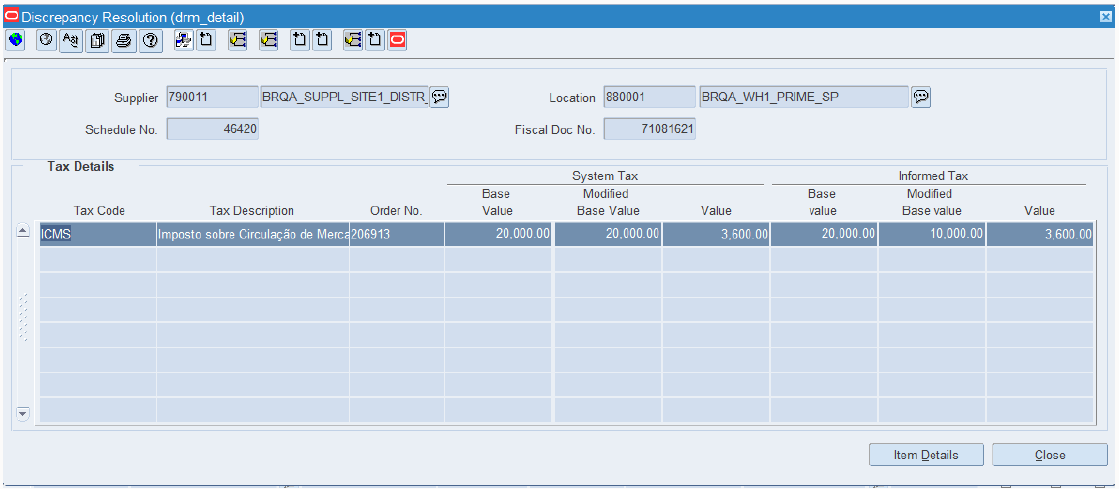
Click Resolve Tax in the Discrepancy Resolution window. The system and informed tax are displayed in the Discrepancy Resolution window.
The system tax includes:
Base Value – The basis for calculation of the tax
Modified Base Value – Contains the taxable basis changed by external tax engine for tax calculation. This happens when a tax rule modifies the taxable basis, mostly in the form of a lower taxable basis. It reflects the taxable basis the tax rate is actually applied on by external tax engine
Value – The total value
The informed tax includes
Base Value – Informed calculated basis for the tax
Modified Base Value – The changed basis, which flows from the external tax engine. This value is applicable for only certain items that are eligible for a tax rule, which modifies the basis on which the tax rate is calculated.
Value – The informed total value for the tax
In this Discrepancy Resolution window, click Item Details. The Item Tax Details is displayed in the Discrepancy Resolution window.
Table 3-17 Item Tax Details Fields and Description
| Fields | Description |
|---|---|
|
Tax Code |
The tax code returned by the external tax engine |
|
System Taxable Base Value |
The total basis on which the tax is calculated |
|
System Tax Value |
The total tax value returned calculated by the tax engine |
|
Informed Taxable Base Value on NF |
The total taxable basis apportioned to the line level by the application |
|
Informed Tax Value on NF |
The total taxable value apportioned to the line level by the application |
|
Item Tax Details Section |
|
|
Item |
The merchandise number |
|
Order No |
The purchase order number |
|
Base Value |
System Tax – The basis used while calculating the tax Apportioned Tax on NF – The apportioned tax basis value calculated for the fiscal line using the header tax basis values |
|
Modified Base Value |
System Tax – Modified Base Value is applicable to items that are eligible to a tax rule that modifies the taxable basis Apportioned Tax on NF – Modified apportioned tax basis value calculated for the fiscal line using the modified header tax basis values. |
|
Rate |
System Tax – The tax rate at the item level Apportioned Tax on NF – The apportioned tax rate calculated at the fiscal line level |
|
Value |
System Tax – The system tax value of the individual item Apportioned Tax on NF – The apportioned tax value calculated for the fiscal line using the header tax value |
|
Value/Unit |
System Tax – The unit tax amount calculated Apportioned Tax on NF – The apportioned unit tax amount |
|
Resolution By |
The resolution can be either as per the System or as per the Nota Fiscal |
|
Reason |
The reason for the resolution action (optional) |
In the Resolution By field, click the list, and select from resolve by either System or Nota Fiscal. Click Resolve Disc.
|
Note: Depending on the system options set, ORFM decides the action to be taken for discrepancy resolution.For example, in case the system option is set to System, the Nota Fiscal option is disabled. The list for resolution is disabled and default method of resolution is set as 'System'. |
The message – "Selected Resolution Action will be applied to all the discrepant records. Are you sure you want to continue?" is displayed. Click Yes. You are returned to the Discrepancy Resolution window. Click Close.
|
Note: If more than one component of the tax is in discrepant state, then the Discrepancy Resolution window displays the details of all the tax components. Follow the procedure listed in steps three to five to resolve the tax discrepancy. |
In the Discrepancy Resolution window, notice that the check box for Tax is not selected, and the Resolve Tax button is disabled as highlighted in Figure 3-33. The Status of the Nota Fiscal is changed to Validated.
Click Close in the Discrepancy Resolution window. You are returned to the Fiscal Documents window. The status of the NF is changed to Validated.
Click OK in the Fiscal Documents window. The Fiscal Docs Find window opens. The status of the NF is displayed as Validated.
Click Close in the Fiscal Docs Find window. The Receiving/Issue Schedule window opens. From the Options menu, select Sub. for Recv.
After the items are received, the status of the nota fiscal changes to Received, if there are any overages/damages and under-receiving. Else, the status of NF changes to Approved.
After the NF is approved, a correction document or complementary NF for tax is generated, based on what you have selected while resolving the discrepancies.
In the following scenarios, the supplier may issue an additional (complementary) NF in addition to the regular NF and may impact the total amount payable and landed cost (WAC) of the item.
The utilization attributes are set up to one of the below values to differentiate the type of Complementary NF: Triangulation Purchase (additional NF from Delivery Supplier)
Non-merchandise cost charged by a different supplier that is, partner (non-merchandise NF)
NF for Cost Correction
NF for Tax Correction
NF for Transfers
For more information on the set up, see Fiscal Utilization Attributes Window.
While creating the purchase order, the user can mention a supplier (referred to as the main supplier) to whom the payment is made and another supplier (a distributor or facilitator) who actually delivers the stock on behalf of the main supplier (referred to as the delivery supplier). This mechanism is referred to as the triangulation purchase.
The main supplier and the delivery supplier may be located in different states. In such cases, the state level taxes like ICMS and ICMS-ST are calculated based on the location of the delivery supplier.
In triangulation purchases, the retailer receives two NFs for the same inventory. One from the main supplier, which primarily serves as an invoice for making the payment and another from the delivery supplier, which serves as a bill of lading document. This document is referred to as the complementary NF for triangulation. Since ICMS and ICMS-ST depend on the delivery supplier's location, they appear on the delivery supplier's NF.
To create a complementary NF for triangulation, do the following:
Navigate: From the RMS Start Menu, select Fiscal Management, then select Contents Of Fiscal Management.
In Contents Of Fiscal Management, select Login of Location. The Location Login window opens.
In the Location Login window, select the store or warehouse of the main supplier. Click the Location LOV to obtain the list of stores or warehouses. Select the location and click OK.
In Contents Of Fiscal Management, click Receiving/Issue. In Contents Of Receiving/Issue, click Edit. The Receiving/Issue Schedule window opens.
In the Receiving/Issue Schedule window, click Add. A new NF is created in the Entry mode.
Click Fiscal in the Receiving/Issue Schedule window. The Fiscal Docs Find window opens.
Click Add in the Fiscal Docs Find window. The Fiscal Documents window opens. Enter the Utilization code for triangulation.
Enter the other values in the Fiscal Documents window. The NF is created in the Worksheet status.
Click OK. You are returned to the Fiscal Docs Find window. The Fiscal Docs Find window displays the NF that is created in the worksheet status.
Create another NF using the same process as given above. This is the complementary NF, and it has to be in the same schedule as the main NF. It should have the same item details as the main NF.
After creating another NF, return to the Fiscal Docs Find window, and select the first NF created for the main supplier.
Click Complement on the Fiscal Document window. The Complement Fiscal Doc window opens.
In the Complement No column, select the complementary NF. Click Add to link this NF with the main NF.
Click OK to return to the main NF. From the Options menu, select Validate. The status of NF changes to Validated, if there is no discrepancy between the two NFs. You are returned to the Receiving/Issue Schedule window.
|
Note: The data integrity validation has to display an error if either of the NF is not entered in the application. |
In the Receiving/Issue Schedule window, select the NF and submit it for receiving. From the Options menu, select Sub. for Recv.
Complementary NF for non-merchandise cost is generated to account for the freight charges incurred during transportation of merchandise. The non-merchandise cost refers to Freight Cost, Insurance Cost, and Other Expenses. Non-merchandise cost is charged by a different supplier (or partner). In such cases, the supplier has to issue an additional NF or complementary NF in addition to the regular NF.
In Complementary NF for non-merchandise cost, NFs can have multiple main NFs or none. Once the main NFs are associated to the Complementary NF for non-merchandise cost NF, the cost components are apportioned to the items that are present in the main NF.
To do the NF Processing for non-merchandise cost, do the following:
Navigate: From the RMS Start Menu, select Fiscal Management, then select Login of Location. The Location Login window is displayed.
Select the location from the Location LOV in the Location Login window.
Click OK to exit the window.
From the RMS Start Menu, select Receiving/Issue. In the Contents Of Receiving/Issue, click Edit. The Receiving/Issue Schedule window is displayed.
Click Add in the Receiving/Issue Schedule window.
A new schedule is created.
|
Note: You can link the Complementary NF for Non-Merchandise Cost to a schedule. The Complementary NF for Non-Merchandise Cost can remain without a schedule.Multiple main NFs can be attached to one Complementary NF for Non-Merchandise Cost. However, you cannot associate the Complementary NF to any main NFs. |
Select the new schedule and click Fiscal in the Receiving/Issue Schedule window. The Fiscal Docs Find window is displayed.
In the Fiscal Docs Find window, click Add.
The Fiscal Documents window is displayed.
In the Fiscal Documents window, select Purchase Order as the Requisition Type from the list.
In the Utilization field, set the Utilization field for both Comp NF for Merchandise and Non-Merchandise.
After you enter the Utilization as Comp NF for Merchandise and Non-Merchandise, in the Header Details of the Fiscal Documents window, the Service and Merchandise Cost fields are disabled. Requisition Doc button is disabled.
The Additional Costs fields that include Freight, Insurance, and Other Expenses are enabled. In the Line Item Detail section, the fields in the Detail Info tab and Detail Taxes tab are disabled.
Enter the expenses incurred for freight and insurance in their respective fields. If other expenses are present, enter the details in the Other Expenses field.
The Totals in the Header Details section is also enabled.
Click Complement to associate this NF with the main NF.
In the Fiscal Documents window, from the Options menu, click Validate.
During the validation process, the total cost is validated. After the validation, status automatically changes to Approved.
Complementary NF for Cost/Tax is generated by the Supplier when there is additional costs to be paid by the Retailer because of some discrepancies in the original NF generated for the Purchase Order.
There can be multiple complementary NFs for cost and tax correction that correspond to one main NF. But one complementary NF cannot correspond to more than one main NF. In case of cost and tax discrepancy in one main NF, the supplier may send one complementary NF for cost correction and one complementary NF for each tax code correction; or the Supplier may send single complementary NF for the correction of cost and all the taxes.
The complementary NF for cost and tax will result in updating the cost in RMS.
To do the NF Processing for cost/tax correction do the following:
Navigate: From the RMS Start Menu, select Fiscal Management, then select Login of Location. The Location Login window is displayed.
Select the location from the Location LOV in the Location Login window. Click OK to exit the window.
From the RMS Start Menu, select Receiving/Issue. In the Contents Of Receiving/Issue, click Edit.
The Receiving/Issue Schedule window is displayed.
Click Add in the Receiving/Issue Schedule window.
A new schedule is created.
|
Note: You can associate only one main NF to a Complementary NF for Cost/Tax Correction. |
Select the new schedule and click Fiscal in the Receiving/Issue Schedule window. The Fiscal Docs Find window is displayed.
In the Fiscal Docs Find window, click Add. The Fiscal Documents window is displayed.
In the Fiscal Documents window, select Purchase Order as the Requisition Type from the list.
In the Utilization field, set the Utilization to Comp NF for Cost/Tax Correction.
After you enter the Utilization as Comp NF for Cost/Tax Correction, in the Header Details of the Fiscal Documents window, the Service and Merchandise Cost fields are disabled. Requisition Doc button is disabled.
The Additional Costs fields that include Freight, Insurance, and Other Expenses are enabled. In the Line Item Detail section, the fields in the Detail Info tab and Detail Taxes tab are disabled.
Enter the expenses incurred for freight and insurance in their respective fields. If other expenses are present, enter the details in the Other Expenses field.
The Totals in the Header Details section is also enabled.
Click Complement to associate this NF with the main NF.
In the Fiscal Documents window, from the Options menu, click Validate.
During the validation process, the total cost is validated. After the validation, status automatically changes to Approved.
Oracle Retail Fiscal Management module have the capacity to support the NF related as-pects of the importation process in Brazil, although it is not in scope to support the entire importation process from the purchase, transport, customs, and so on. More specifically RFM module has the capacity to handle the processing of the NF (nota fiscal) and inven-tory updates, with restrictions that will be explained in this document.
Integration to an importation specialist solution is required for the tasks not supported in RFM. Before getting into these details, some concepts must be clarified:
RMS supports the creation of foreign (non-Brazil) suppliers. All localization fiscal attrib-utes are disabled for this type of supplier. Item master data and localization attributes at item/country level are required even if the item/supplier link is not made with a Brazilian supplier.
Item costing and PO tax breakup are not performed using the tax integration layer in case of non-Brazil suppliers.
It is normal to have an invoice being sent to the retailer for advanced payment or, in sev-eral cases, just after shipment, an invoice is sent from the vendor to the importer. This type of invoice is meant for payment only and it is not used for inventory updates or even for the clearance process.
The assumption in Oracle Retail is that this type of invoice should be sent directly to fi-nance system. There should not be any posting of this type of invoice in RFM/RMS.
The advanced payment invoice may have different currency rates from the final docu-ment generated and used to transport the goods (DI - Import Declaration). The stock ledger would always be updated based on the final document (DI).
The payments will be considered out of RFM/RMS scope. The letter of credits should be controlled by the finance system and the assumption in RFM/RMS is that this type of purchase will be always pre-paid.
In Brazil there are different ways for a retailer to manage and process the importation, especially the clearance process. It is possible for a retailer to do the clearance process himself and be responsible for all activities involved, and also be possible for a retailer to hire a third-party company to handle the clearance and all paper work involved. In that case, this third-party company will handle the importation from a NF stand point. Considering the different ways to handle clearance, we can list:
Direct Import: When the retailer is responsible for the clearance process and for issuing the NF necessary to move the goods.
Import on behalf of thirds: When a third-party company or trading is in charge of handling the clearance process on behalf of the retailer (buyer). From the NF perspective this trading company will be in charge of issuing an internal domes-tic NF to the retailer in a specific transaction code (CFOP) that reflects this im-portation mode.
Import by Order: When a trading company makes the importation from documentation, clearance and NF aspects, but the destination of the goods is a pre-defined company (retailer). In this case the NF from this company to the retailer will be a regular domestic sale.
Assuming a third-party solution is in charge of the importation, clearance and the generation of the entry domestic NF for the imported products, RFM will be able to receive this NF in two different modes:
NFe generated by RFM: third-party trading system provides the necessary in-formation for the NFe generation in RFM, using NFe sequence number main-tained in RFM and from there it will be authorized by the SEFAZ through NFe integration, and follow with the physical receiving flow.
NFe generated by external system: third-party trading system provides NFe information already generated and authorized so that RFM doesn't need to do it. RFM will just follow with the fiscal and physical receiving flow.
It is important to note that the system does not recognize, in fiscal document lev-el, if the NF was generated by RFM or external system. It is managed by RFM system option 'DI_NF_SERIAL_GENERATION_IND', which determines the be-havior of the process. There's no way to have both operating scenarios simulta-neously.
Another important assumption is that in any of the scenarios above, the NF data coming from third party trading system must have all necessary information, taxes, recoverable taxes, fiscal codes, and so on. The reason for that is RFM will not perform tax calls for direct import receiving process.
The direct import NF can be inserted in RFM via EDI tables or manually via screen. The EDI and screen have specific data related to this type of NF. The direct import domestic NF must have specific fields that are based on the clearance process and a document called Import Declaration or DI.
All needed data from DI is placed in Importation NF in RFM system, in tab "Importation Detail".
In case of Direct Import, one DI should normally result in one Entry NF, however the DI is issued based in the entire order. It can happen that all entire order needs to be transported in more than one vehicle. In reason of legal inspection, each truck that transports merchandise needs to have the printed DANFE NF related only with merchandises that are being transported in that particular vehicle, so Import Order NF should be break in "child" NFs.
All NFs must be entered in the system (main NF and child NFs). As the goods will be received partially, the stock should be updated based on each child NF. These child NFs have specific CFOP codes and must be related to the main NF.
The sum of all partial NFs issued for transportation must match with the total of the main NF. On approval of all child NFs, the main NF would automatically be approved.
In RFM system, only one DI NF (parent or child) is allowed per schedule. If a second Direct Import NF is associated with a schedule with an existing NF, sys-tem will show an error message: "For Direct Import NF there can be only one NF per schedule". The fiscal reporting of these NFs (main and child) requires the re-lationship between them and the identification of each one as main or child.
For an Import Order, there must be one parent NF and at least two child NFs as-sociated with it. If there is only one child NF associated with a DI Parent NF, sys-tem will show a warning message: "DI Parent NF must have at least two child NFs".
First, a parent NF is created, and then validated successfully. Next, two child NFs are created. After the two children have been created in Worksheet status, they must be validated.
Manual entry (via screen)
In case DI PO NF is captured using RFM UI, user would use the existing flow to capture NF. Following details will be distinct for DI NFs:
NF Requisition: Purchase Order requisition would be leveraged for DI PO NF capture.
Each DI NF would be associated to individual schedule. A schedule will not be shared between many NFs, there will always be one schedule per DI NF. Reason being that it is not known whether a DI NF has child NFs or is a single DI NF during schedule creation, hence the need to limit the association of NF to sched-ule. If a schedule is already associated to a DI NF, another NF cannot be associ-ated to that schedule.
Utilization: There can be two types of NF captured as part of Direct Import. There can be a main NF and multiple child NFs. User needs to associate appro-priate utilization code to DI NFs (both main and child) based on Import Order Type, such as, Direct Import.
When utilization attached to the NF has Import Order Type set as Direct Im-port. RFM would allow NF Issuer and NF addressee to be set up as follows:
NF Addressee / Sender: Foreign supplier. Addressee/Sender field is a dual use field, and foreign supplier is "Sender".
Following fields to be captured for both main and child DI NFs under a new tab "Importation Details" (when utilization ID has Direct_Import_Indicator as TRUE):
DI number: Import Declaration number at NF header level.
DI Issue Date: Import Declaration issue/register date at NF header level
DI Type: 0 for Import Declaration, 1 for Simplified Import Declaration
Customs details:
Customs Place: Location where customs happened
Customs State: State where customs happened
Customs Date: Date on which customs happened
Fiscal Authority ID: Identification of the fiscal authority that approved the clearance process at NF header level.
Exchange Rate: Exchange rate will be captured for each NF line level on Main NF only. Same importation may have products with different origins (Europe, Asia, and so on) and the DI issued may have different rates for each item de-pending on the currency of the origin of those items (Euro, Dollar, and so on). NF will have a rate at line level. It is assumed that exchange rate date would come in EDI NF details. Exchange rate date would be disabled post NF validation of manual or EDI NF.
Child NFs indicator: Indicator at NF header level on Importation Details tab under Parent NF section to identify a DI NF as child NF, such as, NF with a par-ent NF.
When "Is Child Ind" indicator is unchecked (by default), the main NF LOV would remain disabled. It would be assumed that DI NF is the main NF (with or without child).
When "Is Child Ind" indicator is checked, such as, TRUE, Parent NF LOV would be enabled. It is expected that child NF is associated with one parent NF. LOV would show only those parent NFs which are not approved and belong to the same supplier. Validations will be in place to associate child NF with aren't NF. If any of these validations fails, then RFM should not allow association of child NF with Parent NF.
DI number and date on child NF should be same as main NF's
Child NF should hold the main NF's number, serial and issue date
Fiscal authority ID on child NF should be same as main NF's
RFM to perform line level check between child and Main NF when child NF is validated:
If any item exists on child NF but do not exist on parent NF, then child NF would not be processed. RFM would throw an error that "One or more items on child NF is/are not present on parent NF"
Quantity check at line level: If parent NF has item X with quantity specified as P, then total quantity of item X on all child NFs should not go beyond P, for example, at a given time total quantity of X on child NFs should be less than equal to P. If total quantity of an item on all child NFs is more than specified on parent NF, RFM would not process the last child NF and would throw an error that "One or more items on child NF has/have more than expected quantity"
In case system option DI_UNIT_COST_COMP is "S", RFM should match unit cost on child NF with main NF. RFM should also ensure that total merchandise value of main NF should be greater than or equal to sum of merchandise value of related child NFs. Once all child NFs are referenced to main NF, the total product line value of main NF should be equal to sum of product line values of child NF. In case child NF has different unit cost or sum of child NF merchandise value is more than parent NF merchandise value, RFM should not allow child NF to be validated and should bring it to error status. Rejection reason should be logged.
In system option DI_UNIT_COST_COMP is "T", RFM should only match total value of Parent NF with total value summed of all child NFs. In case sum of child NF value is more than parent NF value, RFM should not allow child NF to be validated and should bring it to error status. Rejection reason should be logged.
Once child NF is associated to a parent NF, parent NF cannot be moved back to worksheet status.

Following fields will be captured at line level on Direct Import NF:
Additions details will be captured at item line level under a new tab "Additions":
Addition Number
Sequence Number of the item in the addition
Foreign Manufacturer Code
Value of the discount of the item of DI - addition
DI NF will be validated. Once Main NF is in validated status, it can be associated to child NFs.
Validation for Main DI or Child NF will not have tax calls.
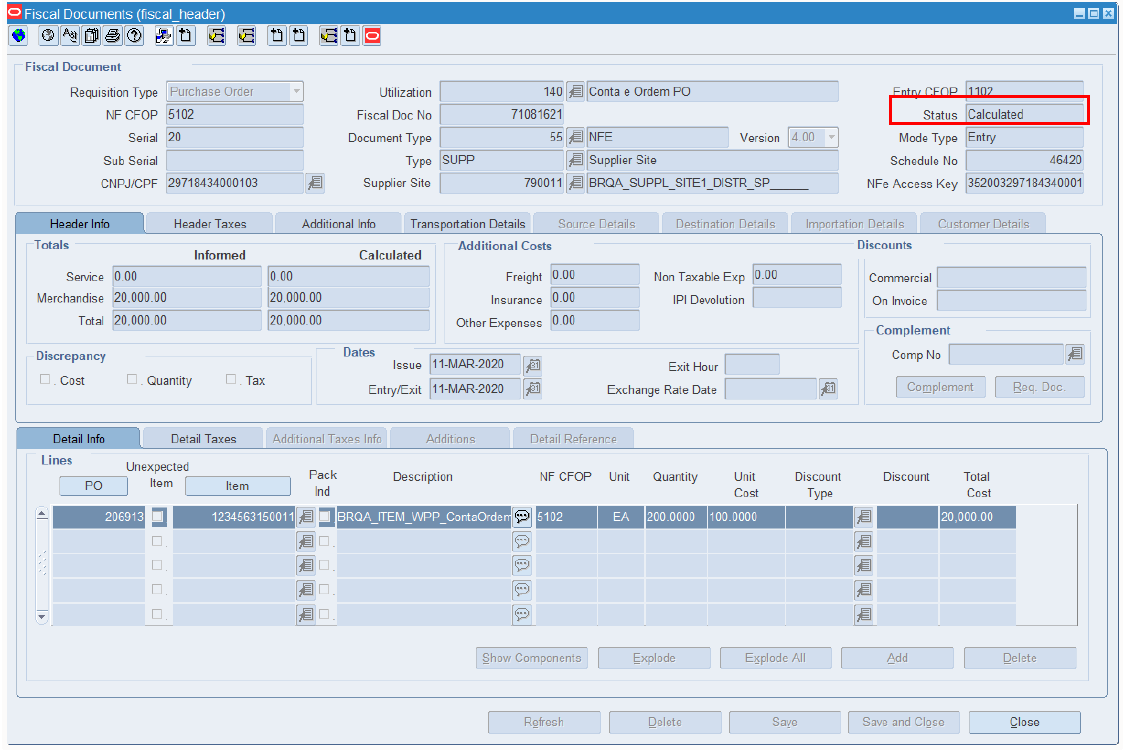
Comparison with PO will happen for cost and quantity, but in case of any discrepancy, the NF will be put in "Calculated" status as there will be no discrepancy treatment for direct import scenario. Cost and quantity dis-crepancy treatment between NF and PO will always result in NF informed value as being correct. User will not be required to treat discrepancy. RFM will display a soft warning message whenever there is a cost or quantity discrepancy to state that discrepancy is being resolved by considering NF informed value as correct value. As there is no discrepancy identification or treatment, in case there are items on NF without a valid PO. It would be a manual business process to include such line items on a PO before receipt. Also there will not be any merchandise without NF report as it is assumed that NF information is always correct. If there are any discrepancies, all would be handled separately through retailer's business process.
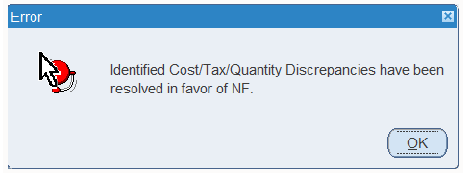
User would have an option to navigate to discrepancy resolution option and view drm_header screen. Further user would have an option to navigate to Resolve Cost option and view drm_detail screen. If user clicks on Item De-tails, the system shows Item Tax Details, but it is not allowing any user driven resolution. By default, RFM will perform resolution by Nota Fiscal and reason as "Importation Scenario". This would not be allowed to be fur-ther changed by user. To summarize, the resolution would always be in favor of NF informed values.
User would further have an option to approve NF once NF is in "Calculated" status.
The user will be able to view discrepancy resolution in Discrepancy Resolution window, but no action will be allowed.
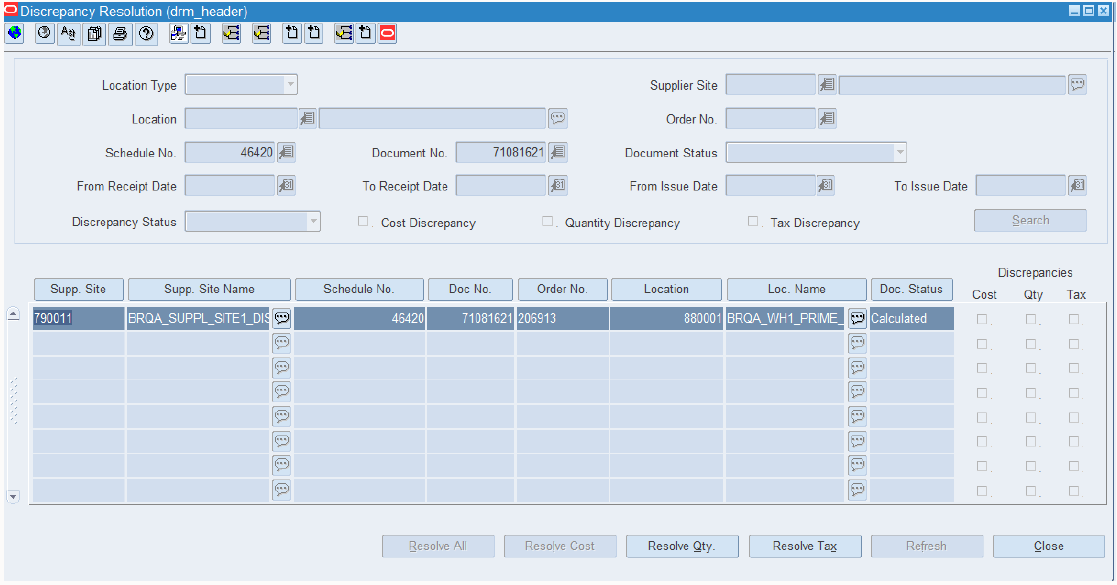
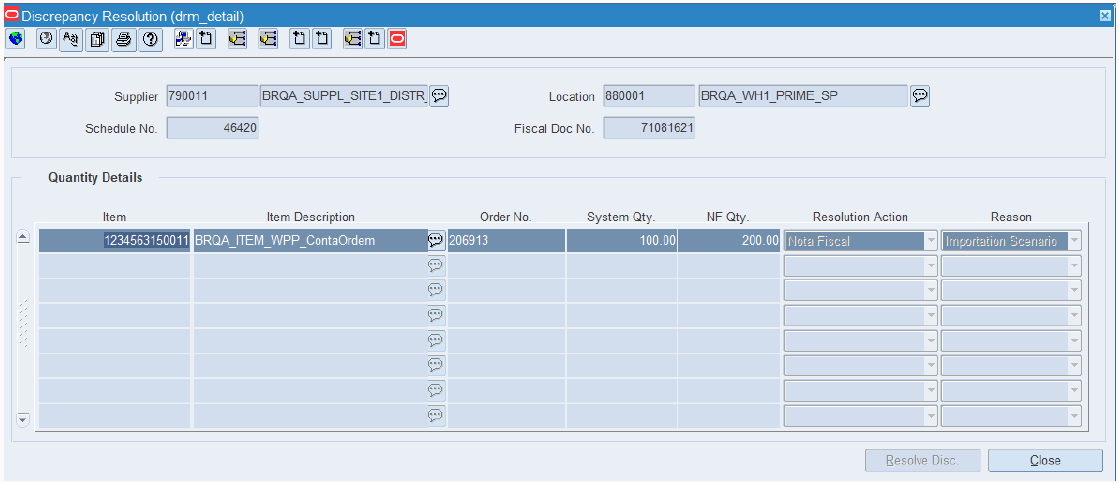
Quantity Resolution Window
Taxes Resolution Window
After validation, the schedule can be submitted for receiving.
If main NF is associated to a child NF as parent NF, main NF cannot be submitted for receiving. Submit for receiving functionality would be disabled in such a case.
RFM would not allow user to submit NF for receiving until NFe is validated
In case main NF is related to child NFs, once all child NFs associated to Main NF are approved, the main NF will automatically move to approved status.
No receipt will be processed or posted for Main NF with child NFs. Schedule of main NF would not be sent to WMS/SIM for receipt.
If main NF is not related to child NF and user tries to submit main NF for receiving, RFM would display a message to confirm whether the main DI NF has any child NFs:
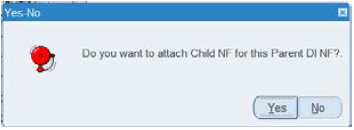
If user's response is YES, then RFM will not allow main DI NF to be submitted for receiving.
If user's response is NO, then main NF would be submitted for receiving and will not be applicable to be related as a parent NF to any child NFs in future.
Each child NF would be associated to its individual schedule which would be sent for receiving to WMS/SIM.
Once schedule is submitted for receiving; WMS/SIM will receive based on appointed quantity. Post receipt, in case of any discrepancy between appointed quantity and received quantity, there will not be any receipt verification.
NF quantity will be posted as received quantity to RMS as part of receipt de-tails. Receipt details will be posted to RMS like any PO receipt posting. It is assumed that any receipt discrepancy will later be handled in WMS through inventory adjustments. RFM will move NF to approved status post receipt. Normal procedure for importers is to receive the goods and update system based on the Entry NF. Possible discrepancies or damaged items encountered in the WH/ST are normally treated as manual inventory adjustments
|
Note: IPI tax captured on DI NF should be captured as recoverable tax. Placeholder on screen would still remain the same. Import IPI would be recoverable tax, hence RFM would exclude IPI from Extended Basis Cost (EBC) in importation order scenarios. |
Besides the entry NF necessary to transport and include all items in the system, there are additional costs in the clearance process that must be added to the product cost and val-uate the inventory. These costs are related to services hired in the clearance process. A complementary Entry NF must be generated, with all items from the main NF and the additional costs to be apportioned to each item. This NF meant only for cost adjustments must be sent for fiscal reporting. GL postings would happen in RMS for cost correction.
RFM should allow association of complementary cost and tax NFs to main DI NFs only. Child NF will not have complementary cost and tax NFs. RFM should continue to post complementary cost and tax details to RMS, like normal PO process.
The clearance process in this type of importation will be handled by a third-party com-pany. That company will only take care of the paper work and clearance activities at the customs. The Entry NF in this case is issued by the third-party company that will use it to enter all goods in their own location. After that, the third-party company will generate another NF that will have all taxes already calculated but the issuer will be the third party and the addressee will be the retailer. That NF will be issued with a specific CFOP code that will represent this type of transaction.
This NF coming from the domestic partner will be associated to the correspondent import PO originally created for the foreign supplier. To support this requirement, RFM will al-low capture of supplier other than the foreign supplier on PO when Import Order Type is "CONTA E ORDEM". NF capture would be similar to regular PO NF. User would be re-quired to select appropriate utilization and import supplier. RFM would further allow user to lookup for import POs with the same utilization code although supplier on the PO may be different from supplier on NF. Match doc functionality can also be utilized to filter out POs.
Expected process flow would be as follows:
User captures NF details along with informed taxes in RFM
User validates the NF by clicking on Validate from option menu
RFM will call 3rd party tax engine to calculate taxes on NF
In case of any discrepancy between informed and calculated taxes, RFM will not move the NF to "In Discrepancy" status but will move the NF to "Calculated" status (New sta-tus). Although the tax discrepancy check box on header info tab would be checked in case there is any tax discrepancy. User would have an option to navigate to discrepancy reso-lution option screens, but they will not allow any user driven resolution. By default, RFM will perform resolution by Nota Fiscal and reason as "Importation Scenario". This would not be allowed to be further changed by user. To summarize, the resolution would always be in favor of NF informed values.
User would further have an option to approve NF once NF is in "Calculated" status.
User will submit NF for receipt, post receipt RFM will not show any receipt verification in case of any discrepancy between appointed and received quantity. RFM will override receipt quantity with NF informed quantity in the receipt, and post the receipt to RMS. Any quantity difference must be treated through inventory adjustments or stock counts.
|
Note: As PO would be in foreign supplier currency and NF in BRL, RFM would convert PO cost in supplier currency to BRL currency when PO and items are selected for NF entry. To support this requirement, RFM will leverage the exchange rate field that can be informed similarly to the Direct Import scenario. This attribute will capture the date to be considered to determine exchange rates for currency conversions from PO currency to BRL. By default, this exchange rate date field on NF header will be blank, and default exchange rate date would be PO approval date for individual PO lines on the NF. In case user records a value for exchange rate date, then exchange rate calculations for all POs on the NF |
The clearance process in this type of importation will be handled by a third-party company. That company will take care of the paper work and clearance activities at the customs and will play the role of the importer but with a pre-defined destination of all imported goods. The Entry NF in this case is issued by the third-party company that will use it to enter all goods in their own location. After that, the third-party company will generate another NF that will have all taxes already calculated but the issuer will be the third party and the addressee will be the retailer. That NF will be issued as a regular domestic sale. Import By Order NF would be similar to "Conta e Ordem" NF.
The main difference between Import by Order and "Conta e Ordem" is about taxation. In the previous one, all taxes except ICMS are based on the DI document and cannot be corrected by the retailer in case of a discrepancy. In the import by order, only the IPI is based on the DI value. ICMS, PIS, COFINS are calculated by the third-party company in the sale transaction. Also, the PO in this case is issued to the domestic supplier and the payment is also made to him.
From a process stand point, RFM will have exact same behavior for this type of importation and for "Conta e Ordem".
In Brazil, all products manufactured in domestic market are subject to the IPI in the sales transaction from the manufacturer to wholesaler or retailer. In this case the manufacturer is responsible to collect this tax to the government. In a scenario of importation, the im-porter would play the same role as a manufacturer from the perspective of the tax inci-dence. In that way, even if the importer is a wholesaler or a retailer, the IPI is calculated for all imported items in the Entry NF and in the subsequent transaction (sale, transfer, and so on).
Normally, in regular domestic purchases done by retailers, the IPI is considered a non-creditable tax because it was already collected to the Government by the manufac-turer; hence from the perspective of the retailer that is purchasing these products, the IPI is considered a cost and it is included in the inventory valuation and WAC calculation. In the case of importation this behavior is different. IPI will be considered as creditable tax for the importer (wholesaler or retailer). The imported items must have the IPI calculated and collected in the first "exit" transaction whatever it would be (transfers, sales, and so on). Normally, when a retailer imports goods to a distribution center, the subsequent transaction would be a transfer. So the IPI must be calculated for this transfer.
|
Note: Item retail sale if not through customer NF functionality will not be tracked in RFM. |
It is only on the first transfer of an imported item that IPI should be calculated. If the initial transfer is done to another DC, the subsequent transfer to the stores should not have IPI calculated (because it was already collected by the first DC). In the same way, if the second DC returns the same product to the importer DC and another transfer takes place from there, IPI should not be calculated, even the item being the same (because collection of IPI happens just once).
In order to have this control, it is necessary to know which items were imported and which stock of these items are being transferred. There may be situations where same item can be imported and also purchased from domestic market. In that case, if the DC has inventory from both sources, only the quantities imported would have IPI calculated in the transfer
In order to identify the stock as Imported, RFM tracks the inventory stock leveraging the table ITEM_LOC_SOH. This "bucket for imported stock" is controlled at item location level. The "bucket" is incremented or decremented based on following transactions:
Whenever physical receipt of imported order is processed (utilization has Import Indicator as TRUE for any PO receipt, such as, for Direct Import, Conta e Ordem and Import by Order scenarios), RFM would increment it with the received quantity.
Whenever stock is transferred out of a location (transfers or customer order) or there is a negative adjustment, RFM would check the value of "Imported" bucket. If there is any stock in imported bucket, imported bucket stock value would be decremented based on a new RFM level system option "PRIORITY_TSF_IPI_IMPORTED" it would have valid value as TRUE to decrement imported stock first and then decrement non-imported stock on first exit, valid value as FALSE to decrement non-imported stock first and then decrement imported stock on first exit.
|
Notes:
|
As suggested above, RFM splits the NFs for imported and non-imported stock based on bucket value. The tax calculation for imported stock NFs will be han-dled in TaxRules. In case of imported stock first exit NF, RFM should communi-cate the following additional details to TaxRules:
Destination Retail: Retail price at destination is sent to TaxRules for the IPI basis determination. Basis can't be less than 90% of the retail price. The application of this percentage (90%) can't result in a taxable value smaller than the current price valid in the wholesale market from the is-suer region.
Current market price: Retail price defined in the origin location is used as the market price. Normally source location will be a DC and retail price set for the DC (RPM can set the DC location as "priceable") can be considered the market price.
Legislation states that the basis for IPI calculation will be "current price at wholesale market" OR "retail price", whatever is higher. TaxWeb will take the two prices and use the higher one.
TaxRules will calculate IPI for the first exit of imported item along with other valid taxes. As retailer will play the role of a manufacturer in this transaction and will be IPI contributor in this case, the IPI will be at detail level, summed at header level.
In a PO, the currency used is the currency defined in supplier foundation data. For importation POs, a foreign currency is used, however the invoice will always be in BRL currency. During the NF validation process, to perform cost discrep-ancy calculation, the item cost informed in NF is compared with unit cost in-formed in PO. As the currencies are different, a conversion is made from the for-eign currency to the local currency (BRL).
The conversion from foreign currency to local currency is done in two ways.
In the NF, it may contain the conversion rate used by the supplier.
If there is any currency rate defined, it will be used currency rate defined in a conversion table in the system to perform the calculation.
After physical receipt, the update of the unit cost of the item received will be the same for all transactions, which is at average cost.
ORFM takes care of posting all finance related documents (NFs) for merchandise inventory/goods movement and finance invoicing. For Deal Income, though there is no inventory movement, financial documents are generated to post the deal income to finance.
You need to define the default utilization in ORFM system options for deal NF. The Deal NF Utilization should be of requisition type PO.
Deal NFs are auto-generated and are not editable through ORFM User Interface. You can view the NF and print it if needed.
RMS supports the following three types of deals:
Off-Invoice
Fixed (Merchandise and Non-merchandise)
Complex
RMS generates the following two types of fixed deal:
Fixed deal with Merchandise and location information associated
Fixed deal non-merchandise with no location and merchandise information associated
RMS deal batches generate the deal income on fixed deals in RMS staging tables, based on the income calculation and invoicing frequency.
For non-merchandise fixed deals, ORFM will always generate NF details at the Set Of Books (SOB) level.
A Complex Deal is created and approved in RMS with a Deal Income calculation frequency and an invoicing frequency. Once the Deal Income calculation frequency is met, RMS calculates the Deal Income through deal batches and stores them in Deal Income related tables. Once the invoicing frequency period for the deal is reached, RMS deal batches make this information available in the RMS staging tables to be processed by ORFM.
For a deal income processing that happens in RMS, a deal NF is generated in ORFM after running the fmdealinc batch.
For more information on Deal Income Batch Processing, see Oracle Retail Fiscal Management/RMS Brazil Localization Implementation Guide.