| Oracle® Retail Store Inventory Management User Guide Release 14.1 E53429-01 |
|


 Previous |
 Next |
| Oracle® Retail Store Inventory Management User Guide Release 14.1 E53429-01 |
|
Previous |
Next |
You can create, edit, and dispatch returns from the store to a company-owned warehouse, a finisher, or directly to a vendor. If there is unavailable stock for a returned item, you have the option to use items from unavailable stock for the return. A completed (dispatched) return decreases available stock on hand.
You can also prepare and print a bill of lading (transport document) to accompany a return.
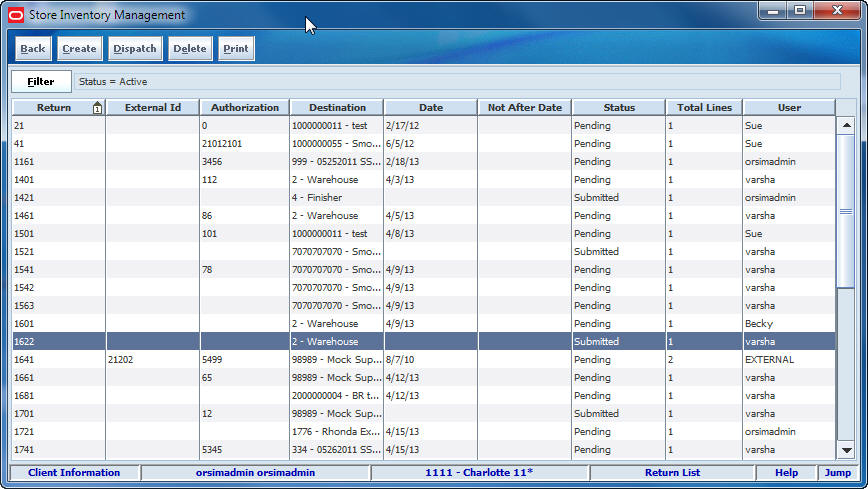
Return List Window
Navigate: Main Menu > Shipping/Receiving > Returns. The Return List window opens.
The Return List window displays the following information about returns:
| Column | Description |
|---|---|
| Return | SIM identifier for the return |
| External ID | Identifier supplied by an external system |
| Authorization | Authorization number, if required for returns |
| Destination | Warehouse or Supplier |
| Date | Create date if in Pending status
Dispatch date if in Dispatched status Close date if in Cancelled status |
| Not After Date | Date after which a return request cannot be dispatched (supplied by an external system) |
| Status | Current status of the return:
|
| Total Lines | Total number of line items in the return |
| User | User who created the return |
From the Return List window, you can do the following:
From the Return List window, click Back to return to the Shipping/Receiving menu.
At any time while the Return List window is open, you can click Filter to change how the list is filtered.
Current filtering is displayed next to the Filter button on the Return List window. If no filtering is displayed, all items are currently selected and listed.
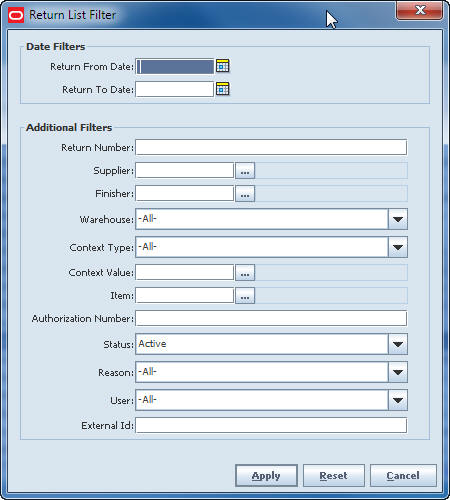
To change how the list is filtered, follow these steps:
Click Filter. The Return List Filter window opens.
If you want to reset all filtering criteria to default values, click Reset.
Enter or select filtering criteria as needed to select just the inventory adjustments you want to list. All criteria are optional. If you leave a field blank or select All, all values will be included in your filtering selection.
Date Filters – Enter or select dates to select only those inventory adjustments between a Return From Date and Return To Date that you specify. The dates used for selection depend on status:
For returns in Pending status, the creation date of the return is used.
For returns in Dispatched status, the date dispatched is used.
For returns in Received or Cancelled status, the date closed is used.
Return Number – Enter the complete number generated by SIM for the adjustment.
Supplier – Use this field to select returns to a supplier. Enter or look up the Supplier ID.
In the Supplier Lookup window, locate and select the supplier you want. Click Apply to return to the Return List Filter window. See ”Supplier Lookup” in Chapter 21 for more information.
Finisher – Use this field to select returns to an external finisher. Enter or look up the Finisher ID.
In the Finisher Lookup window, locate and select the finisher you want. Click Apply to return to the Return List Filter window. See ”Finisher Lookup” in Chapter 21 for more information.
Warehouse – Select a warehouse from the drop-down list.
Context Type – For returns to finishers, select the context type to limit the results returned. For example, select ”Promotion” to limit results to promotions.
Context Value – For returns to finishers, select the context value to limit the results returned. If the transfer is related to a promotion, enter a promotion ID or click the Ellipsis button to look up a promotion. See ”Look Up a Promotion” for more information.
Item – Enter or look up the Item ID.
In the Item Lookup window, locate and select the item you want. Click Apply to return to the Item Request Filter window. See ”Item Lookup” in Chapter 21 for more information.
Authorization Number – Enter the complete authorization number of the return.
Status – Select a status from the drop-down list. The default is Pending.
Reason – Select a reason from the drop-down list.
User – Select a user from the drop-down list.
External ID – Enter the external identifier of the return (supplied by an external system) to locate a particular return.
Click Apply. Results that match your search criteria are displayed in the Return List window.
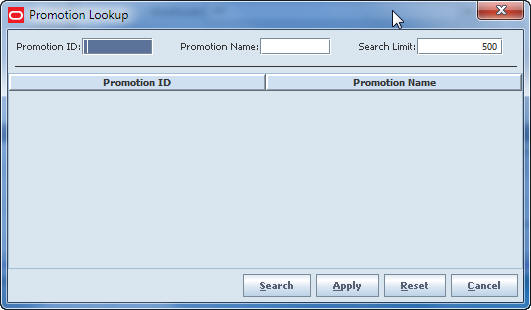
You can look up a promotion when you are filtering the Return List window, or when you are creating a return.
If you click the Ellipsis button on the Context Value field, the Promotion Lookup window opens.
To look up a promotion ID for a return, follow these steps:
Enter any of the following optional values to limit promotion search results:
Promotion ID – If you want to limit the search to a particular promotion ID, enter that identifier.
Promotion Name – If you want to search on the promotion name, enter a string of characters found in the promotion name.
Search Limit – If you want to change the maximum number of promotions returned from the search, enter an integer value. The default value is 500.
Select the promotion you want to use for the transfer.
Click Apply to return to the Return Detail window.
Create a return to return items to an external finisher, a company-owned warehouse, or a supplier. Unavailable or available stock may need to have a return created.
Navigate: Main Menu > Shipping/Receiving > Returns. The Return List window opens.
To create a return, follow these steps:
Click Create. The Return Detail window opens.
In the Comments field, enter any additional information that you want to include to explain this return.
To add an item, click Add Item, or click Scanner to scan the item. See ”Scan an Item (Scanner Button) in Chapter 2 for more information.
In the Return Type field, select one of the following:
Finisher – To return the items to an external finisher (for example, for repairs)
Warehouse – To return the items to a warehouse
Supplier – To return the items to the supplier
(Finisher or Warehouse returns only) In the Inventory Status field, select whether the returned items will come from available or unavailable stock.
All items in a return to warehouse or finisher must come from either available or unavailable stock. You cannot create a return with some items from available stock and some from unavailable stock.
For Supplier returns, the Inventory Status field is disabled. You can specify for each item whether to use available or unavailable stock.
Enter details about the return, depending on whether the return is to a supplier, warehouse, or finisher.
Return to a Supplier
In the Supplier field, enter a supplier or click the Ellipsis button to look up a supplier. See ”Supplier Lookup” in Chapter 21 for more information.
In the Authorization Number field, enter the authorization number to help you track the return.
In the Reason field, select the reason from the drop-down list (optional).
Return to a Finisher
Because UINs are captured when the item is shipped to a finisher, during the receiving process the UIN on the ASN is compared against the UIN shipped. If the delivery is on auto-receiving, the system will validate the UINs are the same and follow the rules on receiving.
In the Finisher field, enter the finisher ID, or click the Ellipsis button to look up the finisher.
In the Authorization Number field, enter the authorization number to help you track the return.
In the Context Type field, select the context type.
In the Reason field, select the reason from the drop-down list (optional).
In the Inventory Status field, select the status from the drop-down list.
(Promotion only) In the Context Value field, enter the promotion ID, or click the Ellipsis button to look up the promotion ID. See ”Look Up a Promotion” for more information.
Return to a Warehouse
In the Warehouse field, select the warehouse from the drop-down list.
In the Authorization Number field, enter the authorization number to help you track the return.
In the Context Type field, select the context type.
In the Reason field, select the reason from the drop-down list (optional).
(Promotion only) In the Context Value field, enter the promotion ID, or click the Ellipsis button to look up the promotion ID. See ”Look Up a Promotion” for more information.
For each item that you want to add to the return, follow these steps:
In the Item field, enter the item ID, or click the Ellipsis button to look up the item. See ”Item Lookup” in Chapter 21 for more information. or click Scanner to scan the item. See ”Scan an Item (Scanner Button)” in Chapter 2.
Update the following fields as needed:
UOM– From Reason – Select the reason that you are returning the items from the Reason drop-down.
Use-Sub-bucket – The sub-bucket will display what is associated with the reason code.
|
Note: These are only displayed for reason codes with an inventory status to take inventory from unavailable stock. Will display only if the system is configured for sub-buckets. |
Unavailable – Will display a Yes if the reason has an inventory status for unavailable stock. Will display a No if the reason has an inventory status for available stock.
Qty – Enter UOM – From the quantity of items, expressed in the drop-down list, select the selected unit of measure, that you are returning.
Reason – Select the reason that you are returning the items from the Reason drop-down list.
UIN Qty – If an item requires unique identification numbers (UIN), this field displays the number of items for which UINs have been scanned or entered. See ”Update UINs for a Return."
If you want to add another item, click Add Item. A new blank line is displayed. Or click Scanner to scan the item. See ”Scan an Item (Scanner Button)” in Chapter 2 for more information.
Update bill of lading (BOL) information:
Click BOL. The BOL Detail window opens.
Update the following fields as needed:
Address Type – The primary mailing address is selected by default. If there are multiple addresses, select the address type to which you want to ship the return. (You can also enter a different new address in the Alternate Destination Address field.)
Motive – The default value is Returns. If needed, select a different value.
Tax ID – If this field is blank, enter the tax ID for the supplier.
Carrier – Select the type of Carrier. Select other pertaining information if necessary, including Service.
Weight – Weight of package if required per the service.
Package Type – Select the type of package for the shipment.
Alternate Destination Address – If the return is to be shipped to an address that you cannot select (Address Type under Ship To), enter the full shipping address to which the return will be shipped.
Requested Pickup Date – Enter or select the date when you want the return picked up.
Tracking ID – Enter a tracking ID number.
Click Save.
|
Note: Depending on the deployment of SIM and backend applications, it is possible for the tracking ID field will be filled in automatically by a Manifest system when submitting or dispatching. Check the Oracle Retail Store Inventory Management Implementation Guide vol 2 - Integration with Oracle Retail Applications for more information. |
Dispatch or save the return.
To dispatch the return now, click Dispatch.
If you do not want to dispatch the return now, click Save to save the return in Pending status.
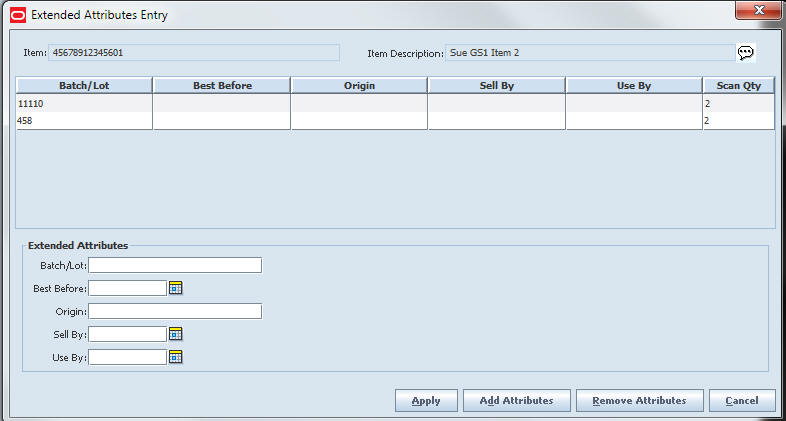
To update the Extended Attributes, select a row and click Ext. Attributes. The Extended Attributes window opens. This window captures additional information about an item.
|
Note: The Extended Attributes Entry window view may vary, depending upon customer chosen attributes. |
Enter/select the field options.
Click Add Attributes to add the additional attributes to the item.
Click Apply to save the changes and return to t he previous window.
If unique identification numbers (UIN) are required for the items in a return, the UINs must be scanned or entered manually.
To enter UINs for the delivery, see "Updating UINs".
You can view any return record, and you can update pending returns when necessary.
|
Note: You can only modify returns in Pending status. |
Navigate: Main Menu > Shipping/Receiving > Returns. The Return List window opens.
To edit or view a return, follow these steps:
If you want to limit which returns are listed, filter the list. See ”Filter the Return List."
Double-click on the return that you want to edit or view. The Return Detail window opens.
Update enabled fields as needed:
Sub-bucket – The sub-bucket will display what is associated with the reason code.
|
Note: These are only displayed for reason codes with an inventory status to take inventory from unavailable stock. This will display only if the system is configured for sub-buckets. |
UOM – From the drop-down list, select the unit of measure.
Reason – Select the reason that you are returning the items from the Reason drop-down.
UIN Qty – Update UINs for the return as needed. See ”Update UINs for a Return."
Add or remove items as needed. See ”Create a Return” for more information about adding and deleting return items.
If needed, update bill of lading (BOL) information. See ”Create a Return” for more information about updating BOL information.
To submit the return, click Submit. You receive a prompt to verify that you want to submit the return now. Click Yes.
To dispatch the return immediately, click Dispatch. You receive a prompt to verify that you want to dispatch the return now. Click Yes. For more information about dispatching a return, see ”Dispatch a Return."
|
Note: Submit will be available if system is configured as such. If it is configured to submit, you will only have a submit or a dispatch. You cannot have both at the same time. It will require that you submit in order to dispatch. Once you submit, then you will be able to dispatch. |
Scan an item. Click Scanner to scan the item. See ”Scan an Item (Scanner Button)” in Chapter 2 for more information.
If you do not want to dispatch the return, click Save. The return is saved until it is dispatched. You return to the Return List window.
Dispatch a return to complete the return.
Navigate: Main Menu > Shipping/Receiving > Returns. The Return List window opens.
To dispatch returns, follow these steps:
Select the returns that you want to dispatch.
Click Dispatch. A message is displayed: ”Are you sure you want to dispatch the selected returns now?”
Click Yes. The returns are dispatched.
You can view or print a return report. You can use the return report as a packing slip.
Navigate: Main Menu > Shipping/Receiving > Returns. The Return List window opens.
To print one or more return reports, follow these steps:
Select the returns for which you want to print reports.
Click Print. The Report Selection window opens.
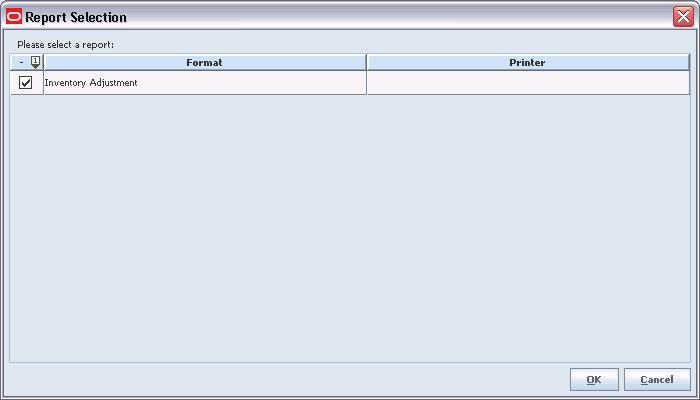
In the Printer field, double-click and select the printer or other output device for the report.
(See ”Print or View SIM Reports and Other Output” in Chapter 2 for general information about SIM report output.)
Click OK. You receive a message that the report was printed.
Click OK to return.
For any return, you can print a bill of lading (transport document) that accompanies the merchandise when it is shipped. You can print the bill of lading at any time; however, if the return is not yet dispatched or if it is cancelled, the bill of lading is marked DRAFT or CANCELLED.
|
Note: Bill of lading information must be entered or updated when returns are created or updated. |
Navigate: Main Menu > Shipping/Receiving > Transfers. The Transfer List window opens.
To print a bill of lading, follow these steps:
If you want to filter the transfer list, see ”Filter the Return List."
Select the transfer for which you want to print a bill of lading.
Click Print.
Select the Return Bill of Lading format and the printer.
Click OK.
Delete a return record if you are cancelling the return.
|
Note: You can delete a return only if it has not been dispatched. |
Navigate: Main Menu > Shipping/Receiving > Returns. The Return List window opens.
To delete returns, follow these steps:
Select the returns that you want to delete.
Click Remove Item. A message is displayed: ”Are you sure you want to delete the selected returns now?”
Click Yes. The status of each deleted return is updated to Cancelled. The return is displayed in the Return List in cancelled status.