| Oracle® Retail Store Inventory Management User Guide Release 14.1 E53429-01 |
|


 Previous |
 Next |
| Oracle® Retail Store Inventory Management User Guide Release 14.1 E53429-01 |
|
Previous |
Next |
Stock counts are the principal tools to ensure that the perpetual inventory for a store remains accurate. For maximum flexibility in performing stock counts, SIM allows these types of stock counts:
Unit
Unit stock counts are scheduled counts that update the Oracle Retail Merchandising System (RMS) and SIM inventory positions, but only for the physical count quantities. These counts are performed on regular schedules.
Unit and Amount
A Unit and Amount count is an typically an annual or semi-annual count that can be used to adjust the financial systems in a corporate merchandising system, in addition to updating inventory positions in SIM.
Problem Line
Problem Line stock counts are similar to Unit counts. Problem Line product groups use predefined criteria to identify problem items. For example, you might use a Problem Line count for all of the items that have negative stock on hand quantities.
Ad Hoc
An Ad Hoc stock count is an unscheduled stock count that is initiated on the handheld device. An Ad Hoc count is similar to a Unit count, but the items are not preassigned and there is no schedule.
Each stock count must be generated, except for Ad Hoc stock count type. To generate a stock count, you must first create a product group and schedule the product group. Product groups can include particular inventory items or entire segments of the item hierarchy, including all items in a store. See Chapter 3, "Product Groups" for information about how to create product groups for the different types of stock counts.
Stock Count Process
The general process to conduct a stock count in SIM is as follows:
Create the stock count product group. (See Chapter 3, "Product Groups.")
Schedule the stock count. (See Chapter 4, "Product Group Scheduler.")
Perform the stock count using handheld devices or the PC, or both.
Recount discrepant items (depending on whether the product group requires a recount).
Review the count information and authorize the count quantities.
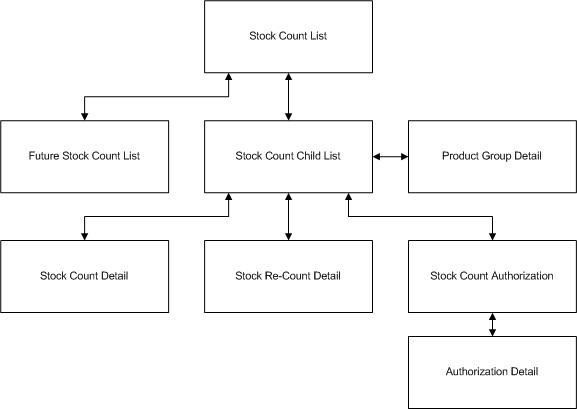
The following diagram illustrates the general process flow.

This chapter is organized as follows:
Reference Topics
The following topics provide background information about the SIM stock count process. Review these topics as needed as you are performing a stock count:
This topic describes the actions and events that occur during a SIM stock count, and how they affect the status of the stock count.
”Product Group Size Limits” in Chapter 3
This topic describes the process that SIM uses to break large stock counts into multiple child counts so that they are more manageable.
This section is an introduction to the SIM stock counts interface. It describes the SIM windows that you use for stock counts, and how to navigate through the interface. Before you begin to execute stock counts, you should become familiar with the interface.
This section describes:
The stock counts windows and what they contain
The actions you can take in each window
Detailed procedures to execute stock counts are later in this chapter; see ”Execute a Stock Count."
The following figure shows the stock counts windows and how you navigate among them.
This section describes the following stock counts windows:
Other stock counts windows are described in the procedures in which you use them.
|
Note: To access some stock count windows and functions, you must have the necessary permissions. Access to some windows and functions depends on the status of a stock count. For example, you cannot access the Stock Count Authorization window until the stock count status indicates that it is ready to be authorized. |
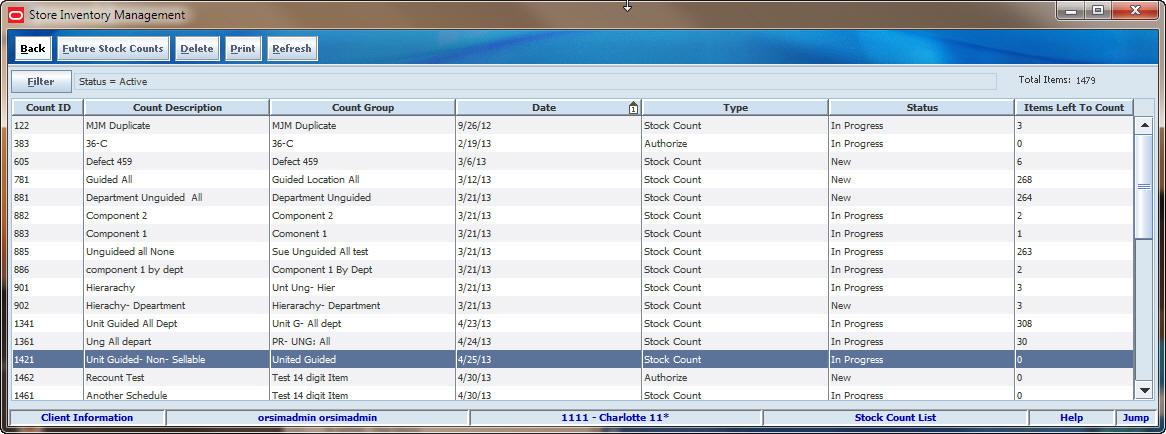
The Stock Count List window is the entry point into stock counts. It lists the currently active SIM stock counts of all types.
Navigate: Main Menu > Inventory Mgmt > Stock Counts. The Stock Count List window opens.
If you want to filter the Stock Count List, click Filter. See ”Filter the Stock Count List."
Window Content
The Items Left to Count field displays the total number of items left to be counted at the store. If every item has been counted for every stock count, the Total Items field will show zero.
Each stock count listed in the Stock Count List window is a master stock count that has one or more child stock counts. Large stock counts are automatically divided into multiple child counts, which are listed in the Child Stock Count List window.
The Stock Count List window columns are as follows:
| Column | Description |
|---|---|
| Count ID | A unique numeric identifier assigned by SIM. |
| Count Description | The description of the product group schedule that was entered when the schedule was set up.
For an Ad Hoc stock count, the description is the ID of the user who created the stock count. |
| Count Group | The description of the product group that was entered when the product group was set up.
For an Ad Hoc stock count, the Count Group value is Ad Hoc. |
| Date | The date for which the stock count is scheduled. |
| Type | The stage the stock count is in: Authorize, Re-Count, or Stock Count. |
| Status | The status of the stock count: Active, Completed, In Progress, New, or Processing. |
| Items Left to Count | The items in the stock count that remain to be counted or authorized. |
Actions You Can Take
In the Stock Count List window, you can do the following:
| Action | Method | Reference |
|---|---|---|
| Access child counts for a stock count | Double-click a stock count | ”Child Stock Count List Window” |
| Print a Stock Count Detail report | Print button | ”Print or Export a Stock Count Report” |
| Delete stock counts | Delete button | ”Delete Stock Counts” |
| View future stock counts | Future Stock Counts button | ”View Future Stock Counts” |
| View rejected items for a third-party stock count | Rejected Items button | ”View and Update Rejected Items” |
| Refresh the Stock Count List display | Refresh button | - - - |
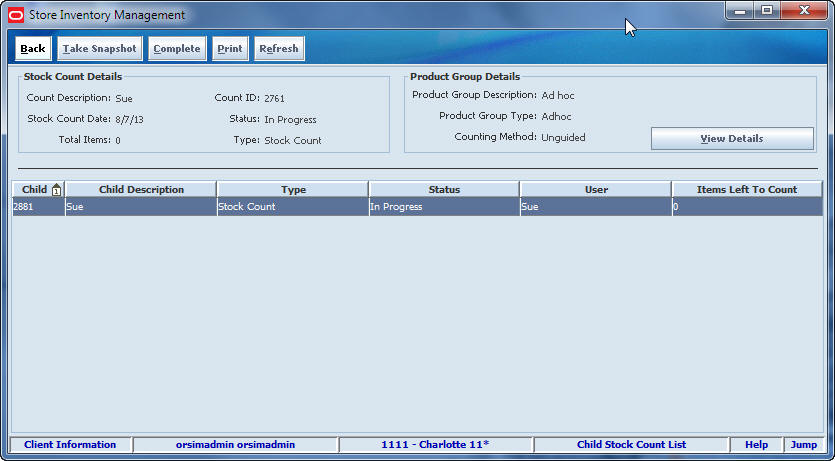
Every master stock count has one or more child counts. A master count with fewer items might have only one child count, but a large count might be split into a number of smaller and more manageable child counts. You can work with each child count separately. Details about the items in a stock count are in the child count records.
Navigate: Main Menu > Inventory Mgmt > Stock Counts. The Stock Count List window opens.
Double-click on the stock count you want to access. The Child Stock Count List window opens.
Window Content
The top of the window displays information about the master stock count and the stock count product group, as displayed on the Stock Count List window.
The Child Stock Count List window columns are as follows:
| Column | Description |
|---|---|
| Child Description | A description that depends on the type of stock count:
|
| Area | Shopfloor, Backroom, or No Location. (This column does not appear for unguided counts.) |
| Type | Future Stock Count, Stock Count, Re-count, or Authorize.
For more information about stock count stages and statuses, see ”Stock Count Status." |
| Status | New, In Progress, Pending, Completed, or Confirmed.
For a Future Stock Count type, this value is N/A. Confirmed status applies only to Unit and Amount count type. |
| User | The user who counted the location or child stock count. This value is the user who last saved the count. If the child count has not been counted yet, no value is shown. |
| Items Left to Count | The number of items that remain to be counted in the child count. |
Actions You Can Take
In the Child Stock Count List window, you can do the following:
| Action | Method | Reference |
|---|---|---|
| Access details of a child count | Double-click a child count | ”Stock Count Detail Window” |
| Print a Stock Count Detail report | Print button | ”Print or Export a Stock Count Report” |
| Take a snapshot of inventory positions for items in the stock count | Take Snapshot button | ”Take a Snapshot” |
| Complete the child count | Complete button | ”Complete a Child Stock Count” |
| Access the Stock Count Authorization window (to authorize a stock count) | Authorize button | ”Stock Count Authorization Window” |
| Access the rejected items | Rejected Items button | View and Update Rejected Items |
| Update authorized quantities for selected child counts | Update Auth Qty button | ”Other Methods to Update Authorized Quantities” |
| Update all authorized quantities for all child counts | Confirm Authorization button | ”Other Methods to Update Authorized Quantities” |
| Refresh the Child Stock Count List display | Refresh button | - - - |
| View details of the stock count product group | View Details button | ”View Product Group Details” |
In the Stock Count Detail window, you can view and update count quantities for the child count you have selected.
Navigate: Main Menu > Inventory Mgmt > Stock Counts. The Stock Count List window opens.
Double-click on the stock count you want to access. The Child Stock Count List window opens.
Double-click on the child count you want to access. The Stock Count Detail window opens.
|
Note: If the stock count is currently being recounted, the Stock Re-Count Detail window opens instead; see ”Stock Re-Count Detail Window." |
Window Content
The Stock Count Detail window displays the child stock count description, scheduled date, and user information, as well as the following fields:
| Field | Description |
|---|---|
| Total Line Items | The total number of items (rows) currently displayed, depending on how the list is filtered. (Use of the filter fields is described in ”Enter Stock Count Results.") |
| Snapshot Taken | Indicator of whether a snapshot has been taken for this child count. (See ”Take a Snapshot” for more information.) |
By default, uncounted items are listed. You can use the Count/Re-count Qty, Dept, Class, and Sub-Class fields to control which items are listed in the window.
The columns of the Stock Count Detail window are as follows:
| Column | Description |
|---|---|
| Sequence ID | For guided counts that use sequencing, the ID of the location of the item. For guided counts, the list is sorted by Sequence ID.
For unguided counts, this column does not appear. |
| Item | The item ID. |
| Description | The item description. |
| UOM | The unit of measure for the item. |
| Pack Size | The number of packs in a case. |
| Count | The counted quantity of the item, if the item has been counted during this stock count. |
| UIN Qty | The number of unique identification numbers (UIN) counted. |
Actions You Can Take
In the Stock Count Detail window, you can do the following:
| Action | Method | Reference |
|---|---|---|
| Enter stock count results | (See procedure) | ”Enter Stock Count Results” |
| Update unique identification numbers (UIN | (See procedure) | ”Update UINs for a Count” |
| Print a Stock Count Detail report | Print button | ”Print or Export a Stock Count Report” |
| Exit and save updates | Save button | - - - |
| Enter extended attributes | Ext. Attributes button | Enter Extended Attributes |
| Scan or Enter a barcode | Scanner button | Scan an Item (Scanner Button) |
| Exit without saving updates | Cancel button | - - - |
| Complete the count
Note: You cannot complete the count until the snapshot is taken. |
Complete button | ”Complete a Child Stock Count” |
In the Stock Count Detail window, you can view and update recount quantities for the child count you have selected. If you selected a stock count that is being recounted, the Stock Re-Count Detail window opens.
|
Note: Recounts are performed only when the stock count product group is set up to require recounts of discrepant items. Recounts do not apply to any third-party or ad hoc stock counts. |
Navigate: Main Menu > Inventory Mgmt > Stock Counts. The Stock Count List window opens.
Double-click on the stock count you want to access. The Child Stock Count List window opens.
Double-click on the child count that you want to access. The Stock Re-Count Detail window opens.
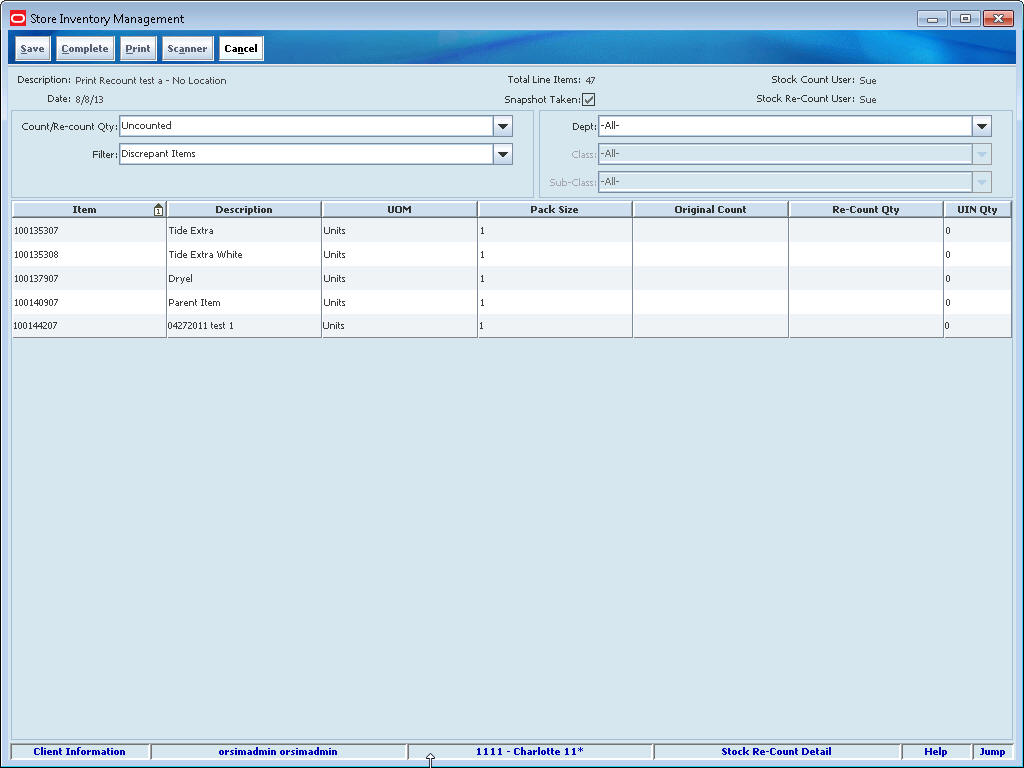
The Stock Re-Count Detail window is similar to the Stock Count Detail window, but it also allows entry of recounted item quantities.
Window Content
The Stock Re-Count Detail window displays the child stock count description, scheduled date, and user information, as well as the following fields:
| Field | Description |
|---|---|
| Total Line Items | The total number of items (rows) currently displayed, depending on how the list is filtered. (Use of the filter fields is described in ”Enter Stock Count Results.") |
| Snapshot Taken | Indicator of whether a snapshot has been taken for this child count. (See ”Take a Snapshot” for more information.) |
By default, uncounted discrepant items are listed. You can use the Count/Re-count Qty, Filter, Dept, Class, and Sub-Class fields to control which items are listed in the window.
The columns of the Stock Re-Count Detail window are as follows:
| Column | Description |
|---|---|
| Sequence ID | For guided counts that use sequencing, the ID of the location of the item. For guided counts, the list is sorted by Sequence ID.
For unguided counts, this column does not appear. |
| Item | The item ID. |
| Description | The item description. |
| UOM | The unit of measure for the item. |
| Pack Size | The number of packs in a case. |
| Original Count | The counted quantity of the item from the original count. |
| Re-Count Qty | The recounted quantity of the item, if the item has been recounted yet. |
| UIN Qty | The number of unique identification numbers (UIN) counted. |
Actions You Can Take
From the Stock Re-Count Detail window, you can do the following:
| Action | Method | Reference |
|---|---|---|
| Print a Stock Count Detail report | Print button | ”Print or Export a Stock Count Report” |
| Enter stock recount results | (See procedure) | ”Enter Recount Results” |
| Update unique identification numbers (UIN) | (See procedure) | ”Update UINs for a Count” |
| Complete the child stock count | Complete button | ”Complete a Child Stock Count” |
| Exit and save updates | Save button | - - - |
| Scan or Enter a Barcode | Scanner button | Scan an Item (Scanner Button) |
| Exit without saving updates | Cancel button | - - - |
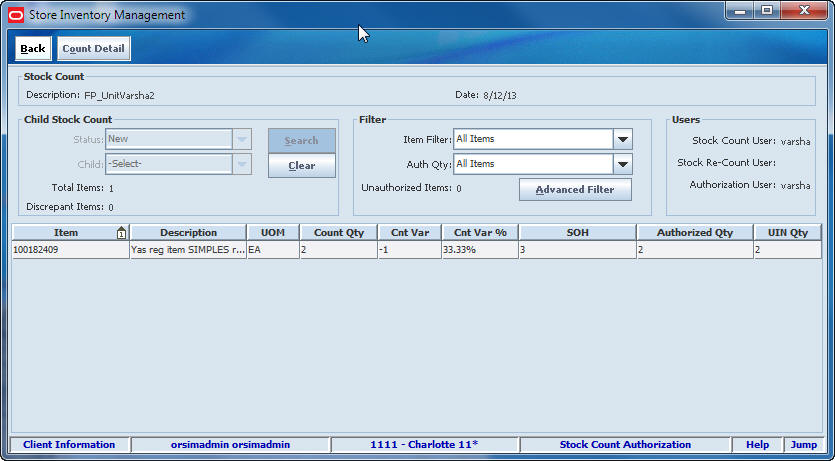
The Stock Count Authorization window is available for a child stock count after the count is completed. In this window, you can review count and recount quantities and enter authorized (approved) count quantities for items. When you have updated authorized quantities, you can confirm the authorization to finish the stock count process. SIM automatically creates inventory adjustment transactions to reconcile SIM inventory positions with authorized quantities for counted items.
|
Note: SIM provides the option to set up stock counts with automatic authorization. This means that the count is authorized automatically after it is completed, and there is no separate authorization procedure. |
Window Content
At the top, the Stock Count Authorization window displays the child stock count description, scheduled date, and user information. The table lists the items and contains the following columns:
| Column | Description |
|---|---|
| Item | SIM item ID |
| Description | Item description |
| UOM | Item unit of measure |
| Count Qty | Original count quantity |
| Cnt Var | Original count variance from the snapshot quantity |
| Cnt Var % | Original count variance percent |
| Re-Count Qty | Recount quantity (if a recount was required) |
| Rcnt Var | Recount variance from the snapshot quantity |
| Rcnt Var % | Recount variance percent |
| SOH | SIM stock on hand |
| Authorized Qty | Authorized quantity for the item |
| UIN Qty | Number of UINs counted |
Actions You Can Take
From the Stock Count Authorization window, you can do the following:
| Action | Method | Reference |
|---|---|---|
| Review quantities and enter authorized quantities manually | (See procedure) | ”Update Authorized Quantities Manually” |
| Update unique identification numbers UIN | Authorization Detail window | ”Update UINs before Authorizing” |
| Select a child count (if more than one child count) | Child Stock Count controls | ”Update Authorized Quantities Manually” |
| Filter the items listed by their current state | Filter controls | ”Update Authorized Quantities Manually” |
| Filter the items listed by additional criteria you specify | Advanced Filter button | ”Filter the Stock Count Authorization List” |
| Update all blank authorized quantities | Update Auth Qty button | ”Other Methods to Update Authorized Quantities” |
| Update the stock count with any late sales that were uploaded since entering the authorization stage. This will update the snapshot and, in turn, mark an item as discrepant or non-discrepant | Update Snapshot button | View Count Detail |
| Confirm the authorization | Confirm Child button | ”Authorize a Stock Count” |
| Save updates (without exiting) | Save Child button | - - - |
| Exit without saving updates | Back button | - - - |
| View the detail of the count | Count Detail button | View Count Detail |
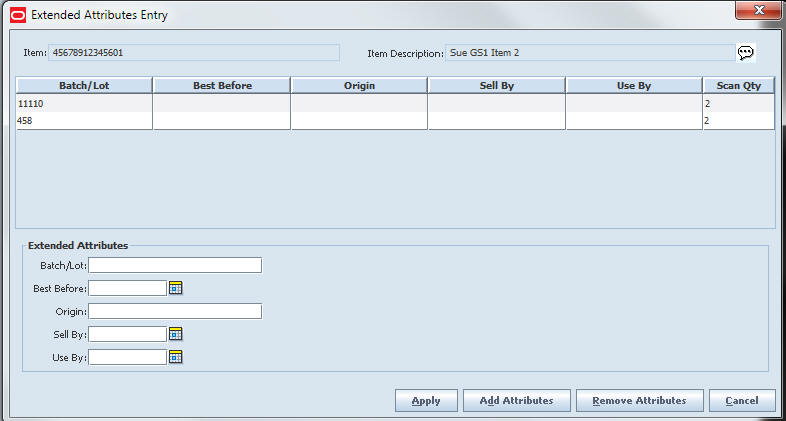
This window is used to enter additional details about the stock count in the Extended Attributes window.
To update the Extended Attributes, select a row and click Ext. Attributes. The Extended Attributes window opens. This window captures additional information about an item.
|
Note: The Extended Attributes Entry window view may vary, depending upon customer chosen attributes. |
Enter/select the field options.
Click Add Attributes to add the additional attributes to the item.
Click Apply to save the changes and return to t he previous window.
From the Stock Count Authorization window, click Count Detail. The detail window opens. This is a view only window. Click Close to return to the Stock Count Authorization window.
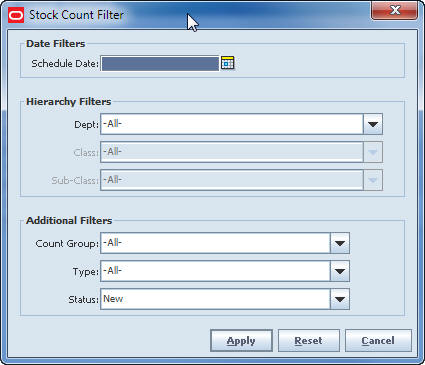
Whenever the Stock Count List window is displayed, you can filter the list of stock counts to limit which stock counts are displayed. If the list is currently filtered, the filtering is shown next to the Filter button.

To filter the list of stock counts or to change the current filtering, follow these steps:
In the Stock Count List window, click Filter. The Stock Count Filter window opens.
Enter or select search values as needed to specify the stock counts that you want to list. All values are optional. If you leave a field blank or select All, all values are included in the search.
Date Filters – In the Schedule Date field, enter or select the schedule date of the stock counts you want to list.
Hierarchy Filters – For the Dept, Class, and Sub-Class fields, select the merchandise hierarchy for which you want to list stock counts.
Count Group – Select the stock count group (product group) for which you want to list stock counts.
Type – Select Stock Count, Re-Count, Authorize, or All (default).
Status – Select Active, Completed, In Progress, New, Processing, or All (default).
Click Apply. You return to the Stock Count List window, where your filter has been applied.
Future stock counts are stock counts for which the scheduled date has not yet arrived and have not been extracted yet for execution. This means these future stock counts should only be used for planning, not execution. You can view future stock counts, and you also have the option to extract a count to view its details.
For stock counts that are extracted before the scheduled stock count date, you cannot take any action on the count. Until the scheduled date is reached, you can view future stock counts in the Future Stock Counts List window. These stock counts have no status. When the scheduled date is reached, SIM deletes the future stock count values and extracts the count again with the real stock count ID. The stock count then moves to the Stock Count List window, and its status changes to Stock Count New.
Navigate: Main Menu > Inventory Mgmt > Stock Counts. The Stock Count List window opens.
To view future stock counts, follow these steps:
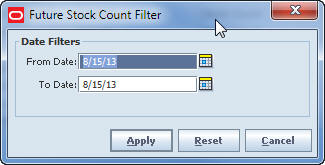
Click Future Stock Counts. The Future Stock Count Filter window opens.
In the From Date and To Date fields, enter or select dates to set the date range of the future stock counts you want to list. (Click Reset if you want to clear the date fields.)
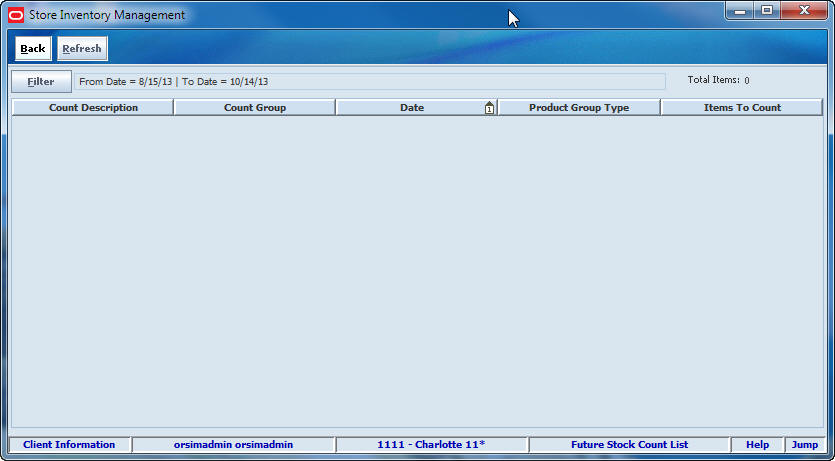
Click Apply. The Future Stock Count List window opens.
The Total Items field displays the total number of items to count in all stock counts listed.
The Future Stock Count List window columns are as follows:
| Field | Description |
|---|---|
| Count Description | The description of the product group schedule that was entered when the schedule was set up. |
| Count Group | The description of the product group that was entered when the product group was set up. |
| Date | The date for which the stock count is scheduled. |
| Product Group Type | The type of stock count product group: Unit, Unit and Amount, or Problem Line. |
| Items to Count | The number of items to be counted in the stock count. |
If you want to extract a future stock count now, follow these steps:
Double-click the stock count that you want to extract.
A message is displayed: ”Do you want to generate the future stock count now?”
Click Yes to extract the selected stock count. The Child Stock Count List window opens, with the generated stock count listed.
To view the details of the stock count, double-click on the count to open it in the Stock Count Detail window. You cannot enter any count quantities or take any action on the count.
Click Back to return to the Future Stock Count List window.
Click Back to return to the Stock Count List window.
You can view, print, or export stock count reports at any time, for reference or as an aid to completing the count.
|
Note: You can print reports from the Stock Count List window, Child Stock Count List window, or Stock Count Detail window. |
Navigate: Main Menu > Inventory Mgmt > Stock Counts. The Stock Count List window opens.
To view or print a stock count report, follow these steps:
Select the stock count for which you want a report.
Click Print. The Report Selection window opens.
Select the report you want to produce.
In the Printer field, select the printer or other output device that you want to use.
Click OK. The report is produced.
The Stock Count Detail report lists the following information for the selected stock count:
Item number
Description
Unit of measure
Counted quantity
Authorized quantity
Recount quantity
The Stock Count Extraction report is primarily designed for use with third-party stock counts, although it can be used for any type of stock count. The report can be modified as required and exported in XML format for interface to a third-party system.
It is assumed that this report will be generated after the snapshot is taken for a stock count. If this report is generated before the snapshot is taken, the unique identification numbers (UIN) and snapshot quantity fields are empty.
The standard report includes the following information:
Header: Stock count ID, stock count type, store ID
Detail: Item number, item description, item snapshot quantity, item UINs
The steps to execute a stock count from start to finish are as follows:
After you have located the stock count that you want to execute, one of the first steps is to take a snapshot. When you take a snapshot, SIM records the stock on hand position for each item in the count at that point in time. These values are compared against the counted values to determine whether there are discrepant items. After the snapshot is taken, you can continue business without having to update the counted quantities with any transactions. This preserves the original counted quantities for an audit, if you want to conduct an audit.
The stock count status changes to In Progress when you take a snapshot or begin counting items.
The point at which a snapshot is taken depends on the type of stock count. Taking the snapshot affects the status of each stock count.
|
Note: For a stock count that uses a counting method of Third-party, you must take the snapshot before the stock count data is uploaded to SIM. |
Ad Hoc Stock Counts
For an Ad Hoc stock count, SIM takes a snapshot when the first item is scanned on the handheld device. (There is no product group for an Ad Hoc stock count.)
Unit and Problem Line Stock Counts
For Unit and Problem Line stock count types, SIM takes a snapshot when the first item is scanned on the handheld device. You can also take a snapshot for child counts by using the Take Snapshot button on the Child Stock Count List window, Stock Count Detail window, or Stock Re-count Detail window (for a recount). You cannot enter quantities until the snapshot has been taken.
Unit and Amount Stock Counts
For a Unit and Amount count, the snapshot must be taken from the PC. It is not possible to take a snapshot for a Unit and Amount count type on the handheld device. If your store uses unique identification numbers (UIN), the snapshot must be taken before the count can begin. If your store does not use UINs, you can start a count on the handheld without having taken the snapshot.
When a snapshot is taken for a Unit and Amount count type, it is taken for all child counts at the same time. Only one snapshot is taken for a Unit and Amount count type. There is no separate snapshot for a recount.
None of the individual child counts can move to Re-Count or Authorize stage until the snapshot has been taken.
The initial snapshot for a stock count can be taken in either of these ways:
From the Child Stock Count List Window
Navigate: Main Menu > Inventory Mgmt > Stock Counts. The Stock Count List window opens.
To take the snapshot, follow these steps:
If you want to filter the Stock Count List, click Filter. See ”Filter the Stock Count List."
Double-click on the stock count for which you want to take a snapshot. The Child Stock Count List window opens.
Select the child counts for which you want to take snapshots.
|
Note: For Unit and Amount counts, the snapshot is taken for all child counts, regardless of the counts selected in the list. A Monitor window opens to inform you that the snapshot is being taken. You can close the Monitor window and continue with other SIM tasks. (If you do not close the window, it closes automatically when snapshot processing is completed.) |
Click Take Snapshot.
Click Done to return to the Stock Count List window.
From the Stock Count Detail Window
Navigate: Main Menu > Inventory Mgmt > Stock Counts. The Stock Count List window opens.
To take the snapshot, follow these steps:
Double-click on the stock count for which you want to take a snapshot. The Child Stock Count List window opens.
Double-click on the child count for which you want to take a snapshot. The Stock Count Detail window opens.
Click Take Snapshot.
Click Back to return to the Stock Count Detail window.
If you want to start entering stock count quantities, see ”Enter Stock Count Results."
After a count is completed, SIM performs variance calculations for all items. If the count for an item exceeds variance limits, the item count is discrepant. If the product group setup requires a recount of discrepant items, you follow the same steps to take a snapshot. The recount snapshot records the current stock on hand levels for all the items on the recount.
You can take a recount snapshot from either the Child Stock Count List window or the Stock Re-Count Detail window.
|
Note: For Unit and Amount count types, there is no snapshot taken for a recount. |
Recounts are optional, depending on the product group setup. Recounts do not apply to ad hoc stock counts or third-party stock counts.
If your store uses UINs, the snapshot captures the status of those items that are in the store as part of the store's stock on hand, as well as those UINs that are in missing status:
In Stock
Customer Order Reserved
Reserved for Shipping
Unavailable
Missing
Removed from Inventory
The UINs in these statuses are displayed in the Stock Count Authorization window, so that you can see which UINs are not counted.
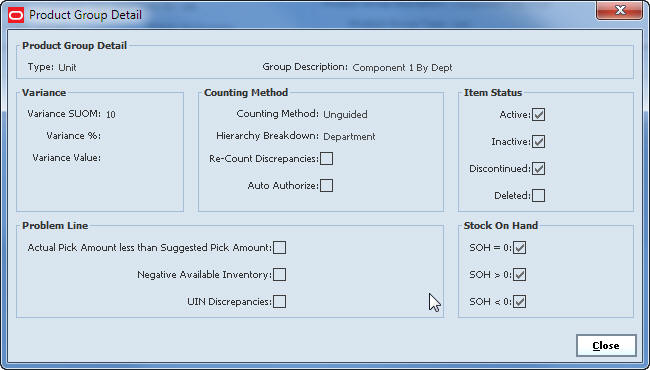
At any time when the Child Stock Count List window is open, you can click View Details to view detailed information about the stock count product group. (Only users with the required permissions can create and change product groups.)
Navigate: Main Menu > Inventory Mgmt > Stock Count. The Stock Count List window opens.
To view details about the product group for the child counts listed, follow these steps:
Double-click on the stock count for which you want to view product group details. The Child Stock Count List window opens.
Click View Details. The Product Group Detail window opens.
Click Close to close the window and return to the Child Stock Count List window.
Click Back to return to the Stock Count List window.
When you perform a stock count, you count all stock in the store for the items. Unavailable inventory must be counted as well. For example, if some items are ready to be returned to a supplier but the return has not yet been dispatched, the items are counted, even though they will not be placed on the shop floor for sale.
For the original count and a recount (if a recount is required), the procedure is the same. For a recount, the data entry window is slightly different; see ”Enter Recount Results."
|
Note: For Unit and Problem Line counts, you must take the snapshot before you enter quantities. |
Navigate: Main Menu > Inventory Mgmt > Stock Counts. The Stock Count List window opens.
To enter stock count results, follow these steps:
If you want to filter the Stock Count List, click Filter. See ”Filter the Stock Count List."
Double-click on the stock count for which you want to enter count results. The Child Stock Count List window opens.
If you want to view details about the stock count product group, click View Details in the Product Group Details section. See ”View Product Group Details."
Double-click on the child stock count for which you want to enter results. The Stock Count Detail window opens.
By default, the uncounted items in the stock count are listed. In the Count/Re-count Qty field, you can select which items you want to list, as follows:
Select Uncounted (default) to list only those items for which no quantity has been entered in the Count field.
Select Counted to list only those items for which a count has been entered.
Select All to list both counted and uncounted items.
You can change these selections at any time while you are entering counts.
If you want to limit the items listed to those in a particular merchandise hierarchy, use the Dept, Class, and Sub-Class fields to select which items to list.
You can change these selections at any time while you are entering counts.
For each item count you want to enter, follow these steps:
In the Count/Re-count Qty field, double-click to activate edit mode.
Type the count value and press Enter.
If you want to update unique identification numbers (UIN), see ”Update UINs for a Count."
When you have finished entering item counts, click Save to save the changes.
Click Back to return to the Child Stock Count List window.
If you have finished entering all item counts, you have the option to complete the count. See ”Complete a Child Stock Count."
If a recount is required, the procedure to enter the recount results is similar to the procedure for the original count.
|
Note: If you are recounting a Unit or Problem Line count, you must take a new snapshot for the recount before entering quantities. See ”Take a Snapshot." |
If you want to filter the Stock Count List, click Filter. See ”Filter the Stock Count List."
Double-click on the stock count for which you want to enter recount results. The Child Stock Count List window opens.
If you want to view details about the stock count product group, click View Details in the Product Group Details section. See ”View Product Group Details."
Double-click on the child stock count for which you want to enter recount results. The Stock Re-Count Detail window opens.
By default, the uncounted items in the stock count are listed. In the Count/Re-Count Qty field, you can select which items you want to list, as follows:
Select Uncounted (default) to list only those items for which no quantity has been entered in the Re-Count field.
Select Counted to list only those items for which a count has been entered.
Select All to list both counted and uncounted items.
You can change this selection at any time while you are entering recounts.
If you want to limit the items listed to those in a particular merchandise hierarchy, use the Dept, Class, and Sub-Class fields to select which items to list.
You can change these selections at any time while you are entering counts.
By default, the discrepant items from the original count are listed. In the Filter field, you can select which items you want to list, as follows:
Select Discrepant (default) to list only those items for which the original count was discrepant.
Select All Items to list both discrepant and nondiscrepant items.
You can change this selection at any time while you are entering recounts.
For each item recount you want to enter, follow these steps:
In the Re-Count Qty field, double-click to activate edit mode.
Type the recount value and press Enter.
If you want to update unique identification numbers (UIN), see ”Update UINs for a Count."
Click Save to save the changes.
Click Back to and return to the Child Stock Count List window.
If you have finished entering all item recount quantities, you have the option to complete the count. See ”Complete a Child Stock Count."
If a stock count includes items that require unique identification numbers (UIN), these UINs must be scanned or entered while counting stock. You can add and delete UINs for a child count. Follow these steps:
In the Stock Count Detail or Stock Re-Count Detail window, double-click on the UIN Qty field for the item. The UIN window opens.
For each UIN that you need to add, click Add and enter a valid UIN.
To delete a UIN, select it and click Remove.
Click Save to save your changes and return.
For each child stock count, you can continue to enter and update count or recount values as needed until all the child counts have been completed. You can complete the count in either of these ways:
From the Stock Count Detail Window
Navigate: Main Menu > Inventory Mgmt > Stock Count. The Stock Count List window opens.
To complete a child count, follow these steps:
If you want to filter the Stock Count List, click Filter. See ”Filter the Stock Count List."
Double-click on the stock count for which you want to complete one or more child counts. The Child Stock Count List window opens.
Double-click the child count that you want to complete. The Stock Count Detail window opens.
Click Complete. A confirmation prompt is displayed.
Click Yes. You return automatically to the Stock Count List window.
From the Child Stock Count List Window
Navigate: Main Menu > Inventory Mgmt > Stock Count. The Stock Count List window opens.
To complete a child count, follow these steps:
If you want to filter the Stock Count List, click Filter. See ”Filter the Stock Count List."
Double-click on the stock count for which you want to complete one or more child counts. The Child Stock Count List window opens.
Select the child counts that you want to complete.
Click Complete. A confirmation prompt is displayed.
Click Yes. You return automatically to the Stock Count List window.
Click Save to return to the Stock Count List window.
Status Changes
When you complete the child count or recount, the status of the child count changes as follows:
For the original count, if any items are discrepant and no recount is required, the child count status changes to Authorize New.
For the original count, if there are no discrepant items and no recount is required, the child count status changes to Authorize Completed.
For the original count, if any items are discrepant and a recount is required, the child count status changes to Re-Count New.
For a recount, the child count status changes to Authorize New if there are discrepant items. If there are no discrepant items, the status changes to Authorize Completed.
For a guided count, if all locations for an item have not been counted when you click Complete, the child count status changes to Pending.
For a Unit and Amount count, if the snapshot has not been taken when you click Complete, the child count status changes to Pending.
The status of the master count does not change until all child counts are completed. See ”Stock Count Status” for more information.
A child stock count moves to Authorize New status after the count and recount (if required) are completed and there are discrepant item counts (see ”Complete a Child Stock Count.") The master stock count moves to Authorize New status when all child counts are completed.
When a stock count is ready for authorization, the last stage of the count requires entering the authorized (approved) quantities for items in the count.
|
Notes:
|
At this point, some stock count quantities might match SIM inventory levels or be within the variance count or percentage set for the product group. There might also be discrepant item counts, if the recount also resulted in discrepancies. You can accept counted quantities or enter different authorized quantities for all items. If you want SIM to fill in authorized quantities for you, the quantities used are based on system settings and defaults as described in the following topics.
You can update authorized quantities using one or more of the following methods:
Update Authorized Quantities Manually
In the Stock Count Authorization window, you can enter authorized values for any items in the count, one by one.
Other Methods to Update Authorized Quantities
With several different methods (buttons), you can have SIM fill in any blank authorized quantities.
If a stock count contains items that require unique identification numbers (UIN), you can also add and delete UINs before you authorize the count. See ”Update UINs before Authorizing."
You can enter authorized quantities for any items in a stock count. For a count with many different items, you may want to enter authorized quantities only for certain items. You do not have to enter any approved quantities manually, if you prefer to use the SIM defaults for authorized quantities (see ”Other Methods to Update Authorized Quantities”).
|
Note: You can enter some authorized quantities manually and have SIM fill in the rest of the authorized quantities. |
Navigate: Main Menu > Inventory Mgmt > Stock Count. The Stock Count List window opens.
To enter authorized quantities manually, follow these steps:
If you want to filter the Stock Count List, click Filter. See ”Filter the Stock Count List."
Double-click on the stock count for which you want to enter authorized quantities. The Child Stock Count List window opens.
Click Authorize. The Stock Count Authorization window opens.
|
Note: If there is only one child count for the master count, the items of the child count are listed. If there is more than one child count, you must select the child count you want (see Step 4). |
For each item, the Stock Count Authorization window lists the following:
The count quantity, count variance, and count variance percentage
The recount quantity, recount variance, and recount variance percentage (if there was a recount)
The SIM stock on hand quantity (SOH column)
If there is more than one child count, select the child count in the Child Stock Count section as follows:
If you want to clear the selection fields, click Clear.
In the Status field, select the status of the child count you want.
In the Child field, select the child count.
Click Search.
To filter the items of the child count that are listed, use fields in the Filter section as follows:
In the Item Filter field, select Discrepant Items or All Items.
In the Auth Qty field, select Authorized, Unauthorized, or All Items.
You can change this filtering whenever you want.
If you want to filter the item list further (for example, to find items that far exceed the allowed count variance), click the Advanced Filter button. See ”Filter the Stock Count Authorization List."
For each item for which you want to enter the authorized quantity manually, follow these steps:
Double-click in the Authorized Qty field to activate edit mode.
Enter the authorized quantity for the item.
Press Enter (or press Tab to go to the next item).
When you are finished entering authorized quantities, do one of the following:
Click Save Child to save your entries. You can click this button as often as you want to save all entries you have completed so far. You remain in the Stock Count Authorization window, where you can continue updating authorized quantities for any of the child counts.
Click Apply to save your entries and return to the Child Stock Count List window.
If you want SIM to fill in the remaining blank authorized quantities, click Update Auth Qty. See ”Update Auth Qty Button – Stock Count Authorization Window” for more information.
If you want SIM to confirm (permanently save) all authorized quantities, click Confirm Child. See ”Confirm Child Button – Stock Count Authorization Window” for more information.
If you want SIM to update a previous snapshot, click Update Snapshot to update the stock count with any late sales that were uploaded since entering the authorization stage.
|
Note: You can also confirm all child counts by clicking Confirm Authorization in the Child Stock Count List window. Clicking that button automatically updates the authorization quantities with the last counted quantities and confirms the master count. |
You can apply additional filters to specify which items you want to list in the Stock Count Authorization window.
To filter the Stock Count Authorization list, follow these steps:
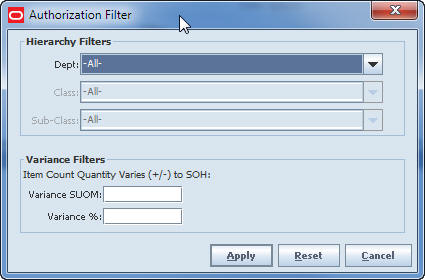
Click Advanced Filter. The Authorization Filter window opens.
Enter or select search values as needed to specify the child counts that you want to list. All values are optional. If you leave a field blank or select All, all values are included in the search.
Hierarchy – Select department, class, and subclass values as needed. The items displayed in the list will be those items in the stock count for the hierarchy that you select.
Variance Filters – These filters allow you to filter the list to only those item counts that are discrepant by a count or percentage equal to or greater than you specify. You can use either or both of these fields:
Variance SUOM – Enter a count threshold value in the standard unit of measure for an item count to be discrepant. Counts that are discrepant by a count equal to or greater than this value, plus or minus, will be listed.
Variance % – Enter a count percentage threshold value for an item count to be discrepant. Counts that are discrepant by a percentage equal to or greater than this percentage, plus or minus, will be listed.
Click Apply. You return to the Stock Count Authorization window, where your filter has been applied.
There are several methods to update authorized quantities, and optionally confirm authorized quantities, in one step. You can complete and confirm authorized quantities after you have entered some quantities manually, or you can complete authorized quantities without any manual entries. There are several ways to do this, using the following buttons in SIM windows:
Update Auth Qty Button – Stock Count Authorization Window
With this method, all empty authorized quantities for the current child count are filled in with the last count or recount quantity. You still have the option to change values manually before confirming the count, and you can save or discard all changes to authorized quantities.
Update Auth Qty Button – Child Stock Count List Window
With this method, all empty authorized quantities for the selected child counts are filled in with the last count or recount quantity. You still have the option to change values manually before confirming the count.
Confirm Child Button – Stock Count Authorization Window
With this method, the child count moves to Authorize Completed status (Authorize Confirmed for a Unit and Amount count). No further changes can be made to authorized quantities in the confirmed child count.
Confirm Authorization Button – Child Stock Count List Window
With this method, all empty authorized quantities for all child counts are filled in with the last counted quantities. The child counts and the master count move to Authorize Completed status (Authorize Confirmed for a Unit and Amount count). No further changes can be made to any authorized quantities in any child counts.
|
Caution: If you want to enter authorized quantities for certain items manually, enter these quantities before you click either the Confirm Child or Confirm Authorization button. Quantities that are confirmed cannot be changed. |
SIM Rules for Blank Authorized Quantities
When SIM fills in blank authorized quantities, the following rules apply:
The authorized quantity for an item is filled in with the last counted quantity. If a recount was done, the recount quantity is used.
For Unit and Amount counts, if there is no count or recount quantity entered, the authorized quantity is 0 (zero). All authorized quantities must be filled in for a Unit and Amount count.
For Unit, Problem Line, and Ad Hoc count types, if there is no count or recount quantity entered, the authorized quantity is blank (null) or zero, depending on your SIM system settings. These count types can include uncounted items.
See the Oracle Retail Store Inventory Management Implementation Guide for information about SIM system options that control rules for authorized stock count quantities.
Update Auth Qty Button – Stock Count Authorization Window
Use this method to have SIM fill in all empty authorized quantities for the current child count (in Authorize New or Authorize In Progress status). You can still update authorized quantities through manual entries before or after you select this action. This action does not change any quantities that you entered previously, either through manual entries or by using this button.
Navigate: Main Menu > Inventory Mgmt > Stock Count. The Stock Count List window opens.
To update authorized quantities for one child count, follow these steps:
If you want to filter the Stock Count List, click Filter. See ”Filter the Stock Count List."
Double-click on the stock count for which you want to enter authorize quantities. The Child Stock Count List window opens.
Click Authorize. The Stock Count Authorization window opens.
|
Note: If there is only one child count for the master count, the items of the child count are listed. If there is more than one child count, you must select the child count you want (see Step 4). |
If there is more than one child count, select the child count in the Child Stock Count section as follows:
If you want to clear the selection fields, click Clear.
In the Status field, select the status of the child count you want.
In the Child field, select the child count.
Click Search.
To filter the items of the child count that are listed, use fields in the Filter section as follows:
In the Item Filter field, select Discrepant Items or All Items.
In the Auth Qty field, select Authorized, Unauthorized, or All Items.
You can change this filtering whenever you want.
Click Update Auth Qty. This message is displayed: ”All discrepant items without authorized quantities will be defaulted with the last counted quantity. Do you wish to continue?”
|
Note: For Unit and Amount counts, the message will say "all items." For other count types, the message might also say "all items," depending on your SIM system settings. |
Click Yes.
Do one of the following:
Click Save Child to save the authorized quantity entries. You can click this button as often as you want to save all entries completed so far. You remain in the Stock Count Authorization window, where you can continue updating authorized quantities for any of the child counts.
Click Back to return to the Child Stock Count List window.
If you want SIM to confirm (permanently save) all authorized quantities, click Confirm Child. See ”Confirm Child Button – Stock Count Authorization Window” for more information.
Update Auth Qty Button – Child Stock Count List Window
Use this method to have SIM fill in all empty authorized quantities for one or more of the child stock counts listed in the Child Stock Count List window (in Authorize New or Authorize In Progress status). You can still update authorized quantities through manual entries before or after you select this action, as long as the count has not yet been confirmed. This action does not change any quantities that you entered previously, either through manual entries or by using this button.
Navigate: Main Menu > Inventory Mgmt > Stock Count. The Stock Count List window opens.
To update authorized quantities for one child count, follow these steps:
If you want to filter the Stock Count List, click Filter. See ”Filter the Stock Count List."
Double-click on the stock count for which you want SIM to complete the authorized quantities. The Child Stock Count List window opens.
Select the child counts for which you want SIM to update the authorized quantities.
Click Update Auth Qty. This message is displayed: ”All discrepant items without authorized quantities will be defaulted with the last counted quantity. Do you wish to continue?”
Click Yes.
At this point, you can optionally view or edit the authorized quantities or confirm the child count; see ”Confirm Child Button – Stock Count Authorization Window."
Click Back to return to the Stock Count List window.
Confirm Child Button – Stock Count Authorization Window
Use this method when you have completed all manual entries for authorized quantities. This action does not change any quantities that you entered previously, either through manual entries or by using the Update Auth Qty button
When you confirm a child count, quantities and status are affected as follows:
Ad Hoc, Unit and Problem Line stock count types – Empty authorized quantities are left blank (null, not counted). The status of the child count changes to Authorize Completed.
Unit and Amount stock count type – Authorized quantities cannot be blank. If any authorized quantities are blank, a message asks whether you want to use the last counted quantities. If you answer No, no action is taken. If you answer Yes, the last count or recount quantity is filled in for any blank authorized quantity, and the child count moves to Authorize Confirmed status.
No further changes can then be made to authorized quantities. SIM inventory adjustments are written for those items that have authorized quantities different from those of the snapshot of the stock on hand.
Navigate: Main Menu > Inventory Mgmt > Stock Count. The Stock Count List window opens.
To confirm a child count, follow these steps:
If you want to filter the Stock Count List, click Filter. See ”Filter the Stock Count List."
Double-click on the stock count for which you want to confirm one or more child counts. The Child Stock Count List window opens.
Click Authorize. The Stock Count Authorization window opens.
|
Note: If there is only one child count for the master count, the items of the child count are listed. If there is more than one child count, you must select the child count you want (see Step 4). |
If there is more than one child count, select the child count in the Child Stock Count section as follows:
If you want to clear the selection fields, click Clear.
In the Status field, select the status of the child count you want.
In the Child field, select the child count.
Click Search.
Click Confirm Child. A confirmation prompt is displayed.
Click Yes to confirm the child.
Click Back to return to the Child Stock Count List window.
Confirm Authorization Button – Child Stock Count List Window
Use this ”blind” authorization method to complete all blank authorized quantities for all child counts and make the changes permanent. The child counts and the master count move to Authorize Completed status and stock on hand is updated. SIM inventory adjustments are also written for those items that have authorization quantities different from those of the snapshot of the stock on hand. No further changes can be made to any authorized quantities in any child counts.
Navigate: Main Menu > Inventory Mgmt > Stock Count. The Stock Count List window opens.
To fill in all authorized quantities and change all child counts to Authorize Completed, follow these steps:
If you want to filter the Stock Count List, click Filter. See ”Filter the Stock Count List."
Double-click on the stock count for which you want to complete the authorized quantities and confirm authorization. The Child Stock Count List window opens.
Click Confirm Authorization. A message is displayed: "All items with blank authorization quantities will be set to the last counted quantity. Would you like to continue?"
Click Yes. The status of the child count moves to Authorize Completed.
For items that require UINs, the values of the Authorized Qty and UIN Qty fields should be equal. You can add and delete UINs as needed before you authorize the count.
To update UINs for the child count, follow these steps:
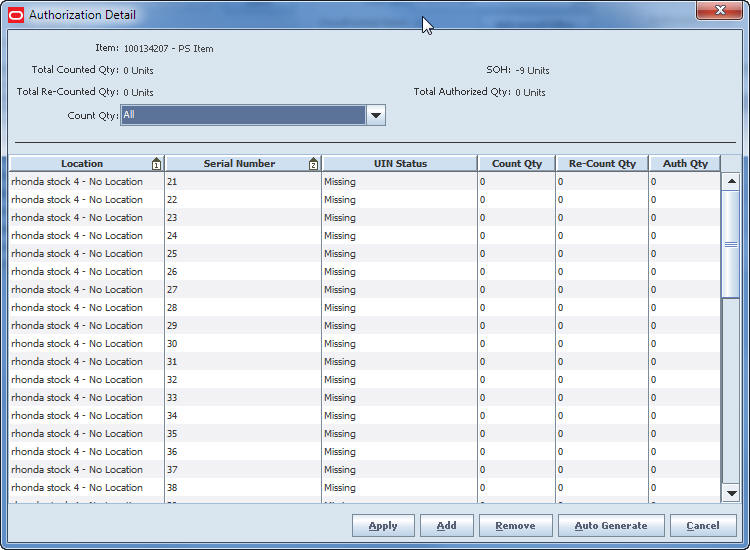
In the Stock Count Authorization window, double-click on the item for which you want to update UINs. The Authorization Detail window opens.
By default, the Authorization Detail lists uncounted items. Use the Filter drop-down to select whether to list uncounted, counted, or all items.
Items are listed as follows:
For items that do not require UINs, one row is listed per location.
For items that require UINs, one row is listed per UIN/location combination. All UINs that were counted are listed, as well as all UINs that should have been counted (based on their status when the snapshot was taken), regardless of the current Filter selection.
For each item, the following information is listed:
| Column | Description |
|---|---|
| Location | For sequenced stock counts, the location name. For other stock counts, ”No Location” is displayed. |
| Serial Number | Unique identification number of the item. For items that require Serial numbers, all serial numbers are listed, regardless of whether they were counted or recounted. |
| UIN Status | Status of the UIN (such as Missing, Reserved for Shipping). |
| Count Qty | Count quantity for the item in the location. For an item that requires UINs, this value is 1, 0, or null (not counted). |
| Re-Count Qty | Recount quantity for the item in the location. For an item that requires UINs, this value is 1, 0, or null (not recounted). |
| Auth Qty | For an item that does not require UINs, this is the same as the Auth Qty from the Stock Count Authorization window.
For an item that requires a UIN, the value of this field determines whether the UIN will be considered counted and confirmed. A value of 1 indicates that you want to authorize this UIN. A value of 0 indicates that you do not want to authorize this UIN for the count. A null value indicates the item was not counted or recounted. When a UIN item is authorized in a stock count, the UIN status is changed to In Stock if it has one of the following statuses: Missing, Sold, Customer Order Fulfilled, Shipped to Warehouse, Shipped to Vendor, Shipped to Finisher, Removed from Inventory. For the statuses Customer Order Reserved, Unavailable, or Reserved for Shipping, the status is not changed. |
To add a serial number type UIN, follow these steps:
Click Add.
Update the Serial Number and Auth Qty fields in the new row.
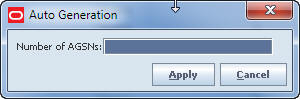
To generate UINs for an Auto-Generate SN (AGSN) type UIN, follow these steps:
Click Auto Generate. The Auto Generation window opens.
In the Number of AGSNs field, enter the number of AGSNs you want to generate.
Click Apply to save and return you to the Authorization Detail window.
To delete a UIN, select the row and click Remove.
Click Apply to save your changes and return to the Stock Count Authorization window.
Some counted items might be rejected when data is scanned or imported into SIM. You can view rejected items, if any, and assign valid SIM item IDs to items not on file and nonranged items. You can also update unique identification numbers (UIN) if they are required for some items in the count.
An item that does not require unique identification numbers (UIN) can be rejected for the following reasons:
Item Not on File
Not on file items are items that are not found in the SIM enterprise-wide inventory. These items might not be set up in the merchandising system. Not on file items can be added to the count.
Item Not at Store
Nonranged items are items that are in the SIM inventory, but they have not been ranged to the store. These items can also be added to the count.
Item Not on Count
Not on count items are items that are not included in the stock count product group. These items cannot be added to the stock count, and they should not have been counted. You cannot take any action with these items.
Rejected Items That Require UINs
For items that require UINs, these statuses can apply:
UIN Duplicate
The same UIN was counted twice for the same valid SIM item during the third-party count. SIM accepts the first item/UIN combination but rejects any duplicates.
UIN Required
A valid SIM item was counted, but the UIN was not provided in the third-party data file. You can assign a valid SIM item ID and UIN.
UIN Not on Count
A UIN was scanned, but the item/UIN combination does not exist in the product group element selected for the count. You cannot take any action with these items. (You can view the UINs that were counted.)
UIN Not at Store
The item/UIN combination exists at a different store. Depending on your SIM system configuration, you may be able to reassign this item/UIN combination to your store. If your SIM configuration does not allow reassignment, you cannot take any action with these items.
UIN Not on File
The item is not on file in SIM. You can assign the item a valid SIM item ID, but you must also enter a UIN for the item.
AGSN Required
If Auto-Generated SN type UINs are required for the item, but the counted items do not have AGSNs assigned in the third-party data file, the items are rejected. You must generate the AGSNs; see ”Update UINs before Authorizing."
You can update rejected items to add item IDs and UINs as required.
Navigate: Main Menu > Inventory Mgmt > Stock Count. The Stock Count List window opens.
To view and update rejected items, follow these steps:
If you want to filter the Stock Count List, click Filter. See ”Filter the Stock Count List."
Double-click on the stock count for which you want to view the rejected items. The Child Stock Count List window opens.
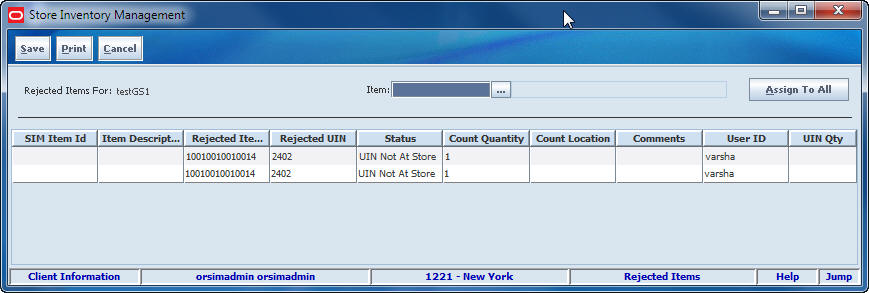
Click Rejected Items. The Rejected Items window opens.
|
Note: If there are no rejected items for the count, a message is displayed to inform you that there are no rejected items. In that case, the Rejected Items window does not open, and the remaining steps of this procedure do not apply. |
You can add items to the count if the Status value is either Item Not At Store or Item Not On File. You can enter item IDs for individual items, or you can assign one item ID to all items that do not yet have item IDs in the SIM Item ID column.
You can also correct problems with UINs for rejected items that have the following statuses:
UIN Duplicate
UIN Required
UIN Not at Store
UIN Not on File
|
Note: For items that require AGSNs, you can generate the required AGSNs from the Authorization Detail window. See ”Update UINs before Authorizing." |
To add a SIM Item ID to a single item, follow these steps:
Select the rejected item you want to look up.
In the Item field, click the Ellipsis button to look up the item.
In the Item Lookup window, enter search criteria as needed to find the item you want. (See ”Item Lookup” in Chapter 21 for more information about item lookup criteria.) Select the item and click Apply to return to the Rejected Items window.
To assign the same SIM Item ID to all items on the rejected list that do not yet have SIM Item ID values, follow these steps:
In the Item field, click the Ellipsis button to look up a valid item.
In the Item Lookup window, enter search criteria as needed to find the item you want. Select the item and click Apply to return to the Rejected Items window.
Click Assign to All.
|
Note: The selected Item ID is assigned to all rejected items that do not yet have a valid SIM Item ID value. Items for which you have already assigned item IDs are not changed. Be sure that the item ID you assign with the Assign to All button is correct for all items to which it is assigned. If necessary, fix errors by assigning different IDs to individual items (see Step 4). |
To correct problems with duplicate or missing UINs, follow these steps:
|
Note: An item must have a valid SIM Item ID before you can assign it a unique identification number. |
Double-click the item. The UIN window opens.
Enter the correct UIN for the item.
Click Apply to save your changes and return to the Rejected Items window.
For items with status UIN Not on File, follow these steps:
|
Note: Items with UIN Not on File status can be assigned to your store only if your SIM system configuration allows it. |
Double-click the item. You receive a prompt asking whether you want to assign the UIN to your store.
Click OK to assign this UIN to your store.
Click Save to save your changes and return to the Child Stock Count List window.
Click Back to return to the Stock Count List window.
You cannot delete stock counts if there are any child counts in Authorize Completed status. You can only delete ad hoc stock counts if they are in Authorize New or Authorize In Progress status. See ”Stock Count Status” for more information.
Navigate: Main Menu > Inventory Mgmt > Stock Counts. The Stock Count List window opens.
To delete stock counts, follow these steps:
If you want to filter the stock counts listed, click Filter. See ”Filter the Stock Count List."
Select the stock counts that you want to delete.
Click Delete. A message is displayed: "Are you sure you want to delete the selected stock counts now?"
|
Note: If you have selected any stock count that cannot be deleted, you receive an error message and that count is not deleted. |
Click Yes. The stock counts are deleted.
From start to completion, each stock count proceeds through different stages and statuses. In each of these stages, you can perform certain actions with the stock count.
The stages of a stock count are as follows:
Future Stock Count
Stock Count
Re-count
Authorize
Each stock count stage (displayed as Type) for the master count has statuses and rules as described in the following.
Future Stock Count
These stock counts have no status. When the scheduled date is reached, SIM extracts the count again. The stock count then moves to the Stock Count List window, and its status changes to Stock Count New.
Stock Count New
All stock counts extracted on the scheduled date begin as Stock Count New. If Daily Sales Processing is being used, you can select whether the count is being performed before or after store hours.
|
Note: The before or after store hours setting cannot be changed after the count has moved to In Progress, when the count process has started or the snapshot has been taken. |
For a count in Stock Count New status, you can take the snapshot, enter count quantities, save the count, or print a report.
|
Note: For Unit and Problem Line counts, you cannot enter count quantities until the snapshot has been taken. When you are using Third-party counting method, the snapshot must be taken before the stock count data is uploaded to SIM. |
Stock Count In Progress
A stock count moves to Stock Count In Progress after you start the counting process or take the snapshot. You can perform an initial count of the items listed in the stock count. This initial count can be completed immediately, or saved and completed later.
Re-count New
The stock count moves to Re-count New after the initial count has been completed but discrepant item counts exist.
|
Note: A recount occurs only if the product group requires recounting of discrepant items. |
There is no recount process for ad hoc stock counts or third-party stock counts.
Re-Count In Progress
A stock recount moves to Re-count In Progress after you start the counting process or take the snapshot.
|
Note: A snapshot cannot be taken on the recount for Unit and Amount counts. |
You can perform a recount that occurs after the initial count. This recount can be completed immediately, or saved and completed later.
Authorize New
The stock count moves to Authorize New after the count process and recount process, if required, are completed. The stock count is typically confirmed by a manager who confirms the count and recount quantities. In confirming the count, there is an option to automatically fill all authorized quantities with the last count quantity.
For third-party stock counts, if you do not use the auto-authorize process, you can assign not-on-file items to valid SIM item IDs before you confirm the count.
Authorize In Progress
The stock count moves to Authorize In Progress after a single child count authorized quantity has been saved or confirmed.
Authorize Completed
The stock count moves to Authorize Completed after all child counts have been confirmed.
After the stock count moves to Authorize Completed, you can only view the stock count, and you cannot change any quantities.
The following tables summarize the actions that move a stock count to a particular stage (Type) and status.
|
Note: A status does not apply to future stock counts. Future stock counts can be viewed before their scheduled dates, but you can take no action with them. |
Master stock counts are counts that are split into one or more child counts. The status of the master count depends on the statuses of the child counts. The status cannot change until the status of each child count has changed. The status changes from New to In Progress, however, when a single child stock count moves to In Progress, or when the snapshot is taken.
| Action | Stock Count Stage (Type) | Stock Count Status |
|---|---|---|
| Future count extracted before the scheduled date | Future Stock Count | N/A |
| New count extracted on the scheduled date | Stock Count | New |
| Snapshot taken of one or more child counts | Stock Count | In Progress |
| Count completed for a single child count, and at least one child is not completed yet | Stock Count | In Progress |
| Count completed for all children | Re-Count
(If a recount is required, otherwise Authorize) |
New |
| Recount completed for a single child count, and at least one child count is not completed | Re-Count | In Progress |
| Recount completed for all child counts | Authorize | New |
| Authorization completed for a single child count, and at least one child is not authorized | Authorize | In Progress |
| All child counts completed for the stock count (Unit, Problem Line) | Authorize | Completed |
Child stock counts are counts that belong to a master stock count. A large stock count might have many child counts, but a smaller count might have only one child count. You can perform actions on each of the child counts separately. Until all child counts change status, the status of the master count does not change.
|
Notes:
|
| Action | Stock Count Stage (Type) | Stock Count Status |
|---|---|---|
| Future count extracted before the scheduled date | Future Stock Count | N/A |
| New count extracted on the scheduled date | Stock Count | New |
| Snapshot not taken but count started and Complete button clicked (Unit and Amount only, both guided and unguided) | Stock Count | Pending |
| At least one item not counted in all locations (Unit, Problem Line, Unit and Amount guided counts only) | Stock Count | Pending |
| Snapshot taken of child count but count not completed | Stock Count | In Progress |
| Count completed for child and snapshot taken | Re-Count
(If a recount is required, otherwise Authorize) |
New |
| Recount started and saved | Re-Count | In Progress |
| Recount completed | Authorize | New |
| Child count authorized | Authorize | Completed |