| Oracle® Retail Store Inventory Management User Guide Release 14.1 E53429-01 |
|


 Previous |
 Next |
| Oracle® Retail Store Inventory Management User Guide Release 14.1 E53429-01 |
|
Previous |
Next |
A direct store delivery is a delivery in which the supplier drops off merchandise directly at the store. Deliveries received directly at the store can be received against existing purchase orders, or without a purchase order.
The store can receive partial shipments, resulting in multiple deliveries against a single purchase order. When all items have been received and a delivery has been finalized, you can print a delivery receipt.
You can also apply direct store deliveries against advance shipment notices (ASN).
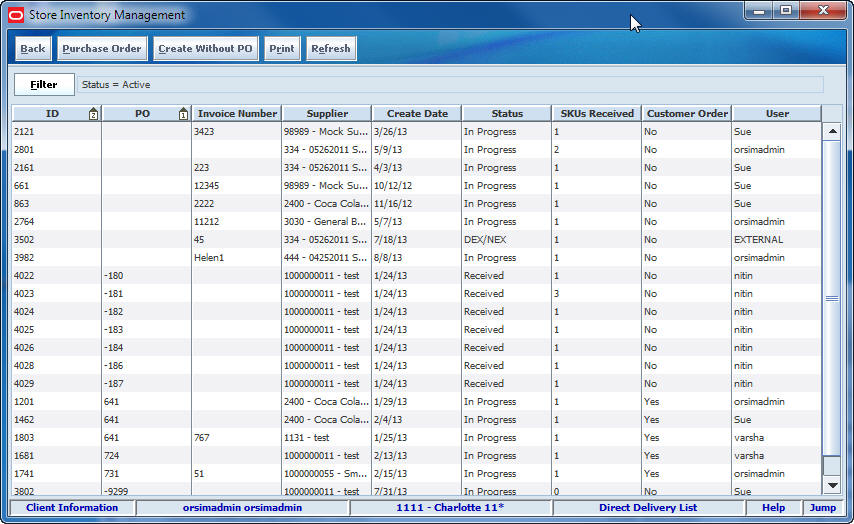
Direct Delivery List Window
Navigate: Main Menu > Shipping/Receiving > Direct Delivery. The Direct Delivery List window opens.
From the Direct Delivery List window, you can do the following:
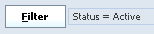
At any time while the Direct Delivery List window is open, you can click Filter to change how the list of purchase orders is filtered.
Current filtering is displayed next to the Filter button on the Direct Delivery List window. If no filtering is displayed, all items are currently selected and listed.
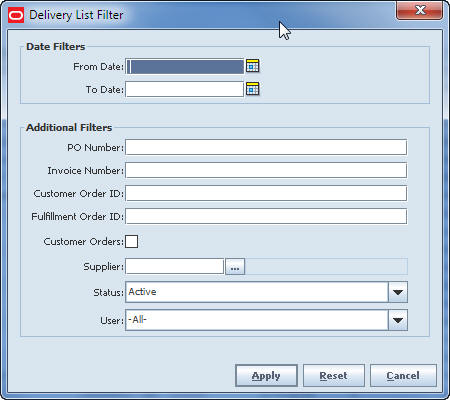
To change how the list is filtered, follow these steps:
Click Filter. The Delivery List Filter window opens.
If you want to reset all filtering criteria to default values, click Reset.
Enter or select filtering criteria as needed to select just the inventory adjustments you want to list. All criteria are optional. If you leave a field blank or select All, all values will be included in your filtering selection.
Date Filters – Enter or select dates to select only those purchase orders created between a From Date and To Date that you specify.
PO Number – Enter the purchase order number to select only a specific purchase order.
Invoice Number – Enter the invoice number to select only a specific invoice order.
Customer Order ID – Enter a customer order ID to select only a specific customer order.
Fulfillment Order ID – Enter a fulfillment order ID to select only a specific fulfillment order.
Customer Order – Select this check box to include only customer orders.
Supplier – Enter the supplier ID or click the Ellipsis button to look up the supplier.
In the Supplier Lookup window, enter search criteria as needed to find the supplier you want. (See ”Supplier Lookup” for more information about supplier lookup criteria.) Select the item you want and click Apply to return to the Delivery List Filter window.
Status – Select a status from the drop-down list. The default is Active.
User – Select a user from the drop-down list.
Click Apply. Results that match your search criteria are displayed in the Inventory Adjustment List window.
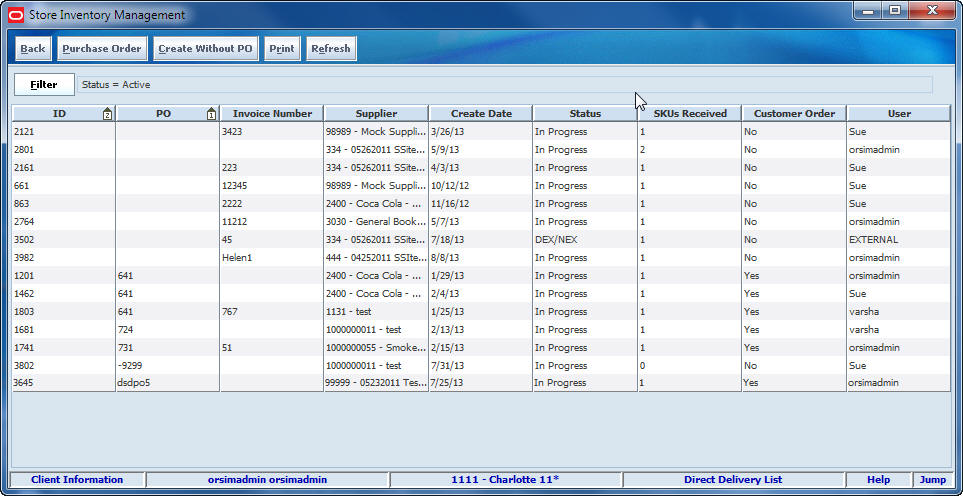
Select an item by double-clicking it to open the details, or click Filter to filter the delivery list. See ”Filter the Direct Delivery List Window” for more information. The Direct Delivery Detail window opens.
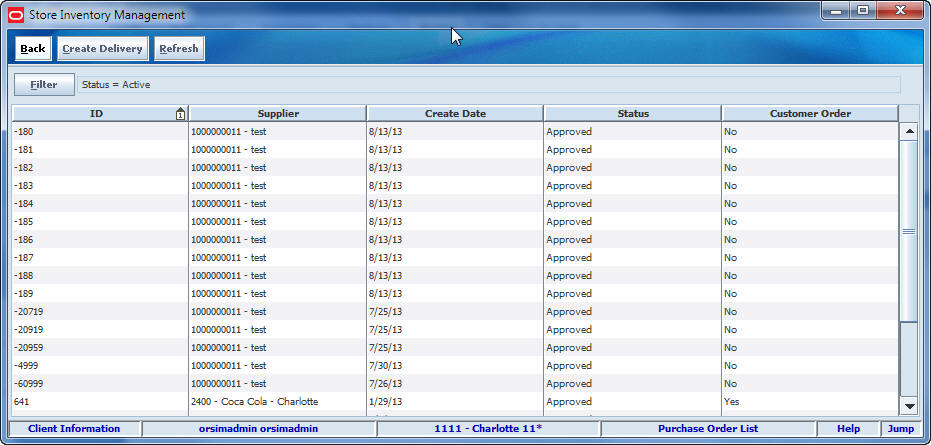
Navigate: Main Menu > Shipping/Receiving > Direct Delivery > Purchase Order. The Purchase Order List window opens.
Select a purchase order ID.
Click Create Delivery. The Direct Delivery Detail window opens.
Continue with Step 2 in Create a Delivery Without a Purchase Order.
To create a delivery without a purchase order, follow these steps:
Navigate: Main Menu > Shipping/Receiving > Direct Delivery. The Direct Delivery List window opens.
Click Create Without PO. The Direct Delivery Detail window opens.
Select the Supplier, or click the Ellipsis button to open the Supplier Lookup window.
In the Supplier Lookup window, look up and select the supplier you want to use. Then click Apply to return to the Direct Delivery Detail window.
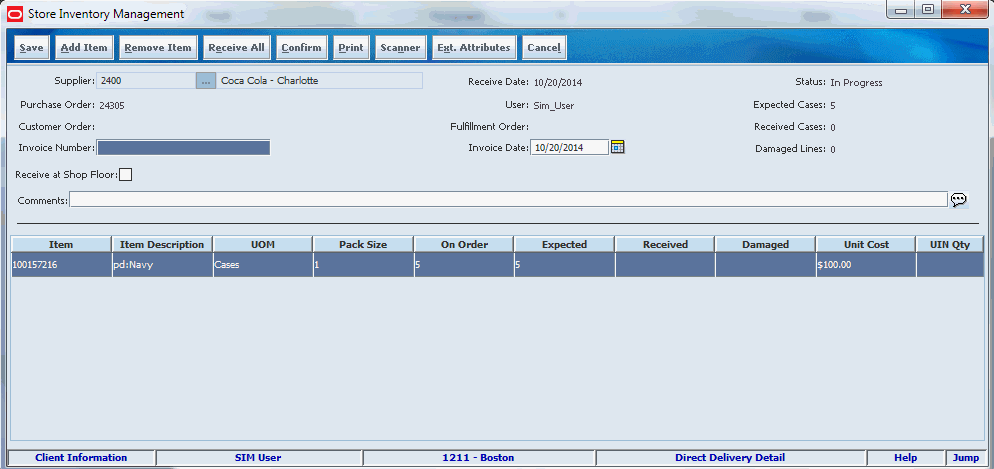
Header fields are as follows:
| Field | Description |
|---|---|
| Supplier | The supplier from whom you are receiving this delivery. |
| Receive Date | The date the receipt is first created. |
| Status | The status of the order. |
| Purchase Order | The purchase order number generated by SIM, or the purchase order number provided by an external system. |
| User | The SIM user who received the delivery. |
| Expected Cases | How many cases were expected on the original ASN or purchase order. |
| Customer Order | The customer order number. |
| Fulfillment Order | The fulfillment order number. |
| Received Cases | The number of cases received in this delivery.
Note: A partial case is represented here as a full case. Multiple individual items with partial cases each add up to a full case. |
| Invoice Number | The invoice number associated with the receipt. |
| Invoice Date | The date of the invoice. |
| Receive Date | The date the receipt is first created. |
| User | The SIM user who received the delivery. |
| Expected | How many cases were expected on the original ASN or purchase order. |
| Received | The number of cases received in this delivery.
Note: A partial case is represented here as a full case. Multiple individual items with partial cases each add up to a full case. |
| Damaged Lines | The number of line items that have damages for this delivery. |
| Receive at Shop Floor | Indicates whether the delivery will be received on the shop floor instead of automatically receiving into the back room. This allows the user to Top off the shop floor first, depending upon how it is configured. |
Complete the fields that are enabled in the table.
Invoice Number – Enter the invoice number for the delivery.
Comments – Enter additional information about the delivery, if necessary.
Item – Enter the item number in the Item field, or click the Ellipsis button to open the Item Lookup window. This field may already have a value, if the information comes from the purchase order or an applied ASN, or click Scanner to scan the item. See ”Scan an Item (Scanner Button)” in Chapter 2 for more information.
In the Item Lookup window, look up and select the item you want. Then click Apply to return to the Direct Delivery Identify window
UOM – Select Units or Cases.
Pack Size – This field is disabled. It displays the pack size of the delivery.
On Order – This field is disabled. It displays the remaining on-order quantity for the purchase order.
Expected – This field is disabled. It displays how many cases were expected on the original ASN or remained on the purchase order that was applied. If SIM generated the purchase order, the value is 0.
Received – Enter the quantity of items that are being received, expressed in the designated unit of measure.
If this is an existing purchase order, select the merchandise that you want to receive. To receive all items, click Receive All. The quantities that were ordered are entered as the received quantities.
|
Note: This is only applicable for existing purchase orders. |
For items that require serial number type UINs, this field is disabled. You update the received quantity through the UIN window; see ”Update the UINs for a Delivery."
Receive All sets the status of the integrated UINs to In Receiving for the delivery. In addition, a validation check is performed to ensure the expected quantity matches the serial numbers for items, if that is not the case, the user will not be allowed to receive all.
Damaged – Enter the number of items that were damaged in the transfer.
For items that require serial number type UINs, this field is disabled. You update the damaged quantity through the UIN window; see ”Update the UINs for a Delivery."
UIN Qty – If an item requires serial number type unique identification numbers (UIN), this field displays the number of items for which UINs have been scanned or entered. See ”Update the UINs for a Delivery."
To add an item, follow these steps:
|
Note: This capability may not be enabled if you are receiving against a new purchase order. |
Click Add Item, or click Scanner to scan the item. See ”Scan an Item (Scanner Button)” in Chapter 2 for more information.
Complete the fields that are enabled:
UOM – From the drop-down list, select the appropriate unit of measure.
Pack Size – If the displayed pack size is not correct, enter the correct pack size.
Expected – Enter the quantity of expected delivery units.
Received – Enter the quantity of received delivery units.
Damaged – Enter the quantity of damaged delivery units.
UIN Qty – Open the pop-up by double clicking it, mark UINs as required.
Click Confirm to approve your changes.
Remove extra lines as follows:
Select the line that you want to remove.
Click Remove Item. The line is removed.
Receive all items as follows:
Click Receive All. The items are received. If Receive all conditions are fulfilled.
|
Note: When receiving an ASN with pre-populated UINs, it will receive without error if the number of UINs match the expected quantity.Receive All sets the status of the integrated UINs to In Receiving for the delivery. In addition, a validation check is performed to ensure the quantity matches the serial numbers for items, if that is not the case, Receive all is not allowed. |
Save, confirm, or reject the delivery:
Click Save to save the information that you entered so that you can print a delivery receipt, confirm the order, or receive the order at a later time. You return to the Direct Delivery List window.
Click Confirm to complete the transaction. The order is recognized as received. You return to the Direct Delivery List window.
To reject the entire delivery, see ”Update the UINs for a Delivery."
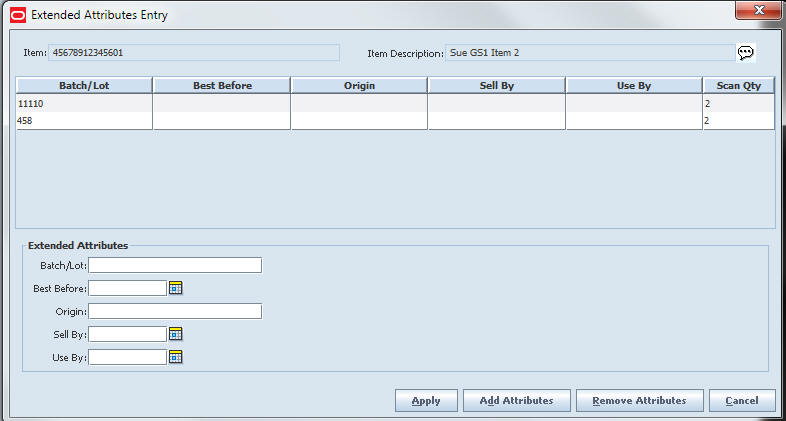
To update the Extended Attributes, select a row and click Ext. Attributes. The Extended Attributes window opens. This window captures additional information about an item.
|
Note: The Extended Attributes Entry window view may vary, depending upon customer chosen attributes. |
Enter/select the field options.
Click Add Attributes to add the additional attributes to the item.
Click Apply to save the changes and return to t he previous window.
If necessary, adjust delivery quantities as follows from the Direct Delivery Detail window:
Click Adjust. The Re-Open the Delivery window opens asking, ”Are you sure you want to re-open the delivery?”
Click Yes. The delivery status is changed from Received to In Progress.
|
Note: This function is valid only after a delivery has been received. |
Complete the fields that are enabled:
Comments – Enter additional information about the delivery, if necessary.
Item – Enter the item number in the Item field by clicking Add Item, or click the Ellipsis button to open the Item Lookup window. This field may already have a value, if the information comes from the purchase order or an applied ASN, click Scanner to scan the item. See ”Scan an Item (Scanner Button)” in Chapter 2 for more information.
In the Item Lookup window, look up and select the item you want. Then click Apply to return to the Direct Delivery Identify window
Pack Size – If the displayed pack size is not correct, enter the correct pack size.
Shipped – If the number is not displayed, enter the number of delivery units or cases that were recorded for the shipment when it left the From location.
Ordered – Enter the number of units or cases that were ordered from the supplier.
Received – Enter the quantity of items that are being received, expressed in the designated UOM.
Damaged – The number of items that were damaged in the transfer.
UIN Qty – Change the UIN quantity if necessary.
Click Confirm to complete the transaction. The order is recognized as received. You return to the Direct Delivery List window.
Some retailers do not allow discrepancies in deliveries and SIM can be configured to support this process. If the delivery does not match the shipping documents, the delivery must be rejected.
|
Notes:
|
When a delivery is rejected, all quantities on the delivery are set to zero and the delivery status is set to Rejected. To reject a delivery, follow these steps:
Click Reject.
You receive a prompt asking whether you really want to reject the delivery.
Click Yes.
The delivery is rejected, and you return to the Direct Delivery List window.
If serial number type unique identification numbers (UIN) are required for the items in a delivery, the UINs must be scanned or entered manually.
Receive All sets the status of the integrated UINs to In Receiving for the delivery. In addition, a validation check is performed to ensure the quantity matches the serial numbers for items, if that is not the case, Receive all is not allowed.
To enter UINs for the delivery, see "Updating UINs".
Navigate: Main Menu > Shipping/Receiving > Direct Delivery. The Direct Delivery List window opens.
To print a Direct Delivery Report, follow these steps:
Select the delivery from the list.
Click Print. The Report Selection window opens.
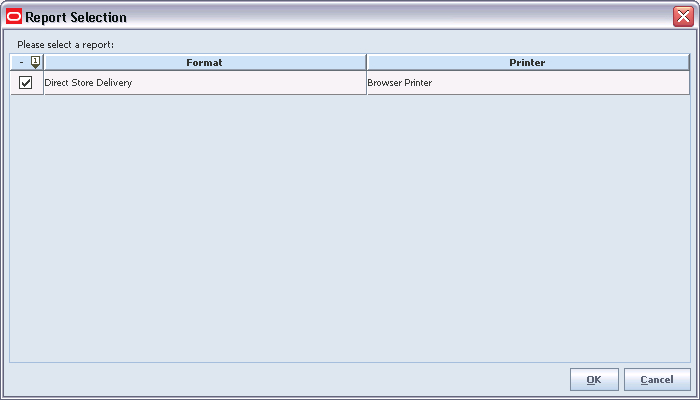
In the Printer field, select the printer you want to use.
(See ”Print or View SIM Reports and Other Output” in Chapter 2 for general information about SIM report output.)
Click OK. A message informs you that the Direct Delivery Report was printed.
Click OK.