| Oracle® Retail Store Inventory Management User Guide Release 14.1 E53429-01 |
|


 Previous |
 Next |
| Oracle® Retail Store Inventory Management User Guide Release 14.1 E53429-01 |
|
Previous |
Next |
Use Warehouse Delivery to receive merchandise from a company-owned warehouse that is an approved shipping location for a receiving store. You can receive against an Advance Shipping Notice (ASN), at the ASN level, by the container, or by the case or item. Inventory adjustment records can be written for missing and damaged items. Large deliveries can remain in In Progress status until all items can be received.
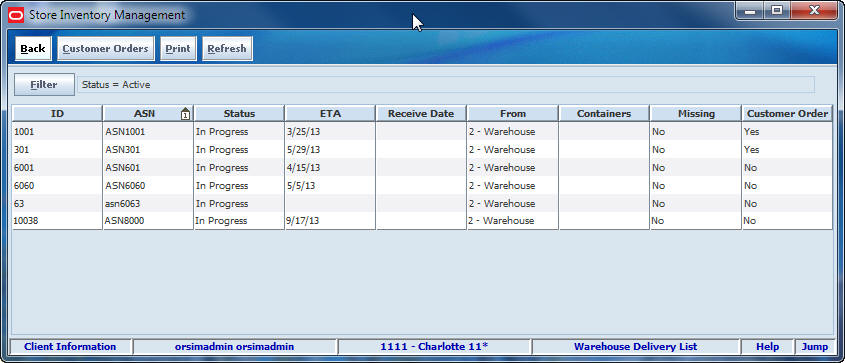
The Warehouse Delivery List window displays shipments expected because of transfers and allocations.
Warehouse Delivery List Window
Navigate: Main Menu > Shipping/Receiving > Warehouse Delivery. The Warehouse Delivery List window opens.
From the Warehouse Delivery List window, you can do the following:
From the Warehouse Delivery List window, click Back to return to the Shipping/Receiving menu.
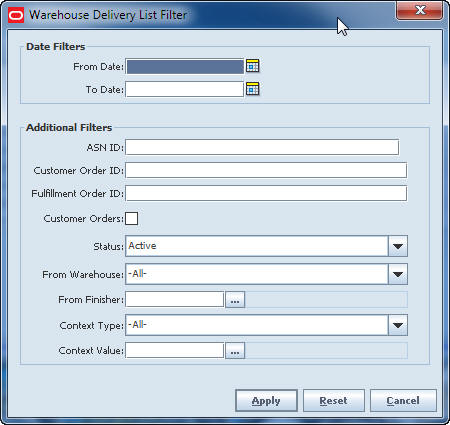
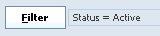
Whenever the Warehouse Delivery List window is displayed, you can filter the list to limit the deliveries listed. If the list is currently filtered, the filtering is shown next to the Filter button.
To filter the list of deliveries or to change the current filtering, follow these steps:
In the Warehouse Delivery List window, click Filter. The Warehouse Delivery List Filter window opens.
Enter or select search values as needed to specify the item requests that you want to list. All values are optional. If you leave a field blank or select All, all values are included in the search.
Date Filters – Enter or select From Date and To Date values to select those deliveries with an estimated time of arrival between the dates you specify.
ASN ID – Enter the ASN number to select only those deliveries related to a specific ASN.
Customer Order ID – Enter the customer order number to select only those deliveries related to a specific customer order.
Fulfillment Order ID – Enter the fulfillment order number to select only those deliveries related to a specific fulfillment order.
Customer Orders – Select this check box to select for customer orders only.
Status – Select Active, In Progress, New, Received, or All. The default is Active.
From Warehouse – Select a warehouse from the drop-down list.
From Finisher – Enter a finisher in the Finisher field, or select the Ellipses to search for a finisher.
Context Type – Select a context type from the drop-down list.
Context Value – Enter a context value in the Context Value field, or select the Ellipses to search for a context value.
Click Apply. You return to the Warehouse Delivery List window, where your filter has been applied.
Use this function to record warehouse deliveries.
Navigate: Main Menu > Shipping/Receiving > Warehouse Delivery. The Warehouse Delivery List window opens.
To receive a shipment, follow these steps:
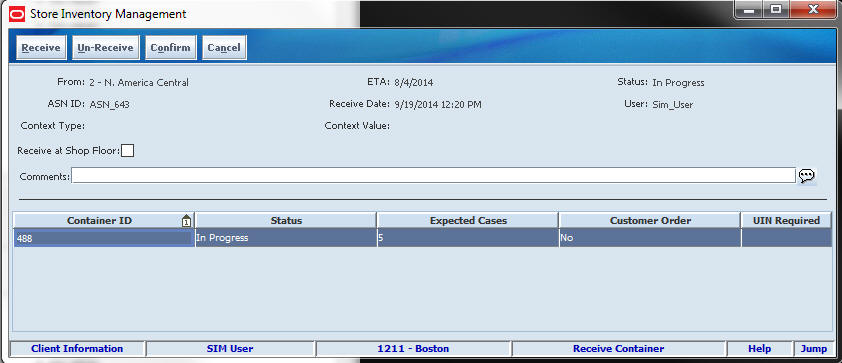
Double-click a container to select it. The Receive Container window opens.
Receive at Shop Floor: Select to indicate whether the delivery will be received on the shop floor instead of automatically receiving into the back room. This allows the user to Top off the shop floor first, depending how it is configured.
For each container, the Receive Container window lists the following:
Container ID number
Status
Number of expected cases in the container
Customer order
Whether unique identification numbers (UIN) are required for items in the container. If UINs are required, a check mark appears in the UIN Required field. It also indicates this delivery has UIN enabled items.
Edit quantities or record damages:
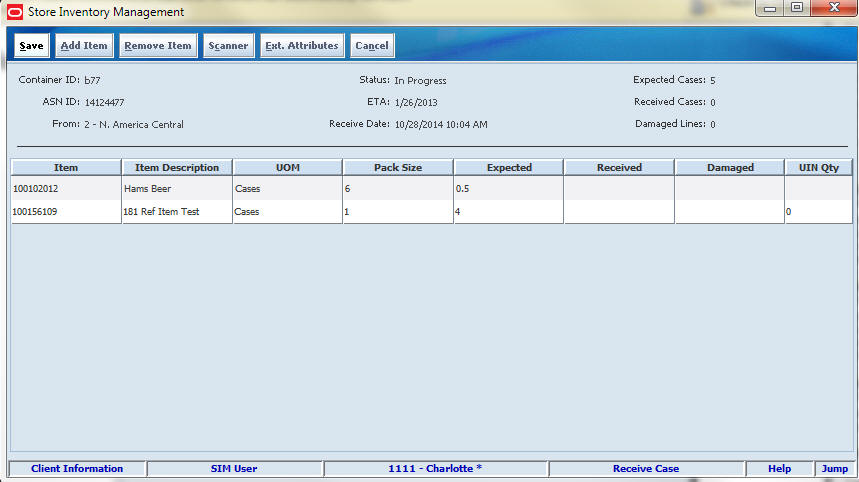
Double-click a container to select it. The Receive Case window opens.
Update any of these enabled fields as needed:
UOM – From the drop-down list, select the unit of measure.
Received – Enter the quantity of received units.
Damaged – Enter the quantity of damaged units.
If necessary, add an item that is not listed on the shipment, delete an item, or edit delivery quantities.
Add an item:
Click Add Item.
Update any of these enabled fields as needed:
Item – Enter the item, or select an item using by clicking the Ellipses.
UOM – From the drop-down list, select the unit of measure.
Received – Enter the quantity of received units.
Damaged – Enter the quantity of damaged units.
Scan an item:
Click Scanner to scan the item. See ”Appendix 2” in Chapter 2 for more information.
Remove items that you added:
Select the items.
Click Remove Item.
Edit delivery:
Click Adjust. The delivery status is changed from Received to In Progress.
Update any of these enabled fields as needed:
Received – Enter the quantity of received delivery units.
Damaged – Enter the quantity of damaged delivery units.
UOM – From the drop-down list, select the appropriate unit of measure.
|
Note: If items with auto-generated serial number (AGSN) type UINs are included in the delivery, the AGSNs are generated when you click Save. The AGSNs are not displayed in this window. |
Click Confirm to change the status of the delivery to Received.
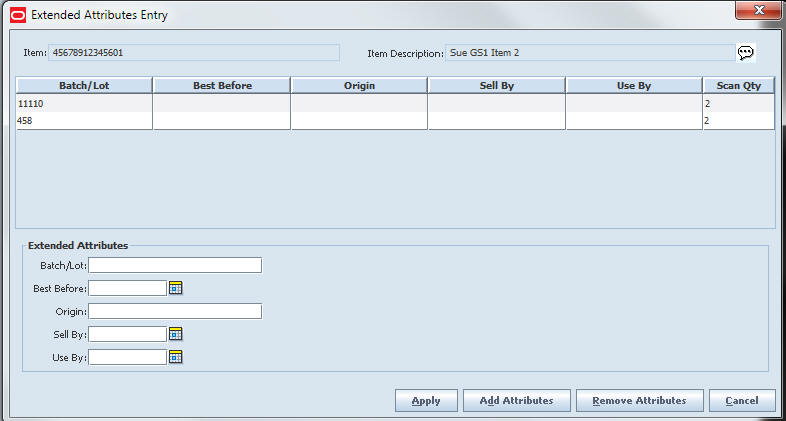
Add Ext Attributes:
To update the Extended Attributes, select a row and click Ext. Attributes. The Extended Attributes window opens. This window captures additional information about an item.
|
Note: The Extended Attributes Entry window view may vary, depending upon customer chosen attributes. |
Enter/select the field options.
Click Add Attributes to add the additional attributes to the item.
Click Apply to save the changes and return to t he previous window.
Select the shipment, container, or cases to receive:
To receive everything listed on the Receive Container window, do not select any items.
To receive a container, select the line that you want to receive.
|
Note: If you have not selected a line, a message is displayed: "Would you like to receive the entire delivery?" Click Yes to receive the entire delivery, or No to go back to the Receive Container window, where you can select a container. |
Click Receive. The status changes to Received.
|
Note: When receiving an ASN with pre-populated UINs, you can receive the entire delivery or container without an error message, if the number of UINs match the expected quantity. |
|
Note: To reverse a receipt, select Un-Receive. A message is displayed: ”Would you like to Un-Receive all containers on the delivery?” Click Yes to reverse the receipt. You can also reverse the receipt of individual containers by selecting the container and then clicking Un-Receive. |
Save or complete the transaction.
To save the transaction so you can edit it later, click Save. You return to the Warehouse Delivery List window.
To complete the transaction:
Click Confirm. A message is displayed: ”This delivery will be received and cannot be changed. Do you want to continue?”
Click Yes to confirm the receipt. You return to the Warehouse Delivery List window.
If unique identification numbers (UIN) are required for the items in a delivery, the UINs must be scanned or entered manually.
To enter UINs for the delivery, see "Updating UINs".
Click Apply to save your changes and return to the Receive Container window.
|
Note: The quantity needs to match the number of serial numbers for the items. |
Navigate: Main Menu > Shipping/Receiving > Warehouse Delivery. The Warehouse Delivery List window opens.
To print a Warehouse Delivery Report, follow these steps:
Select the delivery from the list.
Click Print. The Report Selection window opens.
In the Printer field, select the printer you want to use.
(See ”Print or View SIM Reports and Other Output” in Chapter 2 for general information about SIM report output.)
Click OK. A message informs you that the Warehouse Delivery Report was printed.
Click OK.