| Oracle® Retail Item Planning Configured for COE User Guide for the RPAS Fusion Client Release 14.1 E55951-01 |
|

 Previous |
 Next |
| Oracle® Retail Item Planning Configured for COE User Guide for the RPAS Fusion Client Release 14.1 E55951-01 |
|
Previous |
Next |
Use the Monitor and Adjust Item Plans task to seed the new price plan from the Review and Accept Price Plans task into the associated Wp measures.
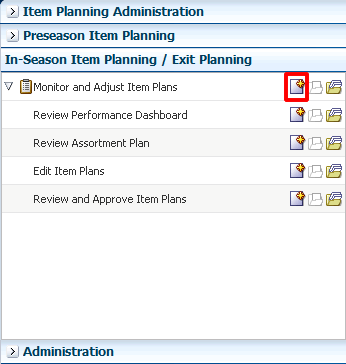
In Monitor and Adjust Item Plan task has five steps:
This task and steps are shown in Figure 9-1.
To build the Monitor and Adjust Item Plans workbook, perform the following steps:
Click the Create New Workbook icon in the Monitor and Adjust Item Plans task.
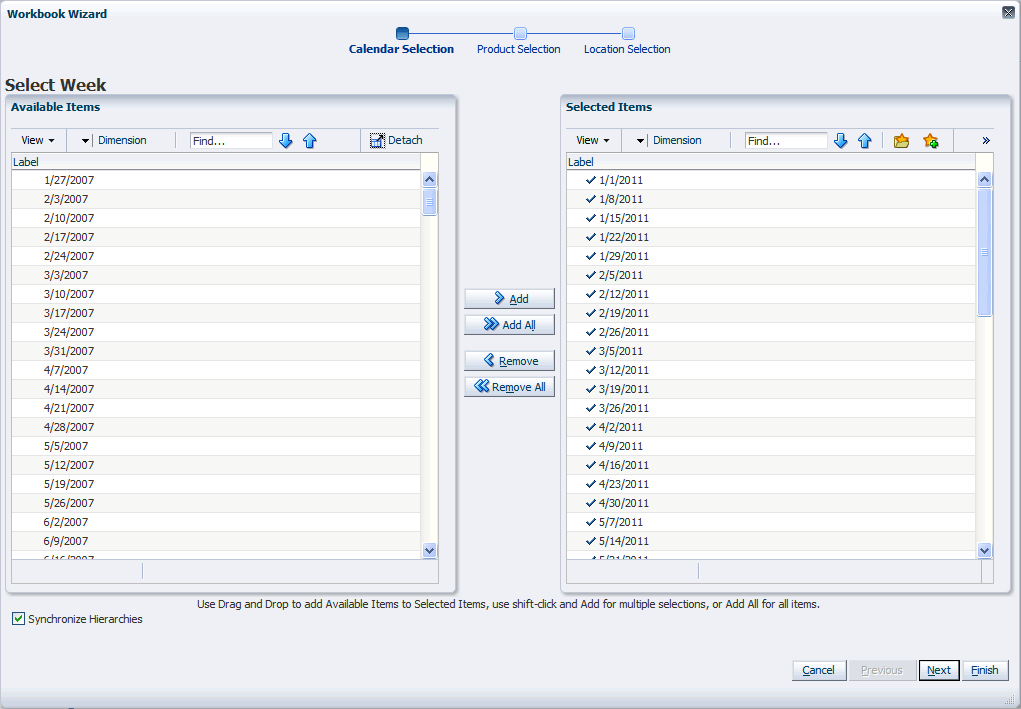
The workbook wizard opens at the Calendar Selection step. Select the weeks that you want to plan and move them to the Selected Items box. Click Next.
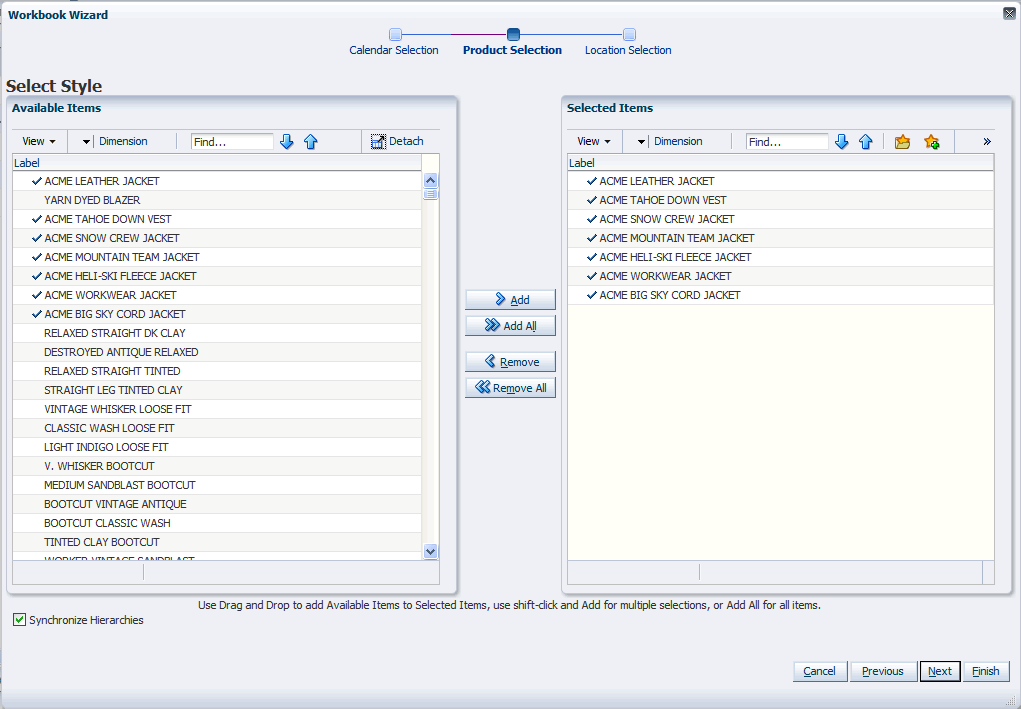
The Product Selection step of the workbook wizard appears. Select the styles you want to plan and move them to the Selected Items box. Click Next.
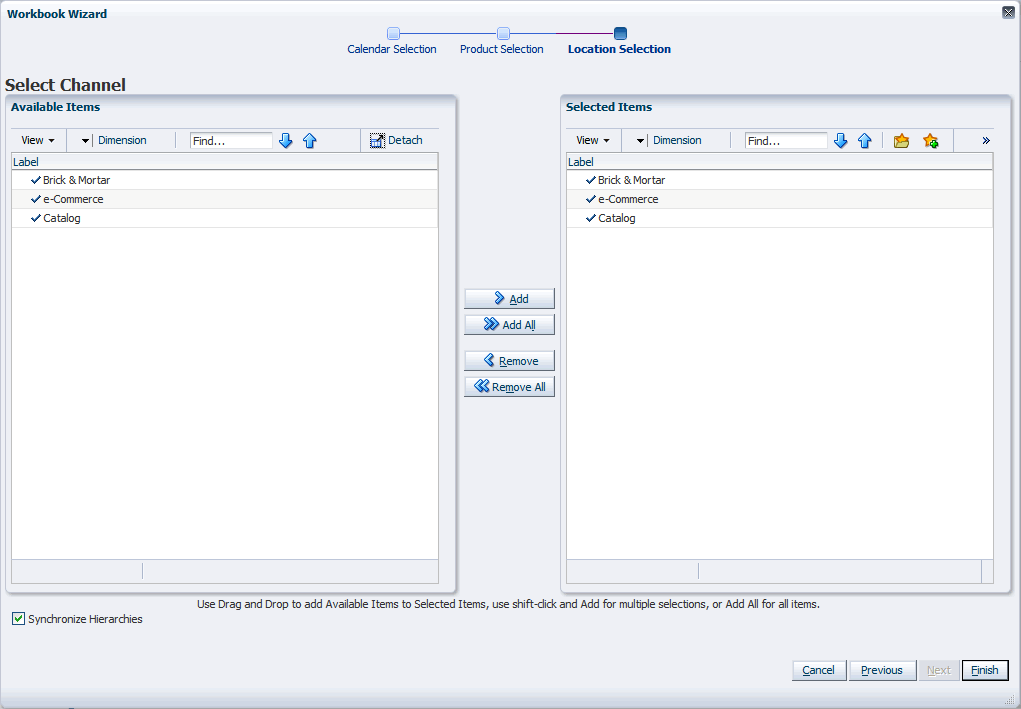
The Location Selection step of the workbook wizard appears. Select the channels you want to plan and move them to the Selected Items box. Click Finish.
The Monitor and Adjust Item Plans workbook is built, and the Dashboard View opens.
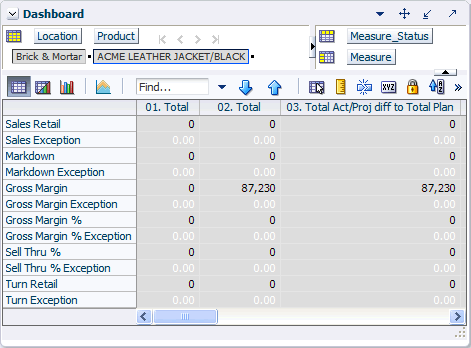
Use the views in this step to review the lifecycle of the style/color as it was setup in the Develop and Approve Item Plans task. This step has two views:
Use the dashboard view for a quick overview of each style/color's data.
The exception measures in this view highlight data that falls within or outside of the bounds set in the next view.
Table 9-1 lists the measures available on this view.
Table 9-1 Dashboard View Measures
| Measure | Description |
|---|---|
|
Sales Retail |
The Retail value of Sales. |
|
Sales Exception |
The Sales exception that is highlighted per the user-defined upper and lower bound limits. |
|
Markdown |
Total Markdowns Retail . |
|
Markdown Exception |
The Markdown exception that is highlighted per the user-defined upper and lower bound limits. |
|
Gross Profit |
Gross Profit Retail. |
|
Gross Profit Exception |
The Gross profit result that is highlighted per the user-defined upper and lower bound limits. |
|
Gross Profit % |
Gross Profit Rate. |
|
Gross Profit Exception |
The Gross profit % result that is highlighted per the user-defined upper and lower bound limits. |
|
Sell Thru % |
The rate at which sales units are moved through beginning of period inventory. |
|
Sell Thru % Exception |
The Sell through % exception that is highlighted per the user-defined upper and lower bound limits. |
|
Turn Retail |
Cumulative Turnover representing the frequency which Inventory is sold and replaced over a stated time period. |
|
Turn Exception |
The turn exception that is highlighted per the user-defined upper and lower bound limits. |
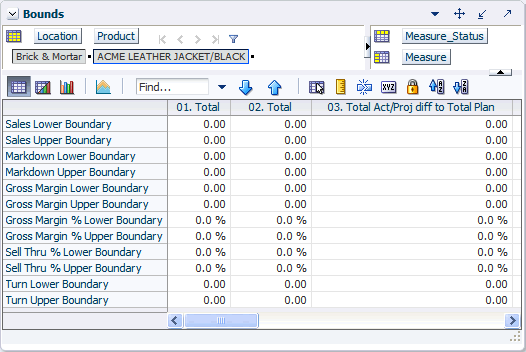
This view allows you to set the upper and lower bounds for sales, markdown, gross profit, sell through, and turn.
Table 9-2 lists the measures available on this view.
Table 9-2 Bounds View Measures
| Measure | Description |
|---|---|
|
Sales Lower Bound |
User-defined sales lower limit. If the sales of any style/color is below this threshold, it is highlighted in the Dashboard view as an exception. |
|
Sales Upper Bound |
User-defined sales upper limit. If the sales of any style/color is above this threshold, it is highlighted in the Dashboard view as an exception. |
|
Markdown Lower Bound |
User-defined markdown lower limit. If the markdown of any style/color is below this threshold, it is highlighted in the Dashboard view as an exception. |
|
Markdown Upper Bound |
User-defined markdown upper limit. If the markdown of any style/color is above this threshold, it is highlighted in the Dashboard view as an exception. |
|
Gross Profit Lower Bound |
User-defined gross profit lower limit. If the gross profit of any style/color is below this threshold, it is highlighted in the Dashboard view as an exception. |
|
Gross Profit Upper Bound |
User-defined gross profit upper limit. If the gross profit of any style/color is above this threshold, it is highlighted in the Dashboard view as an exception. |
|
Gross Profit % Lower Bound |
User-defined gross profit percentage lower limit. If the gross profit percentage of any style/color is below this threshold, it is highlighted in the Dashboard view as an exception. |
|
Gross Profit % Upper Bound |
User-defined gross profit percentage upper limit. If the gross profit percentage of any style/color is above this threshold, it is highlighted in the Dashboard view as an exception. |
|
Sell Thru % Lower Bound |
User-defined sell through percentage percentage lower limit. If the sell through percentage of any style/color is below this threshold, it is highlighted in the Dashboard view as an exception. |
|
Sell Thru % Upper Bound |
User-defined sell through percentage upper limit. If the sell through percentage of any style/color is above this threshold, it is highlighted in the Dashboard view as an exception. |
|
Turn Lower Bound |
User-defined turn percentage lower limit. If the turn of any style/color is below this threshold, it is highlighted in the Dashboard view as an exception. |
|
Turn Upper Bound |
User-defined turn percentage upper limit. If the turn of any style/color is above this threshold, it is highlighted in the Dashboard view as an exception. |
After you have reviewed the dashboard, continue to the Review Assortment Plan Step.
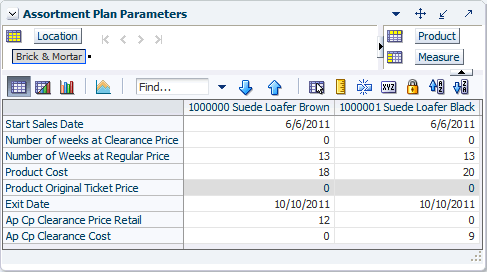
The Review Assortment Plan step has two views:
If you do not use Assortment Planning, continue to the Edit Item Plans Step.
Review the views in the Assortment Plan step if you have loaded data from the Assortment Planning application.
Table 9-3 lists the measures available on this view.
Table 9-3 Assortment Plan Parameters View Measures
| Measure | Description |
|---|---|
|
Product Original Ticket Price |
Initial retail of product. |
|
Product Cost |
The cost of the product. |
|
Start Sales Date |
The date the product is expected to start selling. |
|
Number of weeks at Clearance Price |
Number of weeks the item is expected to sell at Clearance Price. |
|
Number of Weeks at Regular Price |
Number of weeks the item is expected to sell at Regular Price. |
|
Exit Date |
The date that the product should be removed from the sales floor. |
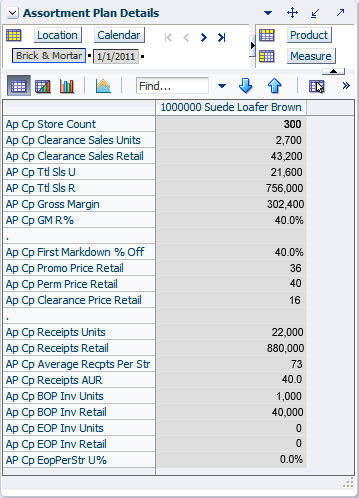
Use the Assortment Plan Details view to see the plan that was created in the Assortment Planning application for the same style-colors you are planning.
Table 9-4 lists the measures available on this view.
Table 9-4 Assortment Plan Details View Measures
| Measure | Description |
|---|---|
|
Ap Cp Store Count |
The number of stores for which this style/color is planned for in the approved plan from the Assortment Planning application. |
|
Ap Cp Clearance Sales Units |
Assortment Planning Current Plan Clearance Sales units. |
|
Ap Cp Clearance Sales Retail |
Assortment Planning Current Plan Clearance Sales retail. |
|
Ap Cp Ttl Sls U |
Assortment Planning Current Plan Total Sales Units. |
|
Ap Cp Ttl Sls R |
Assortment Planning Current Plan Total Sales Retail. |
|
AP Cp Gross Margin |
Assortment Planning Current Plan Gross Margin. |
|
Ap Cp GM R% |
Assortment Planning Current Plan Gross Margin rate. |
|
Ap Cp First Markdown % Off |
Initial Markdown Taken expressed as a rate. |
|
Ap Cp Promo Price Change % |
Assortment Planning Current Plan Promotional Price Change %. |
|
Ap Cp Perm Price Change % |
Permanent Price Change expressed as a rate. |
|
Ap Cp Clearance Price Retail |
Assortment Planning Current Plan Clearance Price Change %. |
|
Ap Cp Receipts Units |
Receipts expressed as Units. |
|
Ap Cp Receipts Retail |
Assortment Planning Current Plan Receipts Retail. |
|
AP Cp Average Recpts Per Str |
Assortment Planning Current Plan Average Receipts per store. |
|
AP Cp Receipts AUR |
Assortment Planning Current Plan Receipts Average Unit Retail. |
|
Ap Cp BOP Inv Units |
The Beginning of Period inventory units from Assortment Planning's current plan. |
|
Ap Cp BOP Inv Retail |
The Beginning of Period inventory retail from Assortment Planning's current plan. |
|
Ap Cp EOP Inv Retail |
The End of Period inventory retail. |
|
Ap Cp EOP Inv Units |
The End of Period inventory units. |
|
AP Cp EopPerStr U% |
Assortment Planning Current Plan End of Period Per Store Unit %. |
After you have reviewed the parameters from the Assortment Planning application, continue to the Edit Item Plans Step to edit your own parameters.
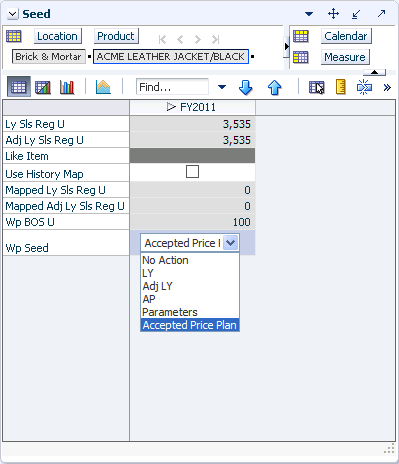
Use this view to seed the accepted price plan that you created in the Review and Accept Price Plans task. This step has one view: Seed.
Use this view to seed the item plan with the accepted price plan. To do this, select Accepted Price Plan as the seed source. The working plan measures of the selected style/colors are updated based on the planned sales units (regular and clearance) of the accepted price plans. All other item planning measures, such as shrink, margin, profit, and so on, are recalculated.
Table 9-5 lists the measures available on this view.
Table 9-5 Seed View Measures
| Measure | Description |
|---|---|
|
Ly Sls Reg U |
The regular units from last year's sales. |
|
Adj Ly Sls Reg U |
The adjusted regular units from last year's sales. |
|
Like Item |
The style/color that you mapped the current style/color to in the Maintain Item and Store Attributes task. |
|
Use History Map |
Select this option to use the history of the style that you mapped the current style to in the Maintain Item and Store Attributes task. |
|
Mapped Ly Sls Reg U |
The regular units from last year's sales of the like item. |
|
Mapped Adj Ly Sls Reg U |
The adjusted regular units from last year's sales of the like item. |
|
Wp BOS U |
The planned Beginning of Season total units. |
|
Wp Seed |
The source used to seed the working plan. Use the dropdown to select the source to use for seeding. |
To seed the plan, perform the following steps:
Roll the calendar hierarchy up to year.
Select the style/color you want to seed in the product hierarchy.
In the Wp Seed measure, choose the Accepted Price Plan option.
Select Use Hist Map if you want to use the data of the like item shown in the Like Item measure.
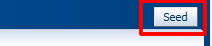
When you have selected all the data you want to seed, click the Seed button in the upper right corner.
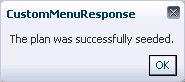
A confirmation message appears, stating that the data has been successfully seeded. Click OK.
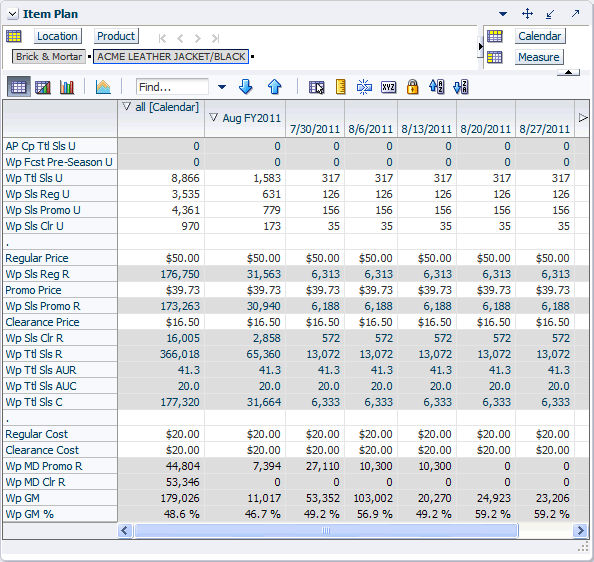
After you have seeded, continue to the Edit Item Plans Step to review the plan.
This step has one view: Item Plan. Use this view to review and edit the item plan.
After you are satisfied with the sales plan, continue to the Review and Approve Item Plans Step.
After you have edited the sales and margin and receipts and inventory plans, compare them to the plans created in the Merchandise Financial Planning (MFP) application. Once you have reviewed the plans, approve them in the Plan Approval view.
This step includes views that are similar to the Review and Approve Item Plans Step in the Develop and Approve Item Plans task. For more information, see Review and Approve Item Plans Step.