| Oracle® Retail Point-of-Service Installation Guide Release 14.1 E54459-01 |
|

 Previous |
 Next |
This chapter provides information about the installation procedures for the Mobile Point-of-Service server. For a list of tested components and supported versions, see Chapter 1.
During installation, the Mobile Point-of-Service server application will be deployed to an Oracle WebLogic Server domain. When the domain was created, the JDK was selected. This is the JDK that is used to run the Mobile Point-of-Service server application. For the remainder of this chapter, the JDK installation directory is referred to as <JDK_INSTALL_DIR>.
This chapter also includes information on setting up the Mobile POS application on the mobile device. See "Mobile POS Application".
If using the RSA Data Protection Manager, WebLogic needs to be updated for the RSA jars and log4j jar. The RSA jar files must be obtained from your provider for the RSA Data Protection Manager. The following RSA and log4j jar files need to be added:
cryptojce.jar
cryptojcommon.jar
jcm.jar
jcmFIPS.jar
kmsclient.jar
LB.jar
LBJNI.jar
sslj.jar
log4j-1.2.17.jar
To set up the jars to use RSA Data Protection Manager:
Copy the RSA jar files and the log4j.jar file to the appropriate directories.
Set the CLASSPATH:
To set the CLASSPATH for Microsoft Windows, edit commEnv.cmd in the <WebLogic_HOME>\wlserver_10.3\common\bin directory:
PRE_CLASSPATH=%MODULES_DIR%\javax.persistence_2.1.0.v201304241213.jar;%MODULES_DIR%/eclipselink.jar;<RSA_JARS_LOCATION>\cryptojce.jar;<RSA_JARS_LOCATION>\cryptojcommon.jar;<RSA_JARS_LOCATION>\jcm.jar;<RSA_JARS_LOCATION>\jcmFIPS.jar;<RSA_JARS_LOCATION>\kmsclient.jar;<RSA_JARS_LOCATION>\LB.jar;<RSA_JARS_LOCATION>\LBJNI.jar;<RSA_JARS_LOCATION>\sslj.jar;<APACHE_JARS_LOCATION>\log4j-1.2.17.jar
To set the CLASSPATH for Novell SLEPOS, edit commEnv.sh in the <WebLogic_HOME>/wlserver_10.3/common/bin directory:
PRE_CLASSPATH="${MODULES_DIR}/javax.persistence_2.1.0.v201304241213.jar:${MODULES_DIR}/eclipselink.jar:<RSA_JARS_LOCATION>/cryptojce.jar:<RSA_JARS_LOCATION>/cryptojcommon.jar:<RSA_JARS_LOCATION>/jcm.jar:<RSA_JARS_LOCATION>/jcmFIPS.jar:<RSA_JARS_LOCATION>/kmsclient.jar:<RSA_JARS_LOCATION>/LB.jar:<RSA_JARS_LOCATION>/LBJNI.jar:<RSA_JARS_LOCATION>/sslj.jar:<APACHE_JARS_LOCATION>/log4j-1.2.17.jar"
After setting the variable, look on the console and make sure the jars are added to the CLASSPATH. If they are not added, shut down WebLogic and add the jars to the WEBLOGIC_CLASSPATH variable in the same file. Put the jar files ahead of the WebLogic jar files.
You can skip this section if you are manually redeploying to an existing domain.
The Mobile Point-of-Service server application must be deployed to its own dedicated domain. For information on how to perform the following steps, consult your Oracle WebLogic Server documentation.
Each server instance in your WebLogic environment must have a unique name, regardless of the domain in which it resides. Within a domain, each server, machine, virtual host, and any other resource type must be named uniquely and must not use the same name as the domain.
|
Note: Back Office, Central Office, Returns Management, and the Mobile Point-of-Service server must have all unique domain names and server names in order to integrate successfully. |
The WebLogic Server enables you to establish global trust between two or more domains. You do this by specifying the same Domain Credential for each of the domains. By default, the Domain Credential is randomly generated and therefore, no two domains have the same Domain Credential. During installation, the WebLogic domain credential is configured to the value entered in the Domain Details installer window. For more information, see Figure C-19.
|
Note: All domains running Oracle Retail applications must have the same domain credentials. |
Mobile Point-of-Service is accessed through a secure HTTP connection. Enable the Secure Sockets Layer (SSL) when creating the domain and set the listen port and SSL list port number so that the numbers are unique for each domain in your configuration.
Verify that the domain's administrative server is started and in running mode.
In addition to specific steps previously described, you can use the following steps to create a new domain using the WebLogic Configuration Wizard:
Log on to the server, which is running your WebLogic installation, as the user who owns the WebLogic installation.
Launch the Weblogic Configuration Wizard.
Select Create a new WebLogic Domain. The domain can be a basic WebLogic server domain.
Choose a unique name for the new domain. In the remainder of this installation guide, <ormpos-domain> is used for the name.
Configure the administrator user name and password.
Configure the server start mode and JDK.
Configure the Administration Server.
Before launching the Mobile Point-of-Service installer:
Start the Administration Server.
Verify that the domain's Administration Server is started and in running mode.
WebLogic can be run in production mode or development mode.
When a domain is created in development mode using the Configuration Wizard, a boot identity file, named boot.properties, is created in the Administration Server's root directory. The boot identity file contains an encrypted version of the user name and password which lets you bypass the login prompt during instantiations of the server. In production mode, WebLogic prompts for credentials on the command line.
To install the Mobile Point-of-Service server on a domain using production mode, you must first create a boot identity file so that the Administration Server can bypass the prompt for user name and password when the installer restarts the server.
Consult your WebLogic documentation for more information and options for creating boot identity files. Following is an example of one method, that can be used after domain creation, to create the boot identity file:
Start the Administration Server at least once and provide the user credentials on the command line.
Create the Administration Server's security directory, if it does not already exist.
<WEBLOGIC_INSTALL_DIR>/user_projects/domains/<ormpos-domain>/servers/<AdminServerName>/security
Place the following two lines in a file named boot.properties in the security directory:
password=<password>
username=<username>
|
Note: There should be no spaces on either side of the equal sign. |
Stop and restart the Administration Server to verify that the credential prompts are bypassed.
To extract the Mobile Point-of-Service files:
Extract the Mobile Point-of-Service Release 14.1 distribution zip file.
Create a new staging directory for the Mobile Point-of-Service application distribution ORMPOS-14.1.zip file, for example, c:\tmp\ormpos\ormpos-staging.
|
Note: The staging area (<staging_directory>) can exist anywhere on the system. It does not need to be under tmp. |
Copy or upload ORMPOS-14.1.zip to <staging_directory> and extract its contents. The following files and directories should be created under
<staging_directory>\ORMPOS-14.1:
ant\
ant-ext\
antinstall\
connectors\
installer-resources\
mobilepos\
.postinstall.cmd
.postinstall.sh
.preinstall.cmd
.preinstall.sh
antinstall-config.xml
build.xml
build-antinstall.xml
build-common.xml
build-common-esapi.xml
build-common-oas.xml
build-common-retailinv.xml
build-common-was.xml
build-common-webapps.xml
build-common-wl.xml
checkdeps.cmd
checkdeps.sh
install.cmd
install.sh
prepare.xml
wallet.xml
For the remainder of this chapter, <staging_directory>\ORMPOS-14.1 is referred to as <INSTALL_DIR>.
In the Integrate Applications window, you select the applications that the Mobile Point-of-Service server is integrated with. See Figure C-39. If Central Office is selected in the window, that application must be running in order for the Mobile Point-of-Service files to be installed correctly.
Commerce Anywhere enables retailers to integrate with e-commerce and order management solutions for processing customer transactions in stores and through web applications.
In the Enable Commerce Anywhere installer window, you select whether integration with Commerce Anywhere is enabled. See Figure C-39.
For more information on Commerce Anywhere, see the following documents available through My Oracle Support. Access My Oracle Support at the following URL:
https://support.oracle.com
Oracle Retail Commerce Anywhere Technical Integration Solution (Doc ID: 1598187.1)
This set of architectural diagrams and related business processes depict the Commerce Anywhere solution and its major integration points. The conceptual representation that is depicted is intended to support an integrated implementation of an Oracle Retail Commerce Anywhere solution that includes Oracle Retail Merchandising System, Oracle Retail Store Inventory Management, Oracle Retail Warehouse Management System, Oracle Retail POS Suite, and Oracle Retail Advanced Inventory Planning.
Oracle Retail Commerce Anywhere Functional White Papers (Doc ID: 1598177.1)
This library contains a collection of white papers that outline functional aspects of the Commerce Anywhere solution in Oracle Retail applications. One document provides an overview of the solution from an enterprise perspective, and it is accompanied by product specific-papers addressing Oracle Retail Merchandising System, Oracle Retail Store Inventory Management, Oracle Retail Warehouse Management System, Oracle Retail POS Suite, and Oracle Retail Advanced Inventory Planning.
Communication with the database and communication between the store server and registers can be secured. When running the installer for a server, you select whether secure JDBC will be used for communication with the database and whether secure RMI will be used for communication with the store server.
If Yes is selected in the Enable Secure JDBC window, the installer sets up the secure JDBC. If you do not select this and you want to manually set up the secure JDBC after the installer completes, see the Oracle Retail POS Suite Security Guide. See Figure C-9.
If Yes is selected on the Enable Secure Client RMI, the installer sets up the secure RMI. If you do not select this and you want to manually set up the secure JDBC after the installer completes, see the Oracle Retail POS Suite Security Guide. See Figure C-49.
Accountability determines whether one or more than one operator can be assigned to a till on a given business day. Each register associated with a mobile device must be configured to use register accountability.
This configuration is stored in the Accountability Code column (cd_act) of the Workstation database table (as_ws). Run the following SQL statement for each register ID associated with a Unique Vendor Identifier (UVID). In this example, the register ID is 200, the store id is 04241, and the accountability code is 0 (Register).
update as_ws set cd_act='0' where id_ws='200' and id_str_rt='04241';
A register is associated with a UVID in the Mobile Device Configuration window. See Figure C-35.
If you are using the RSA Data Protection Manager, you must do the following:
You must provide the installer with the name and location of the configuration property file in the RSA Client Configuration window. See Figure C-16. For detailed information on the content of this file, see the Java client documentation provided by your provider for the RSA Data Protection Manager.
You must obtain the required jar files from your RSA Data Protection Manager provider. You provide the location of the jar files in the RSA Client JAR Files window. See Figure C-15. The directory for the jar files must contain only the RSA Java client jar files.
Lockbox is an RSA feature the provides protection for RSA configuration information. Obtain these libraries from your RSA Data Protection Manager.
You must also update the path variable for the lockbox libraries. For Microsoft Windows, update the PATH variable. For Novell SLEPOS, update the LD_LIBRARY_PATH variable.
You must update the security for your JRE. You need to obtain version 6.0 of the Java Cryptography Extension (JCE) Unlimited Strength Jurisdiction Policy Files.
Make a backup copy of local_policy.jar and US_export_policy.jar:
cd<WEBLOGIC_INSTALL_DIR>/<jdk>/jre/lib/securitymv local_policy.jar local_policy.jar.bakmv US_export_policy.jar US_export_policy.jar.bak
Download version 7 of the JCE:
Go to the following web site:
http://www.oracle.com/technetwork/java/javase/downloads/index.html
Under Additional Resources, find Java Cryptography Extension (JCE) Unlimited Strength Jurisdiction Policy Files 7.
Click Download.
Follow the instructions to download the JCE.
Copy the local_policy.jar and US_export_policy.jar files into the JRE security directory. The files are bundled as UnlimitedJCEPolicyJDK7.zip.
A WebLogic Server domain must be configured and started before you can run the Mobile Point-of-Service server installer. This installer will configure and deploy the Mobile Point-of-Service server.
This installer will configure and deploy the Mobile Point-of-Service server.
Change to the <INSTALL_DIR> directory.
Set the JAVA_HOME environment variable to the location of the Java JRE used by the WebLogic Server instance for the Mobile Point-of-Service server.
|
Note: The installer is not compatible with versions of Java earlier than Java 7. |
When installing the server, set the account of the user running the installer to run as an administrator. Set the account using Microsoft Windows 2012 Server.
Run the install.cmd script. This will launch the installer. After installation is complete, a detailed installation log file is created at
<ORMPOS_install_directory>\ormpos-install-yyyyMMddHHmm.log
In the log file name, yyyyMMddHHmm is the timestamp of the install.
|
Note: The typical usage for GUI mode does not use arguments.install.cmd |
If the application installer encounters any errors, you can see them in the above mentioned log file.
For a list of common installation errors, see Appendix F.
You can choose to disable the non-SSL port in the Turn Off the Application Server's Non-SSL Port window. See Figure C-54. If you select Yes in the window, you must delete the transaction log files.
To delete the files:
Stop the application server.
Delete the transaction log files:
<ormpos-domain>\server\<serverName>\data\store\default/WLS*.dat
Start the application server.
For more information, see the following web site. Refer to the Moving a Server section.
http://download.oracle.com/docs/cd/E12839_01/web.1111/e13731/trxman.htm#i1053371
Skip this section if you chose the default option of allowing the installer to complete installation to the application server on the Manual Deployment Option window. See Figure C-52.
The installer includes the option to configure the application locally and skip deployment to the application server. If this option is chosen, the installer will make the configured application files available under
<INSTALL_DIR>\mobilepos\configured-output\.
If you chose this installer option, you complete the installation by following these steps:
To deploy using the ant target:
|
Note: The application server's non-SSL listen port must be enabled before running the ant target described here. The non-SSL listen port can be enabled using the WebLogic Admin Console. After these steps are completed, the non-SSL listen port can be disabled so the server can only be reached on the SSL listen port. |
Set the JAVA_HOME environment variable to the location of the Java JRE used by the WebLogic Server instance for the Mobile Point-of-Service server.
Update the following property in the ant.install.properties file.
input.install.to.appserver = true
Run the following ant target:
install.cmd ant init app-war-deploy -propertyfile ant.install.properties
To deploy from the application server console:
Set the JAVA_HOME environment variable to the location of the Java JRE used by the WebLogic Server instance for the Mobile Point-of-Service server.
Run the following target:
install.cmd ant init app-war-deploy
Deploy the ear file from the following location:
<INSTALL_DIR>\mobilepos\mobilepos.war
|
Note: When deploying the war file, provide the same application name and context root you gave to the installer. These values were stored in the<INSTALL_DIR>\ant.install.properties file by the installer. |
This section contains information for setting up the Mobile POS application for iOS and Android. The following information is included:
This section describes how to set up the Mobile POS Xcode project included in the Mobile Point-of-Service Release 14.1 distribution zip file.
The ORMPOS-14.1_client.zip file in the distribution zip file contains the Xcode projects used for building the Mobile POS Handheld iOS application that runs on iPod Touch (5th Generation) devices and Mobile POS Tablet iOS application that runs on iPad mini devices.
The following sections describe the steps needed to set up the project. The instructions are for an Apple computer, since Xcode runs only on Apple OS.
To extract the Xcode project:
Create a directory to hold the extracted contents of the ORMPOS-14.1_client.zip file.
Copy the ORMPOS-14.1_client.zip file into the new directory.
Unzip the file into the new directory.
Open the mobilepos directory, created in Step 3, by using mobilepos-14.1.xcodeproj.
Having obtained the Provisioning from Apple, change the Bundle Identifier and Team fields on XCode for each of the targets (mobilepos/mpft).
Navigate to the build settings and change the code signing to point to the iPhone Distribution obtained from Apple.
The mobilepos directory structure is a typical iOS application. This is a hybrid application in that most of the business logic and presentation are run in a web view, with most programming done in web technologies (HTML, CSS, and JavaScript) rather than native iOS Objective C. For best practices in extending, adding, and changing functionality and presentation in Mobile POS, see the Oracle Retail POS Suite Implementation Guide, Volume 5 - Mobile Point-of-Service.
Most application files are in the mobilepos/www directory, including the following:
HTML files used by the web view
JavaScript in the mobilepos/www/js directory. For the tablet, in the mobilepos/www/tablet/js directory. For the handheld, in the mobilepos/www/handheld/js directory.
CSS files for the tablet, in the mobilepos/www/tablet/css directory. CSS files for the handheld, in the mobilepos/www/handheld/css directory.
Translation bundles for the tablet, in the mobilepos/www/tablet/js/translations directory. Translation bundles for the handheld, in the mobilepos/www/handheld/js/translations directory.
Adding new JavaScript and CSS files to the project requires referencing those files in the mobilepos/www/tablet/index.html file for the tablet. For the handheld, reference those files in the mobilepos/www/handheld/index.html file.
Mobile POS also has an external dependency on the PhoneGap library, specifically PhoneGap 2.9.0.
To install the PhoneGap library:
Download the PhoneGap 2.9.0 package from the following web site:
http://phonegap.com/install
Unzip the PhoneGap 2.9.0 package that was downloaded in Step 1. This creates a directory named phonegap-2.9.0.
In Finder, navigate to phonegap-2.9.0/lib/ios/Cordovalib.
Double-click CordovaLib.xcodeproj to open the CordovaLib project in Xcode.
Within Xcode, click on the CordovaLib project in the Project Navigator.
Click the CordovaLib target in the main panel.
Click the Build Settings tab.
Select Product, Destination, and then iOS Device or the name of an attached iOS device.
Perform a clean and build of the product. This creates the PhoneGap 2.9.0 library, libCordova.a.
In the Project Navigator, expand the Products folder. Right click on libCordova.a and select Show in Finder. A new Finder window opens showing a directory with libCordova.a and a directory named include.
Copy include and libCordova.a to the mobilepos/lib/PhoneGap directory.
Navigate to phonegap-2.9.0/lib/ios/Cordovalib and copy the cordova.js file. Place it into the mobilepos/www/js directory.
Restart the mobilepos-14.1.xcodeproj file in the mobilepos directory. This opens the project in Xcode.
Do a clean-build to each of the targets against IOSDevice.
To use Mobile POS with a VeriFone VX600 sled, install the VeriFone sled framework:
Obtain the supported version of the VeriFone framework, 1.0.4.257, directly from VeriFone.
Unzip the package from Step 1. Inside, there should a directory named VMF.framework.
Copy the VMF.framework directory into the mobilepos/lib/NullSled directory. This overwrites the existing VMF.framework.
Restart the mobilepos-14.1.xcodeproj file in the mobilepos directory. This opens the project in Xcode.
Do a clean-build to each of the targets against IOSDevice.
To install the AJB Framework library:
Get the AJB.framework build 100 from AJB Software Design Inc. Following is the primary sales contact for obtaining the AJB Framework:
Pat Polillo
e-mail: ppolillo@ajbsoftware.com
phone: 905-238-4462
After unzipping theAJB framework provided by AJB, copy AJB.Framework to mobilepos. Drag the AJB.framework file on to the XCode Project Navigator section and drop it in the mobilepos/Frameworks directory. This should prompt you to select the targets to which references need to be added. Select both mobilepos and MPFT.
Under the mobilepos/Frameworks/MobilePOS.framework, uncomment the following line from MobilePOS.h:
#import "AJBPaymentProvider.h"
Under mobilepos/mobilepos/Classes, uncomment the following lines from AppDelegate.m:
#import "AJBPaymentProvider.h"
self.paymentProvider = [[AJBPaymentProvider alloc] init]; under runCustomtartUp
Under mobilepos/mobilepos/Plugins, uncomment the following lines from PaymentAcquisitionPlugin.m:
#import <AJB/FiPaySled.h>#import "AJBPaymentProvider.h"
From the isDeviceConnected function, uncomment all commented out lines. After uncommenting everything, it should look like the following:
- (void) isDeviceConnected:(NSMutableArray *)arguments withDict:(NSMutableDictionary *)options
{
    NSString *callback = [arguments pop];

    AppDelegate *appDelegate = (AppDelegate*)[[UIApplication sharedApplication] delegate];
    if (appDelegate.paymentProvider != nil &&

        [appDelegate.paymentProvider isMemberOfClass:[AJBPaymentProvider class]]) {
        AJBPaymentProvider *app =
 (AJBPaymentProvider*)appDelegate.paymentProvider;

        if (app.isDeviceConnected) {

            CDVPluginResult* pluginResult = [CDVPluginResult resultWithStatus:CDVCommandStatus_OK];
            [self writeJavascript: [pluginResult toSuccessCallbackString:callback]];
            return;

        } else {

            CDVPluginResult* pluginResult = [CDVPluginResult resultWithStatus:CDVCommandStatus_ERROR];
            [self writeJavascript: [pluginResult toErrorCallbackString:callback]];            return;

        }
    }
    else {
        CDVPluginResult* pluginResult = [CDVPluginResult resultWithStatus:CDVCommandStatus_OK];
        [self writeJavascript: [pluginResul toSuccessCallbackString:callback]];
        return;
    }

}
Go to finder and navigate to mobilepos/mobilepos/classes. Drag the AJBPaymentProvider.m on the Xcode under mobilepos/mobilepos/classes. This should prompt you to select the targets to which references need to be added. Select both mobilepos and MPFT. Once done, AJBPaymentProvider.m must be seen added to "compile Sources" under the respective targets(mobilepos/mpft) "Build Phases" tab.
From project navigator, Select mobilepos. For each of the targets, navigate to the Info tab. Under Custom iOS Target Properties, change the value of ActivePaymentFramework from blank to AJBPaymentProvider.
Right-click mobilepos/mobilepos/Resources/targets/mobilepos/Settings.bundle/Root.plist and open it as source code. Text needs to be added for each of the targets to configure the AJB payment host and port.
In Root.plist, add the text before the following code:
<dict>
    <key>Title</key>
    <string>Sled</string>
    <key>Type</key>
    <string>PSGroupSpecifier</string>
</dict>
Add the text, shown in the following example, for each of the targets to configure the AJB payment host and port. Add the text before the code shown in the previous example:
<dict>
                            <key>Title</key>
                        <string>Payment Server</string>
                        <key>Type</key>
                        <string>PSGroupSpecifier</string>
                </dict>
                <dict>
                            <key>AutocapitalizationType</key>
                            <string>None</string>
                            <key>AutocorrectionType</key>
                            <string>No</string>
                            <key>IsSecure</key>
                        <false/>
                        <key>Key</key>
                            <string>payment_host</string>
                            <key>KeyboardType</key>
                        <string>URL</string>
                            <key>Title</key>
                            <string>Payment Host</string>
                            <key>Type</key>
                            <string>PSTextFieldSpecifier</string>
                </dict>
                <dict>
                            <key>IsSecure</key>
                            <false/>
                        <key>Key</key>
                            <string>payment_port</string>
                            <key>KeyboardType</key>
                            <string>NumberPad</string>
                        <key>Title</key>
                        <string>Payment Port</string>
                            <key>Type</key>
                            <string>PSTextFieldSpecifier</string>
                </dict>
                <dict>
                            <key>IsSecure</key>
                            <false/>
                            <key>Key</key>
                        <string>payment_idle_timeout</string>
                            <key>KeyboardType</key>
                            <string>NumberPad</string>
                            <key>Title</key>
                            <string>Idle Timeout (seconds)</string>
                            <key>Type</key>
                            <string>PSTextFieldSpecifier</string>
                </dict>
Do a clean-build to each of the targets against IOSDevice.
To verify the build settings:
Double-click the mobilepos-14.1.xcodeproj file in the mobilepos directory. This opens the project in Xcode. There should be no build errors after opening the project if the PhoneGap library and VMF and Mobile POS frameworks are in the locations specified in the previous steps.
If there are build errors or warnings that Xcode cannot find any of those frameworks, verify their locations and update the Framework Search Path after any changes in framework location.
In the Xcode Navigator panel, click the mobilepos project. Then, in the Xcode main panel, click the mobilepos build target.
Scroll to Architectures. Set the value of Valid Architectures to armv7. Depending on your version of Xcode, the value of Valid Architectures may default to armv7 armv7s. However, armv7s is not a valid architecture for Mobile POS 14.1.
By following the steps in the preceding sections, the mobilepos project is ready to be run in an iOS Simulator. For information on setting up and using the simulator, see the following web site:
https://developer.apple.com
Before running the application on a device, install and configure two code signing identities. For instructions, see "Configuring and Deploying the MPOS UI Certificate for iOS".
Before using the Mobile POS Xcode workspace to develop, test, or distribute a customized Mobile POS application, all developers need certificates and provisioning profiles in place to perform code signing.
In order to run the Mobile POS application on an iOS device, the tasks described in this section are performed in the iOS Provisioning Portal. An Apple ID and password is needed to access the iOS Provisioning Portal. The iOS Provisioning Portal is accessed at the following web site:
https://developer.apple.com/ios/my/overview/index.action
The information in this section is based on the Managing Your Team section in the App Distribution Guide. The guide describes how to use the iOS Provisioning Portal. It is available at the following web site:
https://developer.apple.com/library/ios/documentation/IDEs/Conceptual/AppDistributionGuide/ManagingYourTeam/ManagingYourTeam.html#//apple_ref/doc/uid/TP40012582-CH16-SW1
The Managing Your Team section in the App Distribution Guide uses the concepts of development team, team administrator, and team member. These concepts are also used in this section.
The team administrator needs to be involved in completing all steps in this section. Creating provisioning profiles is covered, but steps for administrating the team's settings are not included in this section. For specific information, see the Managing Your Team section in the App Distribution Guide.
Running the Mobile POS application on a device requires a development certificate for each development team member. A developer creates a development certificate request in Xcode by following these steps:
Plug in an iOS device to the development computer.
Start Xcode.
Go to the Organizer. In the Xcode menu, go to Window/Organizer.
Select the device from the list on the left side of the Organizer.
Click Use for Development.
Copy the identifier from the Organizer. This is a 40-digit hexadecimal number. Send this identifier to the team administrator and request that the device be added to the team's list of development devices in the iOS Provisioning Portal.
The team member must wait until the team administrator adds the device to the team provisioning portal. The team administrator should notify the team member when the device is added. For steps used by the team administrator to add a team member's device, see the Managing Your Team section in the App Distribution Guide.
Once the team administrator notifies the team member that the device is added to the team's provisioning portal, the team member should go back to the Organizer in Xcode:
In the Organizer's left column, under the iOS device attached, there is Provisioning Profiles. If the provision is not in the list, add one by clicking Add at the bottom and pointing it to the provisioning file. The team administrator is notified of this development certificate request.
The team administrator must approve this request before the team member can proceed.
If the team administrator has not already done so, the team administrator should use the iOS Provisioning Portal to create a development provisioning profile for the team. See the Managing Your Team section in the App Distribution Guide for information on creating and configuring application IDs and creating and downloading development provisioning profiles.
After approving the developer certificate, the team administrator should notify the team member. The team member can then follow these steps:
Return to the Xcode project in the main window. Click the project in the Navigator view and then click the build target.
In the Build Settings tab, scroll down to the Code Signing section. Under Code Signing Identity, there should be Debug and Release options. Click the value next to Debug and choose the newly installed iOS developer identity from the list.
Make sure the project is built for debug and not release. In the Xcode scheme editor, click the build target and select Edit Scheme.
Click Run <project name>. In the Info tab, choose Debug for the Build Configuration setting.
Click OK. Development setup is complete.
With the Enterprise Program, a team can sign iOS applications for distribution such that each device it runs on does not require a developer certificate and provisioning profile. This allows a company to use their own distribution procedure, whether it is through email, a customized web store, simple URLs, or manually adding the application to a device through Apple iTunes.
The team administrator must create and manage the distribution certificate and provisioning profile. Only the team administrator can perform these tasks.
If the team administrator has access to Xcode, the team administrator should follow the instructions in the Managing Your Team section in the App Distribution Guide for using Xcode to create a distribution certificate.
If the team administrator does not have access to Xcode, the team administrator should follow the instructions for manually managing a distribution certificate in the Managing Your Team section in the App Distribution Guide.
|
Note: When downloading and installing distribution certificates, be sure to keep the distribution certificate in a safe place. |
After the team administrator creates a distribution certificate, the team administrator should create a distribution provisioning profile. Developer and distribution provisioning profiles are different. The team administrator should follow the instructions for creating and downloading a distribution provisioning profile in the Managing Your Team section in the App Distribution Guide.
|
Note: Keep the downloaded distribution provisioning profile in a safe place. |
If the team administrator is not going to sign and package the iOS application for distribution, the team administrator should send the distribution certificate and distribution provisioning profile to a team member to be responsible for these actions. The responsible team member should first install the distribution certificate by double clicking it. This installs the certificate into the keychain. The team member should then install the distribution provisioning profile by double clicking it. This installs the provisioning profile in the Organizer.
To create the application for distribution:
Return to the Xcode project in the main window. Click the project in the Navigator view and then click the build target.
In the Build Settings tab, scroll down to the Code Signing section. Under Code Signing Identity are Debug and Release options. Click the value next to Release and choose the newly installed iOS distribution identity from the list.
Make sure the project is built for release and not debug. In the Xcode scheme editor, click the build target and select Edit Scheme.
Click Run <project name>. In the Info tab, choose Release for the Build Configuration setting.
In the Main Window, select Product, Build For, and then Archiving.
Click Product and then Archive. A list of archived builds appears. The distributable application is based on the build just created.
Select the build that was just created based on its timestamp. Click Distribute. A pop-up menu appears.
For the Contents option, select iOS App Store Package (.ipa).
For the Identity option, make sure the iOS distribution identity is selected. Click Next.
Choose a location where to save the application file and enter a name.
Depending on the distribution method, select the appropriate option. Check the Save for Enterprise Distribution option and fill in the required fields. If the application is going to be installed through iTunes, do not check this option.
Click Save. There is now a fully functional and signed iOS application ready for distribution.
Note the following:
For all Mobile POS servers, only valid certificates from a trusted third-party signing authority will work. Self-signed certificates will not work. The trusted root certificates for iOS 8 are listed here:
http://support.apple.com/kb/HT5012
To access the list of trusted certificates for Android, select Settings, Security, and then Trusted Credentials.
The application requires a valid UVID, even for the simulator. The UVID for the simulator is like any other Mobile POS UVID and needs to be registered with the server. Unlike the previous versions of XCODE, the UVID of the simulator is not the same as the UVID of the Mac. For more information, see "Obtaining the UVID after Installation".
This section describes how to set up the Mobile POS Android project included in the Mobile Point-of-Service Release 14.1 distribution zip file.
Android SDK and Eclipse IDE, with the ADT plug-in, are prerequisites for setting up the MPOS Android project. The Android SDK and ADT plug-in installers, installation instructions, and system requirements are available in the Android developer portal at the following web site:
http://developer.android.com
|
Note: Java 7 JDK or later within the Java 7 code line is required for compiling the MPOS projects. |
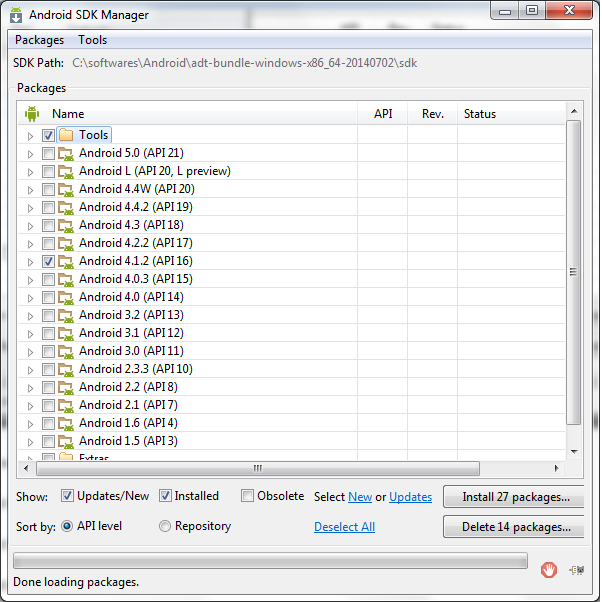
Install Android SDK 4.1.2 (API16) using the Android SDK manager. Launch the SDK manager from the Eclipse tool bar or SDK manager installation folder.
The Intel x86 Emulator Accelerator (HAXM Installer) package, available under Extras, can be installed to speed up the Android application emulation. For more information on system requirements and installation steps, see the following web site:
https://software.intel.com/en-us/android/articles/intel-hardware-accelerated-execution-manager
To install the Android project:
Create a directory to hold the extracted contents of the ORMPOS-14.1.0_client_android.zip file. The file contains projects for both MPOS editions (handheld and tablet).
Copy the ORMPOS-14.1.0_client_android.zip file into the new directory.
Extract the file into the new directory. The following directories are created:
mobileposMobilePOS_Android_Frameworkmpft www
Open the mobilepos or mpft directory created in Step 3.
The mobilepos and mpft directory structures are both a typical Android application. This is a hybrid application, in that most of the business logic and presentation are run in a web view, with most programming done in web technologies (HTML, CSS, and JavaScript) rather than native Android Java. For best practices in extending, adding, and changing functionality and presentation in Mobile Point-of-Service, see the Oracle Retail POS Suite Implementation Guide, Volume 5 - Mobile Point-of-Service.
Most application files are in the mobilepos/www directory, including the following:
HTML files used by the web view
JavaScript in the mobilepos/www/js directory. For the tablet, in the mobilepos/www/tablet/js directory. For the handheld, in the mobilepos/www/handheld/js directory.
CSS files for the tablet, in the mobilepos/www/tablet/css directory. CSS files for the handheld, in the mobilepos/www/handheld/css directory.
Translation bundles for the tablet, in the mobilepos/www/tablet/js/translations directory. Translation bundles for the handheld, in the mobilepos/www/handheld/js/translations directory.
Adding new JavaScript and CSS files to the project requires referencing those files in the mobilepos/www/tablet/index.html file for the tablet. For the handheld, reference those files in the mobilepos/www/handheld/index.html file.
Mobile POS has an external dependency on the PhoneGap library, specifically PhoneGap 2.9.0.
To install the PhoneGap library:
Download the PhoneGap 2.9.0 package from the following web site:
http://phonegap.com/install
Extract the PhoneGap 2.9.0 package that was downloaded in Step 1. This creates a directory named phonegap-2.9.0.
Navigate to phonegap-2.9.0/lib/android.
Rename cordova.js to cordova-android-2.9.0.js.
Copy cordova-android-2.9.0.js and place it into the extracted www/js directory.
Copy the cordova-2.9.0.jar to the extracted Mobilepos_Android_Framework/libs directory.
To import the Android project:
The MPOS Handheld and Tablet projects use business logic code available in the www folder. Create a symbolic link from the Android project assets directory to the www directory:
Open a command prompt as an administrator.
Change to the mobilepos assets directory:
cd <MPOS_EXTRACT>/mobilepos/assets
Run the following command to create a symbolic link from mobile/assets to www:
Microsoft Windows: mklink /D www <path to www directory>
Linux: ln -s <path to www directory> www
Repeat Steps b and c for the mpft project.
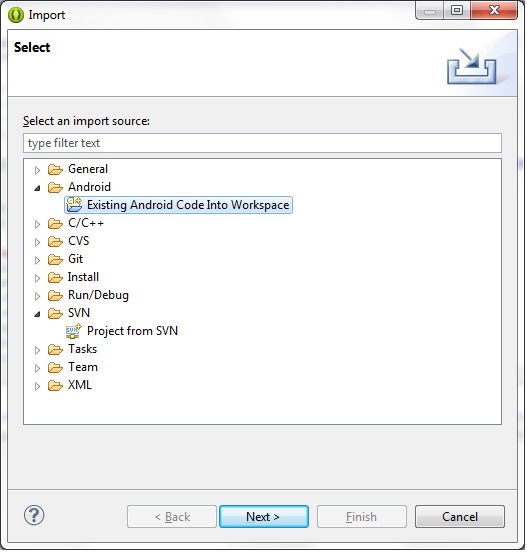
Launch Eclipse ADT. Select File, Import, Android, and then Existing Android Code into Workspace.
Select the directory to which the MPOS Android distribution file was extracted.
To complete the import, click Finish.
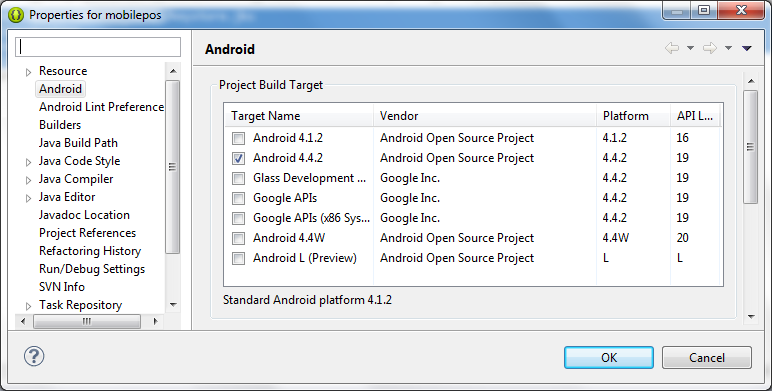
Set the Project Build Target to Android 4.4.2 for the mobilepos and mpft projects. From Eclipse Navigator, right-click mobilepos/mpft. Select Properties and then Android. Select Android 4.4.2. Click OK.
Clean build the projects. There should not be any compilation errors.
This section describes the steps for deploying Mobile Point-of-Service to the Motorola tablet.
To install the USB driver to the Android development workstation:
Download the USB driver from the Motorola support web site using one of the following URLs:
Extract the driver and run the executable.
After installation, reboot your machine as prompted.
To directly deploy the application to the device:
Connect the ET1/MC40 to the development machine using the data cable.
Right click on the mobilepos project. Choose Run As and then Android application.
Select the connected device and run the application.
The application throws an Invalid Server Settings error when the application is launched for the first time.
Press the Android home button. Go to Settings, Accounts, and then MPOS 14.1 or MPFT 14.1. Configure the MPOS application settings. For more information, see "Configuring the Mobile Point-of-Service Application on a Mobile Device".
To run the application on Android emulators:
Launch AVD Manager in Eclipse and create a device definition similar to the Android device used for running MPOS.
Create a virtual device using the device definition created in the Step 1. Set the target as Android 4.1.2.
|
Note: Enter an SD card size in the virtual device definition, for example, 100. |
Launch the emulator created in Step 2.
Right click on the mobilepos/mpft project and choose Run As and then Android application. The application is uploaded and installed to the Android emulator.
To create the MPOS Android application installers:
Create the ANDROID_HOME environment variable with the value
<Android_SDK_DIR>.
Open the build.xml file in the <Android_SDK_DIR>/tools/ant directory and change the properties java.target and java.source values from 1.5 to 1.7.
Android requires that all applications be digitally signed with a certificate before they can be installed. Generate a keystore.jks signing the installers and copy it to the <Android_SDK_ DIR>\sdk folder. For more information, see "Additional Notes Concerning Certificates" and the following web site:
http://developer.android.com/tools/publishing/app-signing.html
After generating the keystore, the ant.properties file needs to be modified. Open the ant.properties file under the mobilepos/mpft project and set the values for the following properties:
key.store=${env.ANDROID_HOME}/<Keystore_Name>
key.alias= <Alias_Name>
key.store.password=<Keystore_Password>Key.alias.password=<Alias_Password>
Open <MPOS_EXTRACT>\MobilePOS_Android_Framework\local.properties and update sdk.dir to point to the SDK installation directory, for example:
sdk.dir=D:\\Android\\android-sdk
Open a command prompt and change directory to mobilepos, for example:
<MPOS_EXTRACT>\mobilepos\build.xml
Set the ANT_HOME environment variable and run ant clean release.
The signed and unsigned installers are created under the dist folder. The final mobile installation file will be similar to <MPOS Application>-release.apk.
|
Note: The Eclipse ADT Android Tools also can be used for creating the MPOS Android application installers. |
The Mobile Point-of-Service application must be downloaded and installed on the mobile devices. To configure the mobile device after installation:
Get the UVID of the device. For more information, see "Obtaining the UVID after Installation". A register is associated with a UVID in the Mobile Device Configuration window. See Figure C-35.
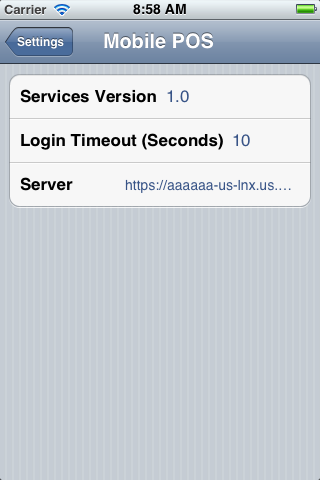
Open the Settings screen for the Mobile POS application.
Set the address of the server that the device uses to communicate with the Mobile POS server as shown in the following example:
https://<host>:<port>/mobilepos/services
When using AJB for payment authorization:
For the payment host, enter the host name of the AJB FIPAY server.
For the payment port, enter the default AJB port plus the register ID assigned to the device.
|
Note: Mobile POS Android applications only support payment using CPOI devices. The payment host and payment port fields are not used. |
UVID is the Unique Vendor ID; in Apple terms, Identifier for Vendor (IDFV). If the UVID for a device was not added to the server, an error occurs when trying to log on the device. You can add the UVID after installation. To add the UVID to the MPOS Server:
Log on to the device using a valid user name and password. An invalid user ID or password error occurs.
Find the error in the log of the <ormpos-domain> domain. The log file is found in the following location:
<WEBLOGIC_INSTALL_DIR>/user_projects/domains/<ormpos-domain>/registers/logs/orpos.log
Look for the line shown in the following example:
No configuration profile found for hardware ID: 51B4C782-12A5-49C3-9391-A19F71C10F05
Add the UVID, obtained from the orpos.log file, to the DeviceContext.xml found in the following location:
<WEBLOGIC_INSTALL_DIR>/user_projects/domains/<ormpos-domain>/servers/<mpos_AdminServer>/tmp/_WL_user/mobilepos/g9eznq/war/WEB-INF/lib
Following is an example of an entry in the DeviceContext.xml file:
<!-- BEGIN devicemapping for UVID -->
<entry key="51B4C782-12A5-49C3-9391-A19F71C10F05">
<bean class="oracle.retail.stores.mobilepos.status.register.RegisterProfileConfiguration.StoreRegisterPair">
<property name="storeID" value="04241" />
<property name="registerID" value="101" />
<property name="printerID" value="device_IppReceiptPrinter" />
</bean>
</entry>
<!-- END devicemapping for UVID1 -->
Once the UVID is added, log on to the device using a valid user name and password.
|
Note: The UVID changes all the time when an application is removed and deployed. The Vendor ID is unique for an application per device and vendor. So, the tablet and handheld on a specific iOS device will have different UVIDs. |