| Oracle® Retail Point-of-Service Installation Guide Release 14.1 E54459-01 |
|

 Previous |
 Next |
This chapter provides information about the installation procedures for Oracle Retail Point-of-Service. This chapter covers installing the server and clients on Novell SLEPOS. For a list of tested components and supported versions, see Chapter 1.
Oracle Retail provides an installer for Point-of-Service, but customer installations typically develop custom procedures. Note that the installer is not appropriate for all installations. Oracle Retail expects implementation teams to develop custom procedures for actual register installations, which may or may not be based on the installer described here. For guidelines, see "Creating a Custom Installation".
The following recommendations should be considered for schema owners:
Database administrators should create an individual schema owner for each application, unless the applications share the same data. In the case of Oracle Retail Back Office and Point-of-Service, the database schema owner is the same because these applications share a database.
The schema owners should only have enough privileges to install the database.
For information on the best practices for passwords, see the Oracle Retail POS Suite Security Guide.
Whether the database schema owner user and the data source user need to be created is dependent on whether Point-of-Service shares the database with Back Office:
If Point-of-Service is sharing the database with Back Office, the same database schema owner is used for both products. Point-of-Service and Back Office can use the same data source user or a separate data source user can be created for each product.
If Point-of-Service is not sharing the database with Back Office, both the database schema owner and data source user need to be created.
To create the database schema owner:
Log in using the database administrator user ID.
Create a role in the database to be used for the schema owner.
CREATE ROLE <schema_owner_role>;
Grant the privileges, shown in the following example, to the role.
GRANT CREATE TABLE, CREATE VIEW, CREATE SEQUENCE, CREATE PROCEDURE, ALTER SESSION, CONNECT TO <schema_owner_role>;
Create the schema owner user in the database.
CREATE USER <schema_username>
IDENTIFIED BY <schema_password>
DEFAULT TABLESPACE users
TEMPORARY TABLESPACE TEMP
QUOTA UNLIMITED ON users;
To create the data source user:
If not already logged in, log in using the database administrator user ID.
Create a role in the database to be used for the data source user.
CREATE ROLE <data_source_role>;
Grant the privileges, shown in the following example, to the role.
GRANT CONNECT, CREATE SYNONYM TO <data_source_role>;
|
Note: After the product is installed successfully, the CREATE SYNONYM privilege must be revoked from the data source role. Before the installer exits, it prompts for a database administrator to revoke the privilege. |
Create the data source user.
CREATE USER <data_source_username>
IDENTIFIED BY <data_source_password>
DEFAULT TABLESPACE users
TEMPORARY TABLESPACE TEMP
QUOTA UNLIMITED ON users;
Grant the data source role to the user.
GRANT <data_source_role> TO <data_source_username>;
The installer grants the data source connection user access to the application database objects.
To establish an initial Oracle Retail Point-of-Service installation or to create a demonstration system, use the Point-of-Service installer as described in this section.
Machines and logical components of the Oracle Retail Point-of-Service application are defined in Table 4-1:
Table 4-1 Server Tier Logical Components
| Machine | Description |
|---|---|
|
Store Server |
The machine that runs the server component of Oracle Retail Point-of-Service. There is at least one store server for each store. This component runs as a service. This machine may also house the Back Office Server and other Oracle Retail POS Suite components such as the OracleRetailStore database. |
|
Point-of-Service Clients |
The machines that execute the Point-of-Service transactions; they are typically cash registers. |
|
Database Server |
The machine that houses the OracleRetailStore databases. This machine may or may not be the same as the store server. |
|
JMS Server |
The machine that houses the JMS server software. |
When you run the installer, it asks you to specify a Tier Type. The following types are available:
N-Tier Client—Choose this when installing the client component.
N-Tier Store Server—Choose this when installing the store server component.
Oracle Retail products such as Point-of-Service and Back Office use the OracleRetailStore database. One OracleRetailStore database is typically installed in each store. Data stored in the OracleRetailStore database includes employee names, logon information, and transaction data. The database can be located on the store server or on a separate machine acting as the database server. The database must be installed before Point-of-Service can be installed.
If you are using Centralized Transaction Retrieval, an additional database called the Scratchpad database is used. This database holds retrieved transactions. For more information on Centralized Transaction Retrieval, see the Oracle Retail POS Suite Operations Guide.
If a previous version of Point-of-Service is installed on a machine, uninstall it by deleting the installation directory (the default directory is /OracleRetailStore) or choose a different installation directory from the default.
Run the installer one time for each machine in the Server Tier and once for each register.
The installer performs the following steps. Not all steps apply to client and server installations.
Installs Foundation, Retail Domain, and Oracle Retail Point-of-Service jar files.
Installs database build scripts and start-up files.
Defines Server Tier in the conduit script that starts Point-of-Service for the given machine.
Defines hostnames or IP addresses and port numbers for the Store Server and database server.
Defines device availability.
Defines application properties for Store ID and Register Number.
To extract the Point-of-Service files:
Extract the Point-of-Service 14.1 distribution zip file.
Create a new staging directory for the Point-of-Service application distribution ORPOS-14.1.zip file, for example, /tmp/orpos/orpos-staging.
|
Note: The staging area (<staging_directory>) can exist anywhere on the system. It does not need to be under tmp. |
Copy or upload ORPOS-14.1.zip to <staging_directory> and extract its contents. The following files and directories should be created under
<staging_directory>/ORPOS-14.1:
ant/
ant-ext/
antinstall/
installer-resources/
installer-templates/
product/
antinstall-config.xml
build.xml
build-antinstall.xml
build-common.xml
build-common-esapi.xml
build-common-oas.xml
build-common-retailinv.xml
build-common-was.xml
build-common-wl.xml
build-conditions.xml
build-filesets.xml
build-filters.xml
build-properties.xml
checkdeps.cmd
checkdeps.sh
install.cmd
install.sh
prepare.xml
revokesyn.sql
wallet.xml
For the remainder of this chapter, <staging_directory>/ORPOS-14.1 is referred to as <INSTALL_DIR>.
This release requires IBM JRE 1.7 for client installs on IBM SurePOS registers. It is distributed by IBM with JavaPOS 1.13.
Communication with the database and communication between the store server and registers can be secured.
When running the installer for a server, you select whether secure JDBC will be used for communication with the database and whether secure RMI will be used for communication between the store server and registers in the Secure Options window. See Figure A-17.
If Enable Secure JDBC is selected, the installer sets up the secure JDBC. If you do not select this and you want to manually set up the secure JDBC after the installer completes, see the Oracle Retail POS Suite Security Guide.
If Enable Secure RMI is selected, the installer sets up the secure RMI. If you do not select this and you want to manually set up the secure JDBC after the installer completes, see the Oracle Retail POS Suite Security Guide.
When running the installer for a client, you select whether secure RMI will be used for communication between the store server and register in the Enable Client Secure RMI window. See Figure B-23.
If Yes is selected, the installer sets up the secure RMI.
If No is selected and you want to manually set up the secure RMI after the installer completes, see the Oracle Retail POS Suite Security Guide.
Point-of-Service supports processing orders thorough an external order management system and Commerce Anywhere. To enable order integration:
In the Integration Applications window, select Orders. See Figure A-13 and Figure B-17.
Select the order type. See Figure A-14 and Figure B-18:
To use an external order management system, select External Order.
To use Commerce Anywhere, select Commerce Anywhere.
You provide the information for accessing the web service for the external order management system. For more information on integrating with an external order management system, see the Oracle Retail POS Suite Implementation Guide, Volume 4 - Point-of-Service External Order.
Commerce Anywhere enables retailers to integrate with e-commerce and order management solutions for processing customer transactions in stores and through web applications.
You provide the information for accessing the web services for Commerce Anywhere.
For more information on Commerce Anywhere, see the following documents available through My Oracle Support. Access My Oracle Support at the following URL:
https://support.oracle.com
Oracle Retail Commerce Anywhere Technical Integration Solution (Doc ID: 1598187.1)
This set of architectural diagrams and related business processes depict the Commerce Anywhere solution and its major integration points. The conceptual representation that is depicted is intended to support an integrated implementation of an Oracle Retail Commerce Anywhere solution that includes Oracle Retail Merchandising System, Oracle Retail Store Inventory Management, Oracle Retail Warehouse Management System, Oracle Retail POS Suite, and Oracle Retail Advanced Inventory Planning.
Oracle Retail Commerce Anywhere Functional White Papers (Doc ID: 1598177.1)
This library contains a collection of white papers that outline functional aspects of the Commerce Anywhere solution in Oracle Retail applications. One document provides an overview of the solution from an enterprise perspective, and it is accompanied by product specific-papers addressing Oracle Retail Merchandising System, Oracle Retail Store Inventory Management, Oracle Retail Warehouse Management System, Oracle Retail POS Suite, and Oracle Retail Advanced Inventory Planning.
In the Install Database Option window, you select whether the installer creates and populates the database schema or if you want to do this manually. See Figure A-20.
|
Caution: If the database schema is already created and populated, select Skip schema creation and data loading. Selecting one of the other options will result in the loss of the data already in the database. If the database schema was created and populated using Point-of-Service, reports data, and Back Office parameters will be lost. |
If you choose Create schema with sample dataset, the installer creates and populates the database schema with sample data, such as item data. The sample dataset includes the minimum dataset. If you want data available to use for demonstrating Point-of-Service functionality after installation, you can select this option.
To use this option, you must provide the location of the zip file containing the sample dataset in the Sample Dataset installer window. See Figure A-21. You can obtain the sample-dataset-14.1.zip file from the Oracle Software Delivery Cloud at the following web site:
https://edelivery.oracle.com/
If you choose Create schema with minimum dataset, the installer creates and populates the database schema with the minimum amount of data needed to launch and run Point-of-Service. If you want to load your own data after installation, you can select this option.
If you choose Skip schema creation and data loading, the installer does not create and populate the database schema. This is the default selection in the window. You choose this option if you want to create and populate the database schema manually or the database schema was created using Back Office.
|
Note: If Point-of-Service is being installed for the first time and a clean schema is being used, do not select the Skip schema creation and data loading option. The installer will fail at some point if there is no data available in the database. You must populate the database schema before running the installer by selecting one of the other options.If the schema is already populated and you want to manually restore or update the data, select the Skip schema creation and data loading option. |
If you are using the RSA Data Protection Manager, you must do the following:
You must provide the installer with the name and location of the configuration property file in the RSA Client Configuration window. See Figure A-66 and Figure B-32. For detailed information on the content of this file, see the Java client documentation provided by your provider for the RSA Data Protection Manager.
You must obtain the required jar files from your RSA Data Protection Manager provider. You provide the location of the jar files in the RSA Client JAR Files window. See Figure A-65 and Figure B-31. The directory for the jar files must contain only the RSA Java client jar files.
Lockbox is an RSA feature the provides protection for RSA configuration information. Obtain these libraries from your RSA Data Protection Manager.
You must also update the path variable, LD_LIBRARY_PATH, for the lockbox libraries.
You must update the security for your JRE. You need to obtain version 7.0 of the Java Cryptography Extension (JCE) Unlimited Strength Jurisdiction Policy Files.
Make a backup copy of local_policy.jar and US_export_policy.jar.
On the server:
cd $JRE_HOME/lib/security
mv local_policy.jar local_policy.jar.bak
mv US_export_policy.jar US_export_policy.jar.bak
On the client:
cd $JRE_HOME/lib/security
mv local_policy.jar local_policy.jar.bak
mv US_export_policy.jar US_export_policy.jar.bak
Download version 7 of the JCE:
Go to the following web site:
http://www.oracle.com/technetwork/java/javase/downloads/index.html
Under Additional Resources, find Java Cryptography Extension (JCE) Unlimited Strength Jurisdiction Policy Files 7.
Click Download.
Follow the instructions to download the JCE.
Copy the local_policy.jar and US_export_policy.jar files into the JRE security directory. The files are bundled as UnlimitedJCEPolicyJDK7.zip.
This installer will configure and deploy the Point-of-Service application.
|
Note: To see details on every window and field for a server installation, see Appendix A. To see details for a client installation, see Appendix B. |
Change to the <INSTALL_DIR> directory.
Set the JAVA_HOME environment variable to the location of the Java JRE.
|
Note: The installer is not compatible with versions of Java earlier than Java 7. |
When installing the store server, set the account of the user running the installer to run as an administrator. Set the account using Microsoft Windows 2008 Server.
Run the install.cmd script. This will launch the installer. After installation is complete, a detailed installation log file is created at
<POS_install_directory>/pos-install-yyyyMMddHHmm.log
In the log file name, yyyyMMddHHmm is the timestamp of the install.
|
Note: The typical usage for GUI mode does not use arguments.install.cmd |
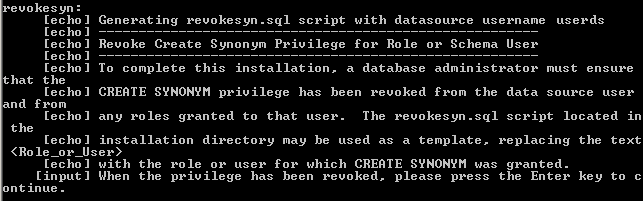
If this is a server install, after the installation is successfully completed, the CREATE SYNONYM privilege must be revoked. In the installer console window, it prompts for a database administrator to run the revokesyn SQL script to revoke the privilege. The script is found in the <INSTALL_DIR> directory.
For information on granting this privilege, see "Create the Database Schema Owner and Data Source Users".
If this is a client install and you are using a DigitalPersona fingerprint device on an IBM SurePOS register, verify the following:
The fingerprint device properties are correct in the following file:
<POS_install_directory>/<client>/pos/config/technician/PosDeviceTechnician.xml
Verify the following properties:
## Properties from Page:fingerPrintDevice
input.client.device.dpfingerprint = true
## Properties from Page:DPEnvironmentClasspath
input.dpfingerprint.dpjavapos = //opt//DigitalPersona//Bin//JavaPOS//dpjavapos.jar
input.dpfingerprint.jpos = //opt//DigitalPersona//Bin//JavaPOS//jpos113.jar
input.dpfingerprint.dpotjni = //opt//DigitalPersona//Bin//Java//dpuareu.jar
The fingerprint device is enabled in the jpos.xml file.
If the application installer encounters any errors, you can read them in the above mentioned log file.
For a list of common installation errors, see Appendix F.
The fiscal printer JPOS API does not support barcode printing. The implementation for this release uses an Epson-specific directIO command to print the barcode. The directIO command is configured in the DeviceContext.xml file. The command and its parameters control the barcode alignment (position in the receipt), barcode width, and barcode type.
To configure the fiscal printing device for barcode printing, make changes to the following file:
<POS_install_directory>/<client>/pos/config/context/DeviceContext.xml
Update the following entry in that file:
        <property name="barcodeDirectIO">
            <map>
                <entry key="command" value="1075" />
                <entry key="parameters" value="011203075210073" />
            </map>
        </property>
The following table describes the parameters entry in the preceding example:
| Value | Description |
|---|---|
| 01 | Operator. Any two digit number can be used. |
| 120 | Left margin (120 at 180 dpi equals 17 mm, plus offset of 3 mm, equals 20 mm). |
| 03 | Dot width of each bar (3 at 180 dpi equals 4 mm). |
| 075 | Height in dots of the barcode (120 at 180 dpi equals 17 mm). |
| 2 | Human Readable Interpretation (HRI) numerical representation text (0 = none, 1 = above, 2 = below, and 3 = both above and below). |
| 1 | Font for text that can be printed above and below the barcode. HRI numerical representation text font (1, 2, or 3). |
| 00 | Always set to 00. |
| 73 | Barcode type. |
The left margin and dot width in the example are configured for a 13-digit transaction ID. To accommodate the 26-digit transaction ID, the left margin needs to be reduced to 080 and dot width to 02.
Fonts are not included in the installation of Point-of-Service. They are provided by the operating system and specialty font vendors. Common problems encountered with eReceipts and network printed receipts and reports include misprinted characters (such as a number sign instead of a multibyte character), illegible characters, and incorrect text alignment. These issues are often resolved by insuring that the Point-of-Service client is configured for the best font available for the language on the operating system.
To resolve issues with misprinted characters, see the following sections:
To resolve misprinted character problems in eReceipts:
Verify that the operating system is installed with a fixed-width font capable of cleanly displaying the misprinted character. For example on Microsoft Windows, MS Gothic can be used to display Chinese characters and Courier New can be used to display Russian characters.
|
Note: Point-of-Service assumes fonts are fixed-width for receipts. If variable-width fonts are used, the fields in an eReceipt will not align properly. |
In the style-sheet used by the Point-of-Service client for eReceipts, specify the best font available for the language on the operating system. Point-of-Service uses Extensible Style-sheet Language Formatting Objects (XSL-FO) to transform each line of receipt data into PDF output. The style-sheet used for eReceipts specifies the Courier font family. To specify a different font, such as SimSun or Courier New, replace the reference to Courier with the new font name in the following files:
<POS_install_directory>/<client>/pos/receipts/printing/templates/xsl/ipp_default.xsl
<POS_install_directory>/<client>/pos/receipts/printing/templates/xsl/ipp_image_receipt.xsl
Point-of-Service is configured to automatically search for fonts in the default paths for your operating system. Point-of-Service uses the Apache Formatting Objects Processor (FOP) to generate eReceipt PDF files. If the font identified in the style-sheet for eReceipts cannot be automatically found, it can be manually registered in the Apache FOP advanced configuration file:
<POS_install_directory>/<client>/pos/receipts/printing/templates/fonts/FopFontConfig.xml
For more information about Apache FOP fonts, see the following web site:
http://xmlgraphics.apache.org/fop/1.0/fonts.html
To resolve misprinted character problems in network printed receipts and reports:
Verify that the operating system is installed with a fixed-width font capable of cleanly displaying the misprinted character. For example on Microsoft Windows, MS Gothic can be used to display Chinese characters and Courier New can be used to display Russian characters.
|
Note: Point-of-Service assumes fonts are fixed-width for receipts and reports. If variable-width fonts are used, the fields in a network printed receipt or report will not align properly. |
In the style-sheet used by the Point-of-Service client for network printing, specify the best font available for the language on the operating system. Point-of-Service uses Extensible Style-sheet Language Formatting Objects (XSL-FO) to transform each line of receipt or report data into the type of output designated for the configured network printer. The style-sheet used for network printing specifies the Courier font family. To specify a different font, such as MS Gothic or Courier New, replace the reference to Courier with the new font name in the following file:
<POS_install_directory>/<client>/pos/receipts/printing/templates/xsl/ipp_default.xsl
Point-of-Service provides the capabilities to display a dashboard in the Main Options screen and access a web site from a register using the Browser button in the Main Options screen. JavaFX is required for both the dashboard and browser functionality. If the version of IBM JRE you are using does not support JavaFX, contact IBM for assistance.
If a web site is accessed through a secure HTTP connection, an SSL certificate is required. The SSL certificate of the web site, which you want to access through the Point-of-Service embedded browser, should be imported in the trust store of the Point-of-Service client.
Either the server or client can host communication with ACI PINComm. If ACI PINComm was selected in the Tender Authorization window, you must update the security for the JRE on either the server or client where the communication is hosted. For more information, see "Install the Java Cryptography Extension (JCE)".
The default root directory for OracleRetailStore applications on Windows for the store server is /OracleRetailStore/Server. For the client, the default directory is /OracleRetailStore/Client. In this guide, these directories are referred to as
<POS_install_directory>
Table 4-2 <POS_install_directory> Subdirectories
| Name | Contents |
|---|---|
|
common |
Files shared by multiple Oracle Retail POS Suite applications including Foundation or 360Platform, Domain, and third-party jar files |
|
pos |
Point-of-Service files |
Important subdirectories of the \pos directory are shown in Table 4-3:
Table 4-3 <POS_install_directory>/pos Subdirectories
| Name | Contents |
|---|---|
|
bin |
Startup batch files and shell scripts |
|
config |
XML configuration files, |
|
lib |
Point-of-Service application and resource jar files |
|
lib/locales |
Text bundles for localization |
|
logs |
Log files (additional log files are in the |
|
receipts |
Files for printing of receipts and blueprint jar file |
You run the Oracle Retail Point-of-Service system by executing batch files or shell scripts, found in your installation's bin directory, to launch various components.
To run Point-of-Service:
Start the store server:
<INSTALL_DIR>/Server/pos/bin/StoreServerConduit.sh
When the message TierManager Started appears, the server has started. The server component does not have a user interface.
Start the registers.
For each of the Point-of-Service registers, execute the conduit script that starts the Point-of-Service client component. Use the following command:
<INSTALL_DIR>/Client/pos/bin/ClientConduit.sh
Verify the installation on each register by logging in to Point-of-Service. On the Main Options screen, select a component and complete the login. For more information, see the Oracle Retail Point-of-Service User Guide.
If the login is successful and the status bar indicates the database is online, the installation is complete.
A custom installation of Point-of-Service can use one of several approaches:
Install Point-of-Service using the installer on a reference machine, and copy the resulting installation to other machines.
With this method, you can change the configuration settings of the installation as described in the Oracle Retail POS Suite Implementation Guide, Volume 2 - Extension Solutions until the installation works as desired, then propagate those configurations to other machines.
You can copy just the installation directory to a new machine, or if the hardware is sufficiently similar, you can copy the entire hard drive image to the machine. Copying the entire hard drive retains the JavaPOS installation as well as any other customizations.
You must change the WorkstationID value for the target machines to a unique number. This value can be found in
<POS_install_directory>/pos/config/application.properties.
Create a custom installer that allows for various hardware options but specifies the software choices your company has chosen.