| Oracle® Retail Point-of-Service User Guide Release 14.1 E54472-02 |
|


 Previous |
 Next |
The following functions are described in this chapter:
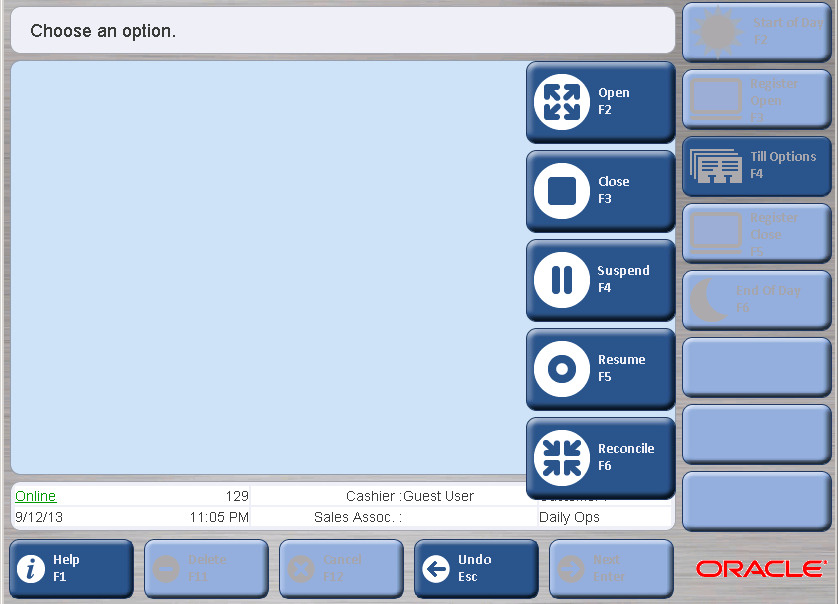
The Daily Operations component is accessed on the Main Options screen. This component enables you to start and end a day (the same as opening and closing a store), open and close registers, and open and close tills. To access the Daily Operations function, press Daily Ops/F2 on the Main Options screen. Enter login information and press Next/Enter. The Daily Ops screen appears.
The following topics are described in this section for the Daily Operations component:
The store must be opened every day because when the store is opened, the financials and totals are started for the day. There are two ways to open the store. The first is through the Daily Operations screen, and the second is through the Daily Operations Wizard. For information on the Daily Operations Wizard, see "The Daily Operations Wizard" section.
When the store is opened through Daily Ops/F2, the Start of Day function is completed from one register, the register is opened, and the till is opened. Each of these tasks are described in the following sections.
The Start of Day function includes defining the business day and the amount of money in the store safe. This function must be completed before any registers can be opened.
To complete Start of Day:
On the Daily Ops screen, press Start of Day/F2. The Enter Business Date screen appears.
Enter the business date if the default date is not correct, and press Next/Enter. If the date entered is not what Oracle Retail Point-of-Service expected, the Later Date Confirmation screen appears.
If the business date entered is correct, press No.
To re-enter the business date, press Yes.
The Summary Count screen appears.
Enter the total amount in the store safe and press Next/Enter. If the amount entered is not what the system expects, the Reconciliation Confirmation Notice appears.
If the amount entered is correct, press Yes.
To re-enter the correct amount, press No.
The Store Open screen appears, notifying you that the store has been opened successfully. Press Enter to continue.
The Start of Day function must be completed before one or more registers may be opened. In turn, registers must be opened before tills may be opened.
To open a register on the Daily Ops screen, press Register Open/F3. The Register Opened screen appears, notifying you that the register has been opened successfully. Press Next/Enter to continue. The Daily Ops screen appears.
|
Note: If the Register Already Open Notice appears, the register has already been opened or it was not closed properly. |
A till is the physical storage box containing the money in the register. Float is the amount of money that is in the till when it is opened. The float travels with the till. A till has to be opened before performing a transaction. A till ID can only be used once during a business day to open a till.
To perform till operations, press Till Options/F4 on the Daily Ops screen. The navigation buttons for the till options appear.
|
Note: The Register must be opened before a till can be opened. |
To open a till:
On the Till Options screen, press Open/F2. The Enter Till ID screen appears.
Enter the Till ID and press Next/Enter. The Summary Count screen appears.
Enter the total amount of the float and press Next/Enter. If the entered amount of the till was not what Oracle Retail Point-of-Service expected, the Reconciliation Confirmation Notice screen appears.
To verify the amount entered, press Yes.
To recount the till and re-enter the amount, press No.
The till is now open and ready for transaction processing. The Till Options screen appears.
The Daily Operations Wizard automatically launches if you attempt to open a till or register without opening the store first. The Daily Operations Wizard guides you through the steps needed to open the store, register, and till. The wizard walks you through the Enter Business Date screen, Summary Count screen, and the Enter Till ID screen. After the store is open through the Daily Operations Wizard, the Sell Item screen appears and you may proceed with a transaction.
Suspend and resume are components available on the Till Options screen. You may suspend a till at one register and resume it at another register. This is called a Floating Till.
A till may be suspended so that you can move to another register and keep the current till. You have the option to remove the cash drawer. The financials travel with the till when it is used in another register. All suspended tills must be resumed and then closed before the register may be closed. To suspend the till, press Suspend/F4 on the Till Options screen. The Remove Till Confirmation screen appears.
To remove the till and close the cash drawer, press Yes. You are asked to close the cash drawer, and the Till Options screen appears. The till is now suspended
To leave the till in the drawer, press No. The Till Options screen appears.
Suspended tills on a register must be resumed before the register is closed.
To resume the till:
On the Till Options screen, press Resume/F5. The Enter Till ID screen appears.
Enter the till ID number and press Next/Enter.
You are prompted to close the cash drawer.
The Till Resumed Succeeded screen appears. Press Enter to continue.
The till is resumed and the Till Options screen appears.
Closing the store is equally important as opening the store. This is because this component closes the financials for the day. The store must be closed every night in Oracle Retail Point-of-Service. To close the store, the tills need to be reconciled and closed, each register needs to be closed, and the End of Day function needs to be completed from one register or through the Back Office application.
Table 2-1 shows the reports that are automatically generated during end-of-day processing. For information on the report content, see Appendix A.
|
Note: Reports appear in the United States locale, not in the default locale for the application. |
Table 2-1 Automatic Reports
| Event | Report Name | Description |
|---|---|---|
|
Till is successfully closed |
Till Summary Report |
This report shows a summary of till information. |
|
Register is successfully closed |
Register Summary Report |
This report shows a summary of register activity. |
|
Store is successfully closed |
Store Summary Report |
This report shows a summary of store activity. |
Tills can be reconciled both in Oracle Retail Point-of-Service and Back Office.
To enable reconciling tills in Point-of-Service, the Till Reconcile parameter must be set to Yes. The Reconcile/F6 button is only available on the Till Options screen when this parameter is set to Yes. For information on this parameter, see the Oracle Retail POS Suite Configuration Guide.
For more information on reconciling tills in Back Office, see the Oracle Retail Back Office User Guide.
|
Note: Tills can only be closed in Oracle Retail Point-of-Service. |
To reconcile a till:
Press Reconcile/F6 on the Till Options screen. The Enter Till ID screen appears.
Enter the Till ID and press Next/Enter.
The Close Till Confirm screen appears, asking if you would like to close the till.
To close the till and continue, press Yes.
To Cancel, press No.
The Remove Till Confirmation screen appears, asking if you would like to remove the till at this time.
To remove the till, press Yes.
To leave the till in the drawer, press No.
The Summary Count screen appears. Enter the amount of float and press Next/Enter. If the entered amount of the float is not what Oracle Retail Point-of-Service expected, the Reconciliation Confirmation Notice screen appears.
To accept the amount entered and continue, press Yes.
To re-count the float and re-enter the amount, press No.
The Select Tender screen appears. This screen and the related screens vary in the detail required, based on how the application is configured. In addition, only tender types that had transactions for the day have values against them in the work area.
For each tender type for which the button is enabled:
Count each tender type in the till.
Press the corresponding button on the navigation bar for the tender type counted.
Enter the amount and press Next/Enter. Some tender types require more detail. For example, Credit requires that the amounts for different credit card types are entered separately.
|
Note: If zero is entered for an amount or if the amount is not what Oracle Retail Point-of-Service expected, verification of the amount is requested. |
When all tender types have been entered, press Next/Enter.
If the total amount of the till is not what Oracle Retail Point-of-Service expected, the Reconciliation Confirmation screen appears.
To verify the amount, press Yes.
To modify the amount, press No.
The Foreign Currency Count screen appears.
To count foreign currency, press Yes.
To continue, press No.
If Yes was chosen in Step 9, then follow these steps to count foreign currency.
The Foreign Currency Count screen appears. Select the type of currency on the navigation bar.
Select the tender in which the foreign currency was received.
The Summary Count screen appears. Enter the amount and press Next/Enter.
The Discrepancy Confirm screen appears. To accept the entered amount and continue, press Yes. To count the till again, press No.
The till is reconciled. The Till Options screen appears.
All tills have to be closed before closing the register. Tills are closed at the register in Oracle Retail Point-of-Service.
To close a till:
On the Till Options screen, press Close/F3. The Enter Till ID screen appears.
Enter the Till ID and press Next/Enter.
The Remove Till Confirmation screen appears, asking if you would like to remove the till at this time.
To remove the till, press Yes.
To leave the till in the drawer, press No.
The Till Reconcile Location screen appears, asking if you want to reconcile the till at the workstation. If the screen is not displayed, follow Step 6.
To reconcile the till at the workstation, press Yes.
To close the till without reconciling, press No.
If you selected Yes in Step 4, then follow Steps 4 through 11 in "Reconciling Tills".
If you selected No in Step 4, the till is closed and the Till Options screen appears.
All tills associated with a register must be closed and reconciled before the register can be closed. All registers must be closed before the store can be closed.
To close the register:
On the Daily Ops screen, press Register Close/F5.
The Register Close Successful Notice appears. Press Enter to continue.
A Register Summary Report is automatically printed.
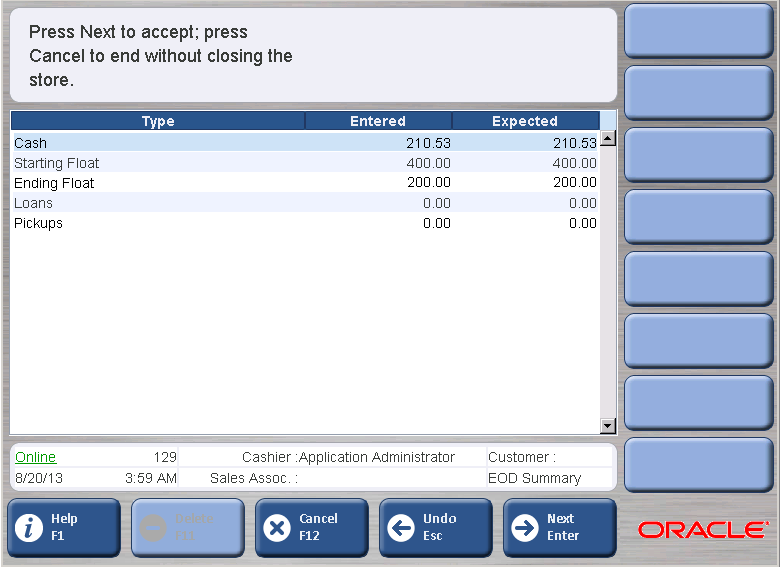
The End of Day function is completed to close a store. All tills and registers must be closed before the End of Day function may be completed.
To close the store:
On the Daily Ops screen, press End of Day/F6. The EOD Summary screen appears.
To accept the balance and close the store, press Next/Enter. To end the operation without closing the store, press Cancel/F12.
If you accept the balance, the Summary Count screen appears.
Enter the total amount in the store safe and press Next/Enter.
If the total amount of the store safe is not what Oracle Retail Point-of-Service expected, the Discrepancy Confirmation screen appears.
To verify the amount, press Yes.
To modify the amount, press No.
The store is closed. The Daily Ops screen appears.
To return to the Main Options screen, press Undo/Esc.
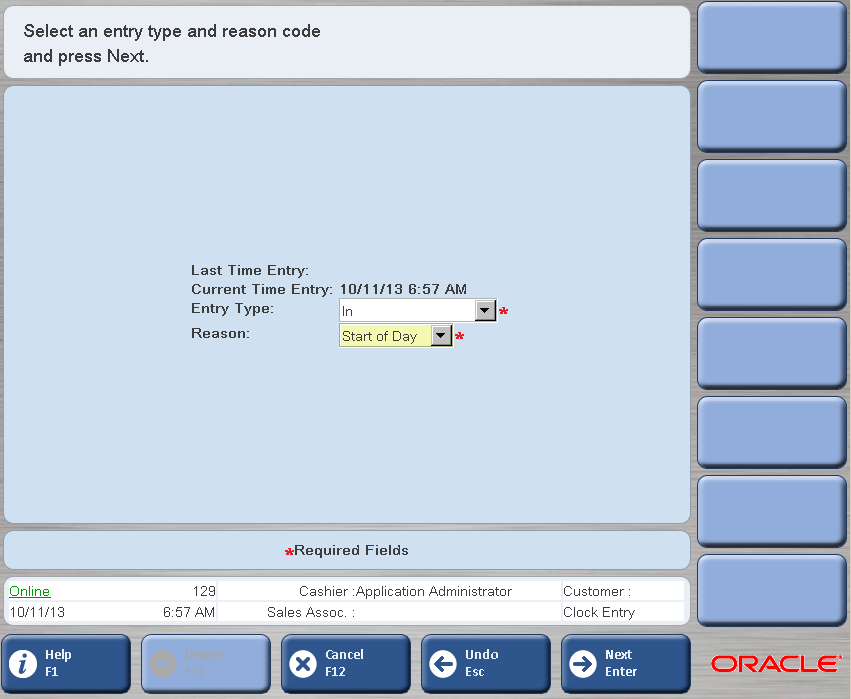
The Clocking In and Out option is available on the Main Options screen.
To clock in or out:
Press Clock In/Out/F5 on the Main Options screen.
Enter your user ID and password, and press Next/Enter. If the login is successful, the Clock Entry screen appears.
Verify the time entry, select an entry type and reason from the menus, and press Next/Enter. A message indicating the entry was successful appears.
Press Next/Enter to continue. The Main Options screen appears.
For security, when you select another component, you are required to log in again.