| Oracle® Retail Point-of-Service User Guide Release 14.1 E54472-02 |
|


 Previous |
 Next |
Oracle Retail Point-of-Service can be accessed using two types of devices–a register and a mobile device. Not all of the Point-of-Service functionality is available on a mobile device. For information on using a mobile device, see the "Using Mobile Point-of-Service" chapter.
This chapter contains introductory information for users of the Oracle Retail Point-of-Service application on a register. The following topics are discussed:
|
Note: The Oracle Retail Point-of-Service application may have been customized for your company. If changes were made on the default configuration, the application may look or behave differently than described in this guide.For example, the steps that describe how to tender a transaction include the franking of certain types of tender such as checks. In your configuration, however, you may not perform franking of checks when tendering a transaction. |
Oracle Retail Point-of-Service is a next-generation point-of-sale application designed to enable customer-centric retailers to carry out day-to-day transactions. Oracle Retail Point-of-Service is comprised of the following major component areas:
Daily Operations
Point-of-Service
Administration
Clock In/Out
Fulfillment
Browser
Messages
Inventory Inquiry
These components are available on the Main Options screen when Oracle Retail Point-of-Service is launched.
This section provides instructions on starting and logging in and out of the various components of Oracle Retail Point-of-Service.
The application is loaded automatically when the register is turned on. The application is running all the time as long as the register is on. You do not start or stop the application. To exit the application, turn the register off.
The Main Options screen appears when Oracle Retail Point-of-Service is launched. How you log in to the application is determined by how Point-of-Service is configured. If a component on the Main Options screen requires you to log in, you use one of the following methods:
The application prompts you for a user ID and password. The login may be completed manually by entering the user ID and password and then pressing Next/Enter. The login may also be completed by scanning a bar code or swiping a magnetic stripe card. In this case, you may or may not be prompted to enter the password.
The application prompts you to enter a user ID and then press a finger against the fingerprint reader. The login may also be completed by scanning a bar code or swiping a magnetic stripe card and then pressing a finger against the fingerprint reader.
The application prompts you to press a finger against the fingerprint reader.
To log out, press Undo/Esc on the global navigation bar until the Main Options screen appears. The Main Options screen is secure from unauthorized access since a user ID and password is required to access each of the components from this screen.
Passwords are used to restrict access to Oracle Retail Point-of-Service. The requirements for passwords are defined by the retailer. Requirements can include the definition of password length and content. For example, you may need to enter a password that is at least five but not more than ten characters and includes at least one numeric character. For information on your password requirements, consult your system administrator.
Passwords can be set to expire within a specific number of days after being set. During login, if you are warned that your password is about to expire, you can choose to change your password at that time. If you do not change your password before it expires, you may be locked out from logging into the application. You may also be locked out after a specific number of invalid login attempts. If you are locked out, a system administrator must reset your password. When your password is reset, you are assigned a temporary password that you must change immediately following your next login.
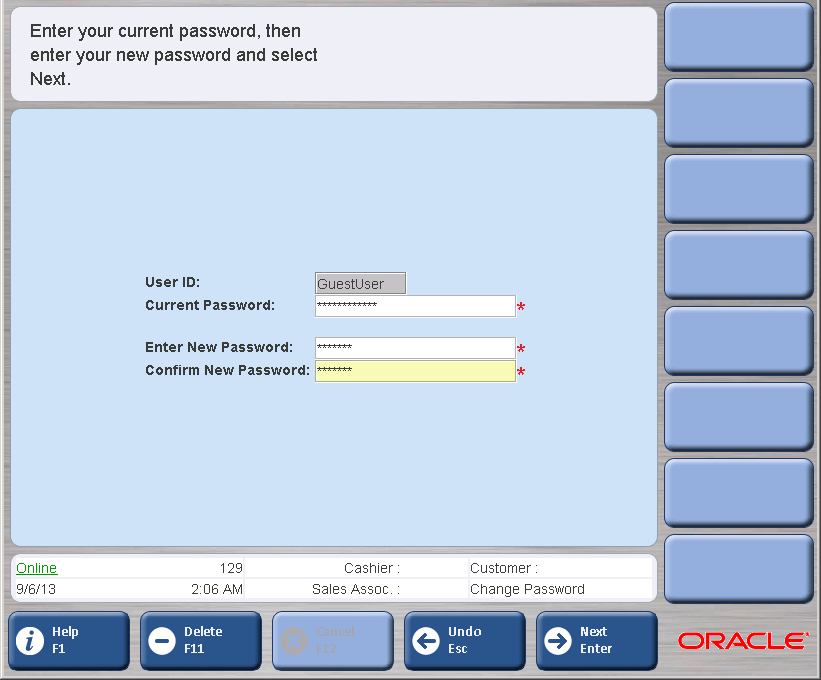
To change your password:
On the Identification screen, press Change Password/F2. The Change Password screen appears.
Enter your current password.
Enter your new password.
Enter your new password again to confirm the change. Press Next/Enter. The Identification screen appears.
To complete logging in, press Next/Enter.
This section provides information regarding the standard screen regions, navigation, and the Main Options screen.
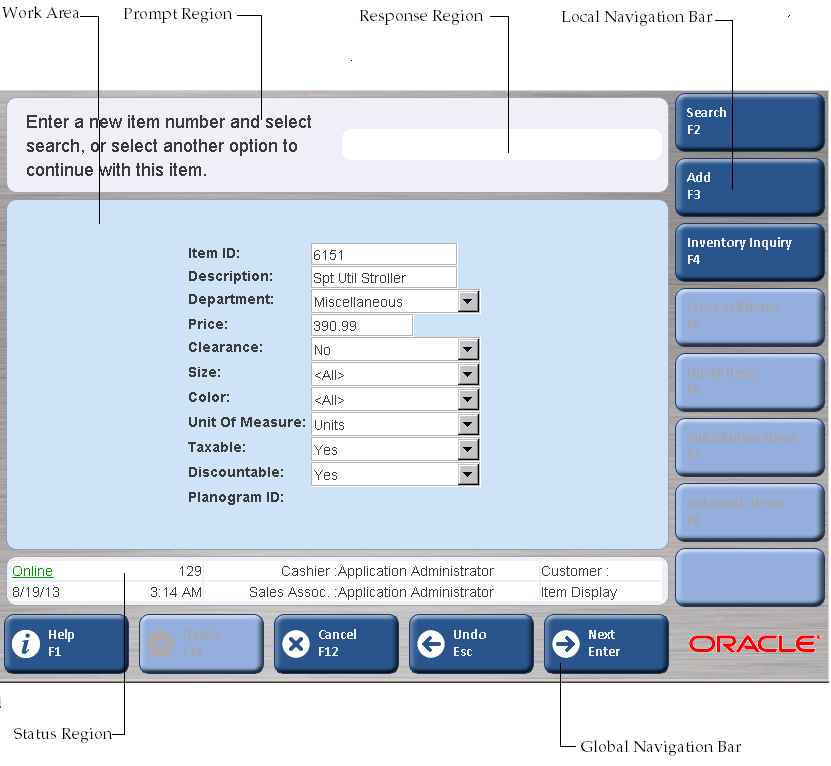
The screens are divided into regions and are named for ease of description. Becoming familiar with these regions helps you to better utilize this guide when asked to reference specific areas of the screen.
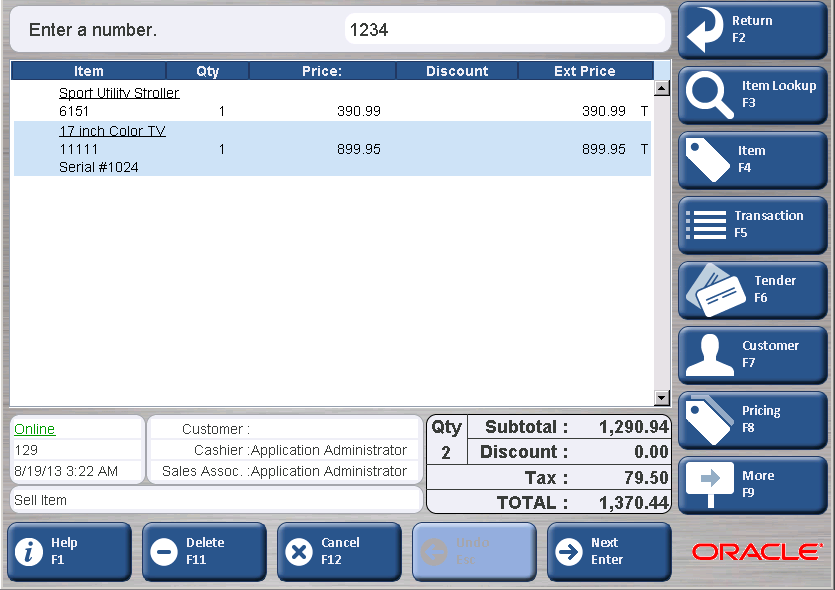
Figure 1-2 shows the screen regions. During a sale transaction, the status region includes the quantity and total amounts for the transaction. This is shown in Figure 1-3.
Table 1-1 describes the screen regions.
Table 1-1 Screen Region Descriptions
| Region | Description |
|---|---|
|
Prompt |
Most screens contain instructions in the prompt region. Instructions may direct you to input data or press a button in the local or global navigation bar. You do not interact with the prompt region. |
|
Response |
The response area is used when one piece of data is required. You enter data in the response region. Input for the response region could be obtained manually as well as through external devices such as a magnetic stripe reader or a bar code scanner. If the field has a default value, it appears in the response region. |
|
The status region is comprised of several fields:
The status region for the POS component includes additional fields:
|
|
|
Local Navigation Bar |
The local navigation bar contains eight buttons that are used to select application functionality. Each button has a label and an associated function key on the keyboard that can be used to achieve the same result as clicking the button. For example, you can click the Item/F4 button or press the F4 function key. Inactive or disabled buttons are grayed-out. Unused buttons are blank. |
|
Global Navigation Bar |
The global navigation bar contains five buttons that are used to select application functionality. The behavior of the buttons is repeated on all screens, where possible, to facilitate consistency and ease-of-use. Each button has a label and an associated function key on the keyboard that can be used to achieve the same result as clicking the button. Inactive or disabled buttons are grayed-out. |
|
Work Area |
The work area is the region of the screen where data for viewing or selection is presented. In some instances, this area is used to display or collect information from you and other times it is blank. |
|
Dialog Boxes |
Dialog boxes are used to present messages or to request verification of a requested action. When these boxes appear, you must provide the requested information and interact with the application by pressing keys or clicking buttons. These boxes only have states such as Enter, Yes, No, Cancel, Retry, Continue, and do not allow for data entry. All local and global navigation is disabled when a dialog appears. |
Navigation is divided into three sections: global navigation, local navigation, and other navigation keys. The global navigation bar provides access to functions that are constant throughout the application. The local navigation bar gives access to functions specific to the Oracle Retail Point-of-Service application, such as Item Modification, Transaction Modification, or Tender. To indicate that a function is disabled, the navigation or global button is grayed-out.
The global navigation bar provides access to global functions that are available on all screens. When a button is grayed-out, this indicates that its functionality is unavailable. The Undo/Esc button is unavailable in the following figure. Table 1-2 describes the functionality of these keys.
Table 1-2 Global Navigation Key Descriptions
| Key | Description |
|---|---|
|
The Help/F1 key enables you to access help for the current screen. When you press Help/F1, the help screen appears. You may need to choose Page Up or Page Down to find help for the specific topic required. Press Done/F1 to close the help screen. |
|
|
On most screens, the Delete/F11 key is used to clear any information that has been typed or scanned in the current field. When you press Delete,/F11 the field is cleared and ready for you to re-enter new information in the same field. For example, on the Sell Item screen, you can delete (or remove) an item on the transaction. To delete an item, select/highlight the item and press Delete/F11. The item is removed on the transaction. Note: If more than one item is to be removed, use the arrow keys to select the first item and press the space bar. Then use the arrow keys to move to the next item and press the space bar again. When all desired items are selected, press Delete/F11. |
|
|
On most screens, the Cancel/F12 key is used to cancel the current transaction or specific function. When you press the Cancel/F12 key, you are prompted to verify whether you wish to cancel the current operation. If Yes is chosen, the transaction is cancelled or the specified function is cancelled. |
|
|
The Undo/Esc key is used on most screens to back out of the current operation and return to the previous screen. Unlike the Cancel/F12 key, the Undo/Esc key does not cancel the current transaction or specific function. When Undo/Esc is pressed, you lose all of the information that has been entered on that screen. |
|
|
The Next/Enter key is used to complete the current operation. For example, if you enter an item number and press Next/Enter, the item number and its defaults (description, price, default quantity of 1, extended price, and tax code) are entered into the transaction and appear on the Sell Item screen. When the Next/Enter key is pressed after data has been entered in the work area, the required fields are validated for minimum/maximum characters and acceptable value ranges. If any of the data is invalid, an error message appears. Throughout this guide, you are directed to "scan the item or enter the item number and press Next/Enter." You only need to press Next/Enter if you have manually entered the number. If you scan the item, the operation is completed automatically (an implied Enter). |
|
|
Keys/Ctrl+K |
The Keys/Ctrl+K key is used to display the on-screen keyboard. For more information, see "On-Screen Keyboard". |
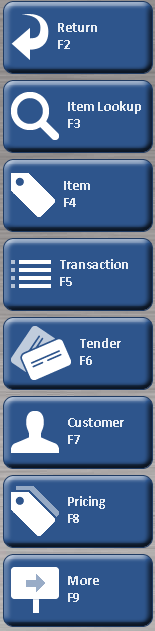
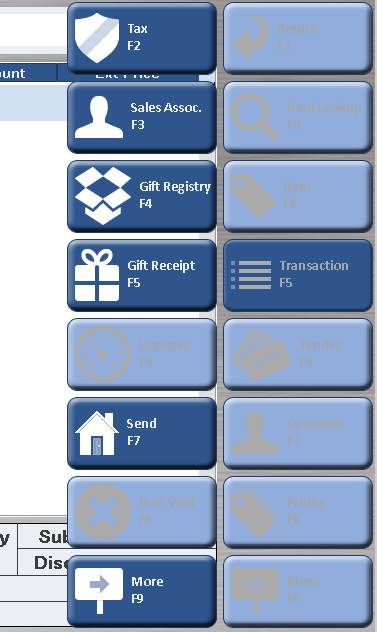
The buttons on the local navigation bar change as you navigate through the various components in Oracle Retail Point-of-Service. The functions of the local navigation bars are described under their specific component. For example, the buttons shown in Figure 1-5 are available on the Sell Item screen. Typically, when you select another screen, a different set of options appears. Buttons that are grayed-out have been designated disabled and are currently unavailable.
If there are more options available than buttons that fit on the screen, the last button is the More option. To view the additional options, press More. Press More again to return to the original set of options.
For some local navigation buttons, selecting the button displays the next set of local buttons just to the left of the original local navigation buttons. Selecting a local navigation button from the new list either displays a third set of buttons to the left or displays the appropriate screen for that button. Navigating off the buttons returns you to the current screen. Figure 1-6 shows an example of an additional set of buttons. In this example, Transaction/F5 is selected on the Sell Item screen. The navigation buttons for the transaction options are shown.
Some key actions permit you to navigate the screen to scroll lists, move from field to field, or manipulate data in a data entry field. Other key actions result in changes in application flow that are specific to the context of the screen. Still others may have globally defined behavior. Table 1-3 describes the keys.
Table 1-3 Other Navigation Key Descriptions
| Key | Description |
|---|---|
|
While entering information into a field, if the Backspace key is chosen, the character preceding the cursor is deleted and the characters following the cursor (if any) are backed-up to close the resulting gap. |
|
|
While entering information into a field, if characters are highlighted and the Delete key is pressed, the highlighted characters are deleted. If no characters are highlighted when the Delete key is pressed, the character following the cursor is deleted and the characters following the deleted character (if any) are backed-up to close the resulting gap. |
|
|
The Page Up and Page Down keys are enabled for lists that exceed the viewable area of the screen. Press Page Up or Page Down to navigate these lists. |
|
|
Some screens display a list of items from which you can select multiple items that receive the same action. For example, in a return transaction, if more than one item is to be returned, you can select multiple items by using the arrow keys to highlight the first item and pressing the space bar once. To choose additional items, use the arrow keys to move to the next item and press the space bar again. Repeat for each additional item to be chosen. To deselect an item, choose the item and press the space bar once. |
|
|
The Tab and Shift-Tab keys are enabled on screens with more than one field. The Tab key moves you to the next field on the screen (left to right, top to bottom, bottom to top). The Shift-Tab key moves you to the previous field on the screen (right to left, bottom to top, top to bottom). |
|
|
The up and down arrow keys can be used when a screen has more than one entry in a list. The up arrow moves to the entry above the current entry. The down arrow moves to the entry below the current entry. |
Retailers may provide extended data to Point-of-Service for their customers, such as recommended items for a customer. When this data is available, tabs are displayed in the Work Area of the screen to enable the user to display this data. For more information on extended data, see "Using Extended Data" in Chapter 3.
Scanning of the serial number or 15-digit IMEI number for an item is supported for the Point-of-Service and Inventory Inquiry components.
If IMEI scanning is enabled and Oracle Retail Point-of-Service is integrated with Oracle Retail Store Inventory Management, you can scan the IMEI number for the item number. If the IMEI or serial number for an item is scanned, the system connects to Oracle Retail Store Inventory Management to get the item information.
If the IMEI or serial number is scanned in transactions where the serial number is not captured, that is, layaway and order transactions, the system connects to Oracle Retail Store Inventory Management to get the item information but the serial number is not added to the transaction.
Oracle Retail Point-of-Service supports multiple languages and a default locale for the application.
|
Note: All figures and examples in this guide use English language and the English - United States locale. |
Oracle Retail Point-of-Service has a default language based on the default locale chosen for the application. In addition, each user has a preferred language that can be selected on the languages supported for the application.
Information on each screen appears in the default language for the application. If a user has a different preferred language selected, the screen appears in that preferred language.
When a customer is linked to a transaction, receipts print in the preferred language of the customer. Screens on the signature pad are also displayed in the preferred language of the customer.
Locale support means tailoring the information displayed on a screen and accepting user entered data in a format that meets the conventions of the locale, or geographic region, where the application is being used. In Oracle Retail Point-of-Service, locale support is provided to enable the date, time, currency, address, and phone number to be displayed in the default locale chosen for the application.
Value added tax (VAT) is a tax added at various stages of production based on the value added to the product at that stage.
When VAT is enabled, all functionality to modify sales tax is unavailable. The following changes are made to the screens:
The Tax/F6 button on the Item Options screen and Tax/F2 on the Trans. Options screen are not available.
Some screens have a Tax field in the summary table at the bottom of the screen that shows the total tax for the transaction. This field is not displayed.
An item level message provides information to the cashier and customer about an item or certain attributes associated with an item. Item level messages can be displayed on the Sell Item and inventory inquiry screens. Item level messages can also be printed on a receipt.
For example, if an item is being sold as a final clearance and cannot be returned, a message could be displayed on the screen and printed on the receipt to inform the cashier and customer that the item cannot be returned. To see an example of an item level message, see Figure 3-1. The Winter Sweater item has an item level message about the discount.
When Oracle Retail Point-of-Service is launched, the Main Options screen appears. This screen provides access to the component areas. These components are arranged vertically on the right-hand side of the screen in the local navigation bar.
You utilize these components to perform various tasks. Table 1-4 describes the components:
Table 1-4 Application Components
| Component | Description |
|---|---|
|
Daily Operations |
Enables you to access the Start of Day, Register Open, Till Options, Register Close, and End of Day functions. |
|
Point-of-Service |
Enables you to conduct the Return, No Sale, Item, Transaction, Tender, Customer, Pricing, Order, House Account, Reprint Receipt, Till, Manager, Gift Card/Certificate, and Redeem operations. |
|
Enables you to access the E-Journal, Reset Totals, Security, Manager, and About functions. See the Oracle Retail POS Suite Implementation Guide, Volume 1 - Implementation Solutions for more information. Also enables you to access the Transaction Re-entry and Training Mode features. For more information, see Chapter 11. |
|
|
Clock In/Out |
Enables you to record your time using the Clock In/Out component. |
|
Fulfillment |
Enables you to access order information for item pickup. |
|
Enables you to access a web browser if a URL to a web site has been configured. For more information, see "Browser Functionality". |
|
|
Messages |
Enables you to view notification messages for the store if available. The message and creation date are displayed. If a message is available, an indicator appears in the status region of the screen. For an example, see Figure 3-6. |
|
Inventory Inquiry |
Enables you to request inventory information on an item if Oracle Retail Store Inventory Management was purchased and implemented. |
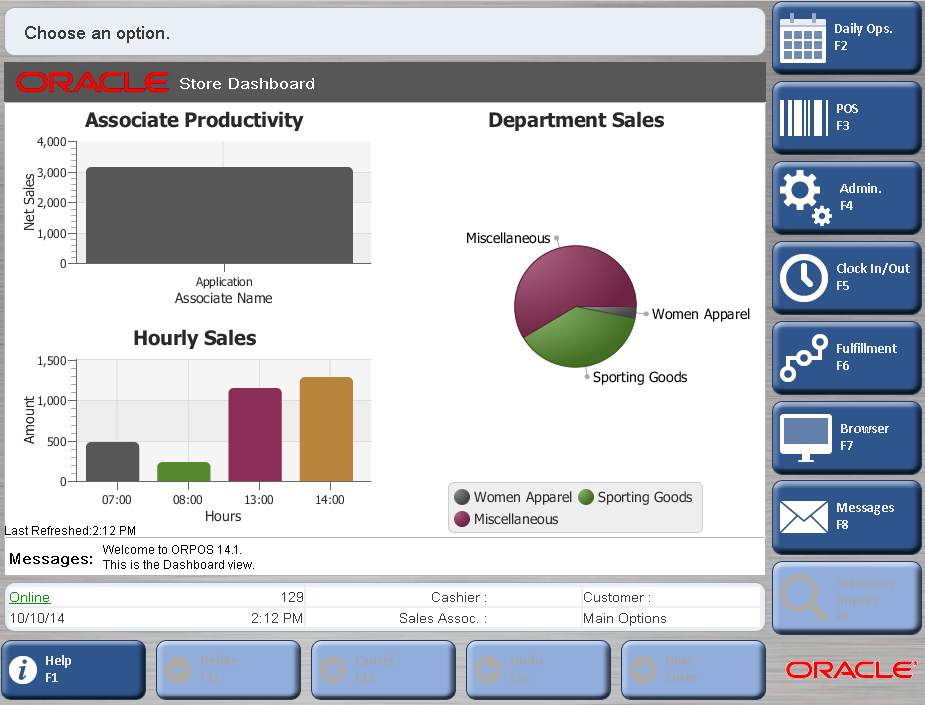
Figure 1-7 shows the Main Options screen with the Store Dashboard displayed. The dashboard displays graphical reports and messages for the store. The reports that appear depend on how the dashboard is configured. The displayed reports are updated in real time.
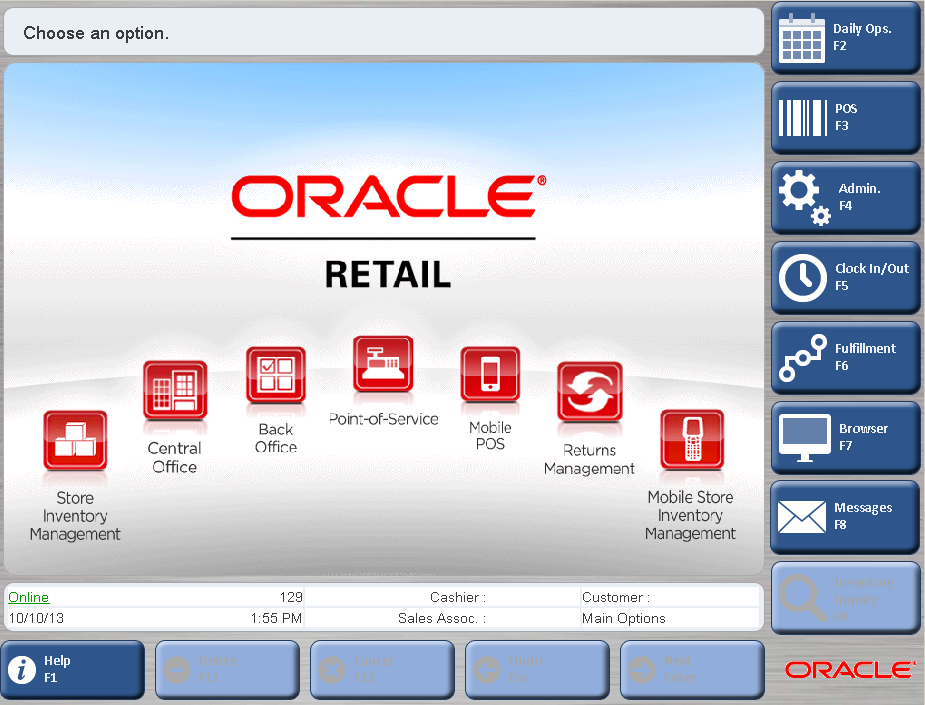
If the dashboard is not configured for display, the Main Options screen appears as shown in Figure 1-8. The status region and navigation bars are the same in both views.
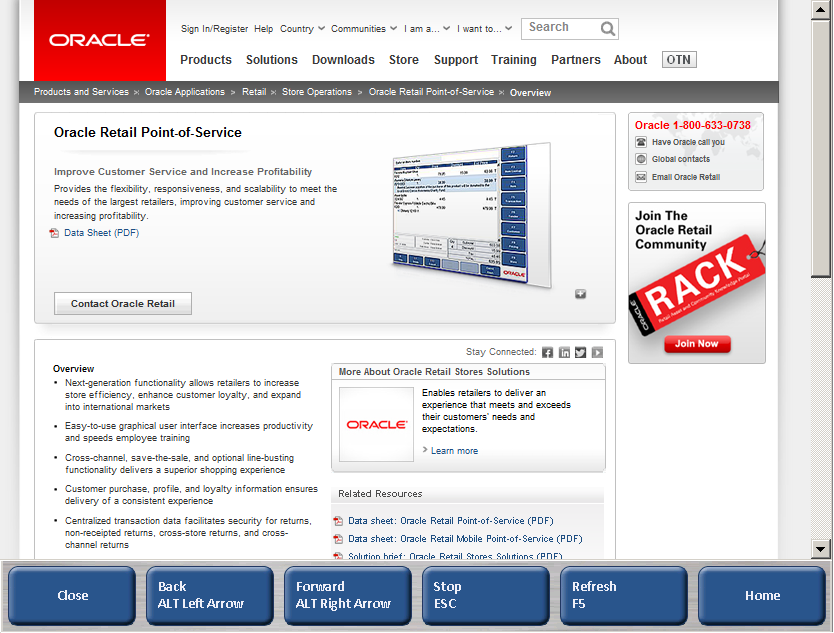
You can access a web browser if a URL to a web site has been configured for your system.
To access the web browser, press Browser/F7 on the Main Options screen. You are prompted to log in. See "Logging In and Out". After logging in, the web site appears. Figure 1-9 shows an example of the screen.
|
Note: If your system has not been configured for this feature, an error appears after logging in. Press Next/Enter to return to the Main Options screen. |
A navigation bar appears at the bottom of the screen. Table 1-5 describes the keys. To return to the Main Options screen, press Close.
Table 1-5 Web Browser Navigation Key Descriptions
| Key | Description |
|---|---|
|
Return to the Main Options screen. |
|
|
Back/ALT Left Arrow |
Same as the Back button on a browser window. |
|
Same as the Forward button on a browser window. |
|
|
Same as the Stop button on a browser window. |
|
|
Same as the Refresh button on a browser window. |
|
|
Home |
Same as the Home button on a browser window. |
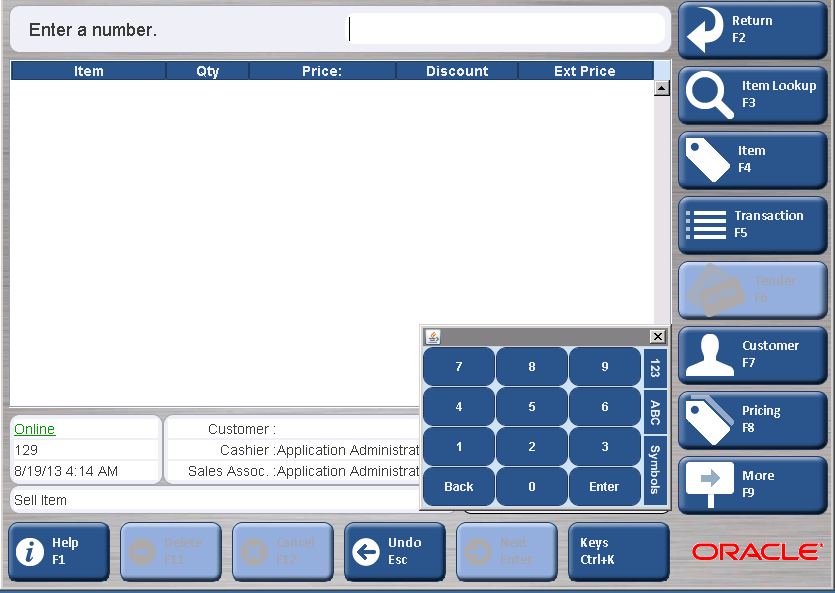
You can enable a keyboard on the Point-of-Service screens. The on-screen keyboard can be used to enter data on the screen rather than using a physical keyboard at the register. The Enter button on the keyboard works the same as the Next/Enter global navigation button.
|
Note: The on-screen keyboard is only supported in the English language. |
To display the on-screen keyboard, press Ctrl+K/Keys. Figure 1-10 shows an example of the keyboard displayed with numbers.
Table 1-6 describes the buttons on the on-screen keyboard.
During the business day, certain types of data may need to be updated for a register. For example, new items may have been added for the store.
Updates to register data only occur when the Main Options screen is being displayed. When an update is occurring, the Data Update dialog message appears and all of the buttons on the screen are unavailable. When the update is complete, the Main Options screen appears and the buttons are enabled.