| Oracle® Retail Point-of-Service User Guide Release 14.1 E54472-02 |
|


 Previous |
 Next |
A transaction is an interaction with a customer in which merchandise is exchanged for a tender of value. Performing transactions is part of the POS component selected on the Main Options screen.
All transactions begin on the Sell Item screen. A transaction is started when an item number is entered on the Sell Item screen. You can enter an item number by any of the following methods:
Enter the item number manually.
Scan a bar code.
Select an item on the scan sheet.
Additional items can be added to the transaction. A transaction can be suspended and resumed.
After all items have been added, the payment process begins. A customer can pay with multiple tenders. The transaction completes when the balance is zero. Return and No Sale are transaction types that begin by selecting a button on the Local Navigation Bar.
For more information on transactions, see the following sections:
When selling items to customers, the Sell Item screen is the home base. It is where all transactions begin, and it appears again when a transaction ends. Like other screens with a Local Navigation Bar, you may choose one of the function buttons on the right. Beginning a transaction to sell to a customer is an implied function. This can be done by entering an item number.
If an item is added to a sale transaction by scanning the barcode, a quantity for the item can be entered on the keyboard before scanning the item. To enter the quantity:
On the keyboard, press asterisk (*) and then the quantity number. For example, press *5.
Scan the item. The item is added to the sale transaction in the selected quantity.
To access the Sell Item screen:
On the Main Options screen, press POS/F3.
Enter the login information. The Sell Item screen appears.
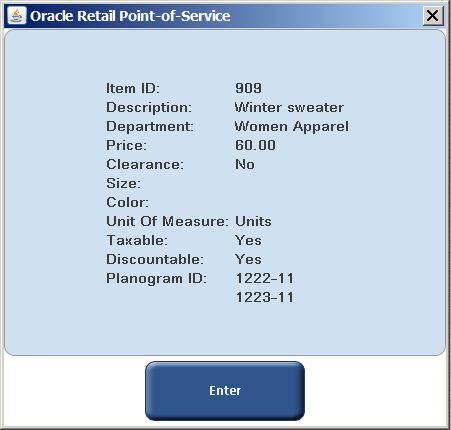
The item description is a link to information about the item. To display the information, select the link. Figure 3-2 shows an example of the item information for the Winter Sweater item. After viewing the information, press Enter to return to the Sell Item screen.
Enter an item number and press Next/Enter.
If the item requires a serial number, you are prompted to enter the serial number. Enter the serial number and press Next/Enter.
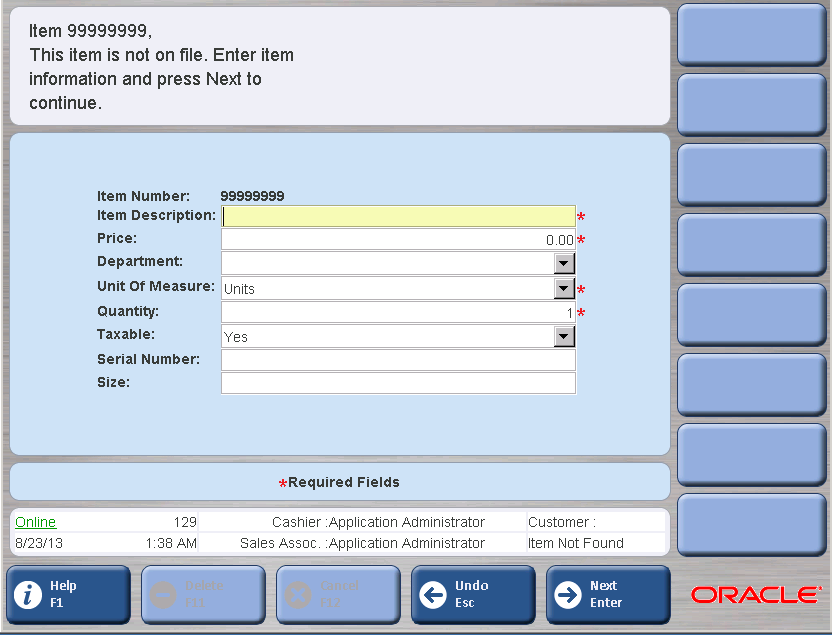
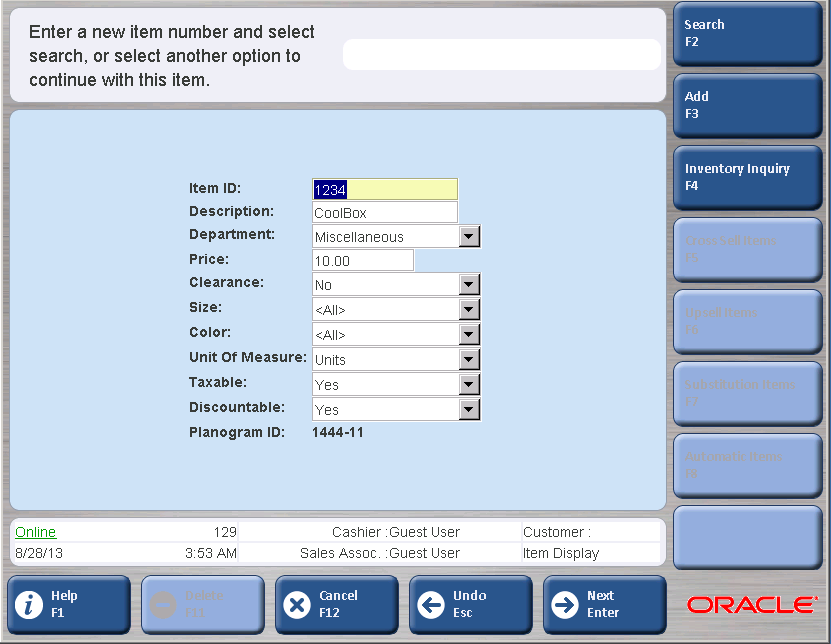
If the item does not exist, the Item Not Found screen appears. Enter the item information and press Next/Enter.
The item is added to the list. The transaction totals on the Sell Item screen are updated.
When all items have been entered, tender the transaction. For information, see "Tendering a Transaction".
A scan sheet can be used to add items to a sale transaction. Actual items and non-merchandise items, such as alterations, can be included on the scan sheet. Items can also be grouped into categories. You can access the scan sheet on the Sell Item screen.
To add an item on the scan sheet:
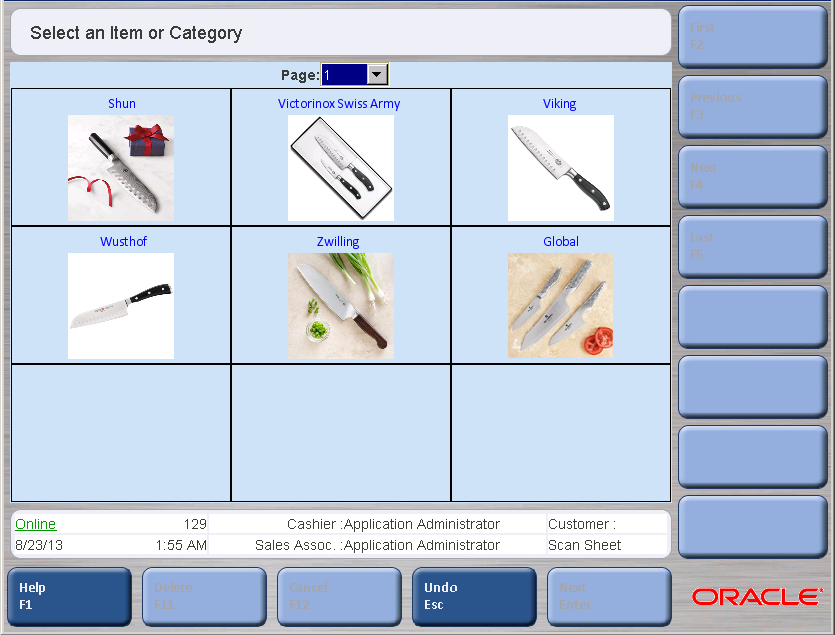
On the Sell Item screen, press More/F9, More/F9, and then Scan Sheet/F2. The Scan Sheet appears.
Make a selection on the scan sheet.
Select a category and press Next/Enter. The items in the category appear.
Select an item and press Next/Enter. If the item requires additional input, such as a serial number, you are prompted to enter the information.
The item is added to the transaction. The list of items and transaction totals on the Sell Item screen are updated.
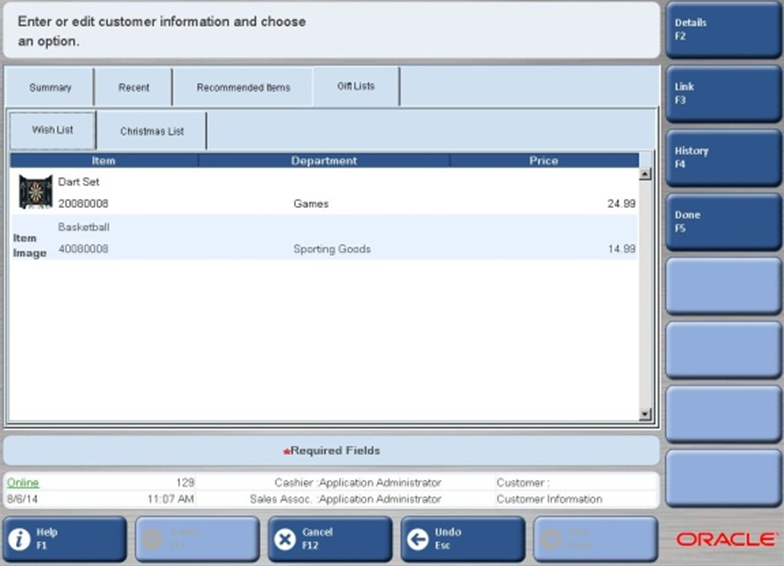
If extended data is available, tabs are displayed to view the information for the customer. Table 3-1 describes the available tabs and the information displayed when the tab is selected.
Table 3-1 Extended Data Tab Descriptions
| Tab | Description |
|---|---|
|
Summary |
Summary of recent shopping done by this customer. |
|
Recent |
List of items recently purchased by this customer. |
|
Recommended Items |
List of items recommended for this customer based on the current list of items in the transaction. |
|
Gift Lists |
Sub-tabs are displayed based on the gift lists available for the retailer. Based on the sub-tab selected, the items available for that list appear. |
Figure 3-5 shows an example of the Customer Information screen with tabs and the sub-tabs for the Gift Lists tab.
When available, Point-of-Service displays the following types of extended data:
If available, you can view supplemental customer data to better understand the customer's preferences, purchase history, gift lists, and so on. The customer extended data is retrieved from a data source external to Point-of-Service. Extended customer data could include recently viewed items, lists created by the customer such as gift or wish lists, or recent purchases.
If available, you can view supplemental item data to provide additional information to the customer. Extended item data is retrieved from a data source external to Point-of-Service when using the item search function. Extended item data can include extended item description and recommended items.
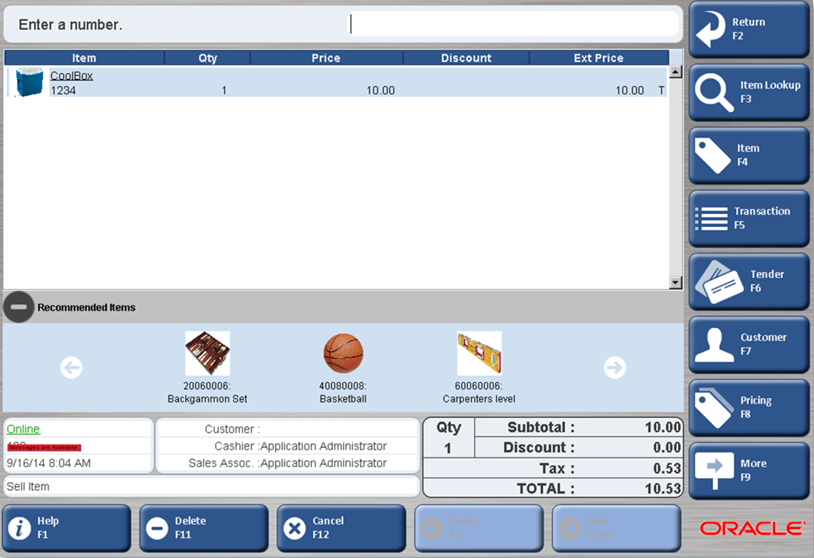
If available, you can view item recommendations for the linked customer. The list of items is built based on the items in the transaction. If the list of items is changed, the displayed list is updated based on the updated transaction.
On the Sell Item screen, items from the list of recommended items can be added to the transaction. To add a recommended item to the transaction:
Select the item in the Recommended Items list. The Item Display screen appears.
To add that item to the transaction, press Add/F3. The item is added to the list on the Sell Item screen. You are returned to the Sell Item screen.
Oracle Retail Point-of-Service supports selling gift cards and gift certificates. Gift cards are plastic cards with magnetic strips that hold an amount of value that can be used as tender. A Gift certificate is a piece of paper that holds an amount of value that can be used as a form of tender.
Oracle Retail Point-of-Service supports selling gift cards and using gift cards as a form of payment. A Gift Card does not hold actual value until it is purchased and activated by the Oracle Retail Point-of-Service application. Gift card purchases are not eligible for discounts other than employee discount, price override, and tax adjustment. The quantity cannot be changed, as each gift card has its own unique number. If the gift card is returned, then the activation is canceled and the gift card can be reused. If the total value of the gift card is used during a transaction, it is deactivated.
To sell a gift card:
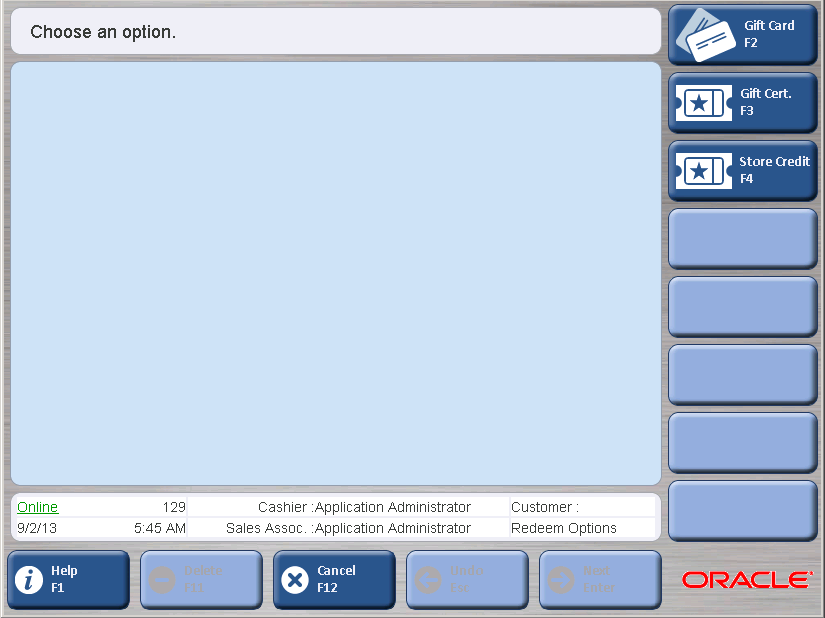
On the Sell Item screen, press More/F9 and then Gift Card/Cert./F7. The Gift Options screen appears.
Press Gift Card/F2. The GC Options screen appears.
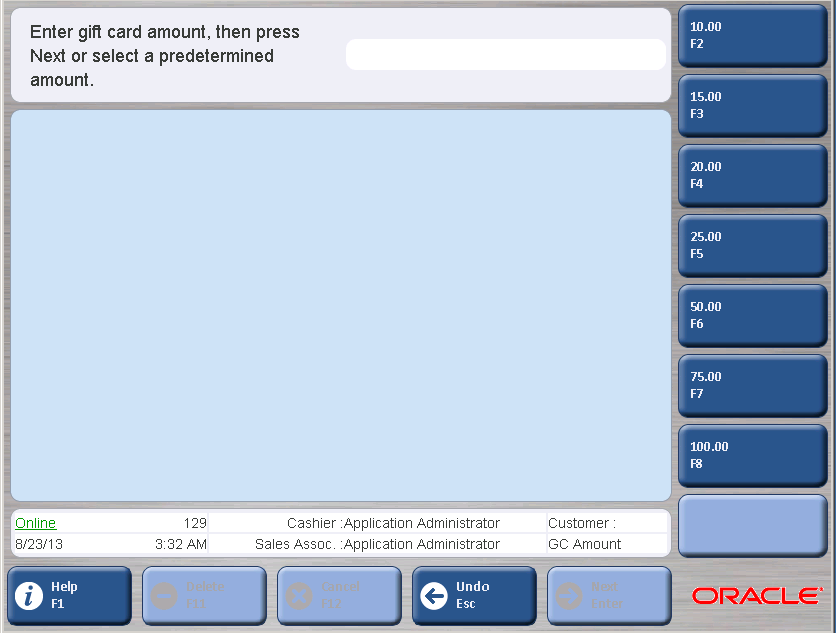
Press Issue/F2. The GC Amount screen appears.
Enter the gift card amount or select an amount. Press Next/Enter. The Sell Gift Card screen appears.
Enter the gift card number. The gift card number can be entered manually or by swiping the card or scanning the bar code. The Sell Item screen appears.
To begin the payment process, press Tender/F6. See "Tendering a Transaction" to tender a transaction.
After tendering the transaction is complete, the Activation screen appears. The gift card is activated.
A gift card is reloaded when you add monetary value to an existing gift card.
To reload a gift card:
Press More/F9 and then Gift Card/Cert./F7 on the Main Options screen. The Gift Options screen appears.
Press Gift Card/F2. The GC Options screen appears.
Press Reload/F3. The GC Amount screen appears.
Follow Steps 4 through 7 in "Selling a Gift Card".
A gift certificate has to be sold at the store before it used as tender.
To sell a gift certificate:
Press More/F9 and then Gift Card/Cert./F7 on the Main Options screen. The Gift Options screen appears.
Press Gift Cert./F3 The Tender Number screen appears.
Enter the gift certificate number and press Next/Enter. The Issue Amount Entry screen appears.
Enter the gift certificate amount or select a predetermined amount. Press Next/Enter. The Sell Item screen appears.
To start the payment process, press Tender/F6. See "Tendering a Transaction" for more information on tendering. After the transaction is tendered, Oracle Retail Point-of-Service franks and prints the gift certificate and returns to the Sell Item screen.
A gift registry is a list of items that the registrant desires to receive as gifts for a registered occasion.
|
Note: Oracle Retail Point-of-Service only captures the Gift Registry number. The retailer is responsible for setting up the Gift Registry. |
When selling an item, the item can be marked as a Gift Registry item and the Gift Registry number can be entered. A Gift Receipt is automatically printed.
After an item is added to the transaction, you can link it to a Gift Registry.
To link an item to a gift registry:
Select the item using the up and down arrow keys.
Press Item/F4 and then Gift Registry/F5. The Gift Registry screen appears.
Scan the Gift Registry number or manually enter it. Press Next/Enter.
The Sell Item screen appears. A Gift Reg. annotation is appended to the item entry. A Gift Receipt is automatically printed for the items associated with a Gift Registry.
A customer may request a gift receipt, with no prices shown, to provide with a gift. The person receiving the gift can return the items using the gift receipt. There are several ways to create gift receipts:
To create a gift receipt that contains all the items in a transaction, you create the gift receipt at the transaction level. See "Issuing a Gift Receipt for a Transaction".
To create a separate gift receipt for each selected item in a transaction, you create the gift receipt at the item level. See "Issuing Gift Receipts for Items".
To create a gift receipt for a single item or multiple items, you reprint a gift receipt for the transaction. See "Reprinting Receipts".
For any item, the retailer can define the minimum age a customer must be in order to purchase the item. When an item with an age restriction is added to a transaction, you are prompted to enter the customer's date of birth. Oracle Retail Point-of-Service calculates the customer's age and determines if the item can be sold to the customer. Age verification is done for an item when it is added to a sale, layaway, or order transaction. You can bypass the age verification if this is allowed by the application configuration.
If multiple items in a transaction require age verification, you are prompted to enter the customer's date of birth only for the first item that has an age restriction. If the first age verification was skipped and an item with a more restrictive age requirement is then added, you are again prompted to enter a date of birth.
If an item has an age restriction, the Date of Birth screen appears.
To handle the age restriction:
Enter the date of birth and press Next/Enter. If the age of the customer meets or exceeds the required age, the item is allowed in the transaction. If the item cannot be purchased because the customer's age does not meet the minimum age requirement, the item is removed on the transaction.
To bypass the age verification, press Skip/F2.
An item, known as the primary item, can have a set of other items or fees associated with it. These other items or fees are known as related items. Related items can be automatically or optionally added to a transaction when the primary item is added. For example, when a customer purchases a car battery, a mandatory environmental disposal fee is automatically added to the transaction and the cashier is prompted to offer the customer the option to select a 12, 24, or 36-month warranty.
A primary item can have multiple groups of related items defined for it. Table 3-2 describes the different groups of related items.
Table 3-2 Related Group Items
| Group | Description |
|---|---|
|
Automatic |
These related items are automatically added to the transaction, for example, a bow case for a bow. |
|
Cross Sell |
These related items are add-on or accessory items for the primary item, for example, a knife sharpener for a set of knives. |
|
Upsell |
These related items are higher-level items, for example, a pair of higher-quality running shoes. |
|
Substitution |
These related items are available as replacements or substitutions, for example, a better warranty for a refrigerator. |
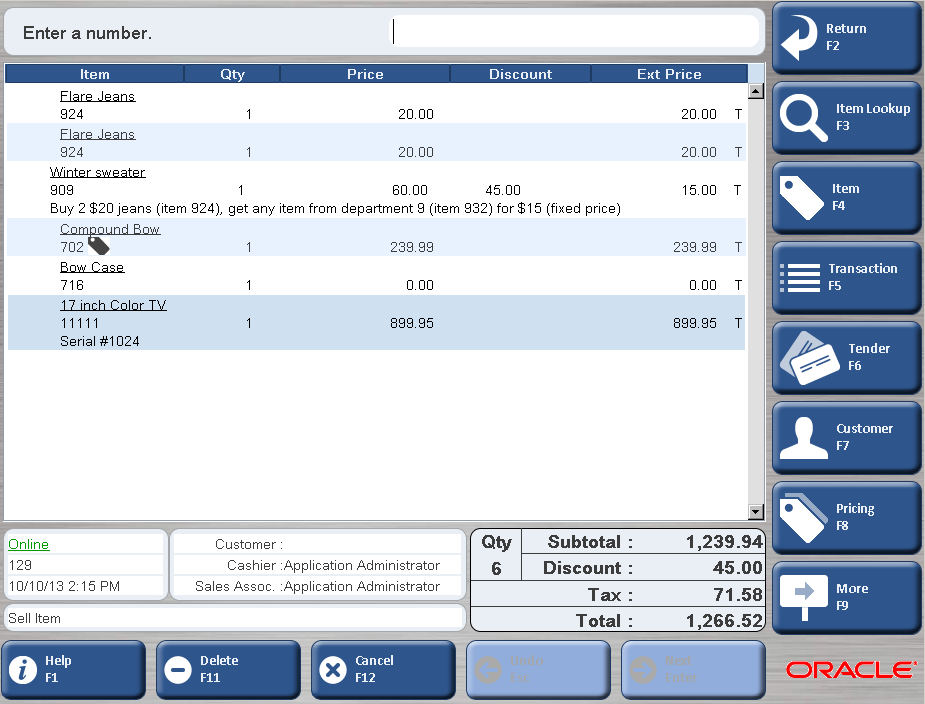
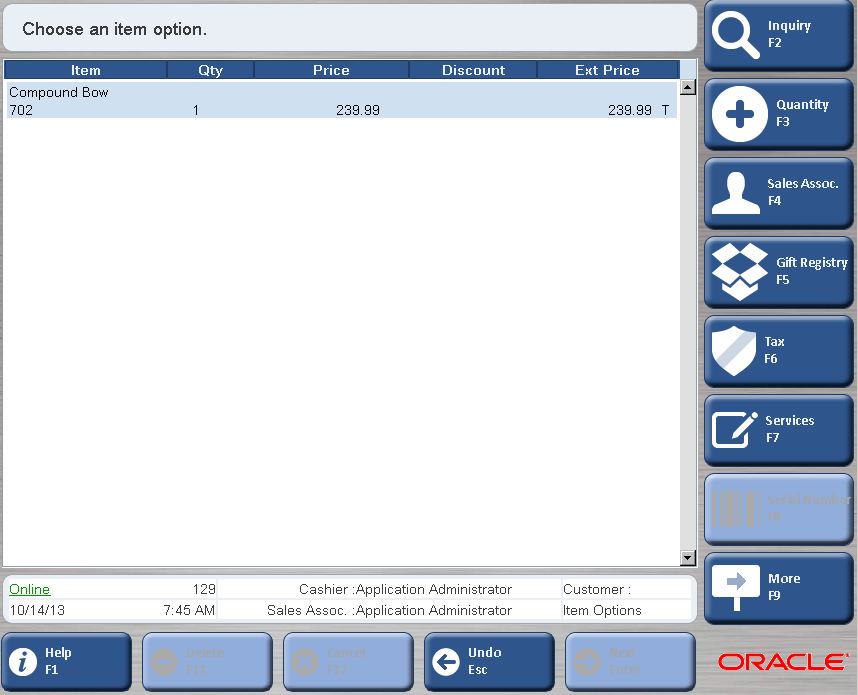
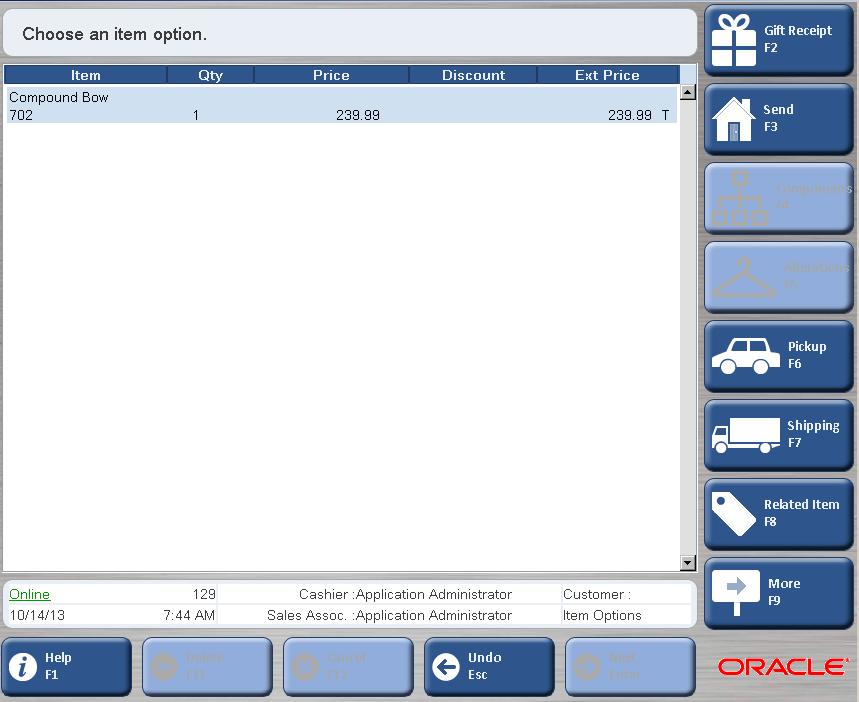
Figure 3-1 shows an example of an item with a related item in a transaction. The Compound Bow item includes the Bow Case as a related item. On this screen, the tag icon is displayed for items that have related items.
If a related item is flagged as non-saleable, it can only be added to a transaction when the primary item has already been added. If the primary item is deleted from the transaction, all of its related items are also deleted.
If a related item has an age restriction, the customer's age is verified. If the customer is not allowed to purchase the related item, the primary item remains in the transaction, but the related item is not added. For more information on age restrictions, see "Handling Age Restricted Sales".
To handle related items:
If an item has Automatic related items, the related items are automatically added to the transaction. Each related item is shown in the list on the Sell Item screen.
If an item has any of the other groups of related items, you can add items from those groups:
To access the related items, press Item/F4. The Item Options screen appears.
Press More/F9 and then Related Items/F8. The Related Items screen appears.
Select the related items:
For Cross Sell related items, press Cross Sell Items/F2. The Cross Sale Items screen appears.
For Upsell related items, press Upsell Items/F3. The Upsell Items screen appears.
For Substitution related items, press Substitute Items/F4. The Substitute Items screen appears.
To add related items to the transaction, select the items from the list and press Add/F2. The related items are added to the transaction. You are returned to the Sell Item screen.
|
Note: If you need to select multiple related items, select an item and press the spacebar. Repeat this for each item to be selected. As each item is selected, the line item becomes shaded. |
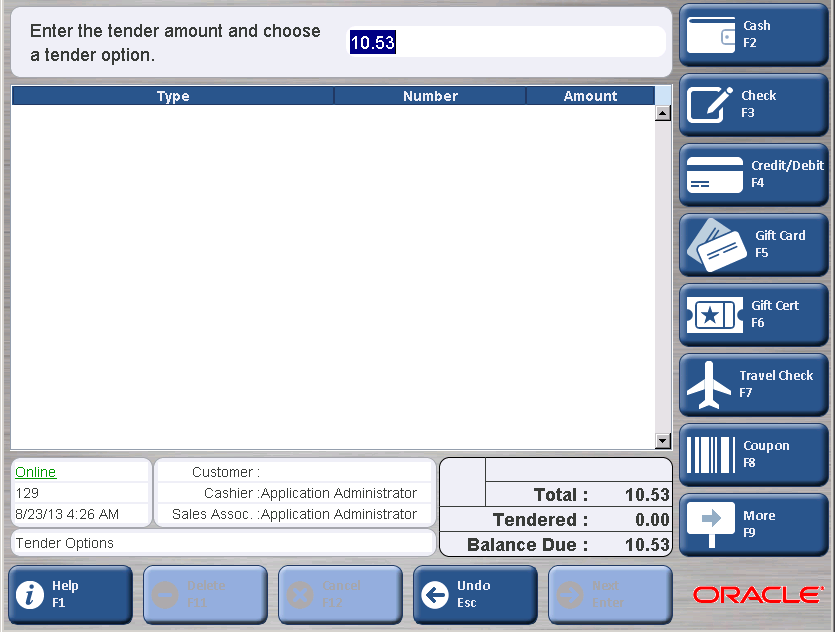
When all items have been entered in the Sell Item screen, the transaction is ready for the tender process. This is the process of accepting one or more types of payment to pay for the balance of the transaction. To tender a transaction, you press Tender/F6 on the Sell Item screen. The following Tender options are available:
Cash
Check
Credit/Debit
Gift Card
Gift Certificate
Traveler's Check
Coupon
Store Credit
Mall Certificate
Purchase Order
Money Order
Foreign Currency
Instant Credit
House Account
See the following individual sections for details on the different Tender options. The following steps assume that items have already been entered into Oracle Retail Point-of-Service and you are ready to tender the transaction.
|
Note: The Instant Credit option on the Tender Options screen lets you enroll a customer for a house account. A house account is a credit card issued by the retailer. For more information on house accounts, see "Enrolling for a House Account" in Chapter 6. |
As an alternative to printing a receipt for a customer, a receipt can be sent to the customer by e-mail. An eReceipt can be created for sale and return transactions. When this feature is enabled, you are prompted to ask if the customer wants an eReceipt.
After completing the tender of the transaction, the Receipt Options screen appears. Choose the option for the receipt:
To print a receipt, press Print/F2. The receipt prints.
To create an eReceipt, press Email/F3. The eReceipt Email Address screen appears. Enter the e-mail address for the customer. Enter the address again to confirm. Press Enter.
To both print and send a receipt, press Print & Email/F4. The eReceipt Email Address screen appears. Enter the e-mail address for the customer. Enter the address again to confirm. Press Enter. The receipt is also printed.
If the receipt could not be sent, it prints. The Sell Item screen appears.
A cash drawer warning indicates that the amount of cash in the cash drawer is less than the required minimum amount or greater than the maximum amount allowed. After the prompt to close the cash drawer, a warning appears if either of these conditions occur:
If the amount is less than the required minimum amount, a warning flashes in the lower left corner of the screen. No action is necessary.
If the amount is greater than the maximum amount allowed, the Cash Drawer Warning dialog appears. You must select Enter to continue.
You should notify a store manager if a warning appears.
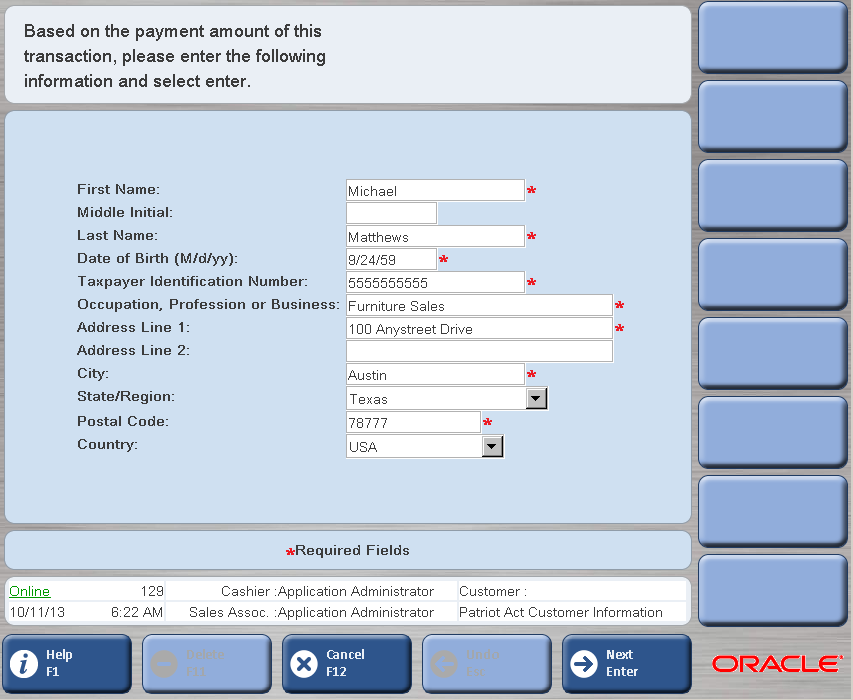
In compliance with the Patriot Act (PAT), the IRS requires that certain customer information must be captured when the tender collected for a transaction is over $10,000 in specific types of tender. The specific types of tender are defined by the IRS:
Coins and currency of the United States
Coins and currency of any country whose currency can be converted to United States currency
Money orders whose face value is $10,000 or less
Traveler's checks whose face value is $10,000 or less
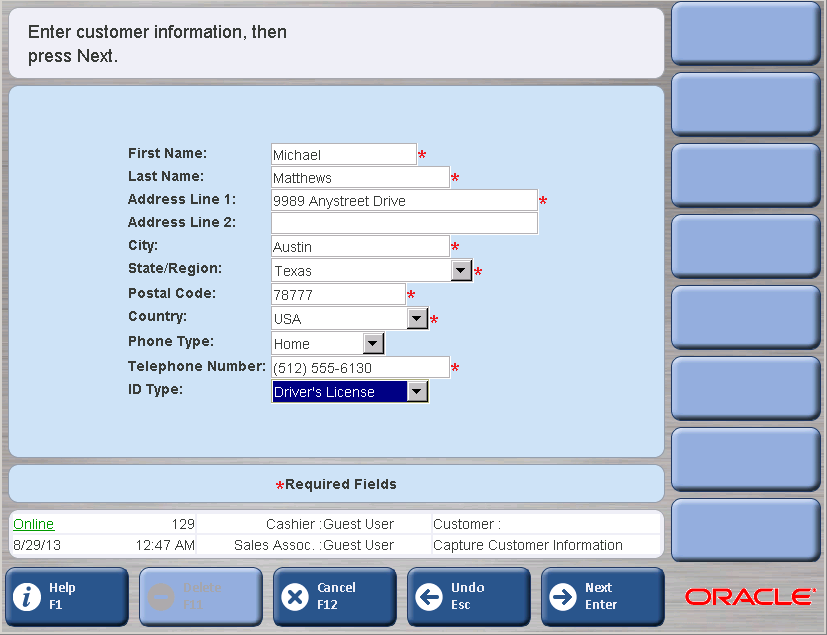
If the tender amount for a sale, exchange, layaway payment, or order payment transaction meets the requirement for PAT compliance, the PAT Customer Information screen appears. Any customer information that has already been linked to the transaction is defaulted on the screen.
To enter customer information:
Enter the information and press Next/Enter. The Enter ID screen appears.
Select the ID Type from the menu and press Next/Enter. The Swipe ID screen appears.
Swipe or manually enter the ID number and press Next/Enter. The ID Origin field appears. Select the ID Country and ID State/Region from the menus. Press Next/Enter.
If you do not want to enter the customer information, press Cancel/F12. The Sell Item screen appears. The items for the transaction remain, but the tenders are discarded.
To tender a transaction using cash:
Press Tender/F6. The Tender Options screen appears.
Enter the amount of the tender and press Cash/F2.
If the amount of the tender is more than the balance due, the Issue Change screen appears, prompting you to issue the indicated amount of change. If the tender amount meets the requirement for PAT compliance, the PAT Customer Information screen appears. After the customer information is entered, you are prompted to close the drawer.
If the amount of the cash tender is less than the balance due, the Tender Options screen appears to complete the tender.
If the cash tender is for the entire amount due, the cash tender is completed. If the tender amount meets the requirement for PAT compliance, the PAT Customer Information screen appears. Enter the customer information.
After the prompt to close the cash drawer, the system checks the amount of cash in the cash drawer. If the amount of cash is less than the required minimum amount or greater than the maximum amount allowed, a warning appears. For more information, see "Handling a Cash Drawer Warning".
If eReceipt is enabled, you are prompted to select a receipt option. Otherwise, the receipt prints. You are returned to the Sell Item screen.
Oracle Retail Point-of-Service can accept both deposit checks as well as e-checks. E-check is a term used when a check has been converted to an electronic fund transfer and has been directly deposited to the retailer's account. With an e-check tender, there is no paper check deposited at the bank.
To tender a transaction with a check:
On the Tender Options screen, the balance due appears. Enter the amount of the check and press Check/F3. The Enter ID screen appears.
Select the ID Type from the menu and press Next/Enter. The Enter ID Number screen appears.
Swipe or manually enter the ID number and press Next/Enter. If a driver's license number was entered, the ID Origin field appears. Select the ID Country and the ID State/Region from the menus. Press Next/Enter.
The Enter Phone screen appears.
Enter the customer's phone number and press Next/Enter. The Check Entry Scan screen appears.
Scan the check through the MICR device or enter the bank information and press Next/Enter. The Check Number screen appears.
Enter the check number and press Next/Enter.
If referred, the Check Referral screen appears. Enter the approval code and press either Approved/F2 or Declined/F3.
If Approved/F2 is pressed, the Close Drawer, Franking Insert, and Franking Remove screens appear. If the check is a deposit check, the Place Deposited Check screen appears. To place the deposited check in the drop safe, press Enter. If the check presented is an e-check, the Return E-check to Customer screen appears.
If Declined/F3 is pressed, the Tender Options screen appears to select another tender option.
If eReceipt is enabled, you are prompted to select a receipt option. Otherwise, the receipt prints. You are returned to the Sell Item screen.
Table 3-3 describes how each result of check authorization is handled.
Table 3-3 Check Authorization Results
| Result | Process |
|---|---|
|
You are prompted to insert the check for franking and then to remove the check. |
|
|
An error message appears. You are returned to the Tender Options screen to choose another tender type. Press Next/Enter to clear the message. |
|
|
The authorizer requires additional information. The Check Referral screen appears. Respond to the request by typing the required information, or follow the instructions on the screen.
|
|
|
The Authorization Retry dialog appears. You can choose to retry the authorization or to cancel. If cancel is selected, the Check Referral screen appears. |
|
|
The Check Authorization Offline dialog appears. Press Enter. The Check Referral screen appears. |
|
|
The Check Warning dialog appears.
|
Transactions can be tendered with both credit and debit cards in Oracle Retail Point-of-Service. The authorization of the credit or debit card is handled by an external payment application.
To tender using a credit/debit card:
Press Credit/Debit/F4 on the Tender Options screen. You are prompted to have the customer swipe the card. After the card is successfully swiped, the authorization process begins automatically.
|
Note: If the credit/debit card is not approved, follow the prompts to handle the reason for the non-approval. |
When approval is received, ask the customer to sign on the signature pad. When the signature is complete, press Next/Enter. The Verify Signature screen appears.
To accept the signature, press Yes. To reject it, press No. If the signature is rejected, you return to the Tender Options screen to select another Tender Option to complete the tender.
If Yes is selected, and the credit tender is equal to the balance due, the Close Drawer screen appears. If multiple tenders were used, authorization is done for the next tender.
If eReceipt is enabled, you are prompted to select a receipt option. Otherwise, the receipt prints. You are returned to the Sell Item screen.
|
Note: A gift card has to be activated before it can be used as a tender option. |
To tender a transaction using a Gift Card, on the Tender Options screen, press Gift Card/F5. Swipe the gift card or enter the gift card number manually. After the card is successfully swiped or the number is entered, the authorization proceeds.
If the amount of the gift card is more than the amount of the purchase or is a partial tender, the gift card remaining balance is shown on the customer receipt. If eReceipt is enabled, you are prompted to select a receipt option. Otherwise, the receipt prints. You are returned to the Sell Item screen.
If the amount of the gift card is less than the amount on the transaction receipt, you are returned to the Tender Options screen to complete the tender.
|
Note: Gift certificates have to be issued in Oracle Retail Point-of-Service before they can be used to tender a transaction. |
To tender a transaction using a Gift Certificate:
On the Tender Options screen, enter the amount of the gift certificate and press Gift Cert./F6. The Store Number screen appears.
Enter the store number where the gift certificate was issued and then press Next/Enter or press Corporate Issued/F2. The Tender Number screen appears.
Scan the barcode or manually enter the gift certificate number and press Next/Enter. Oracle Retail Point-of-Service checks the database to approve the validity of the certificate based on amount and certificate number.
If the gift certificate tender is greater than the balance due, Oracle Retail Point-of-Service evaluates the difference and the Change Due Options screen appears. Select a change option and press Next/Enter. The Close Drawer, Franking Insert, and Franking Remove screens appear.
If the gift certificate tender is less than the balance due, the gift certificate amount appears and the Tender Options screen appears for you to complete the tender. Once the tender is completed, the Close Drawer, Franking Insert, and Franking Remove screens appear.
If the amount of the gift certificate is equal to the balance due, the Close Drawer, Franking Insert, and Franking Remove screens appear.
If eReceipt is enabled, you are prompted to select a receipt option. Otherwise, the receipt prints. You are returned to the Sell Item screen.
To tender a transaction using a traveler's check:
On the Tender Options screen, enter the total amount of all traveler's checks presented if the amount is different on the balance due and press Travel Check/F7. The Traveler's Check screen appears.
Enter the number of traveler's checks presented and press Next/Enter.
If the amount of the traveler's checks is greater than the balance due, the Issue Change screen appears, prompting you to issue change. If the tender amount meets the requirement for PAT compliance, the PAT Customer Information screen appears. The Franking Insert and Franking Remove screens appear.
If the traveler's check tender is less than the balance due, you are returned to the Tender Options screen to select another tender type to complete the transaction. Once you have tendered the entire transaction amount, if the tender amount meets the requirement for PAT compliance, the PAT Customer Information screen appears. The Franking Insert and Franking Remove screens appear.
If eReceipt is enabled, you are prompted to select a receipt option. Otherwise, the receipt prints. You are returned to the Sell Item screen.
|
Note: When coupons are used as the form of tender, overtendering is not permitted. Overtendering is when the coupon amount is greater than the balance due. |
To tender a transaction using a non-store coupon:
On the Tender Options screen, enter the tender amount, if less than the balance due, and press Coupon/F8.
The Coupon Entry screen appears. Scan or manually enter the coupon number (minimum of 3 digits) and press Next/Enter.
If the non-store coupon tender amount is greater than the balance due, the Coup. Overtender screen appears. To select a different tender option on the Tender Options screen, press Next/Enter.
If the non-store coupon tender amount is less than the balance due, the non-store coupon tender item appears on the Tender Options screen and the coupon amount is deducted on the tender. You are returned to the Tender Options screen to select an additional tender type to complete the tender.
When the tender is complete, if eReceipt is enabled, you are prompted to select a receipt option. Otherwise, the receipt prints. You are returned to the Sell Item screen.
Store credit is a type of tender that is valid only for the retailer who issued it. When a customer return or exchange results in a negative balance due, you can issue a store credit, which can be redeemed toward the purchase of other merchandise.
To use a store credit as tender:
On the Tender Options screen, enter the transaction amount and press More/F9 and then Store Credit/F2. The Tender Number screen appears.
Enter the store credit number and press Next/Enter.
If validation of store credit is enabled, the system verifies that the store credit was issued and has not been tendered or redeemed:
If the store credit is valid, you complete the tender process.
If the store credit is not valid, a dialog message appears and you are returned to the Sell Item screen.
Complete the tender process with the store credit.
If the store credit amount is more than the transaction amount, the Change Due Options screen appears, prompting you to select a change option. The Franking Insert and Franking Remove screens appear.
If the store credit amount is less than the transaction amount, the Tender Options screen appears, prompting you to select another tender option to complete the tender. After the tender is complete, the Franking Insert and Franking Remove screens appear.
If the store credit amount is equal to the transaction amount, the Close Drawer, Franking Insert, and Franking Remove screens appear.
If eReceipt is enabled, you are prompted to select a receipt option. Otherwise, the receipt prints. You are returned to the Sell Item screen.
To tender a transaction with a mall certificate:
Enter the amount of the mall certificate tender in the Tender Options screen and press More/F9 and then Mall Cert./F3. The Mall Gift Cert. Options screen appears.
Select the option for the certificate. Press MGC as Check/F2 or MSG as PO/F3. Both of these options have the same flow.
If the mall certificate tender amount is greater than the transaction amount, the Issue Change screen appears, prompting you to issue change. The Franking Insert and Franking Remove screens appear.
If the mall certificate tender amount is less than the transaction amount, the Tender Options screen appears to complete the tender. Once the tender is complete, the Close Drawer, Franking Insert, and Franking Remove screens appear.
If the mall certificate tender amount is equal to the transaction amount, the Close Drawer, Franking Insert and Franking Remove screens appear.
If eReceipt is enabled, you are prompted to select a receipt option. Otherwise, the receipt prints. You are returned to the Sell Item screen.
In Oracle Retail Point-of-Service, you can accept a business purchase order as a tender option.
To tender a transaction with a purchase order:
On the Tender Options screen, enter the purchase order amount and press More/F9 and then Purchase Order/F4. The Agency Select screen appears.
Select the agency.
Select the agency name from the menu and press Next/Enter.
To enter an agency that is not in the list, select Other and press Next/Enter. The Agcy/Bus Name screen appears. Enter the agency or business name. If the transaction is taxable, select Yes from the menu. If the transaction is not taxable, select No. Press Next/Enter.
The P.O. Number screen appears.
Enter the last five digits of the purchase order number and press Next/Enter. The P.O. Amount screen appears.
If the purchase order amount is more than or equal to the transaction amount, the Close Drawer, Franking Insert, and Franking Remove screens appear.
If the purchase order amount is less than the transaction amount, you are returned to the Tender Options screen to complete the tender. Once the tender is completed, the Close Drawer, Franking Insert, and Franking Remove screens appear.
If eReceipt is enabled, you are prompted to select a receipt option. Otherwise, the receipt prints. You are returned to the Sell Item screen.
Money orders issued by banks or other financial institutions can also be used as tender in Oracle Retail Point-of-Service. To use a money order as a form of tender:
On the Tender Options screen, enter the money order amount, press More/F9 and then Money Order/F5.
If the money order amount is more than the transaction amount, the Issue Change screen appears, prompting you to issue change. If the tender amount meets the requirement for PAT compliance, the PAT Customer Information screen appears. The Close Drawer, Franking Insert, and Franking Remove screens appear. You are returned to the Sell Item screen.
If the money order amount is less than the transaction amount, the Tender Options screen appears, prompting you to complete the tender. Once the tender is completed, if the tender amount meets the requirement for PAT compliance, the PAT Customer Information screen appears. The Close Drawer, Franking Insert, and Franking Remove screens appear.
If the money order amount is equal to the transaction amount and if the tender amount meets the requirement for PAT compliance, the Pat Customer Information screen appears. The Close Drawer, Franking Insert, and Franking Remove screens appear.
If eReceipt is enabled, you are prompted to select a receipt option. Otherwise, the receipt prints. You are returned to the Sell Item screen.
Oracle Retail Point-of-Service can accept foreign currencies as tender if this is allowed by the application configuration.
To tender using foreign currency:
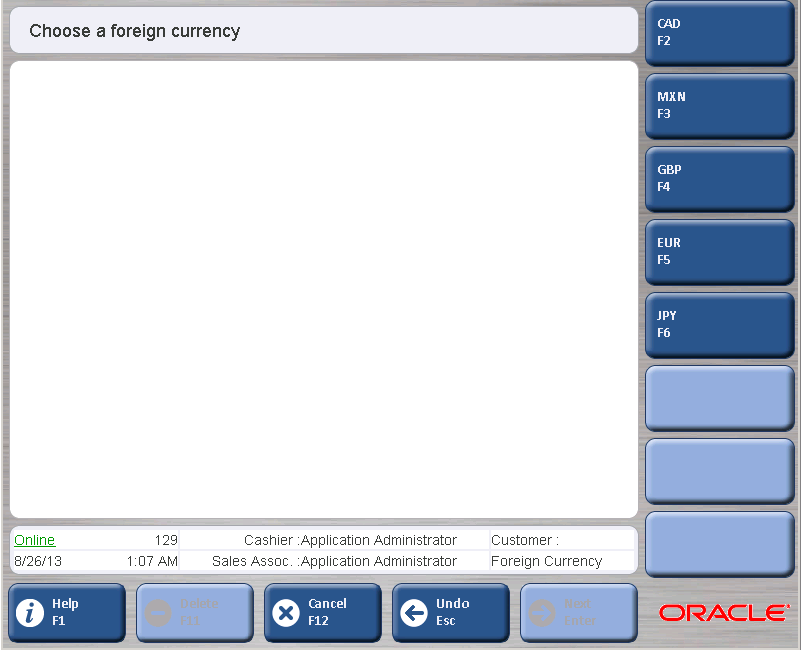
Press More/F9 and then Foreign Currency/F6 on the Tender Options screen. The Foreign Currency screen appears.
Select the foreign currency. The tender options available for that currency appear. Not all tender options are available for every foreign currency.
Enter the amount of foreign currency and select a tender option. Depending on the exchange rate, Oracle Retail Point-of-Service calculates the amount due in foreign currency.
If the amount of foreign currency is less than the transaction amount, Oracle Retail Point-of-Service calculates the difference in the base currency and returns to the Tender Options screen for the tender to be completed. Once the tender is completed, if the tender amount meets the requirement for PAT compliance, the PAT Customer Information screen appears. The Close Drawer screen appears.
If the amount of foreign currency is more than the transaction amount, the Issue Change screen appears, prompting you to issue change. Change is issued in the base currency. If the tender amount meets the requirement for PAT compliance, the PAT Customer Information screen appears.
If the amount of foreign currency is equal to the transaction amount and if the amount meets the requirement for PAT compliance, the PAT Customer Information screen appears. The Close Drawer screen appears.
If eReceipt is enabled, you are prompted to select a receipt option. Otherwise, the receipt prints. You are returned to the Sell Item screen.
To tender a transaction using a house account:
On the Tender Options screen, press More/F9 and then House Account/F8. The House Account Card screen appears.
Enter the house account number. After the card number is entered, the authorization proceeds.
When the tender is complete, if eReceipt is enabled, you are prompted to select a receipt option. Otherwise, the receipt prints. You are returned to the Sell Item screen.
Return enables the customer to return merchandise for an exchange or refund. Customer information and a personal ID may be required for the return.
Items can be returned without receipts. These returns can be done by using the item number or by searching for the transaction. Transactions in which the items were purchased can be searched by customer, purchase date, store number, check, credit/debit card number, gift card number, or serial number.
If Oracle Retail Returns Management was purchased and implemented, it may be used to authorize the return of the items the customer wants to return. When Oracle Retail Returns Management is used, only the following personal IDs are supported:
Driver's License
Passport
Military ID
State/Region ID
For more information on Oracle Retail Returns Management, see the Oracle Retail Returns Management User Guide.
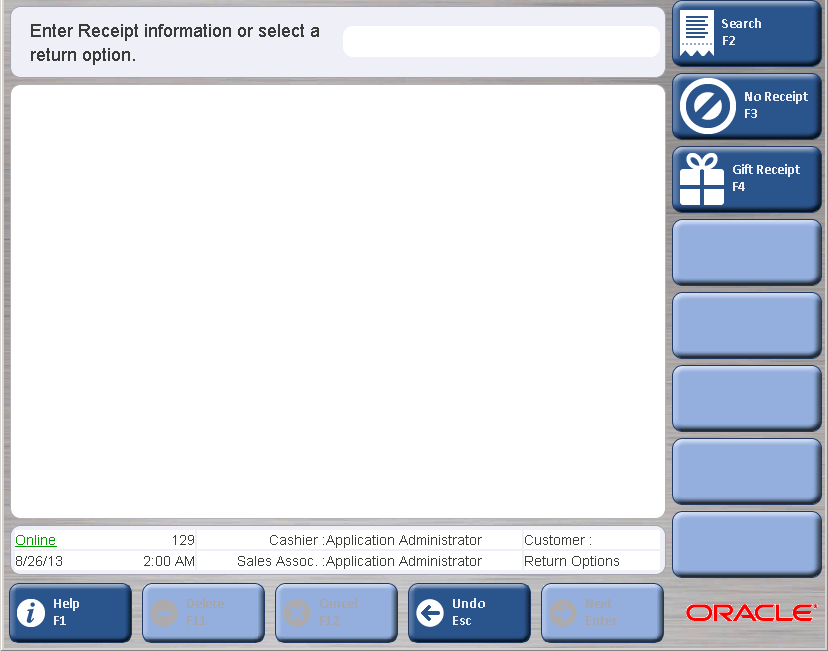
To access the Return option on the Sell Item screen, press Return/F2 to display the Return Options screen. A return can be performed if a receipt is available, a receipt is not available, or a gift receipt is available. Each of these options is described in the following sections.
To perform a return transaction with a receipt available:
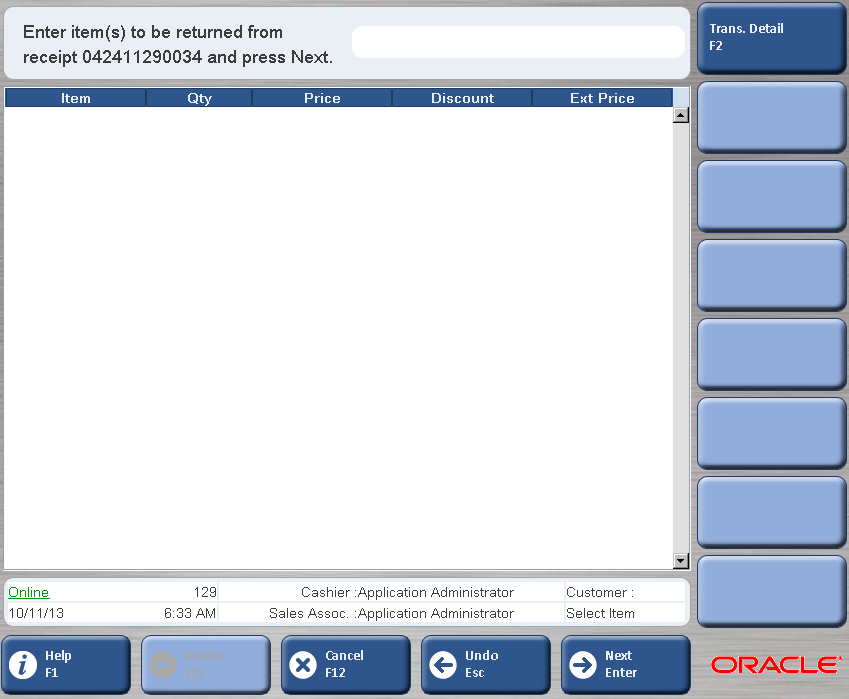
Enter the receipt information or scan the receipt barcode to enter the information. Press Next/Enter. The Select Item screen appears.
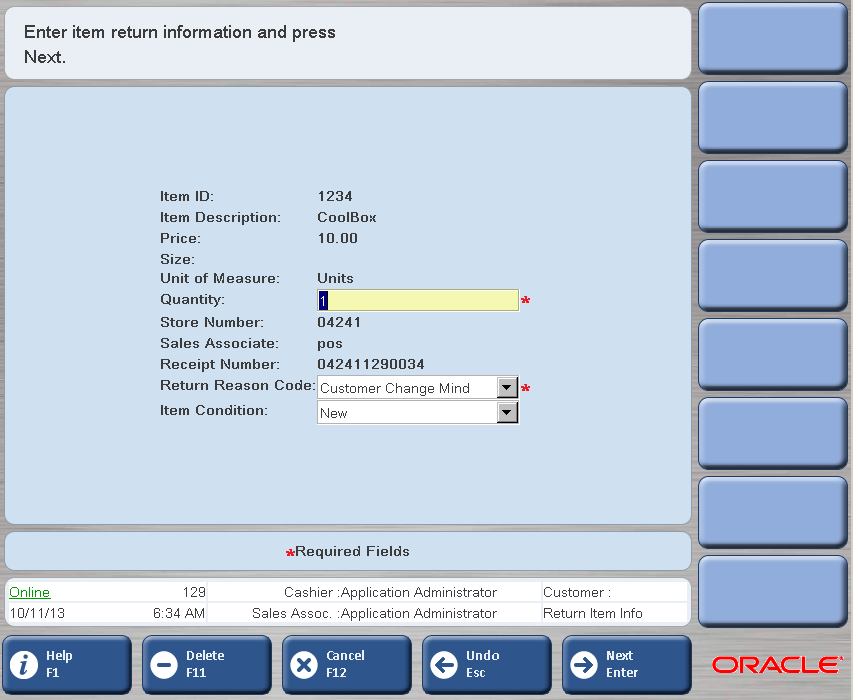
Enter the items to be returned. To view all items in the particular transaction, press Trans Detail/F2 and select the items to be returned on the receipt. To select more than one item, select the first item and press the space bar. Select the other items to be returned. Press Next/Enter. The Return Item Info screen appears.
Enter the item return information. Select a return reason and item condition from the menus. Press Next/Enter.
If the item is not returnable, a dialog message appears and you are returned to the Select Item screen. See Step 3.
If the item has a restocking fee, the Restocking Fee dialog box appears. To accept the restocking fee, press Yes. To decline the restocking fee, press No. The entry on the Sell Item screen is updated with the quantity to be returned in parentheses and the Ext. price as a negative number.
If a customer ID is required for the return, the Customer Options screen appears.
Enter a customer ID to link to the transaction or choose a customer option.
If a personal ID is required for the return, the Personal ID Entry screen appears.
Enter the customer name. If a customer is already linked to the transaction, that information appears on the screen. Enter the ID number and select the ID type from the menu. Select the ID country and ID state from the menus. Press Next/Enter. You are returned to the Sell Item screen.
Press Tender/F6. If returns are being authorized by Oracle Retail Returns Management and any items are not authorized for return, the Return Response screen appears. Otherwise, the Refund Options screen appears. See Step 12.
For each item, the following information is shown:
Table 3-4 Return Response Columns
| Column | Description |
|---|---|
|
Response |
The response returned from authorization and the reason for the response. The following responses may be displayed:
|
|
Description/Item |
Item description and number. |
|
Qty |
Quantity. |
|
Ext Price |
Extended price. This is the price for the total quantity being returned. |
Handle any items that were not authorized for return:
To approve the return of any items with a response of Manager Overridable Denial or Contingent Authorization, select the items and press Manager Override/F2. The response for the items is changed to Approved.
To accept the authorized and approved items for return, press Next/Enter. The Refund Options screen appears.
Select a refund option and press Next/Enter. The Issue Refund screen appears.
If eReceipt is enabled, you are prompted to select a receipt option. Otherwise, the receipt prints. You are returned to the Sell Item screen.
You can perform a return by searching for the transaction. There are several search options available:
Search for a transaction using the customer number
Search for a transaction using the purchase date
Search for a transaction using the store number
Search for a transaction using the check number
Search for a transaction using the credit, debit, or gift card number
Search for a transaction using the item serial number
Search for a transaction using the order information
When searching using the customer, the search can be done using the customer ID number or the Cust. Search Options screen.
To return an item by searching for the transaction:
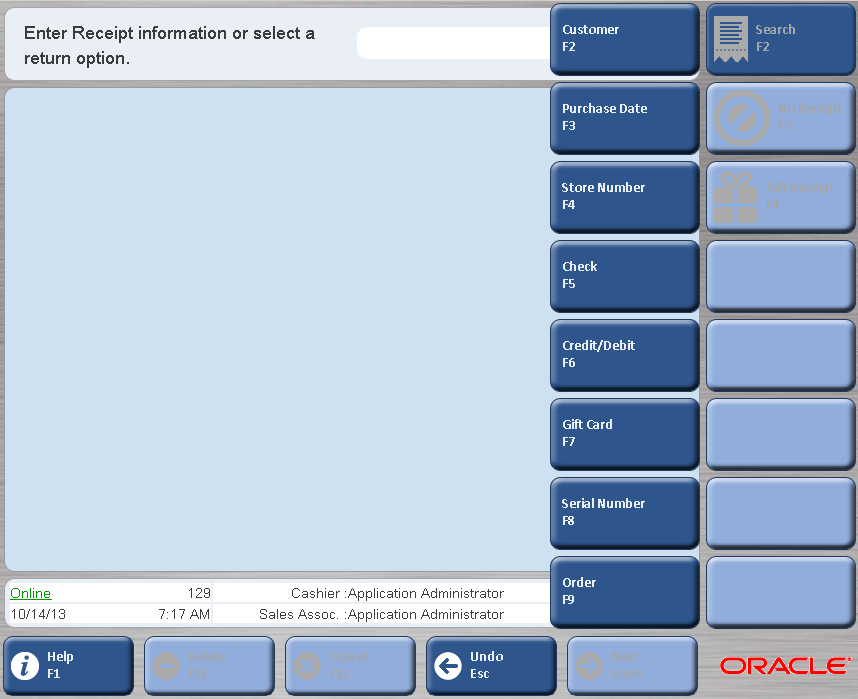
Press Search/F2 on the Return Options screen. The navigation buttons for the search options appear.
Choose the type of search. For more information, see the following sections:
To search for a transaction using the customer IDs:
Press Customer/F2. The Customer Options screen appears.
Enter the customer ID and press Next/Enter. The Display Trans. screen appears.
Select a transaction and press Next/Enter. The Select Item screen appears. To complete the return, see Steps 2 through 12 in "Performing a Return with a Receipt".
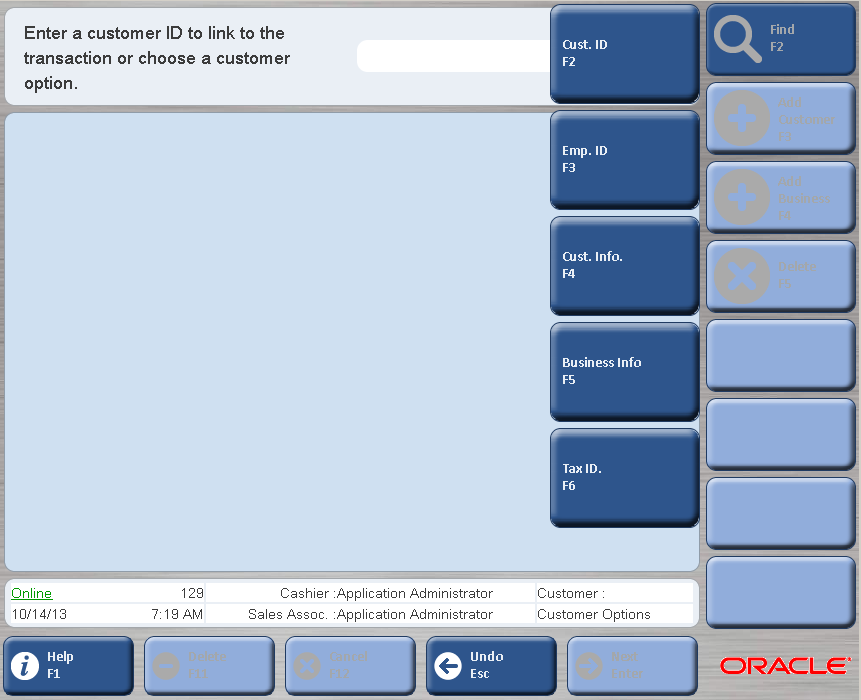
The navigation buttons for the customer search options appear when Find/F2 is pressed on the Customer Options screen.
This screen has multiple options through which a transaction can be searched. They are Customer ID, Employee ID, Customer Information, Business Information, and Tax ID. Each of these options has a different flow.
If Cust. ID/F2 is pressed, the Search by Customer ID screen appears. Enter the customer ID and press Next/Enter. The Customer Information screen appears. Press Link/F3. The Display Trans screen appears. Select a transaction number and press Next/Enter. The Select Item screen appears. To complete the return, see Steps 2 through 13 in "Performing a Return with a Receipt".
If Emp ID/F3 is pressed, the Search By Emp. ID screen appears. Enter the employee ID and press Next/Enter. The Customer Information screen appears. To complete the return, see the above section on searching using Customer ID.
If Cust. Info/F4 or Business Info/F5 is pressed, the Search By Customer Info screen appears. Enter the required information and press Next/Enter. The Customer Information screen appears. To complete the return, see the above section on searching a transaction using Customer ID.
If Tax ID/F6 is pressed, the Search by Tax ID screen appears. Enter the tax ID and press Next/Enter. The Customer Information screen appears. To complete the return, see the above section on searching a transaction using Customer ID.
Transactions can be searched for using the purchase date if no receipt is available. A customer must be linked to the transaction in order to complete a search by purchase date.
To search for a transaction using the purchase date:
Press Purchase Date/F3. The Purchase Date screen appears.
Enter the start and end dates and press Next/Enter. The Customer Options screen appears.
Press Find/F2. The Cust. Search Options screen appears. See "Searching for a Transaction Using the Customer Search Options Screen" to complete the return.
Transactions can be searched for using the store number where it was purchased if no receipt is available. A customer must be linked to the transaction in order to complete a search by store number.
To search using the store number:
Press Store Number/F4. The Store Number screen appears.
Enter the store number and press Next/Enter. The Customer Options screen appears.
Press Find/F2. The Cust. Search Options screen appears. See "Searching for a Transaction Using the Customer Search Options Screen" to complete the return.
A transaction can be searched for using the check details that were used to tender the transaction.
To search for a transaction using a check:
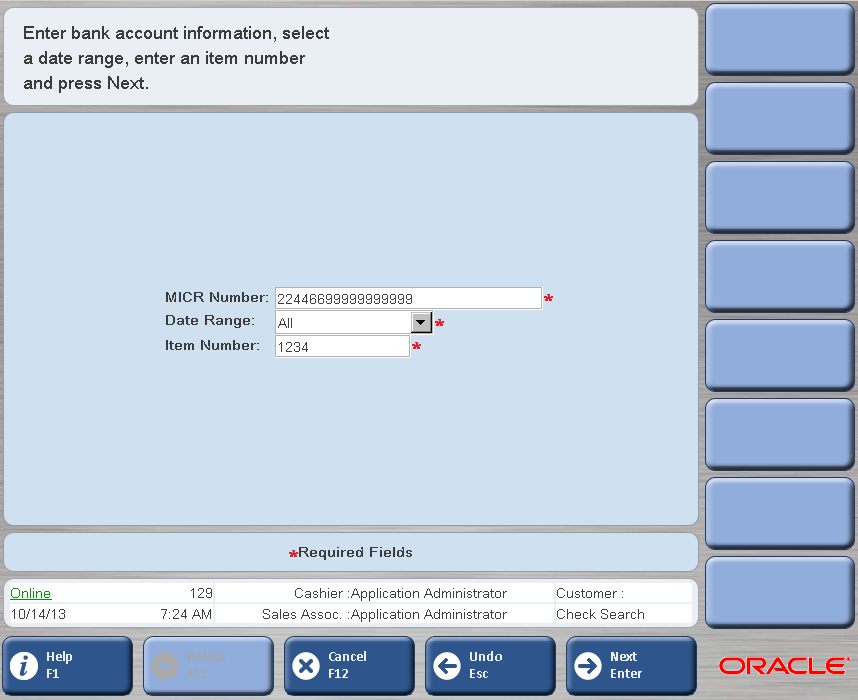
Press Check/F5. The Check Search screen appears.
Enter the required information and press Next/Enter. If transactions are found for the check tender, the Select Item screen appears. See Steps 2 through 12 in "Performing a Return with a Receipt".
A transaction can be searched for using the credit or debit card that was used to tender the transaction.
|
Note: A transaction can also be searched for by the gift card used to tender the transaction. The Gift Card Search screen appears instead of the Credit/Debit screen. |
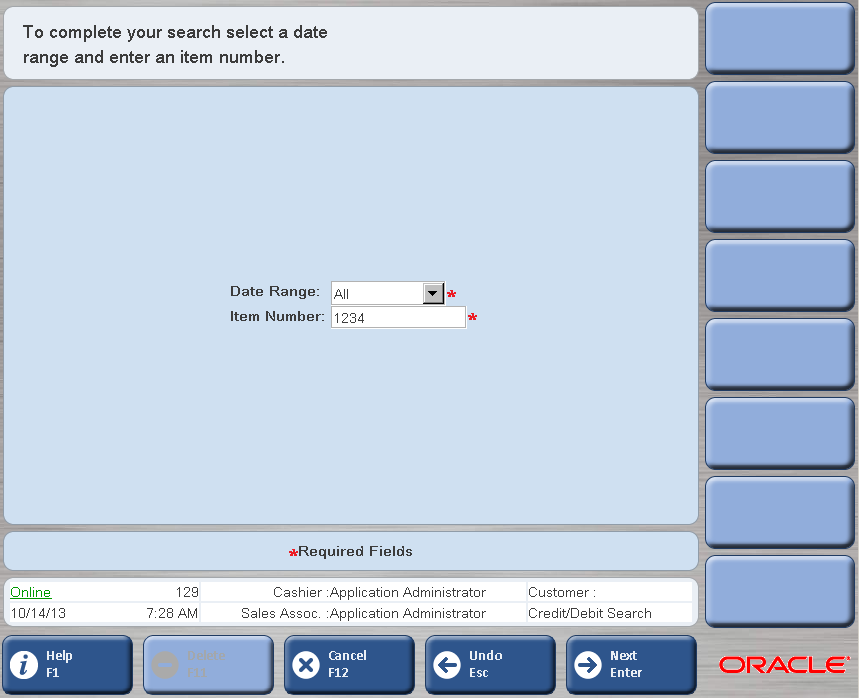
To search for a transaction using the credit/debit card number:
Press Credit/Debit/F6.
You are prompted to ask the customer to swipe their card. If the card is not successfully swiped, you are prompted to search by partial card number. If you select Yes, the Credit/Debit Search screen appears.
Enter the required information and press Next/Enter. If transactions are found for the card, the Select Item screen appears. To complete the return, see Steps 2 through 12 in "Performing a Return with a Receipt".
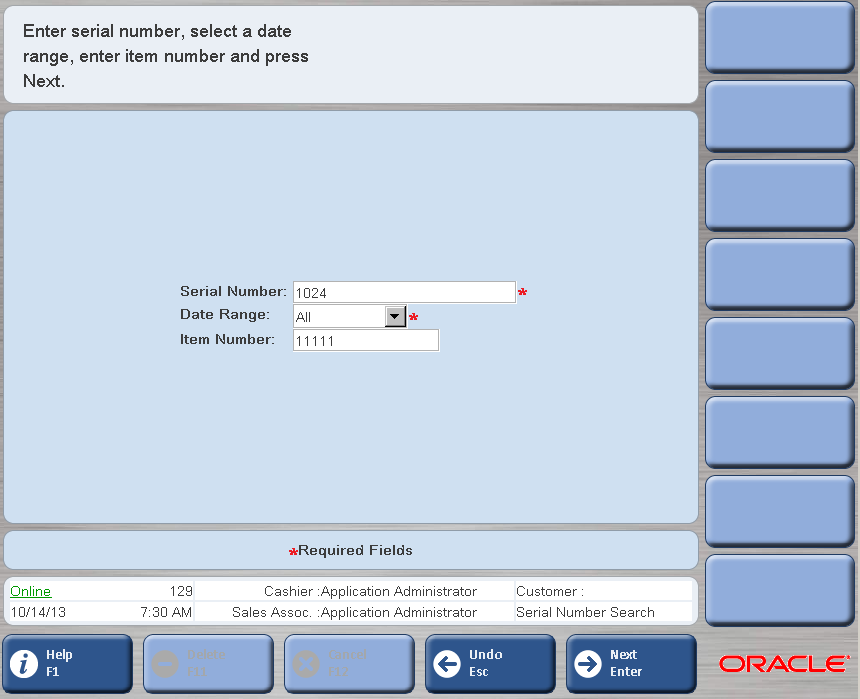
A transaction can be searched for using the serial number for an item.
To search for a transaction using the serial number:
Press Serial Number/F8. The Serial Number Search screen appears.
Enter the required information and press Next/Enter. If transactions are found for the serial number, the Select Item screen appears. To complete the return, see Steps 2 through 12 in "Performing a Return with a Receipt".
A transaction can be searched for using the order information for an item.
To search for a transaction using the order information:
Press Order/F9. The Order Search screen appears.
Enter an order number or select the type of order search:
To search by customer, press Customer/F2. The Order Search by Customer screen appears.
To search by credit card, press Credit Card/F3. The Credit/Debit Search screen appears.
Enter the required information and press Next/Enter. If transactions are found for the order, the Select Item screen appears. To complete the return, see Steps 2 through 12 in "Performing a Return with a Receipt".
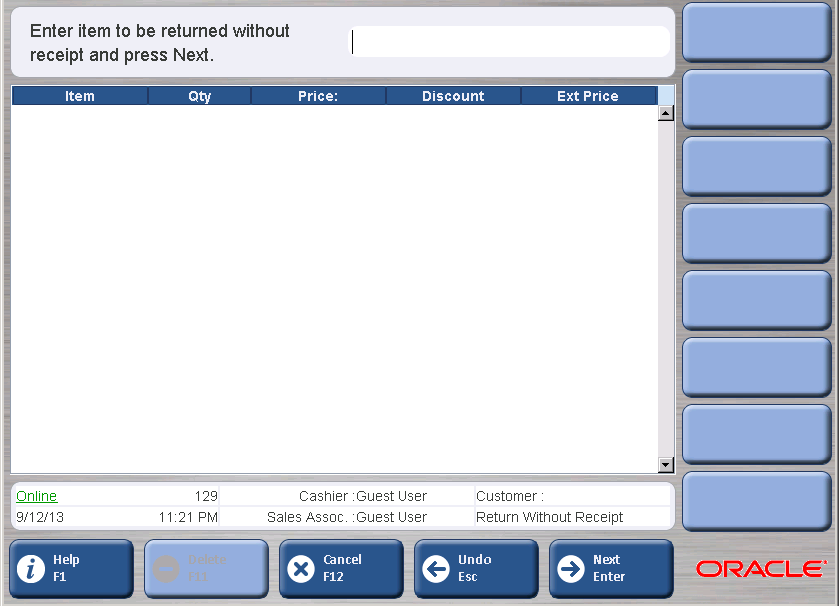
To return items without a receipt by using the item numbers:
Press No Receipt/F3 on the Return Options screen. The Return Without Receipt screen appears.
Enter the item number to be returned and press Next/Enter.
If an item does not exist, the Item Not Found screen appears. See Figure 3-3. Enter the item information and press Next/Enter. The item is added to the list.
Press Next/Enter.
The Return Item Info screen appears. To complete the return, see Steps 3 through 12 in "Performing a Return with a Receipt".
Returns can also be performed using the gift receipt. To make a return using a gift receipt, press Gift Receipt/F4 on the Return Options screen. The Receipt Info screen appears. To complete the return, see Steps 3 through 12 in "Performing a Return with a Receipt".
To look up information on a item:
Press Item Lookup/F3 on the Sell Item screen. The Advanced Inquiry screen appears.
In the Item Search Criteria field, you enter the information you want to search for in the item information. What fields in the item information are compared to the entered criteria is determined by how Point-of-Service is configured, for example, the item number and description may be the fields used for the search. An asterisk can also be entered as a wildcard.
The following examples illustrate different searches:
If exact information is entered, such as dishes, Point-of-Service searches for item information that has dishes in any part of it. For example, dinner dishes, dishes for kids, and seasonal dishes to order would be matches.
If an asterisk is used as a suffix, such as dishes*, Point-of-Service searches for item information that starts with dishes. For example, dishes for kids would be a match.
If an asterisk is used as a prefix, such as *dishes, Point-of-Service searches for item information that ends with dishes. For example, dinner dishes would be a match.
The asterisk can also be placed anywhere in the input. For example, dinner dishes and dishes for kids would be matches for di*s.
To see all items, you enter just an asterisk.
Enter the item search criteria and press Next/Enter. The Item Display screen appears. See Figure 3-23.
To get information on another item, enter a new item number and press Search/F2. The Item Display screen appears with information for the item.
To add the item to the transaction, press Add/F3. The Sell Item screen appears with the item added to the transaction.
To check inventory on an item, press Inventory Inquiry/F4. For information on inventory inquiry, see Chapter 9.
When done displaying the item information, press Next/Enter. You are returned to the Sell Item screen.
Functions that apply at the item level are performed on the Item Options screen. To display the Item Options screen, manually enter or scan at least one item number on the Sell Item screen and press Item/F4. The Item Options screen appears.
|
Note: If you need to select multiple items, select an item and press the spacebar. Repeat this for each item to be selected. As each item is selected, the line item becomes shaded. |
The options displayed on the local navigation bar of this screen are the different functions that can be applied to an item. The following options are available:
See the following individual sections for details on the various item options.
To make an item inquiry, press Inquiry/F2 on the Item Options screen. The navigation buttons for the inquiry options appear.
The following item inquiry options are available:
To do a price inquiry:
Press Price/F2. The Price Inquiry screen appears.
Enter an item number and press Next/Enter or select an option. The two available options are Gift Code/F2 and ADV Search/F3.
If the item number is entered and Next/Enter is pressed, the Item Display screen appears.
To get price information on another item, enter a new item number and press Search/F2.
To add the item to the transaction, press Add/F3. The Sell Item screen appears with the item added to the transaction.
To check inventory on an item, press Inventory Inquiry/F4. For information on inventory inquiry, see Chapter 9.
For Cross Sell related items, press Cross Sell Items/F5. The Cross Sale Items screen appears.
For Upsell related items, press Upsell Items/F6. The Upsell Items screen appears.
For Substitution related items, press Substitute Items/F7. The Substitute Items screen appears.
For Automatic related items, press Automatic Items/F8. The Auto Related Items screen appears.
When finished, press Next/Enter. The Sell item screen appears.
If Gift Code/F2 is pressed on the Price Inquiry screen, the Gift Code Inquiry screen appears. Enter the gift code and press Next/Enter. The Gift Price screen appears. When finished, press Next/Enter. The Sell Item screen appears.
If ADV Search/F3 is pressed on the Price Inquiry screen, the Advanced Inquiry screen appears. For information about this screen, see "Performing an Item Lookup".
Enter the item search information and press Next/Enter.
If one match is found, the Item Display screen appears. To complete a price inquiry on the Item Display screen, continue at Figure 3-23.
If more than one match is found, the Item List screen appears.
Select an item in the list and then select an option.
To add the item to the transaction, press Add/F2.
To complete a price inquiry on the Item Display screen, press Detail/F3. The Item Display screen appears. Continue at Figure 3-23.
To filter out items from the displayed list, press Filter/F4. The Filter screen appears. Select the filtering criteria and press Next/Enter. The displayed list of items is updated based on the selected criteria.
To add Cross Sell related items, press Cross Sell Items/F5. The Cross Sale Items screen appears.
To add Upsell related items, press Upsell Items/F6. The Upsell Items screen appears.
To add Substitution related items, press Substitute Items/F7. The Substitute Items screen appears.
To add Automatic related items, press Automatic Items/F8. The Auto Related Items screen appears.
To add item from the web store to the list, press More/F9 and then Search Webstore/F2. The list is updated with items from the search.
To check inventory on an item, press More/F9 and then Inventory Inquiry/F4. For information on inventory inquiry, see Chapter 9.
To perform a gift card inquiry:
Press Gift Card/F3. The Gift Card screen appears.
Swipe or enter the gift card number. The GC Inquiry screen appears. The gift card number, initial balance, and remaining balance appear.
To get gift card inquiry information on another gift card, swipe or enter another gift card number.
To exit the gift card inquiry option, press Done/F2. The Item Options screen appears.
To print the GC Inquiry screen, press Print/F3.
To perform gift code inquiries:
Press Gift Code/F4. The Gift Code Inq. screen appears.
Enter the price code and press Next/Enter. The Gift Price screen appears. The item's extended price is shown.
Enter another price code and press Search/F2. The Gift Price screen appears for the item entered.
Press Next/Enter. The Sell Item screen appears.
The quantity of an item can be changed after it is added to the transaction.
To change the quantity of an item:
Select the item on the Sell Item screen and press Item/F4. The Item Options screen appears. Press Quantity/F3. The Item Quantity screen appears.
Enter the quantity and press Next/Enter. The Sell Item screen appears with the updated quantity for the item.
To link an item to a sales associate:
Select the item on the Sell Item screen and press Item/F4. The Item Options screen appears. Press Sales Assoc./F4. The Item Sales Assoc. screen appears.
Enter the sales associate's ID and press Next/Enter. The Sell Item screen appears. The sales associate name appears next to the item.
|
Note: When VAT is enabled, this functionality is not available. |
After an item is added to the transaction, you can override or remove the tax. When one of these operations is performed, the tax status indicator on the Sell Item screen is changed for the item. Following are the tax status indicators and their corresponding statuses:
T—Taxable
N—Non-taxable
O—Tax off
R—Override Tax
To override the tax for a particular item:
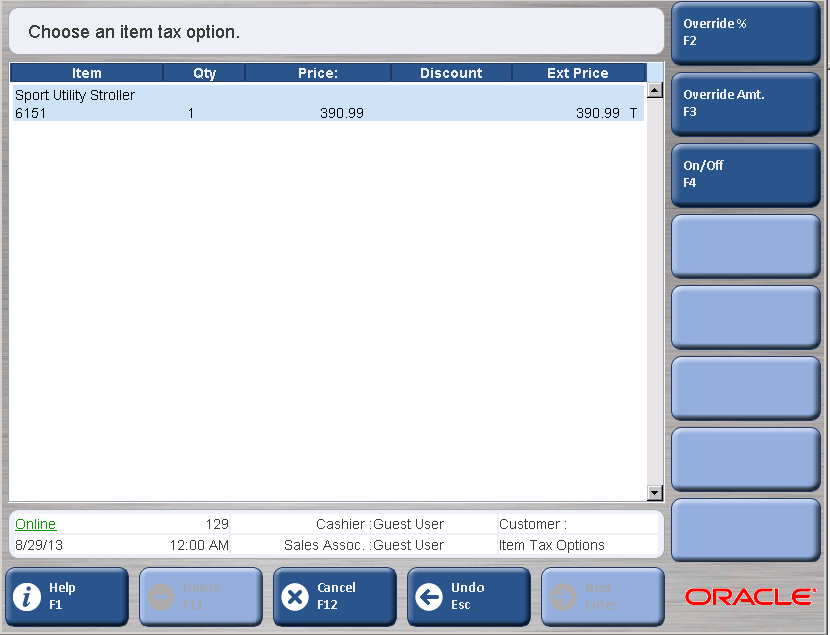
Press Tax/F6 on the Item Options screen. The Item Tax Options screen appears.
Select an option.
To override the tax percentage, press Override %/F2. The Item Tax % screen appears. Enter the tax percentage, select the Reason Code on the list, and press Next/Enter. The new tax rate is set for the item. You are returned to the Sell Item screen.
To override the tax amount, press Override Amt./F3. The Item Tax Amount screen appears. Enter the Override Tax amount, select the Reason Code on the list, and press Next/Enter. The new tax amount for the item is set. You are returned to the Sell Item screen.
To remove or add tax to an item, press On/Off/F4. The Item Tax On/Off screen appears. Select On or Off, and a reason code on the list. Press Next/Enter. A T (taxable) or O (tax off) appears in the Tax column on the Sell Item screen to indicate the change.
You can add services and other non-merchandise items like delivery charges and alterations to a transaction by scanning or typing the item number on the Sell Item screen or by navigating to the Non-Merchandise screen.
To add services or non-merchandise items to a transaction:
On the Sell Item screen, scan the barcode or enter the item number of the service. If the item number finds a match, the service appears on the Sell Item screen and it is flagged as a non-merchandise item.
If the item number is unknown, press Services/F7 on the Item Options screen. The Non-Merchandise screen appears with a selection menu. Select the non-merchandise item from the menu and press Next/Enter.
|
Note: Some non-merchandise items, such as Assembly, require you to enter a price. If an additional screen appears, enter the price and press Next/Enter. |
You are returned to the Sell Item screen, and the non-merchandise item is added to the transaction.
|
Note: A service or non-merchandise item quantity cannot be changed. |
Some items have serial numbers for warranty or other tracking reasons; therefore, the serial numbers must be recorded by item.
|
Note: If an item requires a serial number, you are prompted to enter the serial number when the item is added to the transaction. |
|
Note: The serial number is not captured by the system during the initiation of orders, layaways, item deliveries, and item pickups. The serial number is only captured by the system at the completion of these processes. |
To add a serial number to an item:
Press Serial Number/F8 on the Item Options screen. The Serialized Item screen appears.
You can set up pickup or delivery of the item:
To set up pickup of the item, press Pickup/F2. See Steps 3 and 4 in "Adding Pickup for an Item".
To set up deliver of the item, press Delivery/F3. See Steps 3 through 5 in "Adding Delivery for an Item".
Enter the serial number and press Next/Enter. You are returned to the Sell Item screen. The serial number is added to the item.
A customer may request a gift receipt to provide with a gift. The gift receipt does not show any prices. The person receiving the gift can return the item using the gift receipt.
To request a gift receipt for selected items:
On the Sell Item screen, select the item or items to be printed on a gift receipt.
|
Note: If you need to select multiple items, select an item and press the spacebar. Repeat this for each item to be selected. As each item is selected, the line item becomes shaded. |
Press Item/F4. The Item Options screen appears.
Press More/F9 and then Gift Receipt/F2. The Sell Item screen appears annotated with Gift Receipt.
To tender the transaction, press Tender/F6. For more information see "Tendering a Transaction". A separate gift receipt prints for each selected item. The receipt is annotated *Gift Receipt*.
A customer may want to ship an entire transaction or only selected items in the transaction. Different items can be shipped to different addresses on the same transaction.
To ship items:
Select an item on the Sell Item screen and press Item/F4. The Item Options screen appears.
Press More/F9 and then Send/F3. The Customer Present screen appears.
If the customer is present, press Yes. If the customer is not present, press No. The Capture Customer Information screen appears.
Enter the information in the required fields and press Next/Enter. The Same as Customer screen appears.
You are prompted to select if the ship-to address is the same as the bill-to address.
If the ship-to address is the same as the bill-to address, press Yes. The Shipping Method screen appears.
To enter another ship-to address, press No. The Ship-To Address screen appears. Enter the information in the required area and press Next/Enter. The Shipping Method screen appears.
If available, the list of items and an estimated available to ship date are also displayed.
Select the mode for shipping on the selection list and press Done/F2. The shipping charges are added to the transaction. You are returned to the Sell Item screen. The item is annotated with Send.
The kit feature provides the ability to scan one item that is comprised of multiple items. For example, a kit could be a tire, a valve stem, and the labor to mount and balance the tire. Components are the items that comprise a kit.
To view the components contained in a kit:
Select the item on the Sell Item screen and press Item/F4. The Item Options screen appears.
Press More/F9 and then Components/F4. The Component Options screen appears.
To override the price, apply a discount, override the tax, or change serial numbers, modify the items in the kit.
When all of the components have been viewed or changes have been made to the kit items, press Next/Enter. The kit line item appears with the applicable changes shown in the Sell Item screen.
Alterations is a service through which you are able to enter instructions specific to the type of garment to allow the customer, store, and tailor to know how the garment needs to be altered. Alterations is a service that you can perform on the Non-Merchandise screen.
To perform an alteration:
Select an item on the Sell Item screen and press Item/F4. The Item Options screen appears.
Press Services/F7. The Non-Merchandise screen appears.
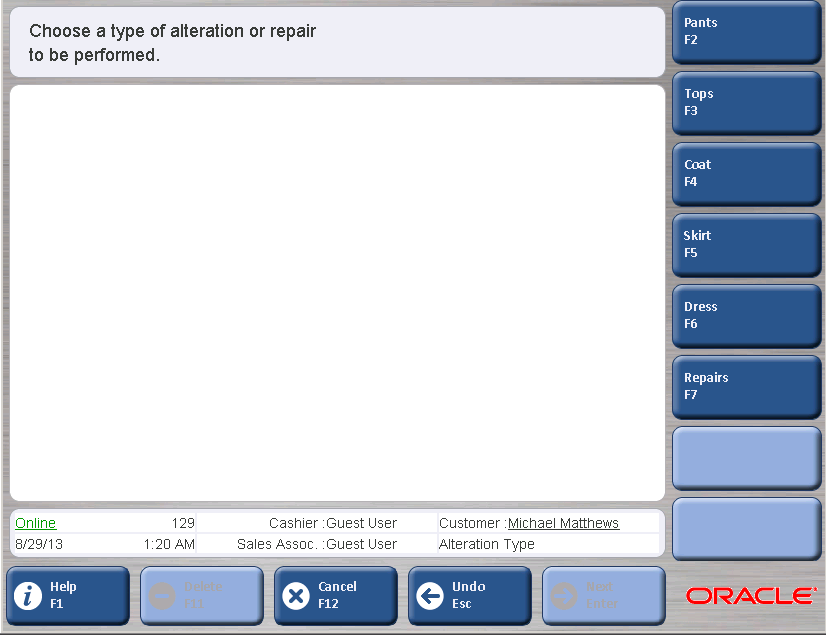
Select Alterations on the Non-Merchandise Item menu and press Next/Enter. The Customer Options screen appears.
Enter a customer ID or select an option to link a customer to the transaction. For more information on linking customers, see "Linking Customers to Transactions". Once a customer has been linked to the transaction, the Alteration Type screen appears.
Select an alteration type. Depending on the type selected, the particular alteration screen appears. Enter the alteration information and press Next/Enter. The Enter Price screen appears.
Enter the price of the alteration and press Next/Enter. You are returned to the Sell Item screen.
A customer may want to pick up an item in the current transaction. This could be requested, for example, if the customer purchases a large item that needs to be picked up on the loading dock.
To add pickup for an item:
Select an item on the Sell Item screen and press Item/F4. The Item Options screen appears.
Press More/F9 and then Pickup/F6.
The screen that appears is dependent on how orders are implemented in Point-of-Service:
If the Customer Options or Pickup Date screen appears, you can set up the pickup at the store. See "Setting Up Pickup at the Store".
If the Pickup Options screen appears, you can select the store for the pickup. See "Selecting the Store for the Pickup".
To complete setting up the pickup at the store:
If a customer is not already linked to the transaction, the Customer Options screen appears. To link the customer to the transaction, enter a customer ID and press Next/Enter. For information on linking a customer to a transaction, see Chapter 4.
The Pickup Date screen appears. Enter the date and press Next/Enter.
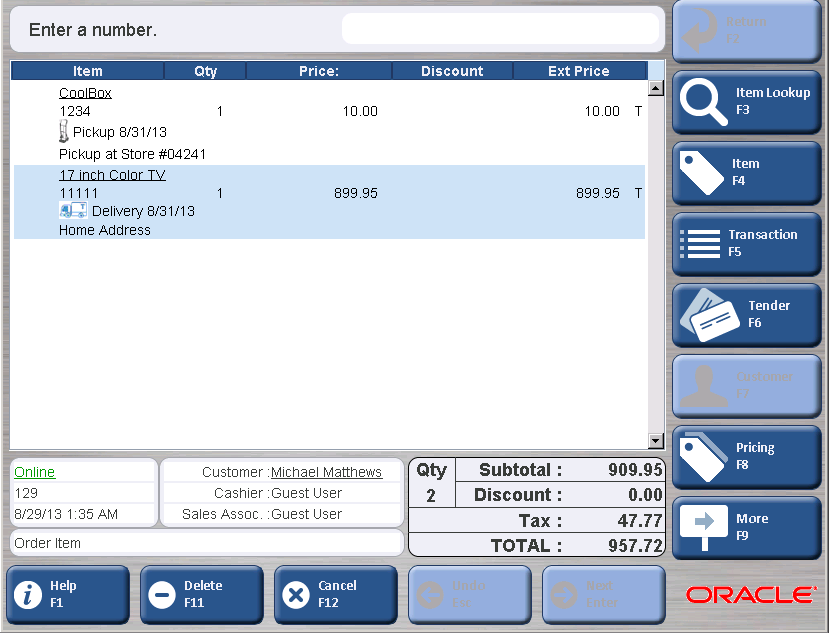
The Sell Item screen appears. An icon is added to the item line to indicate it is a pickup item.
To complete setting up the pickup:
On the Pickup Options screen, select a store for the pickup:
Select a store from the list.
To search for a store, press Store Search/F3. The Store Search for Order screen appears. Enter the search information and press Next/Enter. The updated Pickup Options screen appears.
To print the order, press Print/F4. The order is printed. You are returned to the Order Search screen.
Press Pickup/F2. The CC Capture Customer for PU screen appears.
Enter the customer information and press Next/Enter. The Pickup Date screen appears.
Enter the date and press Next/Enter.
The Sell Item screen appears. An icon is added to the item line to indicate it is a pickup item. For an example, see Figure 3-29.
A customer may want to arrange delivery for an item in the current transaction.
|
Note: A shipping charge is not automatically associated with the item selected for delivery. If a delivery charge is applicable, the charge must be added to the transaction as a non-merchandise item. For information on adding a non-merchandise item, see "Performing Item Services". |
To add delivery for an item:
Select an item on the Sell Item screen and press Item/F4. The Item Options screen appears.
Press More/F9 and then Deliver/F7. If a customer is not already linked to the transaction, the Customer Options screen appears.
To link the customer to the transaction, enter a customer ID and press Next/Enter. For information on linking a customer to a transaction, see Chapter 4.
The Delivery Address screen appears. Enter the address information and any special directions needed.
The Delivery Date screen appears. Enter the date and press Next/Enter.
The Sell Item screen appears. An icon is added to the item line to indicate it is a delivery item. See Figure 3-29.
A customer wants to arrange shipping for an item in the current transaction.
To add shipping for an item:
Select an item on the Sell Item screen and press Item/F4. The Item Options screen appears.
Press More/F9 and then Shipping/F7. The Store Order Shipping Information screen appears:
Enter the customer's shipping address and press Next/Enter.
To select a store where to ship the item, press Ship to Store/F2. The Store Search Results screen appears:
Select a store from the list and press Ship/F2. The CC Capture Customer for Ship screen appears. Enter the information and press Next/Enter.
To search for a store, press Store Search/F3. The Store Search for Order screen appears. Enter the search information and press Next/Enter. The updated Store Search Results screen appears.
To select a customer, press Customer/F3. The Customer Options screen appears:
Enter the customer ID and press Next/Enter.
To search for the customer, press Find/F2. The navigation buttons for the customer search options appear. Select the search option and enter the search information. Select the customer and press Next/Enter. The customer is linked to the transaction.
To add a customer, press Customer/F3 or Business/F4. Enter the required information and press Next/Enter. The customer is linked to the transaction.
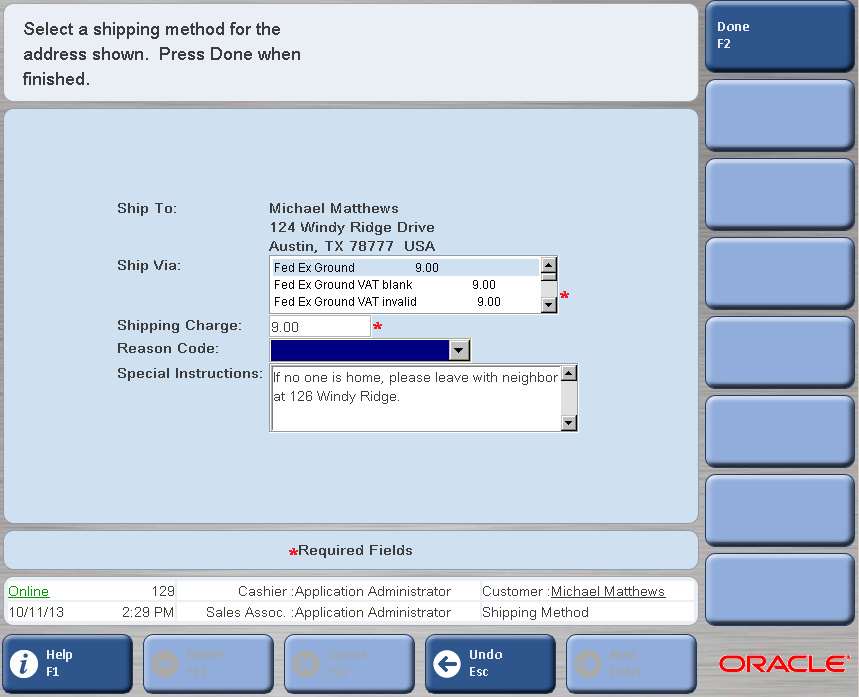
The Shipping Method screen appears. This screen shows the items and shipping address. Complete the setup:
Select how the item is shipped. The shipping charge is updated.
If you manually change the shipping charge, select a reason code.
Enter any special instructions.
Press Next/Enter.
If a tax ID needs to be selected, the Multiple Geo Codes screen appears. Select the tax ID and press Next/Enter.
The Sell Item screen appears. An icon is added to the item line to indicate shipping is selected for the item. An item is also added for the shipping charge.
You can add available related items to the transaction. On the Sell Item screen, a tag icon appears for primary items which have available related items. For an example, see Figure 3-1.
To add related items:
On the Sell Item screen, select a primary item. Press More/F9 and then Related Items/F8. The Related Items screen appears.
If only one related item is available, press Add/F5 to add the item to the transaction.
To add related items, select the type of related items:
For Cross Sell related items, press Cross Sell Items/F2. The Cross Sale Items screen appears.
For Upsell related items, press Upsell Items/F3. The Upsell Items screen appears.
For Substitution related items, press Substitute Items/F4. The Substitute Items screen appears.
After adding an item, you are returned to the Sell Item screen.
To access the functions that affect an entire transaction, press Transaction/F5 on the Sell Item screen. The navigation buttons for the transaction options appear.
The following options are similar to item options. The difference is that they only apply to the particular item for item options whereas for transaction options, they apply to the entire transaction. See "Performing Item Options" for more information on these options.
Changing Tax on a Transaction
Linking a Transaction to a Sales Associate
Linking a Transaction to a Gift Registry
Performing a Transaction Send
For information on transaction options, see the following sections:
A customer may request a gift receipt to provide with a gift. The gift receipt does not show any prices. The person receiving the gift can return the items using the gift receipt.
To request a gift receipt for the transaction:
Press Gift Receipt/F5. The Sell Item screen appears annotated with Gift Receipt.
To tender the transaction, Press Tender/F6. For more information, see "Tendering a Transaction". One gift receipt prints that includes all items in the transaction. The receipt is annotated *Gift Receipt*.
A layaway is created by placing items on hold, reserving them in a customer's name, and allowing the customer to make periodic payments until the total balance is paid. When the balance due is paid, the customer receives the items. There are several layaway options that can be performed. They are creating a new layaway, finding an existing layaway, and deleting a layaway. They are each described in a following section.
Layaways are created on the Layaway Option screen. You can create a new layaway or find an existing layaway.
To create a new layaway:
Press Layaway/F6. The Layaway Options screen appears.
Press New/F2. The Customer Options screen appears.
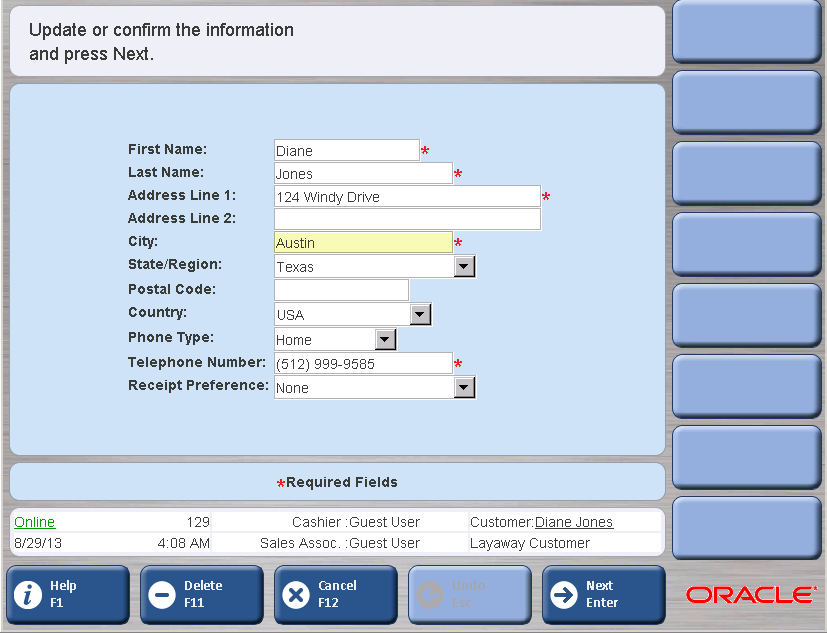
Enter a customer's ID or select an option to link a customer to the layaway. See "Linking Customers to Transactions" for more information. Once a customer is linked to the transaction, the Layaway Customer or Layaway Business screen appears.
Enter the information in the required fields and press Next/Enter. The Layaway Item screen appears. A layaway number is added to the transaction.
Enter the item number to be returned and press Next/Enter. If the item does not exist, the Item Not Found screen appears. See Figure 3-3. Enter the item information and press Next/Enter.
When all the items have been selected, press Tender/F6. The Payment Detail screen appears.
Enter the information and press Next/Enter. The Tender Options screen appears. Tender the transaction normally. See "Tendering a Transaction" for more information.
To find an existing layaway:
Press Layaway/F6. The navigation buttons for the layaway options appear.
Press Find/F3. The Find Layaway screen appears.
Select a layaway search option.
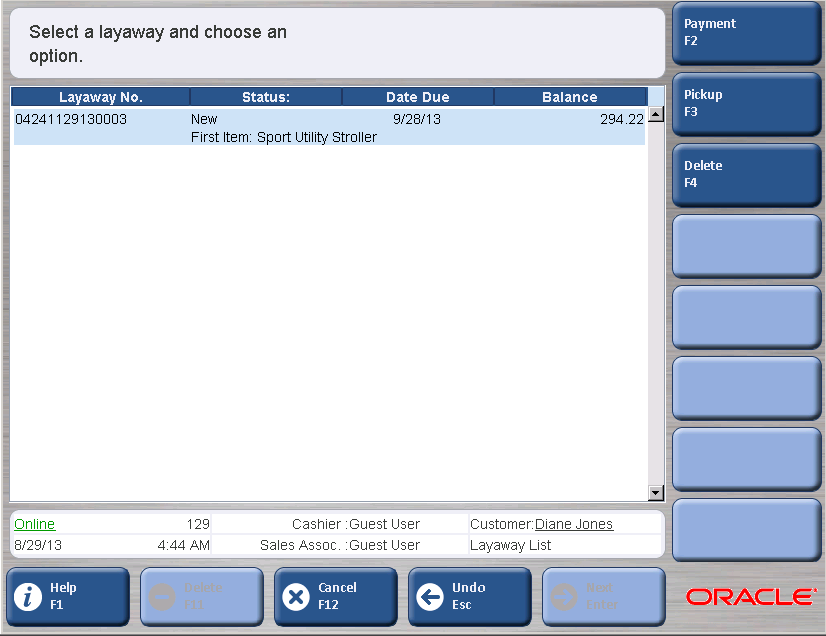
If Layaway Number/F2 is pressed, the Layaway Number screen appears. Enter the layaway number and press Next/Enter. The Layaway List screen appears.
If Customer/F3 is pressed, the Customer Options screen appears. Enter the customer ID number or press Find/F2 to search for the customer. Once a customer number is entered or the customer is found through a search option, the Layaway list screen appears.
Select one of the options:
To make a layaway payment, press Payment/F2. The Payment Detail screen appears. Enter the payment amount and select Next/Enter. The Tender Options screen appears. For more information on tendering a transaction see "Tendering a Transaction".
To perform a layaway pickup, press Pickup/F3. The Payment Detail screen appears. Enter the balance amount due and tender the transaction. When the total balance due is paid, the layaway pickup receipt prints.
To delete a layaway:
Press Delete/F4. The Confirm Delete screen appears.
To delete the layaway, press Yes. The Refund Detail screen appears.
Verify or edit the fees and press Next/Enter. The Refund Options screen appears.
Select a refund option and press Next/Enter. You are returned to the Sell Item screen.
A post void is a cancellation of a transaction after it has been completed. The tender accepted on the transaction is reversed, and the original transaction is updated and marked as being post voided. Once a transaction is post voided, it is no longer available for retrieval.
|
Note: A completed transaction can be post voided only on the same business day and only on the same till. |
Transactions that contain a web order cannot be post voided.
To post void a transaction:
Press Post Void/F8. The Receipt Info screen appears.
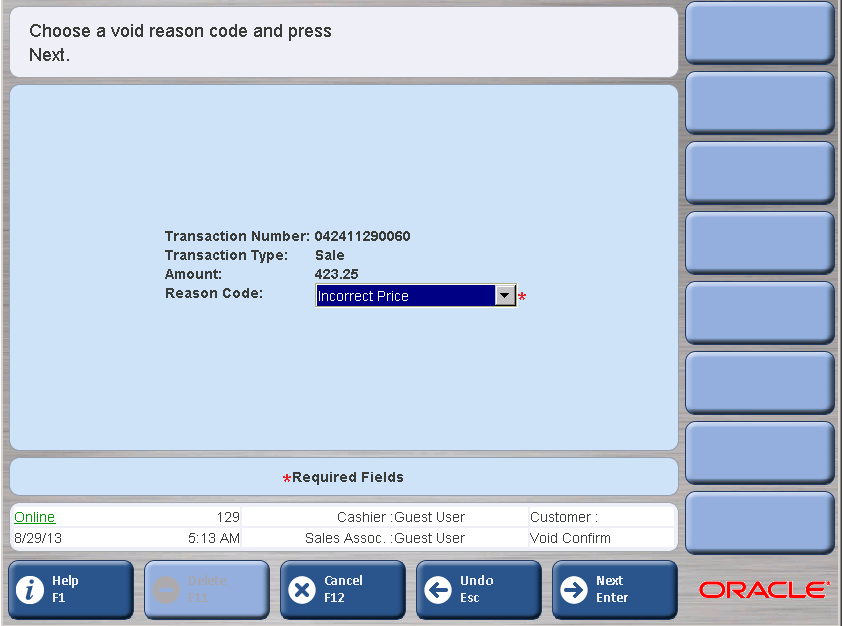
Enter the transaction number and press Next/Enter. The Void Confirm screen appears.
Select the reason code from the menu and press Next/Enter. The Close Drawer screen appears. You are returned to the Sell Item screen.
If a sale, exchange, return, layaway, or order is interrupted for any reason and you do not want to cancel it, you can suspend the transaction for as long as the store is open. A transaction can be suspended at any time before tender is completed.
To suspend a transaction on the Sell Item screen:
Press Transaction/F5. The navigation buttons for the transaction options appear.
Press More/F9 and then Suspend/F2. The Reason Code screen appears.
Select a reason code on the list and press Next/Enter. The transaction is suspended. The Suspend Saved screen appears. Press Enter. The suspended transaction receipt prints. You are returned to the Sell Item screen.
A suspended transaction can be resumed from any register or terminal in the store if no other transaction is active on that register. If a transaction is active, it must be suspended before you can resume a transaction.
To resume a transaction:
Press More/F9 and then Resume/F3. The Enter Transaction screen appears.
Select the transaction.
Scan or enter the transaction number and press Next/Enter.
To see a list of suspended transactions, press List/F2. The Suspend List screen appears. If more than one transaction is listed, select the transaction to be resumed and press Next/Enter.
The suspended transaction is resumed. The transaction details appear on the Sell Item screen. You can complete, change, or cancel the transaction.
|
Note: All suspended transactions must be resolved before closing the store each day. |
To cancel a suspended transaction during the business day:
Press More/F9 and then Resume/F3. The Enter Transaction screen appears.
Scan or enter the transaction number and press Next/Enter. To see a list of suspended transactions, press List/F2. The Suspend List screen appears.
Select the transaction to be cancelled and press Next/Enter. The Sell Item screen appears.
To cancel the transaction, press Cancel/F12.
To confirm and cancel the suspended transaction, press Yes. The receipt annotated ** Cancelled Transaction ** prints. You are returned to the Sell Item Screen.
To create an order, press More/F9 and then Orders/F4. The navigation buttons for the order options appear. The available order options depend on how ordering has been implemented for Point-of-Service:
If you can only work with orders created in the store, the navigation buttons enable you to create a new order or modify an existing order. This section describes working with these types of orders.
If you can work with orders created in other stores, the navigation buttons enable you to modify, cancel, and view the orders. For more information on these options, see Chapter 8.
An order, created in the store, is a type of transaction used to sell items that are not currently available in the store because either they are out of stock, custom, or back ordered. Retailers may order items that are not available in the store.
To create a new order:
Press New/F2. The Customer Options screen appears.
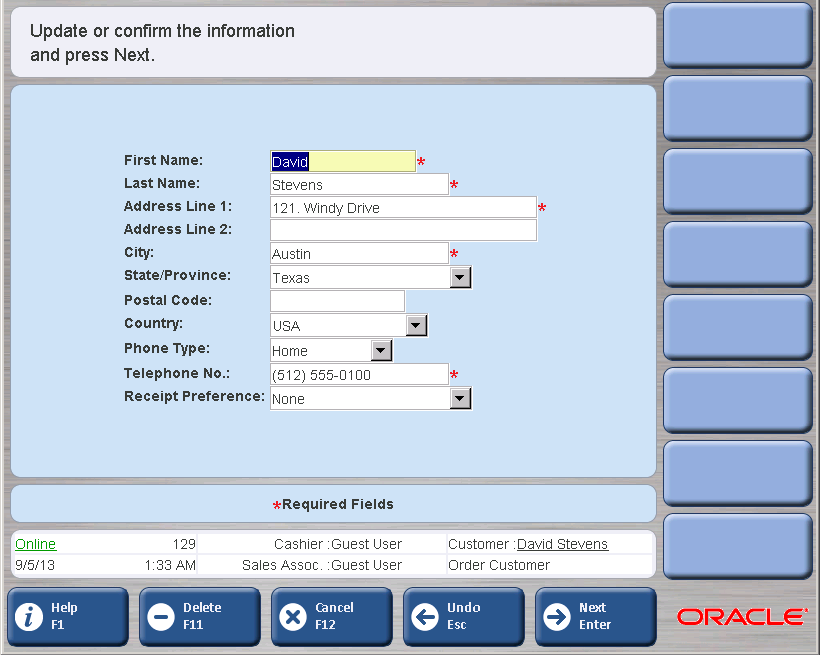
Enter the customer ID or use the search options to link the customer to the transaction. For more information on finding a customer, see "Linking Customers to Transactions". Once a customer is linked to the transaction, the Order Customer screen appears.
Enter the information required and press Next/Enter. The Order Item screen appears.
Scan or manually enter the item numbers. If an item does not exist, the Item Not Found screen appears. See Figure 3-3. Enter the item information and press Next/Enter.
When all items have been entered, press Tender/F6. The Order Deposit screen appears.
Enter the Deposit Amount if greater than the Minimum Deposit Due and press Next/Enter. The Tender Options screen appears. Complete the tender normally. An Order receipt prints. You are returned to the Sell Item screen.
To modify an existing order, press Modify/F3.
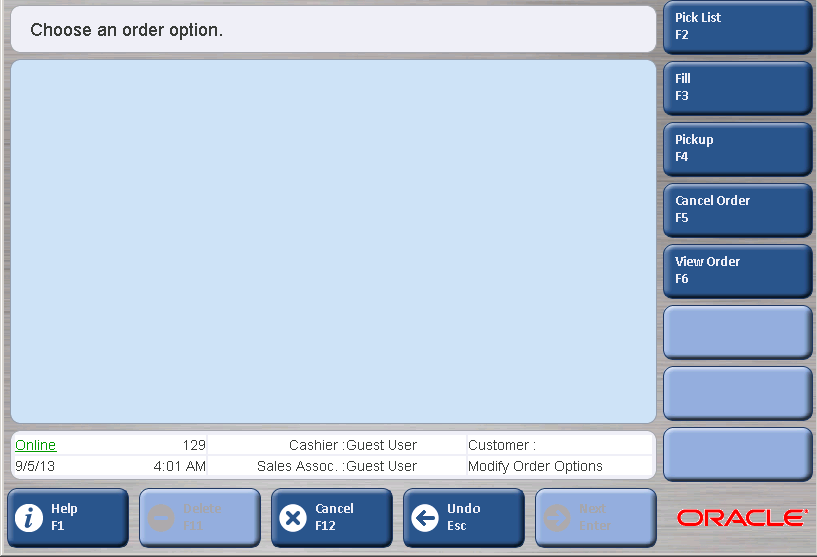
The Order Options screen appears. The following options are available:
Printing a Pick List
Filling an Order
Picking Up an Order
Cancelling an Order
Viewing an Order
To print a pick list:
Press Pick List/F2 on the Order Options screen. The Order List screen appears.
Select the order to print by using the up and down arrow keys and press Next/Enter. The Print Order screen appears.
Press Print/F2. The order prints. You are returned to the Order List screen.
To fill an order:
Press Fill/F3 on the Order Options screen. The Order Search screen appears.
Enter the order number or search for the order either by Customer or Status.
To search using the customer, press Customer/F2 on the Order Search screen. The Customer Options screen appears. Enter the customer ID number or use the options to search for the customer. For more information on linking customers, see "Linking Customers to Transactions". The customer is linked to a transaction.
To search using the credit card, press Credit Card/F3 on the Order Search screen. The Credit/Debit Search screen appears. Enter the date range and item number to search.
If one order is found, the Edit Item Status screen appears. If multiple orders are found, the Order List screen appears. Select the order to be filled with the up and down arrows and press Next/Enter. The Edit Item Status screen is then displayed.
Select the items to be filled and press Filled/F2. The item's status is changed to filled. To continue, press Next/Enter. The Edit Location screen appears.
Select the location on the drop-down selection list and press Next/Enter. The Order Printing screen appears, and the order details print. You are returned to the Sell Item screen.
To pick up an order:
Press Pickup/F4 on the Order Options screen. The Order Search screen appears.
Enter the order number in the response field or select an order search option. For more information on searching for an order number, see Step 2 in "Filling an Order".
If one order is found, the Edit Item Status screen appears. If more than one order is found, the Order List screen appears. Select the order to be picked up with the up and down arrows and press Next/Enter. The Edit Item Status screen is then displayed.
Select the items the customer wants to pick up and press Pick Up/F4.
If no payment has been made for this order, additional items can be added to the transaction if this feature is enabled. To add an item, scan the item.
Press Next/Enter. The Order Location screen appears.
Verify the order information and press Next/Enter. The Confirm Selection screen appears.
If the customer has additional items to purchase, add those items to the transaction.
Press Tender/F2. Tender the transaction normally to complete the transaction. You are returned to the Sell Item screen.
To cancel an order:
Press Cancel Order/F5 on the Order Options screen. The Order Search screen appears.
Enter or search for the order number. See Step 2 in "Filling an Order" for more information on searching for an order number.
If one order is found, the Cancel Order screen appears. If more than one order is found, the Order List screen appears. Select the order to be cancelled with the up and down arrows and press Next/Enter. The Cancel Order screen is then displayed.
Press Cancel Order/F2. The Cancel Confirm screen appears.
To confirm cancellation, press Yes. The Confirm Selection screen appears.
Press Tender/F2. The Issue Change and Close Drawer screens appear. You are returned to the Sell Item screen.
To view an order:
Press View Order/F6 on the Order Options screen. The Order Search screen appears.
Enter or search for the order number. See Step 2 in "Filling an Order" for more information on searching for an order number. The Order List screen appears.
Select the order to be viewed and press Next/Enter. The Order Details screen appears.
To print the order details, press Print/F2. To view the Order Location screen, press Next/Enter.
To return to the Order Options screen, press Next/Enter.
An item basket is a collection of items that have been scanned using Oracle Retail Store Inventory Management. A customer selects items, the items are scanned using a wireless device or Oracle Retail Store Inventory Management handheld device, and an item basket ID is assigned to the collection of items. If configured, the customer gets a slip with the item basket ID that can be given to the cashier to get the items in the item basket added to the transaction. Only one basket can be added to a transaction.
To use an item basket:
Press More/F9 and then Find Basket/F5. The Find Basket screen appears.
Enter the item basket ID or the customer ID and press Next/Enter. The items in the basket are added to the transaction. You are returned to the Sell Item screen.
Orders can be created outside of Point-of-Service. These external orders can be added to the transaction so that the customer can pay for the order.
To add an external order to the transaction:
Press More/F9 and then External Order/F6. The External Order List screen appears.
To search for orders using search criteria:
Press Advanced Search/F2. The Ext Order Adv Search screen appears.
Enter the search criteria and press Next/Enter. The External Order List screen appears with the orders that match the selection criteria.
Select an order on the list and press Next/Enter. The order is added to the transaction. You are returned to the Sell Item screen.
The bill payment feature can be used by retailers, such as telecom retailers, to capture bill payments made by their subscribers or customers at a Point-of-Service register. Point-of-Service must be integrated with the retailer's billing system to enable bill payments to be made by customers using Point-of-Service.
To process a bill payment:
Press More/F9 and then BillPay/F7. The Bill Pay Search screen appears.
Enter the search criteria and press Next/Enter. The Bill Pay List screen appears.
If customer information was entered and more than one customer matches the criteria, the Select Customer screen appears. Select a customer and press Next/Enter. The Bill Pay List screen appears for the selected customer.
|
Note: If the billing system is offline, the Bill Payment Offline Details screen appears. Enter the payment details and press Next/Enter. The Tender Options screen appears. See "Tendering a Transaction". |
Select a bill on the list and press Next/Enter. The payment information is captured. The Bill Payment Details screen appears.
To change the payment amount, enter the new amount and press Next/Enter. The new payment amount appears on the Bill Pay List screen.
To make the payment, press Tender/F2 on the Bill Pay List screen. See "Tendering a Transaction".
For various reasons, a receipt may need to be reprinted for a previous purchase. To reprint a receipt on the Sell Item screen, press More/F9 and then Reprint Receipt/F4. The Reprint Options screen appears. This screen has the following options:
To reprint the receipt of the previous transaction, press Last Trans./F2. The receipt on the last transaction prints.
To reprint a receipt by transaction number, press Trans. Number/F3. The Trans. Search screen appears. Enter the transaction number and press Next/Enter. The Reprint Select screen appears.
To print a gift receipt, select the items and press Gift Receipt/F2. A gift receipt prints.
If multiple items are selected, all those items print on one gift receipt. You can select single items or groups of items to print the gift receipts requested by the customer.
To print a copy of the original receipt, select Print Orig./F3. A copy of the original receipt prints with *Duplicate Receipt* on it.
To print a copy of the original receipt with a VAT summary, select Print VAT Receipt/F4. A copy of the original receipt prints with *Duplicate Receipt* on it and the VAT summary included.
When done printing receipts, press Undo/Esc.
To perform till functions on the Sell Item screen, press More/F9 and then Till Functions/F5. The Till Functions screen appears. You may pick up, loan, pay in, pay out, payroll payout, or log-off of a till.
A till pickup gathers cash on the till when there is too much cash in the till, for example, when a cash drawer warning was displayed.
To complete a till pickup:
Press Pickup/F2 on the Till Functions screen. The Tender Type screen appears.
Select the type of tender that needs to be picked up. The Summary Count screen appears.
Enter the amount of tender pickup and press Next/Enter. The Close Drawer screen appears. You are returned to the Till Functions screen.
A till loan is used to enter cash into the till for making change.
To complete a till loan:
Press Loan/F3 on the Till Functions screen. The Summary Count screen appears.
Enter the amount of cash loan and press Next/Enter. The total amount of the loan appears on the screen, the loan information is recorded, and a receipt prints showing the amount of the loan. The loan transaction is complete. The Close Drawer screen appears. You are returned to the Till Functions screen.
A till pay-in is used to enter cash into the till, for instance, when a customer wants to pay restitution on a returned check.
To complete a till pay-in:
Press Pay-in/F4 on the Till Functions screen. The Pay In screen appears.
Enter the amount of the pay-in, select a reason code on the list, and press Next/Enter. The Close Drawer screen appears. You are returned to the Till Functions screen.
A till pay-out is used to pay cash for something such as stamps or to pay a supplier for goods delivered.
To complete a till pay-out:
Press Pay-out/F5 on the Till Functions screen. The Pay-out screen appears.
Enter the amount of the pay out, and enter valid information in the other required fields, and press Next/Enter. The Close Drawer screen appears. You are returned to the Till Functions screen.
Payroll Pay Outs are performed for advances or to deliver final pay to an employee.
To perform a payroll payment:
Press Payroll Pay Out/F6 on the Till Functions screen. The Payroll Pay Out screen appears.
Enter the payroll pay out information and select a reason code. Press Next/Enter. The Close Drawer screen appears. You are returned to the Till Functions screen.
A till can be logged off through the till close procedure. See "Closing Tills" in Chapter 2 for more information.
Gift cards, gift certificates, and store credits can be redeemed for a refund. To redeem a tender option on the Sell Item screen, press More/F9 and then Redeem/F8. The Redeem Options screen appears. From this screen, you can redeem a gift card, gift certificate, or store credit.
To redeem a gift card:
Press Gift Card/F2 and then Next/Enter. The Gift Card screen appears.
Swipe or manually enter the gift card number and press Next/Enter. The GC Redeem screen appears.
Press Next/Enter. The Capture Customer screen appears.
Enter the required information and press Next/Enter. The Redeem Refund Options screen appears.
Select a refund option.
To obtain a cash refund, press Cash/F2. The Issue Refund and Close Drawer screen appears. You are returned to the Sell Item screen.
To obtain a check refund, press Mail Bank Check/F3. The Capture Customer Information screen appears. Enter the required information and press Next/Enter. The Franking Insert and Franking Remove screens appear. You are returned to the Sell Item screen.
To obtain a credit refund, press Credit/F4. Swipe the card and press Next/Enter. You are returned to the Sell Item screen.
To redeem a gift certificate:
Press Gift Cert./F3 on the Redeem Options menu. The Redeem Amount screen appears.
Enter the amount of the gift certificate and then press Next/Enter. The Store Number screen appears.
Enter the store number where the gift card was issued or press Corporate Issued/F2. The Redeem Number screen appears.
Enter the gift certificate number or press Foreign/F2. The Discount Applied dialog box appears.
If a discount was applied at the time of purchase, press Yes. The Discounted Amount screen appears. Enter the gift certificate discount amount and press Next/Enter. The Capture Customer screen appears.
To redeem the full value of the gift certificate, press No. The Capture Customer screen appears.
Enter the information and press Next/Enter. The Redeem Refund Options screen appears. To complete the redeem, see Steps 3 through 5 in "Redeeming a Gift Card".
To redeem store credit:
Press Store Credit/F4 on the Redeem Options screen. The Redeem Amount screen appears.
Enter the amount of store credit to be redeemed and press Next/Enter. The Redeem Number screen appears.
Enter the store credit number or press Foreign/F2. The Capture Customer screen appears. To complete the redeem, see Steps 3 through 5 in "Redeeming a Gift Card".
No Sale is used to open the cash drawer for non-financial transactions. An example of a non-financial transaction would be to make change for a customer or register.
To complete a no sale:
On the Sell Item screen, press More/F9 and then No Sale/F2. The No Sale Reason screen appears.
Select the reason code on the list and press Next/Enter. The cash drawer closes. You are returned to the Sell Item screen.